
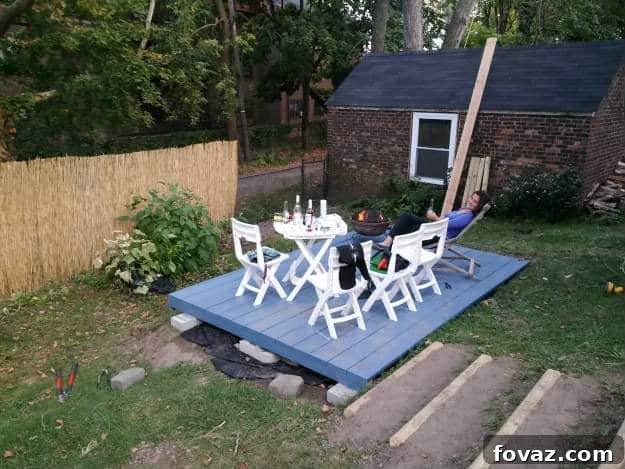
Transforming an outdoor space into a personal sanctuary can dramatically enhance your home’s appeal and your quality of life. For city dwellers, private outdoor areas are a precious commodity. While it’s wonderful to connect with neighbors, having a secluded spot to unwind, entertain, or simply enjoy a quiet moment is invaluable. Building a floating deck offers an ideal solution, providing a flat, functional area within your garden without the complexities of traditional deck construction. This project not only expands your usable outdoor living space but also creates a perfect foundation for amenities like the best hot tub or your very own DIY BBQ Smoker.
Design and Build Your Dream Floating Deck: A Comprehensive DIY Guide
Our journey to creating a tranquil backyard retreat began with a common urban challenge: an unlevel yard. Despite its decent size for a city lot, the ground sloped significantly away from the house, presenting an uneven terrain for any outdoor activity. This posed a perfect opportunity for a DIY project – one that would evolve from a simple idea into a fully realized floating deck, offering both functionality and aesthetic appeal.
The Evolutionary Path of a Project: From Idea to Reality
Many home improvement projects start small and organically grow in scope. Our floating deck was no exception. What began as a modest plan to level a small patch of dirt quickly escalated into a more ambitious, yet ultimately more rewarding, endeavor. This “ascending problem-solving” approach highlights how initial ideas can be refined and expanded upon, leading to a superior outcome:
- Initial Thought: “Let’s just flatten some dirt in the backyard to create a usable area.”
- First Refinement: “Since we have extra 2x8s, we could lay them on the flattened ground to form a small platform.”
- Expanding Vision: “If we’re building a small platform, adding a few more boards would allow us to construct a decent-sized deck.”
- Structural Improvement: “A decent-sized deck deserves a proper frame to keep the boards securely in place.”
- Foundation Upgrade: “And if we’re building a framed deck, concrete blocks are essential to keep it off the ground, preventing moisture damage and improving stability.”
- Accessibility & Aesthetics: “For a truly decent deck, we should definitely include steps for easy and graceful access.”
This natural progression from a basic earth-moving task to a comprehensive deck-building project demonstrates that sometimes, committing to “the full monty” and tackling the larger, more complete project from the outset leads to greater satisfaction and prevents future regrets. Opting for a more extensive build often ensures a more robust, attractive, and functional addition to your home.
Understanding the Floating Deck Concept
A “floating deck” earns its name because it doesn’t rely on posts sunk into the ground for stability. Instead, it rests on a prepared, level surface, typically supported by concrete blocks. This design offers several advantages, making it a popular choice for DIY enthusiasts:
- Simplicity of Installation: Eliminates the need for digging deep holes, pouring concrete footings, or dealing with complex ledger board attachments to your house.
- Flexibility: Easily moved or reconfigured if your needs change, though this project aims for semi-permanence.
- Permit Often Not Required: Many municipalities consider floating decks (especially those below a certain height) as temporary structures, potentially bypassing complex building permits. Always check local codes before starting.
- Cost-Effective: Generally requires fewer specialized tools and materials compared to attached or elevated decks.
The inherent weight of the deck structure, combined with proper ground preparation, usually provides sufficient stability, keeping it firmly in place without external anchoring.
Essential Tools and Supplies for Your Floating Deck Project
Having the right tools is paramount for efficiency and safety. Here’s what you’ll need:
Tools Needed/Used for Floating Deck Construction:
- Spade: For digging and moving earth.
- Mattock: Excellent for breaking up compacted soil and cutting through roots.
- Long-handled Prong Cultivator: For loosening soil and removing debris.
- Iron Rake: For leveling and clearing the ground.
- Sod Tamper: To compact and firm the leveled earth.
- Circular Saw: Essential for cutting deck boards and frame pieces.
- Power Drill: For driving screws and drilling pilot holes.
- ½” Drill Bit: Specifically for drilling holes for rebar in steps.
- Level (long): Crucial for ensuring all surfaces are perfectly horizontal.
- Hammer: For stakes and general use.
- Large Square: To ensure corners are perfectly ninety degrees for framing.
- String: For marking out the deck perimeter.
- Garden Stakes: To hold string lines for layout.
- Metal Mallet: For pounding rebar into the ground.
- Metal Cutting Saw (hacksaw, steel cutting blade in a reciprocating saw, or angle grinder): For cutting rebar.
- Orbital Sander: For smoothing deck surfaces before finishing.
Key Supplies for Your Floating Deck:
- (9) 2”x8”x12’ Pressure-Treated Lumber: For longer deck boards and frame sections.
- (10) 2”x8”x6’ Pressure-Treated Lumber: For shorter deck boards and frame sections.
- (5) 4”x4”x8’ Pressure-Treated Timbers: For the main support beams under the deck surface.
- (3) 3 ½“x3 ½“x8’ Pressure-Treated Landscape Timbers: Ideal for building durable steps.
- Steel Rebar: Cut into (12) 1’ sections for anchoring the steps.
- Landscape Fabric (optional but recommended): To prevent weed growth beneath the deck.
- 3” Self-Driving Deck Screws: For robust and easy fastening of deck boards to the frame.
- 15 Concrete Blocks (8”x8”x16” standard blocks): For supporting the deck frame.
Step-by-Step Guide to Building Your Floating Deck
Step #1: Measure, Layout, and Initial Excavation
Precision in planning saves significant effort later. Begin by visualizing your deck’s footprint. We experimented with various sizes (e.g., 10’x6’, 14’x8’) before settling on a practical 12’x8’ dimension. Drive garden stakes into the ground at each corner of your proposed deck and run string lines between them. This physical representation helps you visualize the space and make final adjustments to the layout before any digging begins.
Given our sloped yard, the next crucial task was to begin rough leveling. This involved digging into the higher side of the slope with a mattock to break up the sod and compacted earth, then using a spade to move this soil to the lower side. The goal is to create a generally flatter area. As you excavate, utilize the cultivator and iron rake to clear out any large rocks, construction debris (like broken glass or rusty nails), and other unwanted materials often found in older yards. This not only cleans the site but also prevents future issues with the deck foundation.
Step #2: Achieve Perfect Leveling and Compaction
Once the initial rough leveling is complete, it’s time for precise leveling. After visually assessing the ground, use the sod tamper to compact the soil, creating a denser, more stable base. For fine-tuning, take one of your 2”x6”x6’ boards, lay it on its edge across the ground, and place a long level on top. Systematically remove or add dirt as needed to achieve a perfectly level surface. This step is time-consuming but absolutely vital for a stable, long-lasting deck. Don’t rush it. Once satisfied, lightly water the entire area with a hose to help the soil settle firmly. Remember, investing time in proper ground preparation prevents future sagging or instability.
Step #3: Position Concrete Blocks and Assemble the Preliminary Frame
With the ground meticulously leveled and compacted, place your concrete blocks. Start with one block at each of the four corners, then add additional blocks along the perimeter and through the center for adequate support. For a 12’x8’ deck, a common arrangement might involve three rows of blocks (one at each 12’ end and one in the middle), with five blocks per row (at 0′, 2′, 4′, 6′, 8′ along the 8′ width), totaling 15 blocks. Recheck the level of each block and make any necessary adjustments to the underlying dirt. While some settling is inevitable over time, starting with everything perfectly plumb and level provides the best foundation.
Step #4: Finalize Frame Attachment and Prepare the Deck Base for Longevity
Before permanently securing the frame, preparing the ground beneath the deck is crucial for long-term maintenance. Even with limited light, nature finds a way, and weeds can quickly establish themselves, becoming impossible to remove once the deck is built. To combat this:
- Install Landscape Fabric: Roll out landscape fabric across the entire area where the deck will sit. This acts as a barrier, blocking sunlight and providing an extra layer of protection against weed growth.
- Utilize Reclaimed Materials (Optional, but highly effective): If you have construction debris like rocks, broken tiles, or concrete chunks, consider using them as an additional sub-base layer on top of the landscape fabric. This serves a dual purpose: it disposes of unsightly waste materials and creates an even more robust barrier against weeds and burrowing animals. This ingenious approach minimizes future headaches and maximizes the utility of existing materials.
With the ground prepared, proceed to assemble and secure your main deck frame using the 4×4 timbers and deck screws. Ensure the frame is square and rigidly constructed, as it forms the backbone of your deck.
Step #5: Install the Deck Boards with Precision and Care
Affixing the deck boards is where your vision truly takes shape. To avoid unsightly seams on the outer edges, use two 12’ boards along the longer sides. For the main deck surface, alternate between 12’ and 6’ boards, working your way inward from one side. Crucially, ensure that your supporting 4”x4” timbers are perfectly centered where the ends of the 6’ boards meet, providing a stable joint.
Maintain consistent spacing between each board, typically between ¼” and ¾”. This gap is vital for several reasons:
- Expansion and Contraction: Wood naturally expands and contracts with changes in temperature and humidity. Proper spacing prevents buckling and warping.
- Drainage: Allows rainwater to drain easily off the deck surface, preventing water from pooling and accelerating wood rot in the joints.
Use 3 ½” self-driving outdoor screws for durable fastening. On the downhill side of the deck, consider affixing an additional 12’ board vertically to create a clean, finished facade. The shorter sides can be left somewhat open at this stage, allowing flexibility for future additions like skirting or benches.
Step #6: Design and Construct Accessible Steps for Your Deck
To enhance accessibility and aesthetics, designing user-friendly steps is essential. Aim for wide steps with a low rise for comfortable ascent and descent. Pressure-treated landscape timbers (3 ½”x3 ½”x8’) are an excellent choice due to their durability and rounded edges, which are gentle on feet. Cut your rebar into 1’ sections using a metal cutting saw (or purchase pre-cut pieces), and divide the landscape timbers into 4’ sections for the steps. Temporarily position the step timbers and pound rebar pieces through them into the ground. This allows you to visualize the layout and angle, making adjustments before permanent installation.
Step #7: Permanently Install the Deck Steps
Consider various step configurations – straight, curved, or angled. For a gentle transition to the deck, an angled descent is often preferred. Lay down a straight board at your desired angle, leading from the ground up to the deck, and abut the step timbers against it. Once the angle and placement are satisfactory, it’s time for permanent installation.
The first task for each step is to level its individual landing spot. Mimicking the deck leveling process, remove dirt from the uphill side and add it to the downhill side to create a flat, stable surface for each timber. Then, using a ½” drill bit, drill two holes into each landscape timber, approximately 8” in from each edge. Finally, use a metal mallet to drive the 1’ rebar sections through these holes and deep into the earth. This semi-permanent anchoring method provides stability while still allowing for future modifications if desired.
Step #8: The Finishing Touch – Protecting and Beautifying Your Deck
Protecting the wood from the elements is critical for its longevity and appearance. The choice between stain and paint depends on your aesthetic preferences:
- Paint: Offers an unlimited color palette and a uniform, opaque finish that hides the wood grain. It provides a thick protective layer but can chip or peel over time.
- Stain: Enhances the natural beauty of the wood by allowing the grain to show through. Stains come in fewer color options but are available in semi-transparent (more grain visible) or opaque (more color, less grain) varieties.
As a fan of showcasing natural wood grain, we opted for an exterior stain. Ensure you choose a product specifically designed for outdoor use, as it contains properties that protect against mildew, UV fading, and moisture. For a smoky, grey-blue hue, we chose an opaque stain to achieve the desired tone.
Before applying any finish, thoroughly sand the entire deck surface with an orbital sander. This removes any burrs, splinters, and minor imperfections, ensuring a smooth, uniform surface for the stain. Apply multiple thin coats of stain (3-4 coats were used here, slightly thinned with water) rather than a few thick ones. Thin coats penetrate better, dry more evenly, and prevent clumping or streaking.
Bonus Steps: Elevating Your Outdoor Oasis
Once the main construction is complete, the desire to further enhance the space often takes over. This “little more work” often turns into a significant undertaking, but the results are incredibly rewarding.
For urban settings, achieving true privacy can be challenging. However, creating an illusion of seclusion can transform the feel of your space. We installed 6’ bamboo fencing along an existing chain-link fence. This was a two-person job: one person to hold the bamboo roll on the outside, and another on the inside to secure it. Using zip ties spaced about 18” apart along the top and a few along the bottom, we quickly affixed the fencing. While not completely opaque, this bamboo barrier made a dramatic difference, instantly making the area feel more enclosed and private.
With the deck built and privacy enhanced, the final steps involve furnishing and enjoying your new oasis. Add comfortable outdoor chairs, a cozy fire pit for evening gatherings, and your favorite refreshments. The transformation from an uneven backyard to a private, relaxing retreat is complete, ready for countless perfect afternoons.
Common Challenges and Smart Solutions During Deck Construction
Even with meticulous planning, DIY projects often present unexpected challenges. Learning from these experiences can turn potential setbacks into valuable lessons:
- Dealing with Twisted or Curved Boards: Lumber isn’t always perfectly straight. If you encounter twisted or crescent-shaped boards, don’t despair. Attach one end securely, then use a pry bar to gently apply pressure and straighten the board as much as possible before fastening it to the next support. While perfection might be elusive, this technique significantly reduces curvature, allowing the board to settle into a straighter position over time without stressing the screws.
- Stripped Screws and Pilot Holes: While self-driving screws are designed for convenience, dense or particularly tough wood can sometimes cause them to strip, making them impossible to drive further or remove. If a screw starts to strip, stop immediately. Use locking pliers (vise grips) to remove the stubborn screw. From that point, drill pilot holes for subsequent screws in that area. This pre-drilling prevents stripping and ensures a smoother, more secure fastening process, especially with harder lumber.
- Happy Accidents in Measurement: A common oversight in lumber dimensions is that a “2×8” is not actually 2 inches by 8 inches (it’s typically 1 ½” x 7 ¼”). While we initially overlooked this standard milling difference, it turned out to be a fortunate mistake. The natural spacing between boards, combined with the actual board dimensions, allowed the final board to fit perfectly without needing to be ripped. Sometimes, errors can serendipitously lead to a better-than-planned outcome. Always double-check actual dimensions vs. nominal dimensions.
- Varying Board Lengths and Edge Finishing: Lumber boards rarely come in exact, uniform lengths. Some may be slightly shorter, others a bit longer. To achieve a clean, professional finish, designate one edge (typically the one closest to the house or a prominent boundary) as your flush edge. Lay all boards to align perfectly with this edge. Once all boards are affixed, use a circular saw to make a single, clean cut down the opposing edge of the entire deck. This trims off any excess length, creating a perfectly straight and consistent outer perimeter. The trimmed pieces can then be neatly tucked away or repurposed.
Building a floating deck is a rewarding home improvement project that can significantly enhance your outdoor living experience. With careful planning, the right tools, and a willingness to tackle challenges, you can create a beautiful, functional, and private oasis right in your own backyard.
Up Next: Off-Grid Solar Survival: Top 5 Things To Consider Before Diving In
Did you find this post on how to make a floating deck helpful? Share your thoughts and questions in the comment section below!