
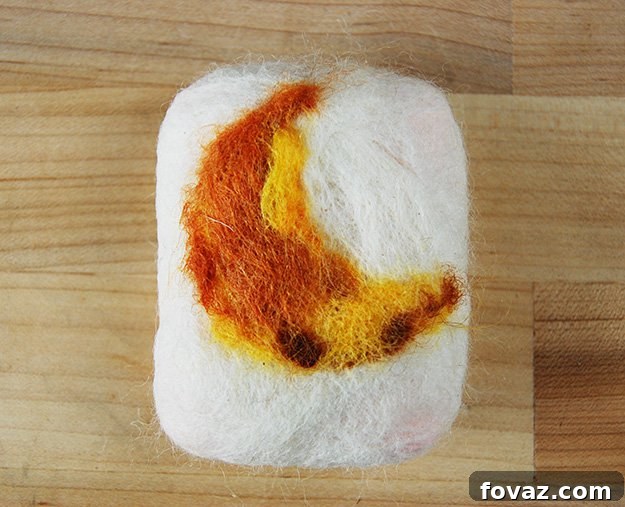
DIY Felted Soap: Your Comprehensive Guide to Handcrafting Beautiful and Long-Lasting Bars
Have you ever dreamed of transforming an ordinary bar of soap into a luxurious, long-lasting, and visually stunning creation? Look no further than the art of making felted soap! This delightful DIY project is not only incredibly satisfying but also yields a product that offers numerous benefits beyond typical soap. Felted soaps are essentially bars of soap encased in a cozy, natural wool “jacket.” This ingenious covering not only makes your soap last significantly longer but also provides gentle exfoliation, a better grip, and a touch of handcrafted elegance to your daily routine. Best of all, it’s a wonderfully accessible craft that you can master right in your own home, allowing for endless personal designs and creative expressions. Whether you’re looking to pamper yourself, create unique handmade gifts, or simply explore a new crafting hobby, learning how to make felted soap is an endeavor well worth undertaking.
Why Embrace the Art of Felted Soap Making?
Beyond the sheer joy of creating something beautiful with your own hands, felted soap offers a remarkable array of practical advantages that elevate your bathing experience and extend the life of your favorite soap bars. Here’s a closer look at the compelling reasons to make felted soap:
- Extended Soap Life: One of the primary benefits of the wool casing is its ability to help your soap last much longer. The wool creates a barrier that slows down how quickly the soap dissolves, preventing it from turning into a gooey mess in your soap dish. This means less waste and more value from each bar you use.
- Natural Exfoliation: The wool fibers act as a gentle, built-in washcloth or loofah. As you use the felted soap, the texture of the wool softly exfoliates your skin, helping to remove dead skin cells and promote circulation. It’s a mild yet effective way to achieve smoother, healthier-looking skin without needing a separate scrubbing tool.
- Enhanced Hygiene and Cleanliness: Wool is naturally quick-drying, breathable, and possesses inherent anti-fungal and anti-microbial properties. This makes felted soap a more hygienic choice compared to leaving a naked bar of soap exposed. The wool covering also prevents the soap from collecting dirt or lint, keeping it clean and fresh.
- Superior Grip: Slippery soap bars can be a nuisance in the shower. The felted wool exterior provides an excellent grip, making your soap much easier and more comfortable to hold, even with wet hands. This is especially beneficial for children or individuals with limited dexterity.
- Aesthetically Pleasing and Personalized: Felted soap is a canvas for creativity! You can choose various wool colors and techniques to create unique patterns, designs, or even miniature art pieces. This personalization makes felted soaps fantastic decorative items for your bathroom and incredibly thoughtful, handcrafted gifts for friends and family.
- Eco-Friendly Choice: By extending the life of your soap and eliminating the need for separate washcloths or plastic loofahs, felted soap contributes to a more sustainable lifestyle. It reduces waste and encourages the use of natural materials.
- Luxurious Lather: The wool helps to create a rich, creamy lather with minimal effort, enhancing the sensory experience of your bath or shower.
Our comprehensive, step-by-step instructions below will guide you through every stage of this enjoyable craft, making it incredibly simple to create your own beautiful and beneficial felted soaps.
Materials Needed to Craft Your Own Felted Soap
Gathering your supplies is the first exciting step in your felted soap journey. The beauty of this craft lies in its simplicity and the minimal number of tools required. Here’s what you’ll need:
- Bar of Soap: The foundation of your project! You can use almost any kind of soap bar you prefer. Firmer, unwrapped bars tend to work best, but don’t hesitate to experiment with your favorite scented or unscented varieties, goat milk soaps, glycerin soaps, or even homemade bars. Consider the size and shape – a standard rectangular or oval bar is easiest for beginners.
- Wool Roving: This is the magical fiber that will transform your soap. Look for unspun wool roving (also known as wool top) in your desired colors. Merino wool is often recommended for its softness and ease of felting, but other types of felting wool will also work. Avoid “superwash” wool as it’s treated to prevent felting. You’ll need enough to cover your soap thoroughly, typically a few ounces per bar depending on size.
- Felting Needle (Optional, for designs): While not strictly necessary for the basic felting process (which primarily uses water and friction), a felting needle (often called a felting pen when in a holder) is indispensable for adding intricate designs, patterns, or contrasting colors to the surface of your already-felted soap. If you plan to add decorative elements, have one on hand.
- Bowl of Hot Water: A container large enough to comfortably dip your soap bar. The heat from the water plays a crucial role in encouraging the wool fibers to felt and shrink around the soap.
- Towel: For drying your hands and gently patting your finished felted soap. A clean, absorbent towel is all you need.
Step-by-Step Guide: How to Make Felted Soap
Now that you have all your materials ready, let’s dive into the fascinating process of wet felting your soap. Follow these steps carefully, and you’ll soon have a beautifully felted soap bar!
Step 1: Prepare and Lay Out Your Wool Base
Begin by selecting the main color of wool roving for your soap’s base. Instead of cutting, gently pull out two long, wide pieces of wool from the roving. The fibers should stretch and separate rather than snap. Lay one piece flat on your work surface. Take the second piece and lay it directly over the first, creating an “X” shape. This overlapping pattern ensures even coverage and strength for your felted casing. Aim for a thickness that will fully envelop your soap without being too bulky, typically enough to see through slightly but still opaque enough to hide the soap’s color.
Step 2: Carefully Cover Your Soap Bar with Wool
Place your chosen bar of soap directly in the center of your prepared wool “X.” Gently begin to wrap the wool around the soap, starting with one side and pulling the fibers snugly over the edges. Then, take the opposite side and wrap it across, overlapping the first layer. Continue wrapping all the wool around your soap, ensuring that the entire surface of the soap is completely covered. Pay special attention to the corners and edges to prevent any gaps. If needed, pull off smaller wisps of wool to patch any thin spots, making sure the coverage is uniform and snug. The tighter you wrap it initially, the easier the felting process will be.
Step 3: Introduce Water to Initiate Felting
With your soap fully encased in wool, it’s time to bring in the hot water. Carefully dip the wool-covered soap into your bowl of hot water. Submerge it completely for a few seconds to ensure the wool is thoroughly saturated. Then, gently remove it and allow any excess water to drip back into the bowl. At this stage, the wool will feel very loose and delicate around the soap. Begin to very gently rub the wet wool all over the soap bar. Use light, circular motions, almost like you’re massaging the wool. The hot water helps to open the scales of the wool fibers, making them ready to interlock and felt.
Step 4: The Heart of the Process – Felting and Lathering
This is where the magic truly happens. Continue rubbing the wool together on all sides of the soap. Start with very gentle pressure, gradually increasing it as the wool begins to bond. As you rub, the soap inside will begin to lather through the wool. This lather is crucial! It acts as a lubricant and an alkaline agent, further assisting the wool fibers in tangling and shrinking around the soap. Keep a consistent, even pressure, rotating the soap in your hands and paying attention to all surfaces. You’ll notice the wool fibers starting to compact and tighten around the soap. The goal is for the wool to adhere to itself and the soap, forming a firm, coherent casing.
(Original images `85.jpg` and `95.jpg` were not displayed as `` tags, hence not reproduced directly. Content is incorporated into text.)
Step 5: Maintain the Lather and Felting Motion
Don’t stop now! Consistency is key in this step. Keep up the lathering and felting motion across all sides of your soap. You will physically feel the wool start to firm up and shrink. Initially, loose fibers might still be visible or easily pulled away. As you continue to rub, these fibers will interlock, and the wool will become a denser, more cohesive fabric. The surface should feel increasingly smooth and tight, with no discernible loose areas or “pills” of wool. Continue until the wool is completely matted and feels firmly attached to the soap, almost like a second skin. If you can’t easily pinch or pull off any loose fibers, you’re on the right track!
(Original image `1110.jpg` was not displayed as `` tag, hence not reproduced directly. Content is incorporated into text.)
Step 6: Rinse and Dry Your Newly Felted Soap
Once you are confident that your soap is fully felted – meaning the wool casing is tight, firm, and won’t easily separate from the soap – it’s time to rinse away the suds. Use cool water to rinse the soap thoroughly. Rinsing in cooler water helps to “shock” the wool fibers, further closing their scales and locking the felt in place, which is a common practice in felting. Once rinsed clean, gently pat your felted soap dry with a clean towel. Avoid squeezing or twisting it too aggressively. For best results, allow your felted soap to air dry completely on a well-drained soap dish or a wire rack for 24-48 hours before use. This ensures the wool and the soap inside are thoroughly dry, preventing any mildew and prolonging its life.
Step 7: Unleash Your Creativity with Designs
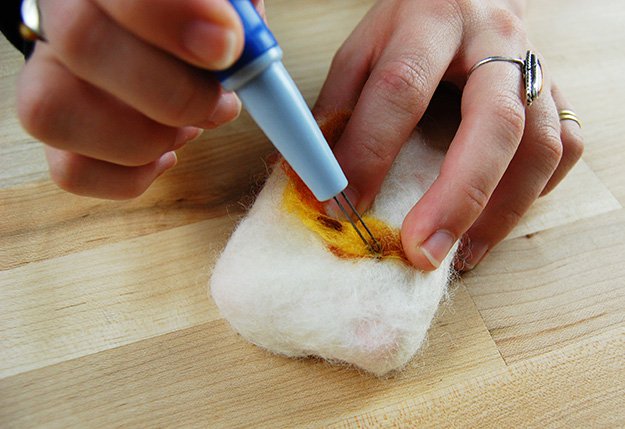
Your basic felted soap is now complete and functional! This is an exciting point where you can add your personal flair and transform it into a unique piece of art. Using contrasting colors of wool roving and a felting needle (felting pen), you can felt various designs onto the surface. Simply take a small wisp of your desired design wool, place it on the felted soap, and use the felting needle to repeatedly prick the design wool into the surface of the felted soap. The barbed needle will push the fibers of the design wool into the existing felt, interlocking them. Start with simple shapes like dots, hearts, or initials, or try more intricate patterns as you gain confidence. The possibilities are endless – let your imagination guide you!
Step 8: Enjoy Your Beautifully Handcrafted Felted Soap!
Congratulations! You’ve successfully created a one-of-a-kind felted soap. Now it’s time to either indulge in the luxurious experience yourself or share your exquisite creation with others. Felted soaps make exceptional and personal gifts for birthdays, holidays, housewarmings, or just because. They are a testament to handmade artistry and thoughtfulness. Store your felted soap on a well-drained soap dish between uses to ensure it dries properly and lasts even longer. With proper care, your felted soap will provide weeks, even months, of gentle cleansing and exfoliation.
Tips for Success and Troubleshooting
- Choosing the Right Wool: For best results, use 100% animal fiber wool that has not been superwash treated. Merino, Corriedale, or Shetland wool are excellent choices for their felting properties.
- Wool Thickness: If your wool layer is too thin, it might felt too quickly and expose the soap. If it’s too thick, it will take longer to felt and might be cumbersome. Aim for even coverage that’s not too sparse or overly dense.
- Water Temperature: Consistently hot water is crucial for opening the wool fibers. If the water cools down, the felting process will slow considerably. Don’t use boiling water, as it can be unsafe.
- Gentle Start: Always start with gentle rubbing. If you apply too much pressure too soon, the wool might tear or clump unevenly. Increase pressure gradually as the wool begins to bond.
- Troubleshooting Loose Fibers: If you notice persistent loose fibers even after significant rubbing, try dipping the soap back into hot water, adding a tiny bit more soap to create more lather, and continue rubbing firmly. Sometimes, a quick dip in cold water after hot water can help “shock” the fibers into felting better.
- Patching Thin Spots: If a thin spot appears during felting, you can lightly felt a small wisp of wool over it with very gentle rubbing or use a felting needle for precision.
Caring for Your Felted Soap
To maximize the lifespan and enjoyment of your handmade felted soap, proper care is essential. Always store your felted soap on a well-draining soap dish between uses. This allows both the wool casing and the soap inside to dry completely, which is crucial for preventing mildew and preserving the integrity of the felt. Avoid letting it sit in standing water. When the soap inside is completely used up, you can carefully cut open the felted pouch, remove any remnants, and use the felted wool pouch as a natural scrubbing pad for cleaning or even refill it with another small piece of soap!
Now that you’ve mastered the art of how to make felted soap, we’d love to hear about your creations! Who are you planning to surprise with your first handcrafted felted soap, or are you keeping this luxurious treat all to yourself?
Explore More DIY Projects!
Keep your creative momentum going by exploring other exciting DIY projects. Check out these articles for more inspiration and expert guides:
- Wine Bottle Crafts | How To Make Wine Bottle Planters
- Things to Do with Glass Jars : DIY Recycling Projects