Craft Your Own Luxe Metallic Tree Stump End Tables: A DIY Guide to Rustic Elegance
Transform ordinary tree stumps into extraordinary pieces of art with this surprisingly simple DIY project. Imagine end tables that gleam with the richness of molten gold and copper, adding a touch of country chic, modern flair, and natural warmth to any living space. These stunning tree stump tables aren’t just functional; they’re guaranteed conversation starters, reflecting your unique style and craftsmanship. Best of all, this high-impact home decor project can be completed in as little as one afternoon, proving that luxury doesn’t have to come with a hefty price tag or a complex instruction manual. Dive into this guide and discover how to create a piece that looks like it belongs in an upscale boutique, right in your own home.
The beauty of these metallic tree stump tables lies in their versatility. Whether your home decor leans towards a cozy farmhouse aesthetic, a sleek contemporary vibe, or an eclectic blend of styles, these natural elements, kissed with metallic accents, will integrate seamlessly. They offer a grounded, organic feel while the metallic finish elevates them to a sophisticated statement piece. This project is not only creatively satisfying but also environmentally conscious, giving new life to fallen timber. Get ready to gather your materials and embark on a rewarding journey to craft end tables that are as unique as they are beautiful.
Why DIY Tree Stump End Tables? Unveiling the Benefits
Beyond their undeniable aesthetic appeal, crafting your own tree stump end tables offers a plethora of advantages. Firstly, it’s an incredibly sustainable project. By repurposing fallen tree stumps, you’re preventing them from becoming waste and instead transforming them into functional art. This eco-friendly approach allows you to contribute to a greener planet while enhancing your home. Secondly, the cost-effectiveness is remarkable. While designer metallic furniture can fetch high prices, the primary material for this project—tree stumps—can often be sourced for free or at a minimal cost. This significantly reduces your overall expenditure, allowing you to achieve a high-end look on a budget.
Moreover, each tree stump is inherently unique, meaning your finished tables will possess an individuality that mass-produced furniture simply cannot replicate. The natural grain, knots, and imperfections of the wood become integral parts of the design, celebrating nature’s artistry. The satisfaction of creating something beautiful and functional with your own hands is another invaluable benefit. It’s a project that builds confidence, encourages creativity, and leaves you with a tangible representation of your efforts. Lastly, these tables offer unparalleled versatility in styling. They can serve as practical end tables, unique nightstands, charming plant stands, or even extra seating in a pinch, adapting effortlessly to your evolving home decor needs.
Supplies You’ll Need for Your Golden & Copper Stumps
Gathering the right supplies is the first crucial step in any successful DIY project. For these metallic marvels, you’ll need a combination of natural elements and craft store staples. Careful selection of each item will ensure a smooth process and a stunning final product.
- Tree Stump Slices (3 in various sizes): The heart of your project! Sourcing these can be an adventure. After a good windstorm, local classifieds like Craigslist often feature “free tree stump” ads. Keep an eye out for a few weeks, and you’re likely to find suitable options. Look for stumps with flat, smooth cuts on both the top and bottom to ensure stability and a level surface for lamps and decor. The wood should ideally be dry to prevent future cracking or issues with paint adhesion. Consider different wood types too; hardwoods like oak or maple are durable, while softer woods like pine might be easier to work with but prone to more natural movement. Aim for stumps that are relatively level and free from excessive rot or insect infestation.
- Sandpaper (Rough and Fine Grit): Essential for smoothing the wood surface. Start with a rougher grit (e.g., 60-80) to tackle any major imperfections, splinters, or rough patches left from the cutting process. This initial sanding creates a more uniform surface. Follow up with a finer grit (e.g., 150-220) to achieve a smooth, silky finish. This step is critical for ensuring the paint adheres properly and looks professional, preventing a bumpy or uneven appearance.
- Sponge and Bucket of Hot, Soapy Water: For thorough cleaning. This simple cleaning solution will help remove dirt, sap, and any loose debris that might interfere with sanding or painting. A clean surface is paramount for optimal paint adhesion and a flawless finish.
- Metallic Spray Paint (2 cans of Copper, 1 can of Metallic Gold): The magic behind the “molten” look. Opt for high-quality metallic spray paints designed for wood. The copper will form your base, so having two cans ensures ample coverage for multiple coats, allowing you to build depth and richness. The gold will be used sparingly as an accent, creating highlights and a truly decadent shimmer. Experiment with brands known for good coverage and a true metallic sheen.
- Gloss Top Coat (Spray Can): To protect and enhance your finished tables. A glossy clear coat will provide a durable, protective layer, guarding against scratches, moisture, and general wear and tear. It also intensifies the metallic sheen, making your copper and gold truly pop. If you prefer a more subtle, burnished look, consider a matte or satin finish top coat instead. Choose a top coat compatible with your metallic spray paint to avoid any adverse reactions.
Other Helpful Items From Around the Craft Room:
While not primary supplies, these tools will make your DIY journey significantly easier and more efficient.
- Dropcloth/Plastic Bags: Absolutely crucial for protecting your workspace from overspray. Spray paint can travel further than you expect, so lay down a generous layer of protection on your floor or outdoor area.
- Flat-Head Screwdriver: An unexpectedly powerful tool for bark removal. A sturdy, wide-bladed screwdriver works wonders when paired with a hammer.
- Hammer/Rubber Mallet: Used in conjunction with the screwdriver, a hammer helps to dislodge stubborn bark. A rubber mallet can be gentler on the wood if you’re concerned about damaging the stump.
- Stiff Wire Brush (Optional): For scrubbing particularly stubborn dirt or sap, a wire brush can be more effective than a sponge.
- Work Gloves: Protect your hands during bark removal, sanding, and painting.
- Dust Mask/Respirator: Essential for safety during sanding to avoid inhaling wood dust, and during spray painting to protect your lungs from fumes.
- Safety Glasses: Protect your eyes from flying debris during bark removal and sanding.
Step 1: The Bare Truth – Stripping the Bark
The first significant step in preparing your tree stumps for their metallic makeover is to strip them of their bark. While some might prefer a rustic look with bark intact, removing it is essential for achieving a smooth, modern finish that allows the metallic paint to truly shine. Plus, bark can sometimes harbor insects or moisture, which you definitely want to avoid trapping under your paint layers.
Attempting to peel the bark with just your fingers can be an exercise in futility and frustration, especially if the bark is thick or tightly adhered. Instead, I highly recommend using a large flat-head screwdriver and a hammer or rubber mallet. Position the edge of the screwdriver along a seam or edge of the bark, near the cut end of the stump. Gently tap the handle of the screwdriver with your hammer, driving the blade between the bark and the wood. Work your way around the stump, prying the bark away in sections. You’ll be surprised at how easily it comes off in large, satisfying chunks once you get the knack of it. For particularly stubborn areas, you might need to apply a bit more force or try a different angle. Always work carefully to avoid splintering the wood underneath excessively. Once the majority of the bark is off, use the screwdriver to scrape away any smaller, clinging pieces, aiming for a relatively smooth, bark-free surface. This process not only reveals the beautiful natural grain of the wood but also ensures a clean canvas for your metallic finish.
Step 2: Clean Slate – Washing and Sanding for Perfection
With the bark removed, your tree stumps are ready for a thorough cleaning and smoothing. This step is critical for preparing the wood to accept paint evenly and for ensuring a long-lasting finish. Start by filling a bucket with hot, soapy water. Using a sturdy sponge or a scrub brush, vigorously clean all surfaces of your tree stumps. Focus on removing any residual dirt, sap, grime, or loose wood fibers. You might be surprised by how much natural debris has accumulated on the stumps, even after bark removal. A clean surface is paramount for optimal paint adhesion; any lingering contaminants can prevent the paint from bonding properly, leading to peeling or an uneven appearance down the line.
Once your stumps are clean, allow them to air dry completely. This might take some time, especially if the wood absorbed a lot of water during cleaning. Ensure they are bone-dry before moving on. Next, it’s time to sand. Begin with your rough-grit sandpaper (60-80 grit) to smooth out any major rough spots, uneven areas, or splintered edges left from the bark removal or initial cutting. Work your way around the entire surface, including the top, bottom, and sides, until the wood feels significantly smoother. Once the major imperfections are addressed, switch to your fine-grit sandpaper (150-220 grit). This will refine the surface, making it beautifully smooth to the touch. The smoother the wood, the more professional and luxurious your metallic finish will look. After sanding, you’ll notice a layer of wood dust covering your stumps. It’s crucial to remove this. Repeat the washing step with clean, hot soapy water to wipe away all the dust and grit. This second wash ensures that no fine particles remain to compromise your paint finish. Let the stumps dry thoroughly once again before proceeding to the painting stage.
Step 3: The Midas Touch – Painting Your Stumps with Metallic Radiance
This is where the magic truly happens! Before you even think about picking up a spray can, it’s absolutely essential to ensure your clean, smooth tree stumps are completely dry. Any trapped moisture underneath the paint can lead to blistering, bubbling, or cracking, ruining your beautiful finish. Patience here is key.
Applying the Copper Base:
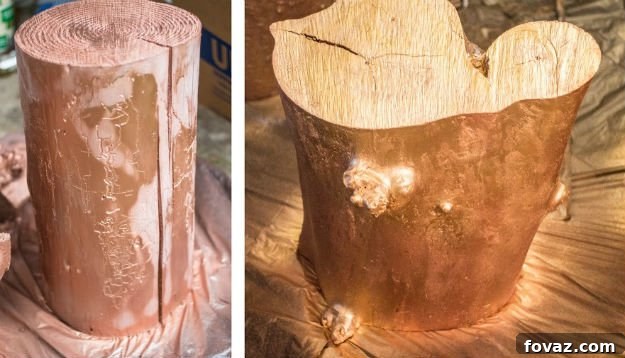
Begin with a liberal coating of copper metallic spray paint. For the first layer, apply it evenly across the entire surface of each stump. Maintain a consistent distance from the surface (usually 8-12 inches) and use steady, sweeping motions to avoid drips and ensure uniform coverage. Let this first coat dry to the touch according to the manufacturer’s instructions, typically 15-30 minutes. Once dry, apply a second, heavier layer of copper. This time, focus on building up the color, especially around any natural knots or imperfections in the wood. The goal here is to create that rich, almost sculptural “molten copper” look, where the metallic paint appears to flow and pool naturally. Don’t be afraid to apply a slightly thicker coat in areas where you want more depth and intensity. Allow this second copper layer to dry completely; this might take a few hours or even overnight, depending on humidity and paint thickness. Rushing this step will compromise the final finish.
Adding the Golden Accents:
Once your copper base is fully cured, it’s time to introduce the stunning gold accent. The trick here is not to overpower the copper but to enhance it with strategic, shimmering highlights. Hold the gold spray can slightly further back than you did with the copper (perhaps 12-15 inches). Instead of even strokes, use soft, random, sweeping motions to apply the gold. You want a light dusting, not a heavy coat. Focus on specific areas: the top surface of the stump where light will naturally catch it, around prominent knots, and in various swirling swaths along the trunk. The intention is to create a dynamic interplay between the copper and gold, making the copper truly “shine” by reflecting the golden light. Step back frequently to assess your progress and ensure you’re achieving the desired balance of metallics. A little gold goes a long way in adding that touch of decadent luxury.
The Protective Gloss Finish:
After your metallic paint layers (both copper and gold) are completely dry and cured – often a waiting period of 24-48 hours is recommended for optimal durability – it’s time for the final protective step. Take your glossy varnish or top coat spray and apply a liberal, but not drippy, coating. Aim for even coverage across all painted surfaces. This top coat serves multiple purposes: it not only brings out an incredible depth of shine, making the metallics appear even richer, but also provides a crucial protective barrier. This layer will shield your beautiful end tables from scratches, moisture, and general wear, ensuring they remain stunning for years to come. For maximum durability, consider applying two thin coats of the top coat, allowing adequate drying time between each. If, however, you prefer a more subtle, burnished, or sophisticated soft-sheen look, you can absolutely opt for a matte or satin finish top coat instead of a glossy one. This choice allows for further customization to perfectly match your home’s aesthetic.
Finishing Touches: Styling Your Metallic Masterpieces
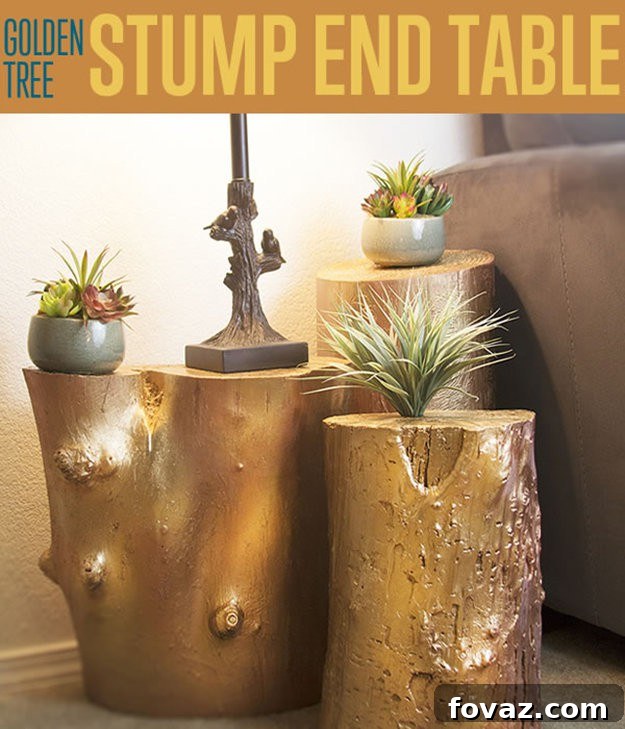
Once everything is completely dry, cured, and sealed – a process that could take up to 72 hours for full hardness, depending on your chosen top coat – your dazzling metallic tree stump end tables are ready to adorn your home. The beauty of this project lies not just in its creation but also in its versatility in styling.
Arrange your pieces in an interesting formation in your living room, bedroom, or even a cozy reading nook. Consider varying heights and sizes to create visual interest if you’ve made multiple tables. These tables are perfect platforms for showcasing your favorite decor items. Place a stylish lamp on one to create ambient lighting, add a vibrant potted plant or a small artificial sprig of greenery to infuse a touch of nature (as seen in many inspirational designs, where a natural hole in the stump can perfectly cradle a faux botanical element), or use them to hold your latest read and a comforting cup of tea. They can also serve as unique pedestals for sculptures, candles, or a stack of elegant coffee table books. Don’t be afraid to experiment with different arrangements and accessories to find what best complements your personal style and the overall aesthetic of your room. Remember, these tables are designed to be statement pieces, so let them shine! Go crazy and have fun with your styling; the possibilities are endless for integrating these unique, rustic-elegant tables into your home decor.
Share Your Craft!
Did you enjoy our post on how to build a table? We’d love to hear your thoughts on this easy wood project tutorial in the comments section below. Your feedback and experiences are incredibly valuable to us and our DIY community. Do you have any other craft ideas you’d like to share, or perhaps a unique twist on this project? Share it with us, and we’d be thrilled to give it a try!
We absolutely love doing cool DIY projects, whether it’s making craft projects, transforming home decor, finding creative upcycling ideas, sharing delicious recipes, or providing helpful tutorials for anything you can do yourself. That’s precisely why we created this site – we want to inspire people to connect with their creative side and realize the immense satisfaction of doing things themselves. We’d love to foster a vibrant community of DIY enthusiasts where inspiration and project ideas are always just a click away. Stay connected with us and be part of our growing community on Facebook, Twitter, Pinterest, and Instagram!
Looking for More Amazing and Easy DIY Projects? Explore These Posts Below:
DIY Bookcase Transformation | Furniture Rehab
15 DIY Wood Burning Projects | Wood Burning Art
How To Make Rustic DIY Stocking Hangers | Christmas Craft Ideas