
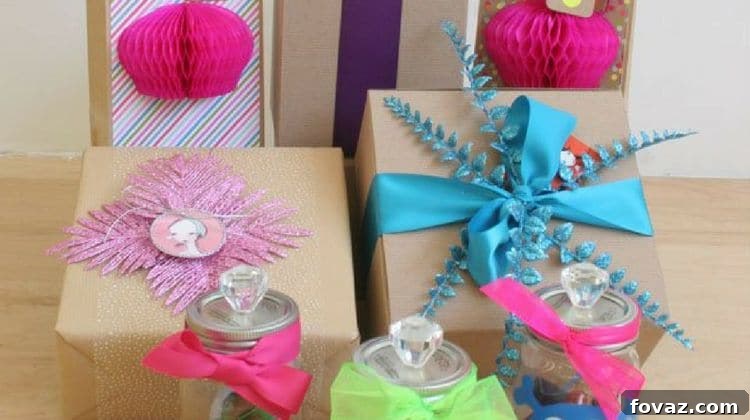
Elevate your gift-giving experience and captivate your recipients with these four extraordinary gift wrapping ideas. Unleash your inner designer and transform ordinary presents into unforgettable tokens of affection, showcasing a meticulous eye for detail and design.
Mastering the Art of Gift Wrapping: Creative Ideas for Every Occasion
Have you ever wished to present a gift in a way that’s as fun and creative as the gift itself? This comprehensive DIY gift wrapping tutorial is your ultimate guide to mastering the art of presentation. We’ll delve into four beautiful and unique methods to wrap the perfect present for any occasion, ensuring your gift stands out before it’s even opened. Giving a gift is fundamentally about spreading joy and creating lasting memories. Why not amplify that joy from the very first glance with exquisitely wrapped packages?
1. Classic Elegance: How to Wrap a Box with Wrapping Paper and Embellishments
Let’s begin with the fundamentals. This first tutorial will guide you through the correct and most aesthetically pleasing way to wrap a standard box using wrapping paper. Beyond the basics, we’ll explore how to infuse personal touches that elevate your gift wrapping to an art form. This method is incredibly versatile, perfect for any celebration, from birthdays and anniversaries to holidays, and is an essential skill for anyone who loves to make every gift special.
What You’ll Need for Perfect Box Wrapping:
- High-quality wrapping paper (consider patterns and textures)
- A sturdy gift box (with your chosen gift securely nestled inside)
- Sharp scissors for clean cuts
- Double-sided tape or invisible scotch tape for a seamless finish
- A ruler or straight edge for precise measurements
- A measuring tape for larger gifts
- Decorative glitter leaves or similar botanical accents
- Sheer accent paper (e.g., vellum, translucent tissue paper)
- Thin glitter ribbon or complementary decorative ribbon
- Fine loose glitter for an extra sparkle
- Glitter glue for precise application
Directions for Impeccable Box Wrapping:
Step 1: Prepare Your Workspace and Unroll the Wrapping Paper
Begin by clearing a spacious, flat surface for your wrapping. Unroll your chosen wrapping paper, ensuring it lies flat without creases. Carefully assess the amount of paper needed to fully cover your gift box. It’s always best to err on the side of caution; leave a few extra inches on all sides. A good rule of thumb is to measure enough paper to wrap around the entire box, plus about an inch or two overlap on one side, and enough to cover the ends with an overhang that reaches about two-thirds up the side of the box. This generous margin helps achieve crisp folds and a professional finish.
Step 2: Strategic Gift Placement and Initial Securement
Once your paper is cut to the ideal size, position your gift box face down at the exact center of the paper. This central placement is crucial for achieving even overlaps and symmetrical folds. Bring one long side of the wrapping paper up and over to the center of your box. Gently pull the opposing long side of the paper to meet it, ensuring the paper embraces your package evenly without too much tension or looseness. Secure these two meeting edges with a strip of double-sided tape or a few pieces of invisible tape for a clean, almost invisible seam.
Step 3: Master the End Folds for Sharp Edges
Now, rotate your gift so that one of the open ends faces you. Begin by folding in the right and left edges of the paper, pushing them inward alongside your box to form neat, triangular flaps. Take your time with this step, pulling gently on all edges to ensure your folds are as crisp and precise as possible. Think of this process like folding origami; the sharper the creases, the more polished your final package will appear. This attention to detail is what separates a good wrap from a truly great one.
Step 4: Secure the Flaps with Precision
Next, carefully fold the top and bottom flaps inward towards the center. Again, the emphasis here is on tightness and crispness. Secure each fold with tape as you go, ensuring no edges are loose. When the side flaps meet in the middle, they should form a clean, inverted triangle shape. Fold this triangle upwards, aligning it perfectly with the top edge of your gift box. This creates the foundational structure for your perfectly wrapped ends.
Step 5: Finalizing the Seam Fold
After creating that central seam fold, gently lay the triangular flap flat against the box. Fold the very tip of this triangle inward, so it meets the base of your gift box, creating a neat, straight line. Secure this final fold firmly with tape. Repeat this entire process on the opposite end of your gift box, ensuring both ends mirror each other in their impeccable finish. The result should be a beautifully rectangular package with sharp, professional-looking corners.
Step 6: Layering with Sheer Decorative Paper
With your gift now perfectly wrapped, it’s time to add a touch of artistic flair. Measure the length and height of your box. Cut a strip of sheer decorative paper that wraps around the entire box, leaving a stylish 1 to 1.5-inch border at the top and bottom of your main wrapping paper. Tape down one end of your sheer paper to the bottom of your gift box, ideally aligning it with the side that has the folded edges. Wrap the sheer paper tightly around the package, ensuring it lies flat and smooth, then secure the end on the bottom of your gift package. This layer adds depth, texture, and a hint of sophistication.
Step 7: The Elegant Ribbon Wrap
Flip your box over so the top surface faces you. Select a generous length of your chosen ribbon. Carefully wrap it around the box, directly over the sheer decorative paper. Aim for a central placement for a balanced look. Tie a simple, snug knot at the top center. For now, resist the urge to trim any extra ribbon; we’ll use it for embellishments later. Consider the texture and color of your ribbon – a contrasting color can add a vibrant pop, while a complementary shade can enhance the overall elegance.
Step 8: Incorporating Glitter Leaves for Natural Charm
Take your glitter leaves and trim them to your desired size and shape. Experiment with different arrangements on top of the package until you are completely satisfied with the aesthetic. Once the placement is perfect, carefully weave the loose ends of your ribbon through the leaves, securing them firmly in place. This not only adds a beautiful, naturalistic element but also helps anchor the ribbon, preventing it from slipping. You can also experiment with small artificial flowers, berries, or even sprigs of real foliage for a unique touch.
Step 9: Crafting a Unique Mini Tag and Final Embellishments
To truly crown your beautiful box, let’s craft a unique, personalized mini tag. Consider using an original illustration, cutting an image from a magazine, or even printing a cherished photo of you and the recipient. For an extra sparkle, line the edges of your chosen tag shape with glitter glue, then dust loose glitter over it. Gently shake off any excess. Using a sewing needle or a small hole punch, create a small hole near the top of the circle. Thread one end of your glitter ribbon through the hole, and then tie it into a delicate bow around the main ribbon on your package. This one-of-a-kind present is now a genuine showstopper, reflecting your thoughtfulness and creativity.
2. The Dynamic 3-D Paper Present Bag: Beyond the Basic Bag
Next, we’ll dive into transforming a simple, plain paper bag into a personalized masterpiece with vibrant colors and captivating 3-D elements. This project proves that stunning gift wrapping doesn’t have to break the bank – often, all it takes is a trip to your local dollar store and a dash of imagination! This dynamic gift wrapping idea is perfect for creating memorable gift bags for birthday parties, or for elegantly wrapping gifts of unusual sizes or awkward shapes that traditional paper might struggle with.
What You’ll Need for a Creative Gift Bag:
- Plain brown paper bags with handles (or any solid color bag)
- Decorative ribbon for embellishment and tying
- Sharp scissors
- Plain brown gift tags (or any blank tags)
- Colorful tissue paper for interior volume and appeal
- Reliable double-sided tape
- A measuring tape
- A ruler for precision
- Party decorations with 3-D paper elements (e.g., honeycomb balls, fan decorations)
- Adhesive poster letters or stencils for personalization
- Colorful patterned craft paper for decorative panels
Directions for an Engaging 3-D Gift Bag:
Step 1: Precise Measurement for Perfect Fit
Let’s kick things off with accurate measurements. Grab your ruler and carefully measure the dimensions of your paper bag (e.g., 8.5 x 5.25 inches). The goal is to cut your patterned craft paper to be slightly smaller than the bag’s main panel. For instance, if your bag is 8.5 x 5.25, you might measure your patterned paper at 8 x 5 inches. This slight border creates a pleasing visual frame. Once measured, use your scissors to cut the patterned paper precisely to size, ensuring straight, clean edges.
Step 2: Attaching the Pretty Patterned Paper Panel
Now it’s time to adhere your chosen patterned paper to the front of your brown bag. Apply double-sided tape generously to the entire backside of your patterned paper, particularly along all four edges and a few strips across the middle. Carefully center the patterned paper panel onto the front of your bag. Once positioned correctly, press it down firmly, smoothing out any air bubbles to ensure a secure and flat attachment. This patterned panel serves as the vibrant backdrop for your 3-D embellishments.
Step 3: Creating the Star 3-D Element
On a recent visit to a dollar store, I discovered fantastic drink decorations featuring small, fold-out 3-D paper elements, like miniature honeycomb balls or paper fans. These are perfect as the centerpiece for our paper bag. Carefully detach the 3-D element from its original cardboard backing or packaging. Once separated, apply double-sided tape to only one half of the backside of your 3-D element. Precisely attach this taped half to the center of the patterned paper panel on your bag, making sure it’s securely fixed.
Step 4: Unfolding and Securing the 3-D Decor
With one half of your 3-D element secured, carefully open and unfold the paper element to reveal its full colorful, three-dimensional form. As you unfold it, gently apply additional double-sided tape to the area where the other half of the element will meet the patterned paper. Press firmly to secure it in place, allowing the 3-D element to spring to life. Your bag is now truly starting to take on a unique and engaging personality, adding depth and visual interest.
Step 5: Arranging Your Gift and Tissue Paper Artistry
Carefully insert your gift into the bag. Next, grab two or more different colored tissue papers. Instead of simply stuffing them in, try a more artful approach: fold each piece of tissue paper into a long, soft triangle. Position these folded triangles side-by-side at the opening of the bag, allowing their vibrant colors to create a “color explosion” effect that elegantly spills out, enhancing the anticipation and excitement for the recipient.
Step 6: Crafting a Personalized Name Tag
To add that quintessential personal touch, let’s create a custom name tag for the lucky recipient of your amazing gift. Choose a paper letter (from your poster letters or cut from craft paper) and attach it to a blank label tag using double-sided tape. Select a beautiful ribbon that complements your bag’s colors, and thread it through the hole in your name tag. All that’s left is to tie the name tag securely to one of the bag’s handles or directly onto the 3-D element, and then trim any excess ribbon to a desired length. You now have a colorfully wrapped present, brimming with personality, guaranteed to brighten anyone’s day!
Going to a wedding soon? Add a special touch to your wedding gift with this DIY idea! 😉 #DIYGifts https://t.co/5eAsuXOYIA
— DIY Projects (@DIYProjectsCom) September 4, 2017
3. Thoughtful Gestures: The Party Favor Gift Wrapping Project
Are you hosting a party and want to express heartfelt gratitude to your guests for attending? This tutorial is tailor-made for you! We’ll show you how to transform even the smallest of gifts into beautifully presented, thoughtful tokens of appreciation. Treating your guests to a smartly wrapped party favor ensures they feel valued and will undoubtedly be first in line for your next gathering. For this particular tutorial, we’ve chosen to wrap small packets of tea, but this versatile wrapping idea is perfect for any small gift, from candies and trinkets to custom magnets.
What You’ll Need for Elegant Party Favors:
- Natural burlap fabric or ribbon for rustic charm
- Clear cellophane gift bags (various sizes to suit your gifts)
- Strong double-sided tape
- Stylish sticker ribbon or decorative tape
- Small artificial roses or other miniature embellishments
- Assorted sticker letters for personalization
- Sharp scissors
- Glitter pens for added sparkle
- Loose glitter for a multi-dimensional effect
- A pencil for marking
- Small wooden tags for a rustic touch
- Brads for securing tags
- A ruler for accurate measurements
- Small gifts to wrap (e.g., tea bags, chocolates, seeds)
Directions for Thoughtful Party Favor Wrapping:
Step 1: Adorning Your Clear Bag with Decorative Tape
Begin by taking a clear cellophane gift bag. Carefully measure and attach your chosen decorative tape or sticker ribbon down the middle of one side of the bag, creating a central design stripe. Ensure you leave a margin of 1 to 2 inches (depending on your bag’s size and the bulk of your gift) at the top. This top space is crucial because we will be folding the edge over to seal the bag, so it needs to be clear of tape to allow for a clean fold.
Step 2: Securing Your Small Gifts Inside
To prevent your small gifts from bunching haphazardly at the bottom of the bag, we’ll use double-sided tape to keep them neatly in place. If you’re using tea bags, turn them face down and apply about an inch of double-sided tape to the back of each tea bag. Next, take your clear bag and lay it face down with the opening towards you. Starting from the bottom left corner, carefully place the first tea bag (or small gift) and press firmly to secure it with the tape. Depending on the size of your bag and gifts, you might be able to fit one or two neat rows of items.
Step 3: Personalizing with Flair and Color
To add an extra special and vibrant touch, let’s introduce some colorful elements. For our tea bags, we’ll carefully arrange small artificial roses over the secured tea bags. No tape is needed for this step, as they will be held in place by the contents and the bag’s structure. Beyond roses, you could add loose candies like Hershey Kisses, delicate pressed flowers, sparkling gemstones, or even chunky glitter for a whimsical and personalized effect. Distribute these elements evenly for a balanced and appealing look.
Step 4: Neatly Closing Your Gift Bag
It’s time to seal our beautifully arranged gift bag. Carefully fold the top opening of the bag over, aligning the fold with the ends of your decorative tape on the reverse side. This creates a clean, straight edge. Next, cut a small, rectangular piece of burlap fabric that is just large enough to cover this folded edge entirely. This burlap piece will add a lovely rustic texture and help reinforce the closure, giving your favor a handcrafted feel.
Step 5: Attaching the Rustic Name Tag
Now, let’s use a wooden name tag to secure both the burlap and the plastic bag shut, adding both function and charm. First, center the wooden name tag over the burlap strip. Make sure to leave a small margin, about a quarter-inch, at the top for the brads to pass through. Next, carefully push the brads through the pre-drilled holes in the wooden name tag, through the burlap, and through the folded-over plastic bag. Secure the brads on the backside of your bag by flattening their prongs. This creates a sturdy and decorative closure.
Step 6: Sprucing Up the Name Tag with Details
To truly jazz up our simple wooden name tag, let’s infuse it with some colorful and personal details! Begin by cutting a tiny diamond shape (or any preferred shape) from a piece of colored craft paper. Attach this tiny shape to the center of your wooden name tag using a small piece of double-sided tape. Next, select sticker letter initials (e.g., of the host or a simple “Thank You”) and adhere them on either side of your diamond shape, or directly onto the diamond itself. This adds a sweet, bespoke touch that makes each favor feel uniquely crafted.
Step 7: The Final Glittering Touch
You know what our name tag needs for that ultimate sparkle? Some glitter! Take a glitter pen and draw a tiny, intricate shape (like a star, heart, or small swirl) directly in the center of your paper diamond or on the wooden tag itself. While the glitter pen ink is still wet, carefully sprinkle a touch of loose glitter over the design for a dazzling, multi-dimensional effect. Gently shake off any excess loose glitter to reveal your sparkling design. Your beautifully designed gift bags are now ready to be distributed, sure to delight your guests!
4. The Charming Mason Jar Gift Box: Sustainable & Stylish
With this creative how-to, the gift isn’t confined to what’s merely inside; the mason jar itself becomes a valuable part of the present! This idea is perfect for fans of upcycling, eco-conscious givers, or as a thoughtful housewarming gift. This versatile, recyclable container can be repurposed for an endless array of craft projects, used as a rustic drinking glass, or for pantry storage. This quick, easy, and exceptionally affordable gift wrapping idea is your go-to solution for any last-minute party or event, adding a personalized and sustainable touch.
What You’ll Need for a Delightful Mason Jar Gift:
- A clean, clear mason jar with a lid
- Decorative craft rocks or pebbles for a colorful base
- Loose glitter for an added sparkle
- A thick, decorative ribbon (contrasting or complementary color)
- Strong adhesive glue (e.g., E3600 or super glue)
- Small plastic gems, miniature toys, or charms for lid embellishment
- Sharp scissors
- Removable gel window stickers or other adhesive decorations
Directions for Your Creative Mason Jar Gift:
Step 1: Creating a Colorful and Stable Base
To create an appealing and stable base for your mini gifts to sit upon, carefully add your chosen craft rocks or decorative pebbles to the bottom of your mason jar. Distribute them evenly. For an extra touch of sparkle and enchantment, sprinkle a generous amount of loose glitter over the rocks. This not only adds visual interest but also provides a lovely foundation that elevates the items placed inside.
Step 2: Inserting Goodies and Adding External Charm
Next, carefully place your chosen “goodies” inside the mason jar, arranging them artfully. These could be small candies, handmade notes, tiny bath bombs, seeds, or anything that fits and delights. Screw the mason jar lid back on securely. To add a vibrant pop of color and personality to the outside, select a decorative removable gel window sticker. Affix it to the side of your jar that you intend to be the front, ensuring it’s smoothly applied without air bubbles. You could also use adhesive vinyl decals, painted designs, or even fabric scraps.
Step 3: Elegantly Wrapping the Lid with Ribbon
Now, let’s turn our attention to the lid. Take a length of thick ribbon, choosing a color that contrasts beautifully or complements the items inside and the external sticker. Wrap this ribbon neatly around the circumference of the jar’s lid. Secure it with a simple, elegant bow tied at the front or side. The texture and width of the ribbon can significantly enhance the overall aesthetic, adding a touch of rustic charm or sophisticated flair.
Step 4: Attaching a Fabulous Handle to the Lid
To truly top off this unique gift, let’s add a decorative handle or topper to the lid of your mason jar. We used some sparkling plastic crystals, but small toys, miniature artificial flowers, a charm, or even a unique button would also look absolutely fantastic. Let your imagination soar with this step! Apply a strong adhesive glue, such as E3600, to the base of your chosen topper and firmly attach it to the center of the mason jar lid. Allow ample time for the glue to dry completely and cure according to the product instructions. Once dry, your fun and uniquely wrapped mason jar gift is ready for any type of party or celebration!
Eager for more innovative gift wrapping inspiration? Discover additional creative techniques and visual guides by checking out this video from Olip Beauty:
Gift wrapping is far more than just covering a present; it’s a simple yet profound way to add flair, a personal touch, and an extra layer of thoughtfulness to your gift, making it even more special and memorable. Regardless of the method you choose, what truly matters is the intention behind making the gift’s presentation perfectly reflect your appreciation for the recipient. It’s about showing you care, right from the very first glimpse.
Which of these creative gift wrapping ideas has inspired you the most? Share your favorite techniques or any unique tips you have in the comments section below. We love hearing from our community!
Up Next: Discover 60 More Cute and Easy DIY Gifts in a Jar Ideas!
Stay inspired and connected with us on Facebook, Twitter, Pinterest, and Instagram for daily doses of DIY creativity and inspiration!
Editor’s Note – This post was originally published in June 2014 and has been comprehensively updated for enhanced quality, improved relevancy, and expanded content, offering even more value to our readers.