
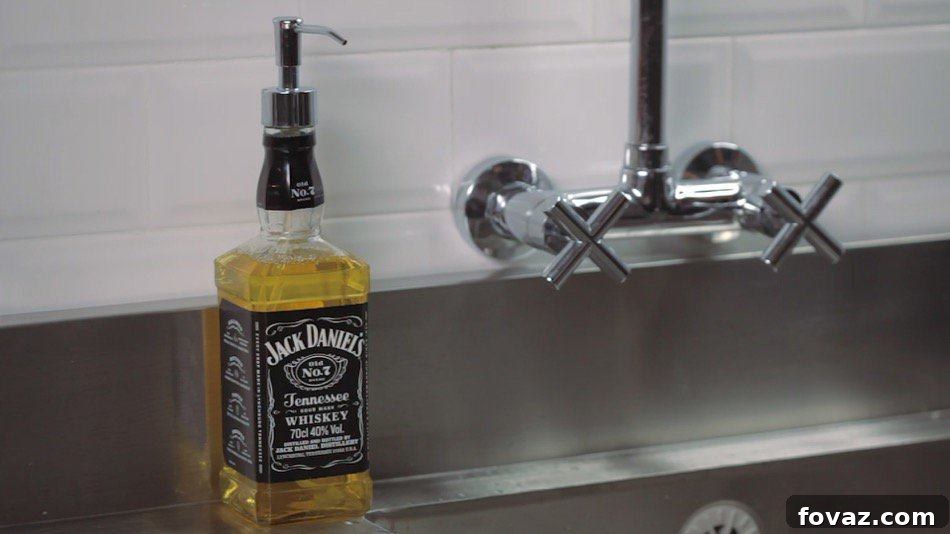
Are you searching for a creative and sustainable way to add a unique touch to your home while also reducing waste? Look no further than the simple art of upcycling! Repurposing old glassware is a fantastic, budget-friendly method to revitalize your living spaces without spending a dime on new items. In this comprehensive guide, we’ll walk you through a super simple yet incredibly rewarding tutorial to transform any glass bottle into a beautiful, functional, and homemade soap dispenser. Get ready to embrace your inner crafter and turn forgotten glass into a stylish statement piece for your kitchen or bathroom!
Repurpose Your Glass Bottle Into a Stylish Soap Dispenser: A DIY Guide
It’s time to see those empty glass bottles in a whole new light! This creative DIY project is not only fast and fun but also incredibly satisfying. With just a few common household items and a dash of creativity, you can craft a custom soap dispenser that reflects your personal style and commitment to sustainability. A homemade soap dispenser adds a distinct character to your kitchen or bathroom, making it a unique focal point that also serves a practical purpose. Imagine the satisfaction of turning what was once considered ‘trash’ into a beautiful ‘treasure’ in just a few easy steps!
Beyond the aesthetic appeal, upcycling glass bottles offers significant environmental benefits. By giving new life to old items, you actively participate in reducing landfill waste and minimizing your carbon footprint. This project isn’t just about crafting; it’s about embracing a more sustainable lifestyle, one elegant soap dispenser at a time. Whether you’re a seasoned DIY enthusiast or just starting your crafting journey, this project is designed for everyone, promising a rewarding experience and a charming addition to your home decor.
The Sustainable Charm of DIY: Why Repurpose Glass Bottles?
In an era increasingly focused on environmental consciousness, repurposing and upcycling have emerged as powerful tools for sustainable living. Glass bottles, in particular, present a wonderful opportunity for creative transformation. Instead of tossing them into recycling bins (or, worse, general waste), giving them a second life as a soap dispenser offers a myriad of benefits:
- Eco-Friendly Impact: Every bottle repurposed means one less item in the waste stream and reduces the demand for new manufacturing, conserving resources and energy.
- Cost-Effective Decor: Why spend money on generic plastic or ceramic dispensers when you can create a personalized, high-quality one for virtually free?
- Unique Personalization: Store-bought dispensers often lack character. Your DIY creation allows you to choose bottles that match your home’s aesthetic, adding a bespoke touch that store-bought items simply can’t replicate.
- Durability and Quality: Glass is a durable material that, unlike plastic, won’t degrade over time, making your homemade dispenser a long-lasting addition to your home.
- Sense of Accomplishment: There’s immense satisfaction in creating something beautiful and functional with your own hands, knowing you’ve contributed to a greener planet.
This project is more than just a craft; it’s a statement about mindful consumption and appreciating the potential in everyday objects. Let’s gather our supplies and begin this exciting upcycling adventure!
Essential Materials: What You’ll Need for Your Homemade Soap Dispenser
One of the beauties of this DIY project is its simplicity and reliance on readily available items. You won’t need any specialized tools or exotic materials. Here’s your checklist to get started:
- Clean, Dry Glass Bottle: This is your blank canvas! Wine bottles, liquor bottles, olive oil bottles, or even certain juice bottles work wonderfully. Choose one with a sturdy base and an opening that can accommodate a standard pump. Ensure it’s thoroughly washed and completely dry before you begin.
- Liquid Hand Soap: Your favorite brand and scent! You’ll need enough to fill your chosen bottle. Consider purchasing large refill pouches or jugs for an even more sustainable approach.
- Stainless Steel Soap Pump: The functional heart of your dispenser. These can often be salvaged from old, broken dispensers, purchased individually at craft stores, home improvement stores, or online. Standard-sized pumps are usually designed to fit common bottle openings.
- Plastic Tube from a Spray Bottle Nozzle: This is a crucial, often overlooked component. You’ll need the long, slender plastic tube that typically extends from the spray mechanism down into the liquid of a spray bottle (like a cleaning product bottle). If you don’t have an old spray bottle, a similar rigid plastic tubing from a hardware store can work, or you might even be able to carefully extend the tube from an existing, shorter soap pump.
With these four simple items, you’re well on your way to crafting a truly unique and practical piece of sustainable home decor. Now, let’s dive into the fun part: making it!
Step-by-Step Guide: How to Craft Your Glass Bottle Soap Dispenser
Follow these easy instructions to transform your chosen glass bottle into a chic and functional soap dispenser. Each step is designed to be straightforward, ensuring a smooth and enjoyable crafting experience.
1. Start with a Clean, Dry Glass Bottle.
This initial step is paramount for a hygienic and aesthetically pleasing end product. Begin by thoroughly washing your chosen glass bottle with hot, soapy water. Use a bottle brush to reach all interior surfaces, especially if the bottle contained something sticky or strong-smelling. Rinse it meticulously until all soap residue is gone. After washing, ensure the bottle is completely dry. You can air-dry it upside down on a drying rack, or for quicker results, use a hairdryer on a cool setting. Any residual moisture can dilute your soap or create an environment for mildew over time.
Regarding labels: we sometimes opt to keep the original label on certain bottles, especially if it’s aesthetically pleasing or adds a vintage charm. However, feel free to remove it if you prefer a more minimalist, clean look or plan to add your own custom label. To remove labels, soak the bottle in warm, soapy water for several hours, then gently scrape off the label and adhesive residue with a non-abrasive scrubber. Stubborn adhesive can often be removed with rubbing alcohol, Goo Gone, or a paste of baking soda and oil.
2. Remove the Cap and Pour Your Favorite Liquid Hand Soap into the Bottle.
Once your bottle is spotless and dry, it’s time to fill it! Carefully remove the original cap or stopper from your glass bottle. Then, slowly pour your chosen liquid hand soap into the bottle’s opening. To prevent spills and ensure a mess-free process, we highly recommend using a funnel, especially if your bottle has a narrow neck. Fill the bottle to about 1-2 inches below the rim. This space is essential to accommodate the displacement caused by inserting the pump mechanism, preventing any overflow. Keep in mind that for larger glass bottles, you may need more than one standard soap refill bottle to fill it completely.
3. Remove the Plastic Tube from Your Spray Bottle Nozzle.
This step involves salvaging a key component for your new pump. Locate an old spray bottle (perhaps from a cleaning product that has run out). Unscrew the nozzle and carefully detach the long, slender plastic tube that extends from the pump mechanism into the bottle. This tube acts as a straw, drawing the liquid up to the pump. You won’t need the nozzle itself – just this flexible or semi-rigid plastic tube. If the tube is too long for your specific glass bottle, you can trim it with scissors so that it reaches close to the bottom of your bottle without kinking. It should ideally sit about a quarter-inch from the bottom to ensure maximum soap retrieval.
4. Insert the Plastic Tube into the Stainless Steel Pump.
Now, let’s assemble the functional part of your dispenser. Take the plastic tube you just prepared and firmly insert one end into the bottom opening of your stainless steel soap pump head. Most pumps have a small port designed for this. Push it in securely until it feels snug and stable. This connection needs to be airtight to ensure proper suction when you operate the pump. A loose connection can lead to air bubbles being drawn up instead of soap, causing the pump to malfunction or squirt inconsistently. Give it a gentle tug to ensure it won’t easily come loose.
Tip: Make sure the tube is inserted securely to avoid any air bubbles that could hinder the pump’s function. If the tube feels a bit loose, a small piece of heat shrink tubing or even a tiny amount of hot glue (applied carefully and allowed to dry completely) could help secure it, though this is rarely necessary with standard-sized components.
5. Twist the Soap Pump into the Glass Bottle Opening.
With the pump assembly ready, it’s time to cap off your creation. Carefully align the threaded collar of the soap pump with the opening of your filled glass bottle. Gently twist the pump clockwise until it is securely fastened. Make sure it’s tight enough to create a good seal, preventing leaks, but avoid over-tightening, which could strip the threads or damage the pump. Any standard-sized soap pump will typically fit into a common glass liquor bottle, wine bottle, or many olive oil bottle openings, as these often share similar neck diameters. Test the stability of the pump; it should feel firmly attached to the bottle.
6. Test and Finalize Your DIY Soap Dispenser.
Your new soap dispenser is almost ready for action! Before placing it in its permanent spot, give the pump a few presses to prime it. It might take several pumps for the soap to travel up the tube and dispense for the first time. Check for any leaks around the pump’s base where it screws into the bottle. If you notice any, tighten the pump slightly or re-seat it. Once you’ve confirmed it’s functioning perfectly and leak-free, you can add any optional decorative touches like a ribbon tied around the neck, a custom label you’ve printed, or even some etching on the glass itself for a truly personalized aesthetic.
There you have it!
Enjoy your new, uniquely crafted, and incredibly sustainable soap dispenser! You’ve not only created a beautiful and functional item for your home but also made a positive impact on the environment by choosing to upcycle. This simple project is a testament to how creativity and mindful consumption can go hand in hand, transforming everyday objects into items of beauty and utility. Take pride in your handmade creation and let it serve as a daily reminder of your commitment to sustainable living.
Check out the video below to see these steps in action and get inspired by the ease of this fantastic DIY project!
That wasn’t hard at all, was it? The most challenging part is often just choosing the perfect glassware you’d like to repurpose, given the endless variety of shapes, sizes, and colors available. Once you start, you’ll likely find yourself looking at every empty bottle with newfound potential! This project is a gateway to a world of creative upcycling opportunities.
Beyond Soap Dispensers: More Creative Upcycling Ideas for Glass Bottles
Now that you’ve mastered the art of transforming a glass bottle into a soap dispenser, your imagination is probably buzzing with more possibilities! Glass bottles are incredibly versatile and can be repurposed into a multitude of useful and decorative items for your home. Here are a few more inspiring ideas to spark your next upcycling project:
- Elegant Vases: With their unique shapes and colors, glass bottles make stunning single-stem or small bouquet vases.
- Charming Candle Holders: Use them as hurricane lamps for pillar candles or fill them with sand for taper candles.
- DIY Terrariums: Create miniature ecosystems inside larger bottles, adding a touch of nature to your indoor space.
- Fairy Light Jars: Stuff string lights inside bottles for a magical, ambient glow.
- Oil and Vinegar Dispensers: Perfect for the kitchen with specialized pour spouts.
- Water Bottles: For personal use, a clean, sturdy bottle can be a stylish water carafe.
- Decorative Storage: Store craft supplies, spices, or even small snacks in an organized and appealing way.
- Artistic Sculptures: Paint, etch, or adorn bottles to create unique decorative pieces.
The potential is truly limitless. Every repurposed bottle is a small victory for sustainability and a testament to your creativity. So, keep collecting those beautiful empties!
Share Your Creativity!
Do you have your own amazing DIY ideas on how to repurpose a glass bottle? We absolutely love seeing your innovative projects and learning from your experiences! Share your brilliant tips, unique creations, or even challenges you faced, by leaving a comment below. Your insights could inspire countless others in our crafting community!
Wondering how you can repurpose your beer bottles specifically? Check out this fantastic list of 24 Creative Uses for Beer Bottles for even more ingenious ideas to expand your upcycling repertoire!
Stay connected and never miss out on our latest DIY inspiration, tips, and tutorials! Follow us on Facebook, Twitter, Pinterest and Instagram! Join our community of makers and let’s craft a more sustainable future together.