
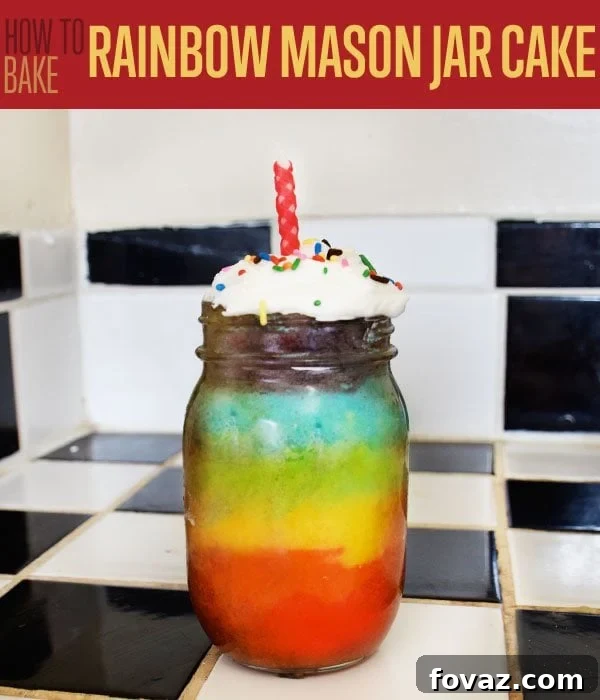
Welcome to a world where baking meets art, creating an instant smile maker: the Mason Jar Rainbow Cake! This delightful dessert isn’t just a treat for the taste buds; it’s a feast for the eyes, bursting with vibrant colors and rich flavor. Perfect for bakers of all skill levels, this project transforms a simple cake into a stunning, portable masterpiece. Imagine unveiling layers of red, orange, yellow, green, blue, and violet, all neatly contained within a charming mason jar. It’s an ideal activity for the whole family, offering a creative outlet and a deliciously rewarding experience.
Beyond its visual appeal and delectable taste, the Mason Jar Rainbow Cake makes for an unforgettable gift. The individual portions are convenient, making them perfect for parties, picnics, or simply as a thoughtful present for a loved one. To add an extra touch of whimsy, consider including this playful riddle: “This rainbow has no ends, so where is the pot of gold?” After their very first bite, they’ll surely discover the sweet, golden answer nestled within each flavorful layer. It’s a gift that promises not just sweetness, but a moment of pure joy and delightful surprise. Get ready to embark on a baking adventure that combines simplicity, creativity, and incredible taste!
How To Bake A Mason Jar Rainbow Cake: A Step-by-Step Guide
Creating a stunning rainbow cake in a jar is an enjoyable and surprisingly straightforward process. This detailed guide will walk you through each step, ensuring your homemade treat is as beautiful as it is delicious. We’ll cover everything from preparing your ingredients to layering the vibrant batter and adding those magical finishing touches.
Essential Supplies Needed To Bake Your Mason Jar Rainbow Cake:
- 1 Stick (1/2 cup) of Softened Unsalted Butter: Essential for a smooth, cohesive cake batter. Softened butter creamed with sugar incorporates air, leading to a lighter cake texture.
- 3 Cups of Granulated Sugar: Provides sweetness and helps keep the cake moist and tender.
- 2 Large Eggs: Act as binders, adding structure, moisture, and richness to the cake.
- 1 Teaspoon of Pure Vanilla Extract: A key flavor enhancer, bringing warmth and depth to the cake.
- 4 Cups of All-Purpose Flour: The primary structural component of our cake. Sifted flour ensures a lighter batter.
- 1 Cup of Whole Milk: Adds moisture and fat, contributing to a tender crumb. Room temperature milk mixes more evenly.
- High-Quality Food Coloring Gel in Red, Blue, Yellow, and Green: Gel food colorings provide vibrant, concentrated hues without thinning the batter, superior to liquid drops.
- White Icing or Frosting: For topping your finished cake. Buttercream or cream cheese frosting works wonderfully.
- Colorful Sprinkles: The perfect festive touch to complete your rainbow masterpiece.
- Mason Jars (approx. 16 oz or pint-sized): The vessel for your individual rainbow cakes. Ensure they are clean and oven-safe.
- Baking Tray (Rimmed): To hold the mason jars during baking and for the essential water bath.
- Electric Mixer (Stand or Handheld) or a Sturdy Wooden Spoon: For thoroughly combining ingredients and achieving a smooth batter.
- Large Mixing Bowl: For preparing the main cake batter.
- 7 Small Bowls: Crucial for separating and coloring your batter into individual rainbow shades.
- Plastic Storage Bags (Sandwich or Quart-sized): For creating makeshift piping bags to layer the batter neatly.
- Scissors: To cut the tips of your homemade piping bags.
Step 1: Prepare Your Oven and Dry Ingredients
Begin by preheating your oven to 350 degrees Fahrenheit (175 degrees Celsius). This ensures the oven is at the correct temperature for even baking as soon as your cake is ready. While the oven heats, gather all your ingredients and tools. In your large mixing bowl, combine 3 cups of granulated sugar and 4 cups of all-purpose flour. Using an electric mixer on low speed, or a sturdy wooden spoon, gently stir these dry ingredients together. The goal is to create a well-combined, fluffy foundation for your cake batter. Thoroughly mixing the dry ingredients now helps to prevent clumps and ensures that the leavening agents (if you were using any, though this recipe relies on eggs for lift) are evenly distributed throughout the final cake.
Step 2: Incorporate Eggs and Softened Butter
Next, it’s time to add the wet ingredients that will enrich your cake. Begin by adding the two large eggs, one at a time, to the dry mixture. Beat each egg into the batter until just combined before adding the next. This allows for better incorporation and emulsification. After the eggs, add your softened stick of butter. Softened butter is key here; it creams beautifully with the other ingredients, creating a smooth, airy batter. If your butter is still cold from the fridge, you can quickly soften it by transferring it to a microwave-safe container and microwaving for 20-30 seconds on a low power setting, being careful not to melt it completely. Mix these ingredients gently with your electric mixer or wooden spoon until just combined. Overmixing at this stage can develop too much gluten, resulting in a tougher cake, so mix until the ingredients are integrated and the batter begins to form a cohesive, slightly lumpy consistency.
Step 3: Blend in Vanilla Extract and Milk
The final wet ingredients to be incorporated are vanilla extract and milk, which are vital for enhancing both the flavor and texture of our rainbow cake. Slowly pour in the cup of milk while continuing to mix on a low speed. Adding the milk gradually helps to maintain a smooth batter consistency and prevents any splashes. Once the milk is almost fully incorporated, add the teaspoon of vanilla extract. Vanilla provides a warm, sweet aroma and a delicious underlying flavor that complements the cake beautifully. Continue mixing until the batter is smooth and well-combined, but again, be careful not to overmix. At this stage, your batter should have a creamy, pourable consistency, perfectly ready for its colorful transformation.
Step 4: Distribute Batter and Infuse with Vibrant Colors
This is where the magic truly begins! Carefully divide your prepared cake batter into your seven small bowls, aiming for approximately one cup of batter in each. The goal is to have relatively equal portions for each color of your rainbow. Now, it’s time to bring out your food coloring gels. You might notice you only have red, blue, yellow, and green, but fear not – we’re going to create the full spectrum! Squeeze a small amount of gel into six of the bowls. Keep one bowl plain white for any accidental spills or if you want a white layer.
For the primary colors, add red, yellow, green, and blue to four separate bowls. For the secondary colors, get creative: mix red and yellow to create a brilliant orange in one bowl, and combine red and blue to achieve a rich violet in another. Stir each bowl thoroughly until the color is evenly distributed and vibrant. Gel food coloring works much better than liquid drops, providing intense hues without altering the batter’s consistency. You’ll now have a beautiful palette of six distinct colors: red, orange, yellow, green, blue, and violet, perfectly representing a vibrant rainbow.
Step 5: Create Homemade Piping Bags for Seamless Layers
Achieving those distinct, seamless layers of color in your mason jar cake is made incredibly easy with piping bags. Don’t have any on hand? No problem! You can effortlessly create your own using standard plastic storage bags, such as sandwich or quart-sized bags. Simply roll down the top edge of each plastic bag to create a cuff, making it easier to fill without making a mess. Carefully spoon each individual colored batter into its own plastic bag. Once filled, push all the batter towards one corner of the bag, effectively creating a makeshift cone. With a pair of scissors, snip off a small tip from that corner. Start with a very small opening; you can always enlarge it if needed. You’ve now successfully created your own set of piping bags, ready to elegantly layer your rainbow cake batter!
Step 6: Layer Up Your Rainbow!
With your piping bags ready and your mason jars clean and dry, it’s time for the most exciting part: layering your cake! Start by carefully squeezing the red batter into the bottom of your mason jar, creating an even layer. Remember the classic order of the rainbow? It’s essential for achieving that iconic spectrum! For a quick refresher, the order is: Red, Orange, Yellow, Green, Blue, and Violet.
Proceed with each color, gently squeezing the batter from your piping bags to form distinct layers on top of the previous one. Take your time with each layer, aiming for even thickness and trying to keep the edges as neat as possible. This meticulous layering is what will create the beautiful, defined rainbow effect when the cake is baked. Don’t worry if it’s not absolutely perfect; the charm of a homemade cake is in its unique character. As you layer, the anticipation of cutting into this colorful creation will build!
Step 7: Prepare and Bake Your Mason Jar Cakes
Now that your beautiful rainbow layers are in place, it’s time to prepare your cakes for baking. Carefully place your filled mason jars onto a rimmed baking tray. This tray serves a crucial purpose: preventing your jars from cracking under the heat of the oven. To further ensure an even bake and reduce the risk of thermal shock to the glass, add about 1/2 inch of water to the bottom of the baking tray, creating a shallow water bath. This helps to distribute heat gently around the jars, ensuring your cakes bake evenly and remain moist.
Carefully transfer the baking tray with the jars into your preheated 350-degree Fahrenheit (175°C) oven. Set a timer for 20-30 minutes, but remember that oven temperatures can vary, so keep a close watch on your cakes. You’ll want them to bake through without over-browning the tops. You can test for doneness by gently inserting a clean toothpick into the center of a cake; if it comes out clean, your cake is ready. Once baked, carefully remove the tray from the oven and allow the jars to cool completely on a wire rack before handling them further.
Step 8: The Grand Finale – Finishing Touches and Enjoyment!
It’s completely normal for your rainbow cakes to overflow slightly from the mason jars during baking, creating charming “cake tops” that might look a bit wild. Don’t worry; this is a sign of a well-risen cake! The most important step now is patience: allow your cakes to cool completely within their jars on a wire rack. Attempting to trim or frost them while warm will lead to a messy disaster.
Once the cakes are thoroughly cooled, take a small, sharp knife and carefully trim off any excess cake that has risen above the jar’s rim. This creates a neat, flat surface, perfect for decorating. Now, for the exciting part – the decorations! Add a generous dollop or swirl of your favorite icing or frosting on top of each cooled cake. Whether it’s classic vanilla buttercream, a tangy cream cheese frosting, or even a light whipped cream, choose what you love. Finish your magical creation by liberally sprinkling colorful sprinkles over the frosting. These individual Mason Jar Rainbow Cakes are not only a feast for the eyes but also a delightful experience to share or savor solo. Get ready to enjoy the fruit of your creative baking endeavors!
Like This Craft? Explore More Creative Projects!
If you’ve enjoyed creating these delightful Mason Jar Rainbow Cakes and are looking for more fun and rewarding DIY projects, you’ve come to the right place! Baking and crafting are wonderful ways to express creativity and bring joy into your home. From delicious recipes to clever homemade ideas, there’s always something new to learn and create.
Check Out Our Other Exciting DIY Projects:
Discover how to make perfect, fluffy homemade biscuits from scratch with our easy-to-follow recipe. It’s a classic comfort food that pairs perfectly with almost any meal or can be enjoyed on its own. Keep exploring our site for more inspiration and step-by-step guides to unleash your inner baker and crafter!