
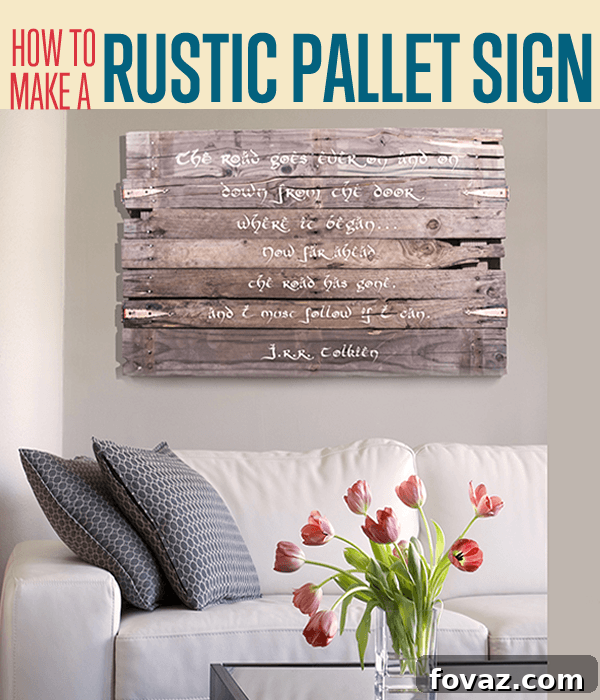
DIY Weathered Wood Wall Art: Craft Your Own Rustic Pallet Signs
Have you ever admired those charming, weathered wood wall art signs gracing Pinterest boards and wondered how to create one yourself? This comprehensive guide will show you exactly how to bring that rustic aesthetic into your home through an engaging DIY project. The most challenging part? Potentially sourcing the perfect disposed shipping pallets. But don’t worry, the reward of a custom, hand-crafted piece is well worth the effort. We highly recommend reviewing our essential article on
How To Know If A Shipping Pallet Is Safe to Use
before you begin. Understanding pallet markings ensures your project is not only beautiful but also safe for your home. The best news is that safe, reclaimed pallets are often free, making this an incredibly budget-friendly endeavor. If local scavenging isn’t an option, platforms like eBay can also be a source.
Why Choose Pallet Wood for Your DIY Wall Art?
Pallet wood isn’t just a cost-effective material; it’s a canvas rich with character and history. Each board tells a story, featuring unique grain patterns, natural imperfections, and a charmingly aged patina that’s difficult to replicate. By transforming these discarded materials, you’re not only creating stunning home decor but also engaging in a sustainable practice that reduces waste. This DIY project allows you to infuse your space with personalized charm, whether you’re aiming for a cozy farmhouse feel, an industrial edge, or a touch of vintage elegance. Bring your favorite inspirational or literary quote to life, creating a focal point that truly reflects your style and personality.
Safety First: Selecting and Preparing Your Pallets
Before you even think about deconstructing a pallet, it’s crucial to ensure it’s safe for indoor use. Look for pallets stamped with an “HT” (Heat Treated) mark, which indicates they were sterilized with heat, not harmful chemicals. Avoid pallets marked “MB” (Methyl Bromide), as these were treated with pesticides and are not suitable for indoor projects. Always inspect pallets for excessive staining, mold, or strong odors, which could indicate contamination. Once you’ve selected a safe pallet, clean it thoroughly with a stiff brush and soapy water, then allow it to dry completely. This preparation ensures a clean slate for your beautiful art project.
Gather Your Tools and Materials
Embarking on this creative journey requires a modest collection of supplies and tools. Many of these items you might already have around your home, making the project even more accessible. Investing in quality brushes and paints will ensure a vibrant and lasting finish for your personalized artwork.
Crafting Materials:
- Weathered Old Pallet: The star of your project! Look for natural aging, interesting textures, and even a bit of rustic wear for that authentic look.
- White and Brown Acrylic Paint: Acrylics are versatile and easy to work with. The combination allows you to create custom shades of off-white for a perfectly aged appearance.
- Delicate Paint Brush for Fine Detail Work: Essential for precise lettering and intricate designs. A small, angled, or round brush works best.
- Old Barn Hinges: These add a fantastic rustic touch. Explore local architectural salvage shops, antique stores, or flea markets for unique, rusty finds. The older and more character-filled, the better!
- Long Nails (e.g., 2” nails): For securely reattaching your pallet boards. New, straight nails are often easier to work with than reusing old, bent ones.
- Printed Quote of Your Choice: The heart of your message, prepared as described in detail in Step 6.
Essential Tools:
- Hammer: Indispensable for deconstruction and reassembly.
- Rubber Mallet: Crucial for gently yet firmly separating pallet boards without causing excessive damage.
- Chop Saw (or Hand Saw): A chop saw offers quick, precise cuts. If you’re using a hand saw, ensure you have a sturdy workbench and clamps for safety and accuracy.
- Scotch Tape: For piecing together your printed quote.
- Duct Tape: For securely affixing your quote to the wooden canvas during the etching process.
- Pencil: For marking cut lines and general layout.
- Paint Mixing Bowl: To achieve your perfect custom paint hue.
- Ruler or Straight Edge: For accurate measurements and ensuring level lines.
- Seam Ripper or Sharp, Hard Object: For etching the letter outlines. A dull knife, a metal stylus, or even a sturdy pen cap can work.
- Safety Glasses and Gloves: Always recommended when working with wood and tools.
Step-by-Step Guide: Crafting Your Weathered Wood Masterpiece
Step 1: Deconstructing Your Pallet with Care
The first step in transforming your pallet into art is to carefully dismantle it. Begin by using your rubber mallet to pound apart the pallet boards. Focus on hitting the ends of the boards from behind, forcing the nails out of the three support beams. This method minimizes damage to the planks you’ll be using. If the nails are stubborn, a hammer can be used intermittently with the mallet. Pallets with significant natural age or even a bit of wood rot, while desirable for a weathered look, can be more challenging to take apart due to rusted nails. This process might require some “elbow grease,” but patience is key. Don’t be discouraged if some pieces split or crack; these imperfections only add to the authentic, character-chiseled look of your finished project. Remember to wear gloves and safety glasses during this step to protect your hands and eyes from splinters and flying debris.
Step 2: Arranging Your Rustic Canvas
Once you’ve successfully separated all the top planks from the pallet’s support beams (you’ll use the back-brace boards later), it’s time to arrange them into your wooden “canvas.” Experiment with different configurations, staggering boards or lining them up perfectly, until you achieve an aesthetically pleasing layout. Consider the overall size and shape you desire for your final art piece. You can use as few or as many boards as you like; for a large, impactful project, utilizing all the top boards creates a grand statement. Lay them out on a flat surface, ensuring they fit together snugly to minimize gaps. This is where your artistic vision truly begins to take shape.
Step 3: Measuring and Marking the Support Beams
Now, bring in your three back-boards (the thicker support beams from the original pallet). Lay them across your newly arranged pallet planks. You’ll quickly notice that since you’ve removed the gaps between the front boards, the back-boards are now too long. This is easily remedied! Position the back-boards so they won’t quite reach the very edge of your assembled front boards. This slight overhang creates a “floating” effect when the piece is mounted on the wall, adding a subtle dimension and modern touch to the rustic design. Once you’re happy with the positioning, use a pencil to clearly mark the cut lines on each of the three back-boards.
Step 4: Precision Cutting for a Seamless Finish
With your cut lines marked, it’s time to trim the support beams. If you’re fortunate enough to have a chop saw, this step will be quick and effortless, delivering clean, straight cuts. If you’re using a hand saw, prepare for a bit more effort, perhaps with your favorite music playing to keep you company! Focus on making nice, straight cuts to ensure the support beams sit flush against the back of your art. After cutting, take a moment to remove any splinters or protruding nails from the boards. This not only makes the piece safer to handle but also ensures it will sit perfectly flat against your wall without causing damage. Sanding the cut edges lightly can also enhance the finished look.
Step 5: Securing Your Pallet Boards
This step involves reassembling your “canvas” with the cut support beams. Slide your three neatly sliced back-boards into position underneath your arranged front planks. Originally, these supports were likely attached with their narrow side flush against the front boards. However, for a sturdier and more professional finish, turn them on their sides so the *widest* side faces upwards towards the front boards. This provides a larger surface area for nailing. The great thing about using reclaimed pallet wood is that you’ve often got existing nail holes to guide you! While you might be tempted to reuse the original nails, they are often bent and difficult to work with. Using new, straight, and sharp nails will make this process much easier and more secure. For added durability and to prevent splitting, especially with aged wood, consider pre-drilling pilot holes before hammering in the new nails. Securely nail all the front boards to the three back-boards, creating a solid and stable wooden canvas.
Step 6: Designing Your Inspirational Text
With your sturdy wooden canvas assembled, it’s time to bring your chosen words to life. The key here is proper text preparation. Using a graphic design program like Photoshop, GIMP, or even a robust word processor like Microsoft Word or Google Docs, lay out your desired text. For ease of transfer, design your text a few words at a time on standard 8.5×11 inch paper. Measure the average height of your pallet boards (e.g., 3 inches) to determine how many lines or words can fit comfortably on each page for printing. For instance, if your boards are 3 inches high, you might fit three words per page. Print your pages, then carefully chop them into individual word strips. This method provides flexibility in arranging your quote on the wooden surface. Experiment with different fonts and sizes to achieve the desired aesthetic, ensuring readability and visual impact.
Step 7: Strategically Positioning Your Quote
Now, carefully piece together your printed word strips using a bit of scotch tape on the back to form complete sentences. Lay them out across your wooden canvas. To maintain control and prevent the paper from catching on clothing, it’s recommended to work on one section or length of board at a time rather than spreading all the paper out at once. Use a ruler to measure from the tops of your letters to the top edge of the board, ensuring a perfectly even and level line across your entire quote. To achieve consistent spacing, choose a specific letter (like “O” or “E”) that is the same height across your text and use its top edge as your reference point as you slide your ruler along the sentence. This precision will result in a professional, well-aligned appearance.
Step 8: Anchoring Your Design with Duct Tape
Once your carefully measured paper sentences are perfectly positioned on the wooden canvas, it’s time to secure them firmly. Use duct tape to tape down the edges of your paper strips. Duct tape is ideal for this step because it holds fast and prevents any shifting while you work, yet it peels up cleanly and easily when you’re done, leaving no residue behind. Ensure all edges and corners of your paper are well-secured to prevent any movement during the etching process.
Step 9: Integrating Rustic Hardware
Before you begin stenciling your letters, consider the placement of your decorative rustic hinges. You need to ensure they won’t cover up any part of your text. Hold the hinges up to your wooden canvas, experimenting with different positions until you find a spot that complements both the text and the overall aesthetic. Once you’re satisfied with their placement, go ahead and screw those hinges in to anchor them securely. Attaching them now prevents any accidental damage to your freshly painted letters later and helps finalize the visual balance of your art piece.
Step 10: Etching Your Letters onto the Wood
This step requires a steady hand and a bit of patience. Using a sharp and hard object—such as a seam ripper, a sturdy pen, a metal stylus, or even a dull screwdriver—carefully and firmly trace the outline of your lettering onto the wood through the paper. The goal is to create a clear indentation in the wood, deep enough to be easily visible once you peel back the paper. You’ll need to press quite hard, which can be a little tough on the wrists, but persevere! This etching provides the perfect guide for your subsequent painting, ensuring crisp and clean letter edges. The more defined your etchings, the easier the painting will be.
Step 11: Mixing Your Custom Paint Hue
The beauty of weathered wood art lies in its subtle, aged charm. Stark white paint might look too bright and modern against the rustic backdrop. To achieve that perfectly “dusky” and charmingly old feel, it’s time to mix your paint. Pour your white acrylic paint into a mixing bowl, then add just a tiny touch of brown acrylic paint. Mix thoroughly until the white transforms into a soft, creamy ivory or an antique off-white shade. You want just enough brown to take away the harshness of pure white, creating a warm, inviting hue that harmonizes beautifully with the weathered wood. Test the color on a scrap piece of wood to ensure it’s exactly what you envision before proceeding.
Step 12: Bringing Your Words to Life with Paint
Once all your words and sentences have been etched (from Step 10), it’s time for the most rewarding part: painting! To maintain precision and allow for corrections, consider painting one letter at a time. Carefully peel back the paper from a single etched letter, then, using your delicate paint brush and custom-mixed paint, meticulously fill in the etched outline. If you find an etching isn’t deep enough, simply lay the paper back down, re-etch that specific letter, and continue. After painting a letter, use scissors to slice that painted letter off your paper strip before moving to the next. This method helps prevent smudges and provides a clean working area. This step is the most time-consuming, so put on a favorite movie or podcast and enjoy the meditative process of hand-painting your unique creation. Take your time, applying thin, even coats for a smooth finish.
Step 13: The Final Touch: Mounting Your Art
Once all your lettering is beautifully painted and completely dry, flip your finished piece over. It’s now time to attach your preferred wall-hanging hardware. The choice of hanging mechanism is entirely up to you and depends on the weight of your art and your wall type. Common options include sturdy D-rings with picture wire, metal hooks, or brackets. For heavier pieces, a French cleat system provides excellent support and a flush mount. Personally, I favor “earthquake-proof” hooks, especially in homes with active children, as they offer peace of mind against accidental bumps and potential topples. These provide extra security, ensuring your beautiful art stays safely on the wall. You can find robust,
large art hanging kits, including earthquake-resistant options, on Amazon.com and other hardware retailers.
Displaying Your Unique Pallet Wood Art
Congratulations! You’ve successfully transformed raw pallet wood into a stunning piece of personalized art. Now, it’s time to display your creation. Consider where in your home this rustic masterpiece will shine brightest. It could be a focal point in your living room, a warm welcome in your entryway, an inspiring message in your home office, or a charming accent in a bedroom. The weathered aesthetic blends seamlessly with various decor styles, from farmhouse and rustic to industrial and bohemian. Ensure the lighting in your chosen spot enhances the text and the natural beauty of the wood. This isn’t just a decoration; it’s a testament to your creativity and patience, a unique conversation starter that will inspire for years to come.
Conclusion: Your Personalized Rustic Decor Awaits!
This project undeniably demands a bit of patience and time, but if you’ve followed these steps and reached the end, a huge congratulations are in order! You now possess a truly unique and stunning piece of weathered wood wall art for your home, a handcrafted treasure that will undoubtedly bring inspiration and character for years to come. Creating something beautiful from reclaimed materials is incredibly rewarding, offering both aesthetic appeal and a sense of accomplishment. Thank you for exploring this guide on how to make your very own weathered wood wall art. We would absolutely love to hear about your experience and see your finished creations! Please feel free to share your feedback and photos in the comments section below. Happy crafting!
Check out some related posts for more DIY inspiration:
How to Make an Aquatic Table Centerpiece
Alice in Wonderland Style Stacked Teacup Lamp