
Easter Sunday will never be the same after you introduce these magnificent DIY giant origami bunnies. Prepare for boundless joy as your home transforms into a whimsical wonderland, captivating both young and old alike!
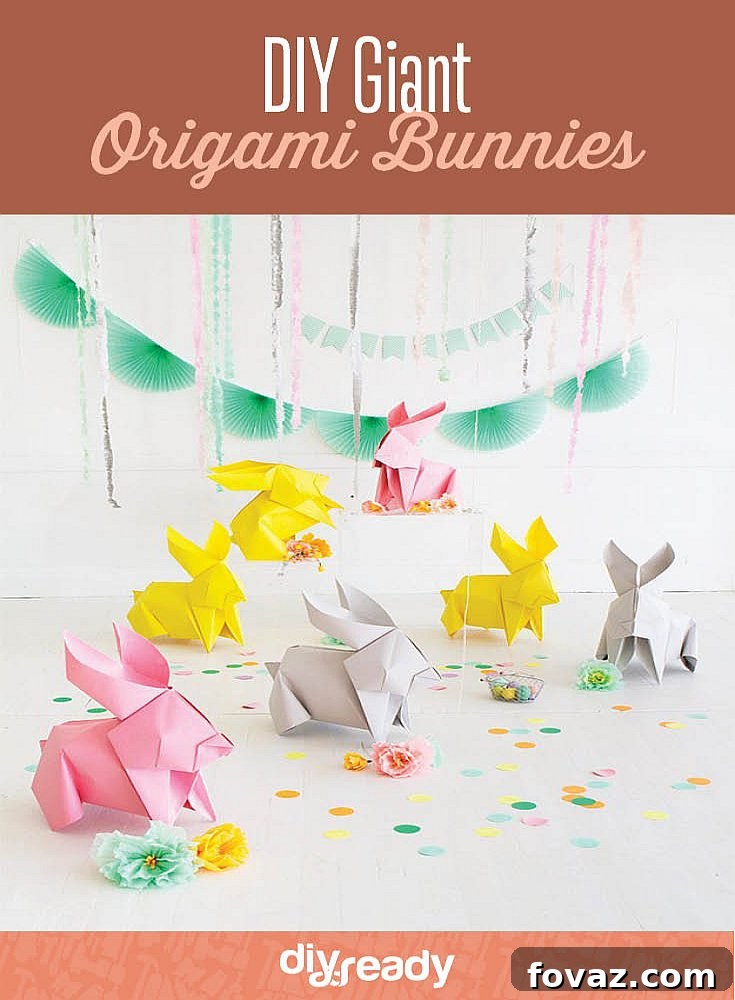
As spring blooms and Easter approaches, our thoughts often turn to the charming symbols of the season, with bunnies taking center stage. If you’re looking to infuse your celebrations with an extra touch of magic and creativity, then you are going to absolutely adore these DIY giant origami bunnies! Imagine the delight on your children’s faces, and the impressed gasps from your guests, as these colossal paper creations become the focal point of your holiday decor. Far more enchanting and less demanding than a real pet, these origami masterpieces offer all the charm without any of the commitment.
This project is a must-try for any craft enthusiast, an exciting challenge for origami fans, and a perfect way to elevate your Easter Sunday brunch or spring gatherings. Forget the traditional small decorations; these life-sized bunnies command attention, adding a unique, artistic, and utterly adorable element to your home. They embody the spirit of Easter in a grand, imaginative way, promising to be memorable conversation starters and cherished additions to your festive setup. Let’s embark on this delightful crafting journey and bring these gentle giants to life!
DIY Giant Origami Bunnies: A Step-by-Step Guide to Grand Easter Decor
Creating these impressive giant origami bunnies is not just a craft; it’s an experience that blends art, patience, and a touch of engineering. This comprehensive guide will walk you through each step, ensuring you have all the insights and tips to successfully fold your own magnificent paper rabbits. Get ready to transform ordinary paper into extraordinary decorations!
Why Choose Giant Origami Bunnies for Your Easter Celebrations?
Beyond their undeniable cuteness, giant origami bunnies offer numerous advantages as a unique Easter decoration. Firstly, their sheer size makes an immediate statement, creating a captivating focal point in any room or even outdoors in a sheltered area. Unlike fleeting floral arrangements or delicate eggs, these paper sculptures are durable (with proper care) and can be reused for years to come, making them an eco-friendly choice. They are also incredibly versatile; you can choose paper colors and patterns to match any decor scheme, from vibrant spring hues to subtle pastels. Moreover, the process of creating them is a rewarding family activity, fostering creativity and teamwork. Imagine the pride in knowing you’ve crafted such a magnificent piece of art with your own hands, far surpassing the impact of store-bought decorations. These bunnies aren’t just decor; they’re a testament to your creativity and a source of lasting memories.
What You’ll Need for Your Giant Origami Masterpiece:
- 53” Seamless Paper Backdrop: The foundation of your giant bunny. Seamless paper, often used for photography backdrops, is ideal because it’s large, sturdy, and offers a smooth, consistent surface. Choose a color that complements your Easter theme – traditional whites, soft pastels like pink or blue, or even a vibrant green for a grassy feel.
- Self-Healing Mat: Essential for protecting your work surface and ensuring clean, precise cuts. A large mat will allow you to work comfortably with the sizable paper.
- A Long Ruler: Crucial for guiding your X-acto knife and ensuring straight, accurate folds and cuts across the expansive paper. Aim for a ruler at least 36 inches long, preferably longer if available.
- X-Acto Knife (or Utility Knife): For making sharp, clean cuts. Ensure your blade is new and very sharp to avoid tearing the paper.
- Bone Folder (for hard creases): While not strictly necessary for every fold, a bone folder is invaluable for creating crisp, defined creases, especially with thick paper. This will give your bunny a professional, polished look.
- Pencil: For light marking, guiding folds, and measuring, which can be erased later if needed.
- Hot Glue Gun and Glue Sticks: For securing certain folds and adding stability to your finished bunny, ensuring it stands upright and maintains its shape.
Instructions: Folding Your Giant Origami Bunny
Creating a giant origami bunny is a rewarding process that requires precision and patience, especially given the scale of the paper. Follow these detailed steps carefully, and you’ll soon have an impressive Easter decoration that will captivate everyone.
Step 1. Prepare Your Paper and Create the Initial Square Base
Begin by rolling out your large seamless paper backdrop on a clean, spacious, and flat surface. Due to its size and tendency to curl, you might need to place weights on the corners or edges to keep the paper flat and manageable. This initial flattening is crucial for accurate folds. Next, take one of the free corners of the paper and fold it inward to align perfectly with the opposite edge, forming a large triangle. This step is to help you measure and cut a perfect square. Using your self-healing mat underneath, a long ruler to guide your cut, and a sharp X-acto knife, carefully cut the excess paper from the roll along the edge created by your fold. Once cut, unfold the paper. You should now have a perfect, giant square, which is the foundational shape for most complex origami projects.
Step 2. Establish the Central Creases
With your perfect square laid flat, fold the paper precisely in half, either horizontally or vertically, to create a large rectangle. Use your bone folder to make a very sharp crease down the middle. Unfold the paper. Now, take both the left and right sides of the paper and fold them inward so their edges meet precisely at the central crease you just made. Press firmly to create two more strong creases. Unfold again. You should now have a square with three parallel vertical creases, guiding your subsequent folds.
Step 3. Initiate the Left-Hand Side Triangle Folds
Focus on the left-hand side of your paper. Take the top-left corner and fold it down to meet the central vertical crease, forming a diagonal crease. Repeat this action with the bottom-left corner, folding it up to meet the same central crease. You should now have two diagonal creases on the left side of the paper, forming an ‘X’ shape within the left rectangle segment. Unfold these two new diagonal creases, leaving only the indentations.
Step 4. Perform a Squash Fold to Create a Diamond Shape
Using the pre-folded lines from Step 3 (the two diagonal creases and the outermost vertical crease on the left), gently push in the left edge of the paper. This will naturally cause the paper to collapse inward, allowing you to flatten it into a “squash fold.” The resulting shape on the left side should resemble a diamond. Once flattened, take the right-most point of this newly formed diamond and fold it over to align with the left-most point, effectively folding the diamond in half horizontally.
Step 5. Fold the Entire Structure in Half and Flip
Carefully fold the entire paper in half from left to right, ensuring all the layers align neatly. Press firmly along the crease. Once folded, flip the entire paper over to the other side. This prepares the structure for the next set of folds, which will begin to define the bunny’s body.
Step 6. Shape the Bunny’s “Feet”
With the paper flipped, identify the remaining rectangular edge (it should be on the right side if you’ve followed the previous flips). Take the two corners of this rectangle and fold them inward, away from the center. The goal here is to create a rough, rounded shape that will eventually form the bunny’s front paws. Precision isn’t paramount in this step; a rough 30-degree angle from the center fold often works well to create a natural curve. Use your judgment to make a pleasing, symmetrical shape for the feet.
Step 7. Further Folding and Orientation
Fold the entire structure in half once more, again from left to right. This further compacts the paper and reinforces the main body shape. After folding, flip the paper over to the other side. Finally, rotate the paper so that the pointed end (which will become the head) is facing towards the upper right, aligning it with the typical orientation seen in many origami bunny tutorials. Refer to any reference photos if available to confirm the correct orientation.
Step 8. Prepare for the Ear Fold
Focus on the top-right corner of your rotated paper. Fold this corner inward to create a distinct triangular crease. This crease will serve as a guideline for one of the bunny’s ears. Press firmly to establish a strong crease, potentially using your bone folder here, as the layers of paper are now thicker. Unfold this triangle.
Step 9. Execute the Ear Squash Fold
Using the pre-folded lines from Step 8, perform another squash fold. Gently open up the paper at the corner you just creased, and flatten it down so that the triangular section lies flat, creating a larger, more prominent triangular shape. This forms the base of what will become one of the bunny’s ears. Once the large triangle is formed, fold the left-most corner of this new triangle over to meet the right side, effectively folding this section in half vertically.
Step 10. Mark the Mid-Point for the Head Section
Carefully open the fold you made in Step 7 (where you folded the entire structure in half). As you open it, you should see a pre-folded triangle on the right side of the paper. This section is crucial for defining the bunny’s head. Using your long ruler and a pencil, accurately mark the mid-point along the bottom edge of this triangle. This mark will serve as a pivot point for the subsequent head folds.
Step 11. Create Guiding Creases for the Head
From the top-right corner of the triangle you identified in Step 10, create a new pre-fold crease that extends down to the penciled mid-point mark. Press firmly. Repeat this process with the lower-right corner of the same triangle, folding it up to meet the same mid-point mark. You should now have two diagonal creases converging at the mid-point, forming a smaller ‘V’ shape within the larger triangle.
Step 12. Pop Up the Head Section
Utilizing the pre-folded creases you just made in Step 11, gently push and pop the top portion of the paper upward. This action will cause the paper to fold along the creases, creating a distinct, three-dimensional “reverse L” shape. This segment is beginning to form the top of your bunny’s head and the base for its ears.
Step 13. Form the Ear Base Triangle
From the top-most point of the “reverse L” shape you just created, gently separate the layers of paper and fold the top triangle downwards. This action will flatten the top portion into a larger, more pronounced triangular shape, which serves as the broad base for both of your bunny’s ears. Ensure the fold is symmetrical and crisp.
Step 14. Refine the Ear Structure with Inner Creases
Now, focus on the right-hand flap of the large triangle created in Step 13. Open this flap up. You’ll see an inner crease within it. Use this inner crease as a guide to bisect the flap, folding it inward. This helps to narrow and refine the ear shape. Once bisected, carefully close the flap. Repeat this exact process on the other side of the large triangle, ensuring both ears are symmetrically shaped.
Step 15. Create the Iconic “Z-Fold” for the Ears
With the ear bases refined, it’s time to give them their characteristic shape. Take the top-most part of one of the ears and perform a “Z-fold” along a pre-existing crease (or create a new one if necessary). This involves folding the paper in one direction, then immediately folding it back in the opposite direction, creating a zig-zag or ‘Z’ shape. The sharpness of this angle will determine how pointed or rounded your bunny’s ears appear – this is where you can truly personalize their look! Repeat this Z-fold precisely on the other ear, striving for symmetry.
Step 16. Secure the Ears with a Squash Fold and Glue
Open the flap on the right ear again. Looking at the backside of the Z-fold you just created, fold the side inward, making a small squash fold. This helps to secure the ear’s position and adds volume. Apply a small amount of hot glue to this internal squash fold and hold it firmly until the glue cools and sets. This will permanently fix the ear’s shape. Close the flap. Repeat this entire process on the other ear, making sure both ears are identical in shape and securely glued.
Step 17. Form the Bunny’s Nose with a Z-Fold
Turn your attention to the right-most point of the bunny’s face area. This will become the nose. Perform a Z-fold inward, approximately one-third of the way into the face. This creates a small, prominent protrusion that gives your bunny its adorable snout. Adjust the depth and angle of the fold to achieve your desired nose shape.
Step 18. Craft the Bunny’s Tail with Another Z-Fold
Now, move to the left-most point of the entire structure. This section will form the bunny’s fluffy tail. Execute another Z-fold, allowing the point to stick out a few inches. This creates a distinct, three-dimensional tail that adds character to your giant bunny. You can adjust how far it sticks out to make it more or less prominent.
Step 19. Refine the Bunny’s Chin Area
Look into the interior of the bottom-fold section of your bunny. You should observe a flap on the right-hand side. Carefully fold this flap over so that its edge gently peeks out from beneath the bunny’s face. This fold helps to define the chin and neck area, giving the bunny a more finished and three-dimensional appearance.
Step 20. Sculpt and Secure the Front Paws
Focus on the bottom-right point, which represents one of the bunny’s front paws. Create a small pinch-fold underneath this point. Approximately one-quarter of the way up the paw, apply a dab of hot glue inside the fold and hold it securely until the glue cools and hardens. This secures the paw’s shape and provides stability. Repeat this precise process on the other side to create the second front paw, ensuring both are symmetrical.
Step 21. Create and Stabilize the Back Legs
Moving approximately one-third of the way into the bunny’s body from the left-hand side, create a loose pinch-fold. This fold will define your bunny’s back legs. Apply hot glue inside this fold and hold until completely cool, ensuring the leg maintains its shape. Repeat this process on the other side, exercising extreme care to ensure both back legs are even and symmetrical. This step is crucial for the bunny’s balance and ability to stand.
Step 22. Final Touches, Stability, and Adjustments
For added stability, apply hot glue approximately two-thirds of the way down the fold created in Step 19 (the chin/neck area). Hold firmly until the glue sets. Next, create a small, triangular pinch-fold on the face, using a pre-folded crease as a starting point, to define a subtle facial feature or cheek. Apply hot glue and hold until cool. Finally, carefully stand your giant origami bunny upright. Adjust the ears, the body, and the legs as necessary to ensure it stands securely and looks its best. Don’t forget to gently “fluff” his ears by lightly curving the paper outwards, giving them a more realistic and playful appearance. Your magnificent giant origami bunny is now complete!
For a visual guide and a detailed demonstration on how to fold a paper bunny, watch this helpful video:
Tips for Success with Your Giant Origami Project:
- Work on a Large, Clean Surface: Space is your best friend when working with giant paper. Ensure your area is free from dust and debris that could mark your paper.
- Pre-Crease Everything: For very large and thick paper, making a very firm pre-crease (and unfolding) before attempting a complex fold can make the final fold much cleaner and easier to execute.
- Patience is Key: Don’t rush. Origami is about precision. If a fold isn’t quite right, gently unfold and try again.
- Use Your Bone Folder Liberally: For sharp, professional-looking creases, a bone folder is indispensable. Press firmly and consistently.
- Safety First with Cutting Tools: Always cut away from your body and use a self-healing mat to protect your surfaces. Keep fingers clear of the blade.
- Consider Two People: For the initial large folds, having an extra set of hands can make aligning the paper much easier and prevent tearing or inaccurate creases.
Customization and Display Ideas:
- Decorate Their Faces: Once folded, you can add googly eyes, draw a nose and whiskers with a marker, or even glue on fabric for a furry effect.
- Accessorize: Tie a colorful ribbon around their neck, create a tiny paper bow tie, or give them a mini Easter basket to hold.
- Create a Scene: Arrange multiple bunnies of different sizes or colors in a “bunny patch” with artificial grass, spring flowers, and oversized Easter eggs.
- Photo Booth Prop: These giant bunnies make fantastic, whimsical props for an Easter photo booth.
- Welcome Greeters: Place them near your entryway to welcome guests to your Easter celebration.
Maintenance and Storage:
To ensure your DIY giant origami bunnies last for many Easter seasons, store them carefully. Gently flatten them if possible, or store them upright in a large box in a dry, temperate environment to prevent damage from moisture or extreme temperatures. Dust them periodically with a soft brush or cloth to keep them looking fresh.
Enjoy your magnificent, life-sized origami bunnies! The joy and wonder they bring to your home will undoubtedly make your Easter celebrations even more special. I’m hopping with delight just looking at these adorable, giant creations, and I know you will be too!
Are you a fan of impressive giant origami projects? Did you enjoy crafting our DIY giant origami bunnies? We’d love to hear about your experience! Share your thoughts, tips, and even pictures of your successful (or delightfully quirky!) DIY projects in the comments section below! Your creativity inspires us all.
Don’t forget to stay connected with us for more exciting DIY ideas and inspiration! Follow us on Facebook, Twitter, Pinterestand Instagram!
If you loved this project, you’ll surely be inspired by these related DIY articles:
Bedroom String Lights With Origami Paper Lanterns
40 Pinterest Fails to Make Your DIY Day
5 DIY Ideas for a Peaceful Bedroom