
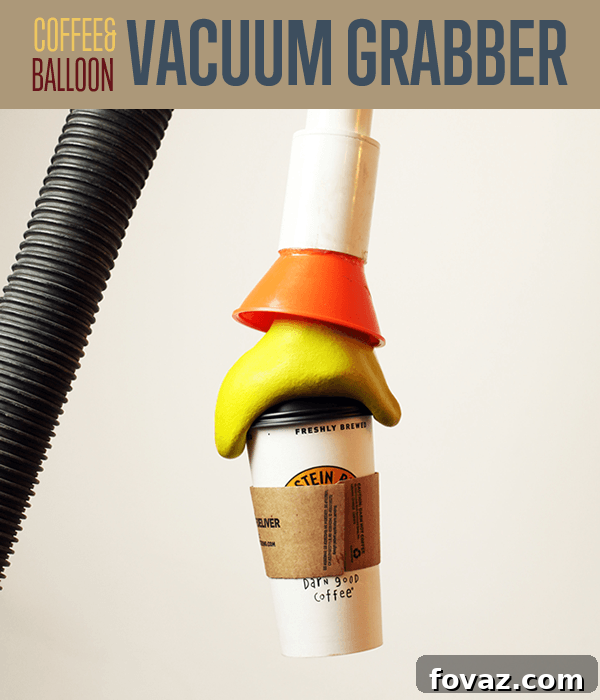
DIY Vacuum Grabber: Build Your Own Robotic Arm for Fun & Function!
Ever dreamed of building your own robotic arm, but thought it required a complex engineering degree? Or maybe you’re simply looking for a fun, unique, and surprisingly practical DIY project that will impress your friends and make mundane tasks a little more exciting? You’ve come to the right place! Our DIY Vacuum Grabber project offers an innovative and engaging way to create a functional “robotic” arm using household items and the power of a common vacuum cleaner. Get ready to explore the fascinating world of granular jamming and discover how to pick up objects with a clever, coffee-powered gripper!
This comprehensive guide will walk you through every step of constructing your very own vacuum-powered robotic arm. We’ll cover everything from gathering supplies to understanding the simple yet effective science behind its operation, ensuring you can successfully build a device that can grip objects of various shapes and sizes with ease. It’s time to transform ordinary materials into an extraordinary tool!
Understanding the Magic: How Your Vacuum Grabber Works
Before we dive into the construction, let’s briefly touch upon the ingenious principle that makes this DIY robotic arm possible: **granular jamming**. Imagine a balloon filled with tiny, loose particles – in our case, coffee grounds. When the vacuum is off, these particles move freely, allowing the balloon to conform to any object you press it against. However, when you turn the vacuum on, it sucks air out of the balloon, compacting the coffee grounds. This sudden compaction causes the loose, free-flowing particles to “jam” together, forming a rigid, solid-like structure. This rigid form then perfectly encapsulates and firmly grips the object it was pressed against. It’s a marvel of simple physics that’s both effective and incredibly fun to demonstrate!
Supplies List for Your DIY Vacuum Grabber Project
Gathering the right materials is the first crucial step towards building your vacuum grabber. We’ve carefully selected common, affordable items that are easy to find at most hardware stores or even around your home. Pay close attention to the sizing notes, as a snug fit is key for optimal performance.
- 2 ft. of 1-1/4 inch PVC Pipe: This will form the main “arm” of your grabber. The length can be adjusted based on your desired reach.
- (x2) 1-1/4 inch PVC Coupler: These are essential for connecting different sections of PVC pipe and, more importantly, for attaching the funnel and the vacuum hose securely.
- 4-inch Diameter Funnel: This forms the base of your gripping mechanism. A sturdy plastic funnel is ideal.
- Household or Shop Vacuum: The power source for your grabber. Any standard vacuum with a hose will work.
- Rotary Tool with Cutting Disk (or a sharp utility knife/scissors): For modifying the funnel. Safety first!
- 4-inch Hose Clamp: Crucial for creating an airtight seal between the PVC assembly and your vacuum hose.
- 1 x Six-inch Balloon: This is where the magic (coffee grounds) happens. A standard, durable balloon is perfect.
- Hot Glue, Plastic Epoxy, or Super Glue: For securely bonding the funnel to the PVC coupler. Choose an adhesive suitable for plastics.
- Strong Tape (e.g., Electrical Tape): For securing the balloon to the funnel and other minor sealing tasks.
- Coffee Grounds (approximately two cups): The granular material that enables gripping. Fresh or used, any grind will do!
- Some Pantyhose (or a fine mesh fabric): Acts as a filter to keep coffee grounds contained while allowing air to pass.
*Important Note on Sizing: The size of your vacuum hose is the most critical factor in determining the correct PVC pipe diameter. We used a shop vacuum, and 1-1/4 inch PVC pipe worked perfectly for us. Before purchasing any PVC components, measure the inside diameter of your vacuum hose. Ensure that the PVC couplers you buy will fit snugly inside or can be adapted to your specific vacuum hose for an airtight connection. Don’t hesitate to take your vacuum hose to the hardware store to test fits!
Step 1: Preparing Your Granular Gripper – Fill the Balloon with Coffee Grounds
The core of your vacuum grabber’s gripping power lies within this balloon and its coffee ground filling. This step requires a bit of patience to ensure the balloon is filled correctly for optimal performance.
Begin by stretching the mouth of your balloon over the narrow end of the 4-inch funnel. Ensure it’s secure but not so tight that it might tear. Now, carefully shake about two cups of coffee grounds into the funnel. The grounds might not immediately fall into the balloon. Gently tap the funnel against a surface or use your fingers or a slender object like a pen to carefully push and coax the coffee grounds down into the balloon’s body. Be careful not to puncture the balloon during this process.
Continue filling the balloon until it reaches approximately the size and firmness of a baseball or a small apple. It should be full enough to feel substantial but still pliable. This allows it to conform easily around objects before the vacuum solidifies it. Avoid overfilling, as this can make the balloon too rigid to mold effectively, or underfilling, which will result in a weak grip.
Once filled, the coffee grounds inside will provide the necessary granular material for the jamming effect. You’ll notice the balloon is now surprisingly heavy and dense, perfect for forming around objects.
Step 2: Modifying the Funnel for Optimal Airflow and Balloon Integration
The funnel serves as the housing for your coffee-filled balloon and the connection point to your PVC arm. For proper integration, a small modification is required.
Carefully use a rotary tool with a cutting disk or a sharp pair of heavy-duty scissors to cut off the very tip of the narrow end of the funnel. The goal is to create an opening large enough to easily pull the mouth of the balloon through, but not so large that it compromises the structural integrity of the funnel’s neck. A clean, smooth cut will help ensure a better seal later.
This modification is essential because it allows the mouth of the balloon to pass through the funnel, where it will later be secured to create an airtight chamber.
Step 3: Securely Attaching the Coffee-Filled Balloon to the Funnel
This step integrates the balloon with the funnel, forming the primary gripping mechanism. A tight, reliable seal here is critical for the vacuum grabber to function effectively.
First, carefully place the coffee-filled balloon inside the wide opening of the funnel. Now, gently pull the mouth of the balloon through the newly cut small opening at the funnel’s narrow end. Do NOT tie the balloon yet! The goal is to get the mouth fully through so you can manipulate it from the outside.
If you find it difficult to grasp the balloon’s mouth through the small opening, a helpful trick is to tie a piece of string around the balloon’s neck before inserting it into the funnel. Then, thread the string through the small hole and pull it through, bringing the balloon’s mouth along with it. Once the mouth is through, you can remove the string.
Once the balloon’s mouth is pulled through the small end, fold it back over the rim of the funnel’s opening, creating a seal around the funnel’s neck. Use strong tape, such as electrical tape, to firmly secure the folded balloon mouth to the funnel. Wrap the tape several times to ensure a tight, continuous seal. This prevents air from leaking in or out from this connection point and ensures that the vacuum pressure is efficiently applied to the coffee grounds.
Step 4: Creating a Filter – Covering the Funnel Opening with Pantyhose
To prevent any coffee grounds from being accidentally sucked into your vacuum cleaner while still allowing air to pass freely, you need to create a simple filter. This step is quick but important for the longevity of your vacuum.
Cut a small piece of pantyhose, large enough to fully cover the opening where the balloon’s mouth is secured to the funnel. Stretch the pantyhose piece over this opening and securely tape it in place around the funnel’s neck. Ensure there are no gaps for coffee grounds to escape. The pantyhose acts as a fine mesh, allowing air to be drawn out by the vacuum, but effectively blocking the coffee grounds from passing through.
Double-check that the pantyhose is taut and securely taped to maintain an effective seal and prevent any sagging that could interfere with the air path.
Step 5: Permanently Attaching the Funnel to the PVC Coupler
Now it’s time to create a robust connection between your gripping mechanism (the funnel and balloon) and the PVC “arm” of your grabber. This bond needs to be strong and airtight.
Apply a continuous bead of fast-setting adhesive around the inner rim of one end of a 1-1/4 inch PVC Coupler. For this, plastic epoxy works exceptionally well, creating a very strong, durable bond. Alternatively, a hot glue gun (with sufficient glue for a strong bond), superglue, or other high-quality bonding agents designed for plastics can be used. Ensure the adhesive you choose is compatible with both PVC and the plastic of your funnel.
Once the adhesive is applied, carefully place the 1-1/4 inch PVC Coupler over the narrow, taped end of the funnel, pressing it down firmly. Ensure the funnel’s opening (covered by pantyhose) aligns with the coupler’s opening. Hold it in place for a few moments to allow the adhesive to set slightly, then let it fully cure according to the product’s instructions. A well-cured bond here is crucial for the integrity and functionality of your grabber.
Step 6: Assembling the PVC Arm – Connecting the Coupler to the PVC Pipe
With the gripping mechanism complete, it’s time to build the “arm” of your vacuum grabber. This involves connecting the PVC coupler (which is now attached to the funnel) to the main PVC pipe.
If you’ve followed our initial sizing advice and selected PVC components that match, this step is straightforward. Simply slide the open end of the 1-1/4 inch PVC Coupler over one end of your 1-1/4 inch PVC pipe. The fit should be snug. For this particular connection, permanent gluing with PVC glue is optional. The friction fit is often sufficient for this project, especially if you plan to disassemble it for storage or modifications. However, if you desire a more robust and permanent connection, a small amount of PVC cement can be applied to the pipe end before sliding the coupler on.
If you encountered a situation like ours, where an adapter was needed (e.g., a 1-1/2 inch to 1-1/4 inch adapter to accommodate a 1-1/4 inch pipe into a 1-1/2 inch coupler), slide the adapter onto the PVC pipe first, then connect the coupler to the adapter. While we opted for convenience, we highly recommend planning ahead to get perfectly matching PVC components to simplify assembly and ensure the best possible airflow.
Step 7: Extending Your Reach – Adding More PVC Pipe (Optional)
Depending on how long you want your robotic arm to be, you might need to add another section of PVC pipe. This step is identical to the previous one, ensuring a continuous and stable arm structure.
Take your second 1-1/4 inch PVC pipe and slide it into the remaining open end of the 1-1/4 inch PVC coupler (the one already attached to your funnel/first pipe). Again, the fit should be snug. As with the previous connection, using PVC glue for a permanent bond is optional. For many DIY projects, a tight friction fit is perfectly adequate and allows for easier future adjustments or storage.
By connecting these segments, you build the desired length for your grabber, allowing you to reach objects near and far. Ensure all connections feel secure and stable.
Step 8: Connecting Your Grabber to the Vacuum – The Power Source
This is the final assembly step, where you connect your newly built grabber arm to its power source: your vacuum cleaner. An airtight connection here is paramount for the granular jamming principle to work effectively.
Take the free end of your PVC pipe assembly. If your vacuum hose directly fits snugly over or into the PVC pipe, you’re in luck! If not, you’ll need an adapter. For example, our shop vac hose was roughly 1-1/2 inches in diameter, so we used a 1-1/4 inch to 1-1/2 inch threaded adapter to bridge the size difference between our PVC pipe and the vacuum hose. It’s always best to measure your vacuum hose diameter accurately *before* buying PVC parts to avoid needing last-minute adapters.
Once you have a connection method, slide the end of your PVC pipe assembly firmly into (or over) the vacuum hose. Then, slide a hose clamp over this connection point. Position the hose clamp so it encompasses both the PVC and the vacuum hose. Using a screwdriver, tighten the hose clamp firmly. The goal is to create a completely airtight seal. Any leaks will reduce the vacuum pressure and compromise the grabber’s ability to grip objects securely.
Give the connection a good tug and twist to ensure it’s secure. You are now ready to test your DIY Vacuum Grabber!
Step 9: Unleash Your Robotic Arm – Pick Things Up!
The moment of truth has arrived! With your DIY Vacuum Grabber fully assembled and connected to your vacuum, you’re ready to experience the wonders of granular jamming.
To pick up an object, simply position the coffee-filled balloon end of your grabber over the item. Gently press the balloon onto the object, allowing the loose coffee grounds to conform perfectly to its shape. Once the balloon is molded around the object, turn your vacuum cleaner ON. You’ll hear the vacuum whir and, almost instantly, the air will be sucked out of the balloon, causing the coffee grounds inside to compact and “jam” together. This makes the balloon rigid, firmly gripping the object in its new, solidified form.
You can now lift the object! The vacuum grabber will hold it securely, regardless of its unique shape or size (within the balloon’s capacity). When you’re ready to release the object, simply turn the vacuum OFF. The air will return to the balloon, the coffee grounds will become pliable again, and the object will be released. It’s that simple!
Experiment with picking up various items – from small toys and pens to oddly shaped tools or even delicate objects. You’ll find your DIY Vacuum Grabber to be surprisingly versatile and effective. Congratulations, you’ve successfully built your very own robotic arm, transforming a rudimentary human task into an exciting and totally radical engineering feat. Have fun with your new, extended reach!
Tips for Optimal Performance and Troubleshooting
- Ensure Airtight Seals: The most common reason for poor performance is air leaks. Double-check all connections – the balloon to the funnel, the funnel to the coupler, and the PVC to the vacuum hose – to ensure they are completely airtight.
- Coffee Ground Consistency: The coffee grounds should be dry. If they are damp, they might clump and not jam as effectively.
- Balloon Quality: Use a durable balloon. A thin, cheap balloon might tear under pressure or after repeated use.
- Vacuum Power: A stronger vacuum will create a more powerful grip. Shop vacs generally work very well for this project.
- Object Size: While versatile, the grabber has limits. It works best on objects that the balloon can fully envelop and conform around.
- Experiment with Gripping: Sometimes a slight twist or wiggling motion while pressing the balloon onto an object can help it conform better before activating the vacuum.
Liked This Fun DIY Robotic Arm Project?
We hope you enjoyed building your DIY Vacuum Grabber! If you love innovative projects that combine creativity with practical results, you’ll find plenty more to explore on our site.