
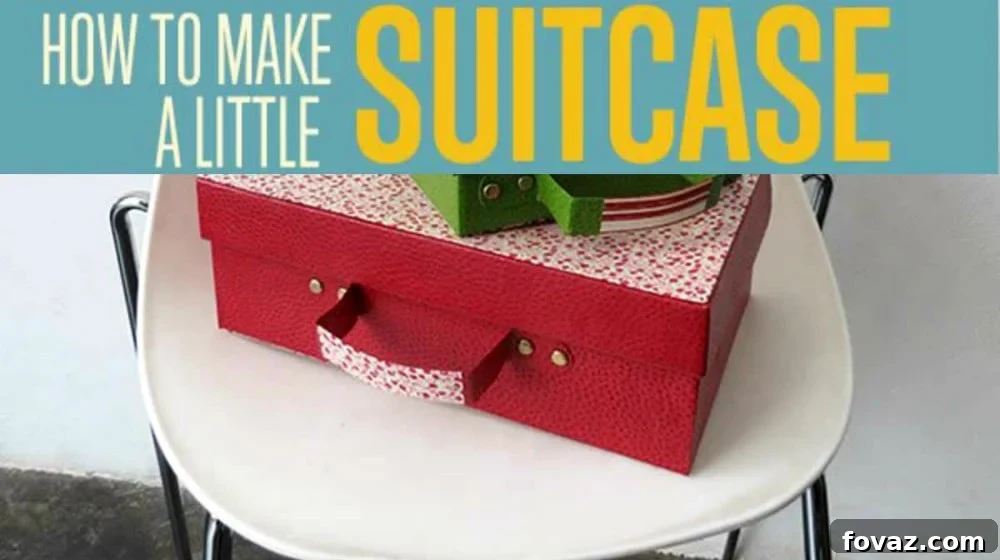
Unlock your creativity and embark on a delightful crafting journey by learning how to transform ordinary cardboard boxes into charming and functional suitcases. Whether you’re seeking a unique storage solution, a fun plaything for a child, or a personalized gift, this DIY cardboard suitcase project offers endless possibilities. Dive into the world of upcycling and discover how simple materials can become something truly special.
RELATED: How To Build A Jewelry Box | DIY Cardboard Jewelry Box
In this article, you will learn:
- The Joy of Crafting a DIY Cardboard Suitcase from Recyclable Boxes
- Essential Supplies and Tools for Your Cardboard Suitcase Project
- Step-by-Step Instructions to Create Your Own Cardboard Suitcase
- Unveiling Your Beautifully Finished DIY Cardboard Suitcase
Crafting a Charming DIY Cardboard Suitcase: A Complete Guide
The Joy of Crafting a DIY Cardboard Suitcase from Recyclable Boxes
Are you looking for an engaging and eco-friendly activity that sparks creativity and provides practical results? Look no further! This DIY cardboard suitcase project is the perfect answer. Instead of discarding those empty shoe boxes, imagine transforming them into adorable, personalized suitcases. Not only is it a fantastic way to engage children in imaginative play, allowing them to hide their little treasures, but it also serves as a wonderfully original storage unit for small items, keeping your home organized with a touch of handmade charm.
Upcycling is more than just a craft; it’s a valuable lesson in sustainability and resourcefulness. By teaching your children how to repurpose materials, you’re instilling a green initiative early on, showing them the importance of reducing waste and giving new life to old objects. This summer, or on any lazy afternoon, gather your family and turn crafting into a bonding experience that saves money and fosters environmental awareness.
Creating these beautiful, sturdy “suitcases” is much simpler than you might think. With just a few common household items, you can achieve impressive results. We’ll guide you through each step, ensuring a smooth and enjoyable crafting experience. Before we embark on this exciting DIY mission, make sure all your supplies are ready and organized. This preparation will make the process seamless and fun, leading to a stunning finished product that you’ll be proud to display or use.
Ready to unleash your inner crafter and create something truly special? Follow our awesome how-to guide below and get started on this fantastic DIY kids’ craft project. It’s a rewarding activity that promises both fun during the creation process and lasting enjoyment from the finished suitcase.
Essential Supplies and Tools for Your Cardboard Suitcase Project
Before you begin assembling your charming cardboard suitcase, it’s crucial to gather all the necessary materials and tools. Having everything at hand will streamline your crafting process and ensure a more enjoyable experience. Most of these items are likely already in your home or can be easily acquired, making this an accessible and budget-friendly project.
Materials:
- Decorative Paper Sheets: Choose sturdy paper in various colors, patterns, or textures to give your suitcase its unique aesthetic. Scrapbooking paper, wrapping paper, or even painted paper are excellent choices. Consider papers that complement the intended use or recipient of the suitcase.
- White Glue: Standard PVA white glue, often found in craft stores or school supplies, works best for adhering paper to cardboard. Ensure it’s a good quality, strong adhesive that dries clear.
- Brads (Paper Fasteners): These small, two-pronged metal fasteners will be essential for securely attaching the suitcase handle, allowing it to pivot. Select brads that are appropriate in size and color for your design.
- Velcro Tape: A small strip of self-adhesive Velcro tape will provide a simple yet effective closure for your suitcase lid, making it easy for little hands to open and close.
- Cereal Box or Thin Cardboard: An empty cereal box is perfect for creating the reinforced top and bottom panels of your suitcase, adding extra durability and a neat finish. Any similar thin, flexible cardboard will also work.
- Shoebox: The main structure of your suitcase will come from a clean, empty shoebox. The size of the shoebox will dictate the final dimensions of your suitcase, so choose one that suits your needs.
Tools:
- Scissors: A good pair of sharp scissors is indispensable for cutting paper and smaller cardboard pieces precisely.
- Utility Knife (Craft Knife): For cleaner, straighter cuts on thicker cardboard and for making small holes, a utility knife is invaluable. Always use with caution and on a protected surface.
- Ruler: Essential for accurate measuring and drawing straight lines, which are critical for a professional-looking finish.
- Foam Paintbrush: Ideal for applying an even, smooth layer of glue without leaving brush strokes or excess.
Safety Tip: When using a utility knife, always ensure an adult supervises children and that cuts are made on a self-healing mat or a thick piece of scrap cardboard to protect your work surface.
RELATED: 28 Things You Can Make From Cereal Boxes
Step-by-Step Instructions to Create Your Own Cardboard Suitcase
Now that you have all your materials and tools ready, let’s get down to the exciting part: constructing your very own DIY cardboard suitcase. Follow these detailed instructions carefully, taking your time with each step to ensure a beautiful and sturdy result.
Step 1. Elegantly Cover the Main Box Body
Begin by giving your shoebox a clean and decorative finish. This step involves covering the exterior edges of the main box body. To do this, cut a large rectangular piece of your chosen decorative paper. Precision in measurement here will ensure a neat outcome:
- Length Calculation: The paper’s length should cover three exterior sides of the box (front, bottom, back) plus an additional 1 inch for overlap. This extra inch allows for a clean fold and secure gluing.
- Height Calculation: The paper’s height should match one side of the box, plus an additional 1 inch. This excess will be folded inwards for a polished edge.
Once you’ve cut your paper, apply a thin, even layer of white glue to the corresponding sections of the box and carefully adhere the paper, smoothing out any air bubbles with your foam brush or a clean cloth.
To prepare for folding, make small diagonal cuts at the corners of the excess paper. This technique, often used in gift wrapping, allows the paper to fold neatly around the corners without bunching up, creating crisp, professional-looking edges.
Carefully fold the excess paper from the sides onto the back of the box, applying glue as you go. Press firmly to ensure good adhesion and a smooth finish.
Finally, fold and glue the remaining excess paper from the top edge into the inside of the box. This creates a beautifully finished rim and adds to the overall sturdiness of the box.
Step 2. Flawlessly Cover the Cardboard Suitcase Lid
Now, shift your attention to the shoebox lid. You’ll repeat a similar process to cover its sides, ensuring a consistent and attractive look for your entire suitcase. Start by cutting another long rectangle of your decorative paper. The dimensions are slightly different due to the lid’s structure:
- Length Calculation: The paper’s length must be sufficient to wrap around all four exterior sides of the lid, plus an additional 1 inch for a secure overlap.
- Height Calculation: The height of the paper should correspond to the height of the lid’s side, plus an extra 1 inch for folding and neat edges.
- Apply glue to the lid sides and carefully attach the paper, making sure it’s centered and smooth.
As with the main box, trim the corners of the excess paper to create clean folds. Then, carefully fold the paper over the top edge of the lid and glue it down. Repeat this for the inside edge, folding the paper inwards to create a crisp, finished look.
Continue to smooth out any wrinkles or bubbles as you go, ensuring the paper adheres perfectly to the lid’s surface.
Work your way around all sides of the lid, meticulously folding and gluing the paper to achieve a seamless covering.
The final step for covering the lid’s sides involves the back. Cut a separate rectangle of paper that matches the size of the lid’s backside, adding 1 inch to its height. Glue this paper onto the back, then fold and glue the top and bottom edges over for a neat, enclosed finish. This attention to detail will elevate the overall appearance of your DIY suitcase.
Step 3. Reinforcing and Beautifying the Top and Bottom
To enhance the durability and aesthetic appeal of your cardboard suitcase, you’ll now reinforce and cover the main top and bottom surfaces. This is where your empty cereal box or thin cardboard sheet comes into play, providing an excellent sturdy layer.
Carefully open up a cereal box to create a flat cardboard sheet. Place the top of your shoebox onto this flat cardboard and trace its exact dimensions. Using your utility knife and ruler, precisely cut out this rectangle from the cereal box. This will be the sturdy insert for your suitcase’s top.
Next, cut a piece of your decorative paper that is 1 inch wider and 1 inch longer than this cardboard rectangle. Center the cardboard rectangle on the back (non-decorative side) of the paper. Apply glue to the cardboard and carefully adhere the paper, ensuring it’s smooth and flat.
To finish the edges, cut the corners of the excess paper diagonally. Then, fold these excess paper edges over onto the back of the cardboard rectangle and glue them down firmly. This creates a beautifully finished, rigid panel.
Now, apply glue to the back of this newly covered panel and carefully attach it to the top of your shoebox lid. Align it perfectly to cover the entire surface, pressing down firmly to ensure it’s securely glued in place. This adds a layer of strength and a polished look.
Repeat the exact same steps with another piece of the cereal box cardboard and decorative paper to create a matching panel for the bottom of your main shoebox. This consistent detailing contributes greatly to the suitcase’s finished quality and professional appearance.
Step 4. Constructing the Sturdy Cardboard Suitcase Handle
A suitcase isn’t complete without a functional and stylish handle! This step guides you through creating a durable handle that complements your design. You will need a few specific pieces:
- A long piece of decorative paper, approximately 3 inches wide by 10 inches long.
- A small piece of decorative paper, approximately 3 inches wide by 4 inches long.
- A sturdy cardboard rectangle, about 1 inch wide by 4 inches long. This will be the core of your handle, providing strength.
- Four brads (paper fasteners) for attachment.
Take the 1×4 inch cardboard rectangle and apply glue to its center. Place it centrally on the back of your long (3×10 inch) decorative paper. Carefully fold one side of the paper over the cardboard and glue it down, then repeat with the other side, ensuring the cardboard core is fully enclosed and the paper is neatly folded around it. This creates a strong, yet visually appealing handle strap.
Now, take the smaller (3×4 inch) piece of decorative paper. Apply glue to one side and attach it over the folded edges of your handle strap. This piece will act as a decorative overlay, concealing the seams and providing a finished look. Gently round off the edges of this overlay piece if desired for a softer appearance. Once the glue is dry, position the completed handle onto the top of your suitcase lid, marking the points where the brads will go.
Step 5. Securely Attaching the DIY Suitcase Handle
With your handle crafted, it’s time to securely attach it to the suitcase. This step ensures the handle is functional and can withstand being carried, even if only by tiny hands.
Carefully use a utility knife to make four small, precise holes on the suitcase lid where you marked the handle attachment points. Ensure these holes are small enough for the brads to pass through snugly. Exercise caution when using the knife, and if children are involved, this step should be performed by an adult.
Once the holes are made, align the handle with the holes on the lid. Insert the brads through the pre-punched holes in the handle, and then through the corresponding holes in the suitcase lid. On the inside of the lid, flatten the prongs of each brad to securely fasten the handle in place. This method allows the handle to pivot slightly, just like a real suitcase, adding to its authentic feel and functionality.
Step 6. Implementing the Convenient Velcro Lid Lock
The final touch for your DIY cardboard suitcase is adding a simple and effective closure mechanism. Velcro tape is ideal for this, as it’s easy for anyone to use and provides a secure, yet accessible, lock for your treasures.
Take two pieces of self-adhesive Velcro tape. One piece (either the hook or loop side) should be glued to the top, front edge of the main shoebox body. Ensure it’s centered and positioned where the lid will meet it when closed. The other piece (the complementary hook or loop side) should be glued to the inside front edge of the suitcase lid, aligning perfectly with the first piece when the lid is shut. Press both pieces firmly to ensure maximum adhesion. This simple closure will keep the suitcase securely shut, protecting whatever precious items are stored inside.
Voila! Your Beautifully Finished DIY Cardboard Suitcase Awaits!
Congratulations! You’ve successfully completed your very own DIY cardboard suitcase. Take a moment to admire your handiwork. From a simple shoebox, you’ve created a charming, functional, and eco-friendly masterpiece. This project is a testament to how creative repurposing can transform everyday items into something delightful and useful.
We’re passionate about crafting with cardboard and paper boxes, and we love finding new ways to inspire creativity. To keep the crafting fun going, here’s a fantastic video from Red Ted Art showing how to make another delightful paper box that we know you’ll absolutely adore:
As the colder seasons arrive or during school breaks, you’ll undoubtedly have more opportunities for quality time at home with your kids. What better way to spend those precious moments creatively than by making wonderful items from recyclable materials readily available around your house? This DIY cardboard suitcase is just the beginning of a world of imaginative projects.
Have an absolute blast making this DIY cardboard suitcase, and then let the imaginative play begin! Whether it’s for playing dress-up, organizing small toys, or storing craft supplies, this little suitcase is sure to bring joy and a sense of accomplishment.
Tips for Customizing Your Cardboard Suitcase:
- Themed Decor: Personalize your suitcase with specific themes. Think travel-themed stickers, pirate motifs, princess glamour, or even space adventures.
- Paint & Embellish: Instead of pre-patterned paper, use plain paper and let your creativity flow with paint, markers, glitter, or fabric scraps. Add buttons, beads, or ribbons for extra flair.
- Interior Design: Line the inside of your suitcase with soft fabric or felt for a luxurious touch, or add small cardboard dividers to create compartments for organization.
- Vary Sizes: Experiment with different sized boxes – a smaller gift box could become a miniature jewelry box suitcase, while a larger storage box could turn into a substantial treasure chest.
This project is not just about making a suitcase; it’s about fostering creativity, promoting sustainability, and enjoying quality time with loved ones. It’s a wonderful way to teach valuable lessons while having fun.
Thanks for stopping by and checking out our mini suitcase tutorial! We truly hope you enjoyed crafting this adorable project. How is this DIY adventure working out for you? We’d love to hear about your experience and see your unique creations! Leave us your feedback, tips, and photos in the comments section below! Your insights help our crafting community grow.
Up Next: Explore More Inspiring DIY Projects
- How To Make An Ugly Christmas Sweater | DIY Project
- 25 Heartwarming DIY Photo Ornaments To Craft For Christmas
- 17 DIY Placemat Ideas To Make Your Thanksgiving Table Stand Out
Stay connected with us for more creative ideas and tutorials! Follow us on Facebook, Twitter, and Instagram! Don’t miss out on our latest projects and tips.Editor’s Note: This post was originally published on June 30, 2014, and has been updated for quality, relevancy, and comprehensiveness to provide you with the best crafting experience.