
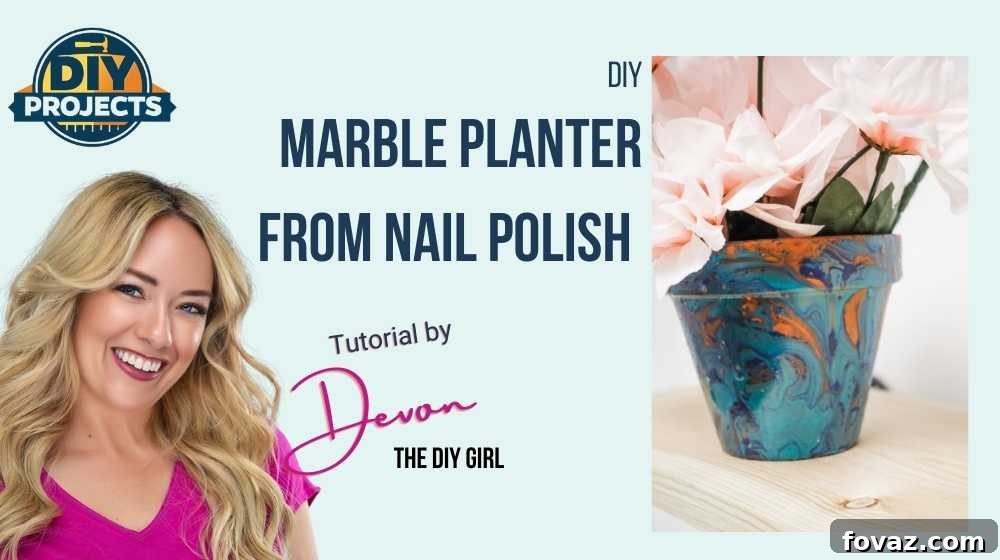
Craft Your Own Eco-Friendly Planter for Earth Day: A Simple DIY Guide
This Earth Day, transform a simple act of crafting into a powerful statement of environmental consciousness. By creating your own beautiful, upcycled planter, you’ll not only celebrate our planet but also add a unique, personalized touch to your home or garden. Forget expensive store-bought pots; with a few accessible materials and a dash of creativity, you can give everyday items a new, green lease on life. This comprehensive guide will walk you through everything you need to know to make a stunning DIY planter that perfectly embodies the spirit of Earth Day.
RELATED: Upcycle Your Plastic Bottles With These DIY Projects To Save The Earth
Why Choose a DIY Eco-Planter for Earth Day?
Earth Day is a crucial annual reminder of our collective responsibility to nurture and protect our planet. Engaging in sustainable DIY projects, such as crafting an eco-friendly planter from repurposed materials, offers a multitude of benefits that extend far beyond simply having a new pot for your plants. It’s a hands-on approach to living more sustainably.
1. Championing the 3 Rs: Reduce, Reuse, Recycle
At its core, an upcycled planter is a testament to the powerful principles of reduce, reuse, and recycle. Instead of contributing to landfill waste by discarding items like plastic bottles, glass jars, tin cans, or old ceramic pots, you’re diverting them and giving them a second, purposeful life. This simple yet impactful act helps minimize waste, conserves valuable natural resources, and reduces the energy footprint associated with manufacturing new products. It’s a direct, tangible way to make a difference and practice responsible consumption.
2. Unleash Your Creativity and Personal Style
Unlike mass-produced items, a handmade planter is a canvas for your personal expression. This project allows for unparalleled customization, from selecting vibrant colors to experimenting with unique patterns like the mesmerizing marbled effect. Each planter you create will be a one-of-a-kind piece, perfectly reflecting your aesthetic and complementing your home decor. It’s an opportunity to infuse your space with personality and enjoy the satisfaction of creating something truly unique.
3. Economical and Accessible Crafting
Crafting your own planter is often a significantly more budget-friendly option than purchasing new ones from a garden center. Many of the base materials are items you might already consider waste, making the initial cost virtually zero. The decorative supplies are typically inexpensive and readily available at most craft or general stores, ensuring this project is accessible to nearly everyone, regardless of budget.
4. An Engaging Educational Activity for All Ages
This DIY planter project is an excellent activity for families and individuals of all ages. Involving children in the process offers invaluable lessons about environmental stewardship, resourcefulness, and the transformative power of creativity. It fosters a hands-on understanding of how ordinary items can be reimagined, sparking curiosity and cultivating an early appreciation for eco-conscious living and sustainable practices.
5. Cultivate Connection with Nature and Enhance Well-being
The act of crafting, particularly when it leads to bringing more greenery into your home, can be incredibly therapeutic. Engaging with plants and nurturing them has been shown to reduce stress, improve mood, and foster a sense of calm and accomplishment. A DIY planter not only beautifies your environment but also serves as a constant reminder of your creative effort and the calming presence of nature in your daily life.
Essential Supplies for Your Earth Day Planter Project
Before you embark on your creative journey, gather these simple yet effective materials. They are carefully selected for their ease of use and their ability to help you achieve a stunning, durable result, especially if you’re aiming for an eye-catching marbled effect on your upcycled base.
- Nail Polish: This will be your primary artistic medium for infusing your planter with vibrant colors and unique patterns. Gather a selection of colors that you love or that harmonize with your existing decor. Nail polish offers a beautiful glossy finish and is surprisingly effective for various decorative techniques, particularly water marbling. Don’t hesitate to experiment with different types, like metallics or glitters, to add extra flair.
- Bowl: An old, disposable, or designated crafting bowl is absolutely essential for the water marbling technique. It needs to be wide and deep enough to comfortably submerge your planter base without touching the sides. Recycled plastic food containers, old aluminum foil pans, or even a sturdy cardboard box lined with plastic can serve this purpose well.
- Toothpick: This humble tool plays a crucial role in creating intricate designs. You’ll use it to gently swirl and manipulate the nail polish on the water’s surface, forming mesmerizing patterns before you dip your planter. Longer skewers or even the fine tip of a painting brush can also be used for varied effects.
- Planter Base: This is the hero of your upcycling project – the item you will transform. For Earth Day, embrace sustainability by choosing an item that would otherwise be discarded. Excellent candidates include clean plastic bottles (cut to size), glass jars of various shapes, tin cans (ensuring edges are smooth), or even existing old ceramic or terracotta pots that need a refresh. Ensure your chosen base is thoroughly clean, completely dry, and has a relatively smooth surface for optimal paint adhesion. Consider drilling or punching drainage holes in your chosen base if it lacks them, which is vital for plant health.
- Mod Podge (Acrylic Sealer): This incredibly versatile craft essential is vital for sealing and protecting your beautiful artwork. It creates a durable, water-resistant, and either glossy or matte (depending on the formula you choose) layer over your nail polish design, safeguarding it from moisture, soil, and everyday wear. This ensures your DIY planter remains vibrant and intact for years to come.
- Gloves: To keep your hands clean and protected from nail polish and Mod Podge, disposable gloves are highly recommended. They ensure a mess-free and enjoyable crafting experience.
Additional Recommended Materials (Optional but Helpful):
- Rubbing Alcohol or Nail Polish Remover: Essential for quick clean-ups of spills or to correct any marbling mistakes on your work surface or hands.
- Old Newspapers or Drop Cloth: Crucial for protecting your workspace from spills and drips, ensuring an easy cleanup.
- Scissors or Utility Knife: Necessary if you need to cut or reshape your chosen upcycled planter base, such as trimming a plastic bottle to a specific height.
- Drill or Awl: For creating essential drainage holes in the bottom of your upcycled planter base (e.g., plastic, metal). Proper drainage is critical for plant health.
- Small Paintbrush or Sponge Brush: Ideal for applying an even, smooth coat of Mod Podge sealant without streaks.
Step-by-Step Guide to Crafting Your Marbled Eco-Planter
Now that you have all your materials, let’s dive into the exciting part: transforming your chosen base into a stunning, one-of-a-kind planter using the popular and visually captivating nail polish water marbling technique. Follow these steps for a beautiful result.
Step 1: Prepare Your Workspace and Planter Base
Begin by laying down old newspapers or a protective drop cloth over your work surface to prevent any accidental spills from staining. Next, thoroughly clean your chosen planter base (e.g., a plastic bottle, glass jar, or old ceramic pot) to remove any dirt, dust, or grease, then allow it to dry completely. If you’re using a plastic bottle, carefully cut it to your desired height and smooth any rough edges. Crucially, if your base lacks drainage holes and can be safely modified (like plastic or thin metal), create a few small holes at the bottom using a drill or awl. Proper drainage is absolutely vital for the health of your future plant.
Step 2: Set Up Your Marbling Station
Fill your designated crafting bowl with lukewarm tap water. The temperature of the water plays a role in how the nail polish spreads and dries; lukewarm water typically allows for optimal spread without the polish drying too rapidly. Ensure the bowl is deep enough to comfortably dip your entire planter. Open all the nail polish colors you plan to use and have your toothpick ready for swirling. Work in a well-ventilated area.
Step 3: Create Your Marbled Design on Water
Carefully drip small drops of your chosen nail polish colors onto the surface of the water in the bowl. Start with one color, then add drops of other colors directly on top or adjacent to the first. It’s important not to pour too much polish, as it can quickly sink. Work relatively quickly, as nail polish dries fast when exposed to air. Once you have a desirable arrangement of drops, use the toothpick to gently swirl the colors together. Experiment with various motions – straight lines, zigzags, or delicate circular patterns – to create intricate and unique designs. Avoid over-swirling, which can cause the colors to blend excessively and create a muddy appearance.
Step 4: Dip Your Planter Base into the Design
With your protective gloves on, slowly and steadily dip your planter base into the water, rotating it gently to pick up the mesmerizing nail polish design. The nail polish film will adhere to the surface of your planter. Once coated, carefully lift the planter out of the water. If you plan to make multiple dips or planters, you might need to gently blow on the remaining nail polish film on the water’s surface to push it aside, or use a scrap piece of paper to skim it off before your next dip.
Step 5: Allow for Complete Drying
Place your newly marbled planter on a protected surface, such as an old tray, wire rack, or a piece of cardboard, to dry thoroughly. This step is critical and can take several hours, depending on the thickness of the nail polish application and the humidity levels in your environment. Ensure the nail polish is completely dry and hardened to the touch before proceeding to the next step, as premature handling can cause smudging or damage to your beautiful design.
Step 6: Seal Your Masterpiece with Mod Podge
Once the nail polish is fully dry and cured, apply an even, thin coat of Mod Podge using a small paintbrush or a sponge brush. This layer is your sealant, providing crucial protection for your design against water, soil moisture, and general wear and tear, significantly increasing your planter’s durability for both indoor and outdoor use. Allow the first coat to dry completely – typically 15-20 minutes – then apply a second coat for enhanced protection, especially if the planter will be exposed to frequent moisture or outdoor elements. For maximum weather resistance if placed outdoors, consider using a Mod Podge Outdoor formula or an additional clear acrylic spray sealer.
Step 7: Introduce Your Green Tenant!
After the Mod Podge has thoroughly dried and fully cured (which can take 24-72 hours for maximum hardness, always refer to product instructions), your beautiful, eco-friendly planter is ready to welcome its new green occupant! To ensure optimal plant health, consider adding a thin layer of gravel or small stones at the bottom for improved drainage before filling it with appropriate, high-quality potting mix. Then, carefully plant your favorite succulent, herb, small flower, or any plant suited for its size. Place your unique creation in a location where it will receive the ideal amount of light and care, allowing it to thrive and brighten your space.
Tips for a Thriving Eco-Garden in Your DIY Planter
Creating your stunning DIY planter is a fantastic achievement, but ensuring your plants flourish in their new upcycled home requires a bit of ongoing care and knowledge. Follow these essential gardening tips to help your green companions thrive:
- Choose the Right Plant: Select plants that are well-suited to the size of your planter and the specific environmental conditions of where it will be placed (e.g., light exposure, temperature, indoor/outdoor). Succulents, small herbs, and compact flowering plants are often excellent choices for DIY containers.
- Ensure Adequate Drainage: This cannot be stressed enough – drainage holes are paramount for plant health. Without them, water can accumulate at the bottom, leading to root rot, which is fatal for most plants. If your upcycled item could not accommodate drainage holes, consider using it as a decorative cachepot (a cover pot) for a smaller plant that remains in its original nursery pot with drainage.
- Invest in Quality Potting Mix: Avoid using garden soil directly in containers. Instead, opt for a good quality, well-draining potting mix specifically designed for container gardening. Potting mixes provide the right balance of nutrients, aeration, and moisture retention needed for potted plants.
- Water Wisely: Overwatering is a common cause of plant demise. Always check the soil moisture before watering; only water when the top inch or two of soil feels dry to the touch. The frequency of watering will vary depending on the plant type, the planter material, and the ambient environmental conditions.
- Understand Sunlight Requirements: Position your planter where your plant will receive the optimal amount of sunlight it needs to thrive. Some plants crave direct, bright sun, while others prefer bright, indirect light or even partial shade. Research your specific plant’s needs.
- Consider Fertilization: While most potting mixes contain initial nutrients, your plants may benefit from occasional feeding during their active growing season. Use a balanced liquid fertilizer diluted according to the product instructions.
- Plan for Repotting: As your plant matures and grows, it will eventually outgrow its DIY planter. Be prepared to repot it into a larger container when its roots become crowded, indicated by roots growing out of drainage holes or the plant appearing stunted.
Beyond the Planter: Embracing a Holistic Sustainable Lifestyle
This Earth Day planter project is more than just a creative endeavor; it’s a stepping stone toward a more conscious and sustainable way of living. By taking this small but meaningful step, you are actively contributing to a broader movement of environmental stewardship. Consider how you can further integrate “reduce, reuse, recycle” principles and other eco-friendly habits into your daily life:
- Explore More Upcycling Projects: Keep an eye out for other household items that can be repurposed creatively. Old tires can become vibrant garden beds, glass bottles can be transformed into unique vases or candle holders, and wooden pallets can be ingeniously crafted into furniture or vertical gardens.
- Minimize Consumption: Before making a new purchase, pause and ask yourself if you truly need the item, or if there’s a more eco-friendly alternative available, perhaps by repairing, borrowing, or buying second-hand.
- Support Sustainable Brands: Make informed choices by opting for products from companies that are genuinely committed to ethical sourcing, sustainable production, and environmentally responsible business practices.
- Conserve Resources at Home: Be mindful of your daily water and energy usage. Simple habits like turning off lights, unplugging electronics, and taking shorter showers can make a significant difference.
- Educate and Inspire Others: Share your DIY projects and your knowledge about sustainable living with friends, family, and your community. Lead by example and encourage others to adopt eco-conscious habits.
Connect with Our Community for More DIY Inspiration!
At DIY Projects, we thrive on the power of community and shared creativity. We invite you to join our exclusive online spaces to share your amazing projects, ask questions, exchange tips, and get endless inspiration from fellow DIY enthusiasts and plant lovers!
Watch the Live tutorial Video on Thursday in our Exclusive Facebook Group live Thursdays at 1pm PST. Don’t miss out on these fantastic opportunities for real-time demonstrations, interactive Q&A sessions, and a chance to learn directly from crafting experts.
Tag us on Instagram and Facebook for the chance for your furry friend to be featured! We absolutely adore seeing your finished projects and how they beautifully enhance your homes, especially when showcased alongside your beloved pets!
Don’t forget to stay connected with us on our exclusive Facebook Group for ongoing tips, fresh project ideas, troubleshooting advice, and unwavering community support. It’s a vibrant and welcoming hub for all things DIY.
Subscribe to our DIY Projects Youtube Channel for a treasure trove of DIY Project Videos. Our channel is continuously updated with visual guides, innovative ideas, and step-by-step tutorials to fuel your next creative endeavor and expand your crafting skills.
More Inspiring DIY Projects to Explore:
- 17 Creative DIY Pallet Planter Ideas For Spring
- This DIY Succulent Planter Will Make Walls And Gardens Look Beautiful
- 121 Homesteading Skills You Should Know