
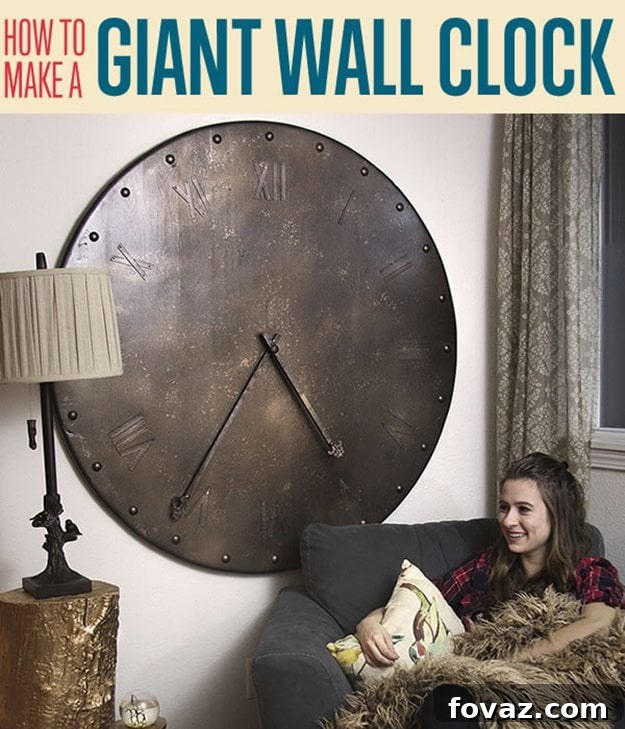
Transforming your living space doesn’t have to come with a hefty price tag. Imagine a grand, striking wall decor piece that commands attention, fills a vast expanse of wall, and exudes timeless elegance – all crafted by your own hands for under $100. This guide will walk you through creating a magnificent, static decorative clock, turning a humble dining table into an exquisite focal point that reflects your unique style. In just a few dedicated hours, you can create an oversized statement piece that truly elevates your home’s aesthetic, blending rustic charm with industrial sophistication.
This DIY giant wall clock project is not just about telling time; it’s about making a bold artistic statement. Utilizing readily available and often overlooked items, we’ll demonstrate how to upcycle an old dining table into a conversation-starting piece of art. Get ready to embark on a creative journey that promises immense satisfaction and a stunning addition to your home decor.
Supplies for Your DIY Giant Wall Clock:
- Round Dining Table: The foundation of your clock. Seek out a sturdy round table, ideally around 4 feet in diameter, to ensure a truly impressive scale. It’s crucial that the table has a base or pedestal that can be easily removed or dismantled. Websites like Craigslist or local thrift stores are excellent resources for finding affordable, pre-loved dining tables perfect for this upcycling project.
- 1” Round Upholstery Tacks: These will define the outer ring of your clock face, adding a touch of industrial flair and serving as guides for your Roman numerals.
- ½” Beveled Upholstery Tacks: Smaller and more decorative, these tacks will be used for detailing the clock hands.
- Cardboard Tack Strips: Found in the upholstery section of most fabric stores, these strips are incredibly versatile and cost-effective. Their ideal width makes them perfect for crafting the Roman numerals. Grab a few extra for practice cuts!
- Small, Round Head Nails: Essential for securely anchoring your Roman numerals to the clock face.
- 2 Square Dowel Rods: These will become the hands of your impressive clock. Choose a thickness that feels proportionate to your 4-foot clock face.
- Assorted Cheap Wooden Ornaments: Explore the craft store aisles (like Michael’s) for wooden embellishments with interesting scrolls, flourishes, or intricate shapes. These will add character and a custom feel to your clock hands.
- “Hammered” Texture Spray Paint: This special paint will give your clock a unique, textured finish, mimicking forged metal and adding depth.
- Dark Bronze Spray Paint: Your base coat color, providing a rich, antique foundation for the entire clock.
- Light Bronze Spray Paint: Used for highlighting and creating an aged, weathered patina effect, adding visual interest and realism.
- Heavy-Duty Art Hanging Hooks: Essential for safely mounting your substantial clock to the wall. Ensure they are rated for the estimated weight of your finished piece.
- Tremor Hooks (Earthquake-Proof Hooks): These hardware store finds provide extra security, ensuring your heavy clock remains firmly anchored, especially if you live in an area prone to tremors.
Tools from Around the Craft Room:
- Wood Glue: For permanently attaching embellishments and the clock hands.
- Hammer: A fundamental tool for driving in upholstery tacks and small nails.
- Rubber Mallet: Useful for gently tapping and loosening stubborn parts without causing damage, particularly during table dismantling.
- Crowbar: An indispensable tool for prying apart the table base from the tabletop.
- Scissors: A sharp pair for cutting the cardboard tack strips. An X-Acto knife can also be very helpful for precise cuts.
- Tweezers: Handy for precisely placing small embellishments or removing errant splinters.
- Measuring Tape: Crucial for achieving symmetry and accurate placement of all elements on your clock face.
- Sandpaper: For smoothing rough edges on your wooden embellishments and preparing surfaces for paint.
Step 1: Dismantling Your Dining Table
The first exciting step in transforming your dining table into a magnificent clock is to separate the tabletop from its base. Lay the table upside down on a protected surface, such as a drop cloth or old blankets, to prevent scratching. Carefully inspect how the pedestal is attached. Older tables often rely on sturdy wooden joinery, sometimes reinforced with bolts or screws. In my experience with an antique table, this required a bit of brute force and patience. Arm yourself with a rubber mallet and a crowbar, and begin by gently but firmly tapping at the joints where the pedestal meets the tabletop. You might need to pry carefully to loosen the connection. Take your time, working around the entire circumference to gradually separate the components. The satisfying thud as the pedestal finally detaches signals a major milestone in your project, clearing the way for the clock face to emerge!
Step 2: Defining the Clock Face with Upholstery Tacks
Once the tabletop is liberated from its base, lay it face up on the floor or a sturdy workbench. This is where your giant clock truly begins to take shape. Grab your measuring tape and carefully locate the absolute dead center of the table; mark this precisely with an “X”. From this center point, measure outwards to find the four cardinal points that will represent 12, 3, 6, and 9 o’clock. Mark these points clearly along the edge of the tabletop. These initial marks are critical for ensuring everything that follows is perfectly symmetrical and evenly spaced.
Now, let’s introduce those striking 1” diameter upholstery tacks. These will form a beautiful, textured border around your clock face. Starting with your pre-marked “north,” “south,” “east,” and “west” points, begin hammering the tacks into the tabletop. It’s essential to maintain a consistent distance from the outer edge for each tack; I opted for exactly 1 inch in from the edge to ensure a uniform appearance. After placing these initial four tacks, measure and place additional tacks to represent the remaining hours (1, 2, 4, 5, 7, 8, 10, 11 o’clock), aiming for a total of 12 evenly spaced tacks. As you progress, you might find yourself falling in love with the visual texture these tacks provide, just as I did! Originally, I planned for 12 tacks, but later decided to add another tack into each gap, bringing the total number of perfectly spaced tacks to 24. This doubled the visual density and created an even more impressive, robust border for the clock face, significantly enhancing its industrial charm.
Step 3: Crafting the Roman Numerals
With the outer ring of tacks in place, it’s time to bring the Roman numerals to life. The cardboard upholstery tack strips are a hidden gem for this task; their pre-set width is ideal, saving you a considerable amount of time and effort. Using a sharp pair of scissors or a precision X-Acto knife, carefully cut out each of your Roman numeral components. The “I” is simply a single strip. For the “V,” you’ll cut two strips at a mitered angle, allowing them to join seamlessly at the top. The “X” is slightly more complex, requiring three pieces: one main strip that runs diagonally through the middle, and two shorter side legs that meet the main strip to form the iconic cross. Referencing the included photo for Step 3 will provide a clear visual guide for each numeral type, ensuring accuracy in your cuts.
Here is the full list of Roman numerals you will need to meticulously craft for your clock face, starting with the prominent XII for the top:
- XII
- I
- II
- III
- IV
- V
- VI
- VII
- VIII
- IX
- X
- XI
Take your time with this step, as the precision of your numeral cuts will significantly impact the overall polished look of your giant clock. You might find it helpful to sketch out the numeral shapes on paper first, or even print templates, to guide your cuts.
Step 4: Anchoring the Roman Numerals
Once all your meticulously cut Roman numeral pieces are ready, it’s time to secure them permanently onto your clock face. Position each numeral carefully onto the tabletop, ensuring it aligns perfectly with the previously placed 1-inch upholstery tacks. Remember the importance of symmetry; use your measuring tape to confirm that each numeral is an equal distance from the outer edge and evenly spaced from its neighbors. The small, round-head nails are your best friends here. They provide a secure and unobtrusive anchor, holding the cardboard strips tightly in place. Work methodically, starting with the cardinal points (XII, III, VI, IX) and then filling in the rest. Step back frequently to assess the overall balance and make any minor adjustments before fully hammering in all the nails. This attention to detail will ensure your Roman numerals look professional and perfectly integrated into the design.
Step 5: Crafting the Clock Hands
Now, let’s create the functional (albeit static) elements that truly define your piece as a clock: the hands. Take your two square dowel rods and carefully cut them to size, creating a “big hand” (minute hand) and a “little hand” (hour hand). The longer arm, designed to be the minute hand, should extend from the exact center of the clock to a point slightly inside the ring of 1-inch upholstery tacks, ensuring it doesn’t overlap the numerical indicators. The shorter arm, the hour hand, should be approximately three-quarters the length of the long arm. This proportional difference is key to creating a visually accurate and aesthetically pleasing clock. Sand down any rough edges on your newly cut dowel rods to prepare them for embellishments and painting.
Step 6: Embellishing the Clock Hands for a 3D Effect
This step adds a unique, artisanal touch to your clock hands. Retrieve those interesting wooden ornaments you selected from the craft store. Using sharp scissors or an X-Acto knife, carefully slice off various scrolls, flourishes, and decorative embellishments. Don’t be afraid to experiment and combine different shapes to create a truly unique design for each hand. Once cut, use sandpaper to meticulously smooth away any rough edges, ensuring a refined finish. To achieve a captivating three-dimensional effect, attach some of these embellishments to the front of your clock hands using the small, beveled upholstery tacks. For added depth, use wood glue to secure additional embellishments to the back of the hands, allowing them to subtly peek out and create a layered, sculptural look. I found that applying this front-and-back embellishment style to the longer minute hand created a more dramatic impact, while a single-sided embellishment sufficed for the shorter hour hand, maintaining a good visual balance.
Step 7: Temporarily Pinning the Clock Hands
Before applying any paint or permanent glue, it’s beneficial to temporarily assemble the clock hands to test their fit and movement. Take one of the 1-inch upholstery tacks and use it to loosely pin the two embellished dowel rods together at their intended pivot point. This allows you to check that their lengths are appropriate and that they can theoretically move freely without obstructing each other or the clock face elements. While this pin is not for permanent attachment, it helps visualize the final appearance and ensures everything is proportioned correctly before moving on to the finishing stages.
Step 8: The Art of Spray Painting and Patina
Now for the exciting transformation through paint! Lay out your clock face and the assembled clock hands on a protected surface in a well-ventilated area. Begin with the dark bronze spray paint. Apply an even, consistent base coat over the entire clock face, including all the tacks and Roman numerals, as well as both clock hands. Ensure complete coverage, allowing the paint to dry thoroughly according to the manufacturer’s instructions.
Once the dark bronze base coat is completely dry, it’s time to create that stunning, aged patina effect with the lighter bronze spray paint. This step is where your artistic flair comes into play. Instead of applying an even topcoat, aim for an organic, uneven, and worn look. I discovered that by holding down the nozzle gently, rather than pressing firmly, I achieved a beautiful spattering effect that wonderfully mimics rust, age, and weather-worn spots. Apply this lighter coat selectively, focusing on edges and raised areas, allowing the dark bronze to show through in places. Experiment with different distances and pressures to create varying textures and depths. This layering technique will give your giant clock an authentic, antiqued metallic finish that is both sophisticated and captivating.
Step 9: Attaching the Clock Hands Permanently
With both the clock face and hands beautifully painted and dried, it’s time for their final assembly. Carefully position the assembled clock hands (from Step 7, still pinned together with the tack) precisely in the dead center of your clock face, where you initially marked your “X.” Apply a generous amount of strong wood glue to the back of the hands at their pivot point, and firmly press them onto the center of the clock. Ensure they are perfectly aligned and centered. It’s crucial at this stage to allow the wood glue to dry completely and cure fully, which might take several hours or even overnight, depending on the glue type. Resist the urge to move or test the hands until they are completely set, as this will ensure a durable and lasting bond.
Step 10: Safely Hanging Your Giant Wall Clock
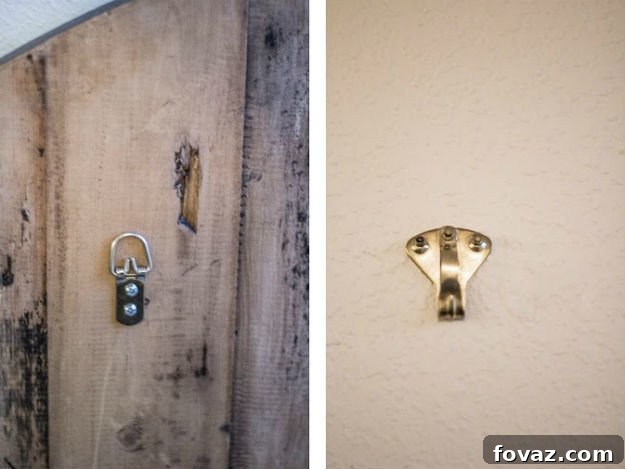
Congratulations, your magnificent DIY giant wall clock is almost ready for its grand debut! Given its size and weight, proper installation is paramount for safety and longevity. Begin by identifying two sturdy wall studs in your desired location; a stud finder is invaluable here. Using tremor hooks (also known as “earthquake-proof” hooks) for enhanced security, screw them firmly into the center of the identified studs. Use a level to ensure these two hooks are perfectly even with one another, as this will dictate how straight your clock hangs.
Next, turn your attention to the back of the finished clock. Carefully screw in two heavy-duty art hanging hooks, ensuring they are positioned at a height that will correspond with the wall hooks. Again, use a level to guarantee they are perfectly even across the back of the clock. Then, measure the exact distance between these two hooks. Compare this measurement to the spacing of the hooks on your wall to ensure a perfect match. Finally, enlist the help of a strong assistant. Together, carefully lift the clock and align the hooks on its back with the hooks on the wall, latching it securely into place. Step back and admire your stunning, hand-crafted giant decorative wall clock. You’ve not only created a functional art piece but a true statement of personal style and DIY accomplishment!
Did you enjoy our comprehensive guide on how to create a stunning giant decorative wall clock? We’d love to hear your thoughts on this amazing DIY wall art project in the comments section below! What creative twists would you add to make it uniquely yours? Do you have other innovative craft ideas or upcycling projects you’re eager to share? Tell us all about it – we’re always looking for cool DIY challenges to try out!
Our passion lies in fostering a vibrant community of DIY enthusiasts, where inspiration flows freely, and every project, from craft ideas to home decor transformations and clever upcycling solutions, is just a click away. We believe everyone has a creative side waiting to be unleashed, and realizing the potential to make things yourself is incredibly rewarding. Join our growing community and stay connected with us on Facebook, Twitter, Pinterest, and Instagram for daily doses of creative inspiration and exciting new projects!