
Unleash Happiness: How to Build the Ultimate DIY Cat Self-Petting Station
Every cat owner knows the unique joy and occasional challenge of keeping their feline friend entertained and loved, especially when life gets busy. For those moments when you can’t be there to shower your kitty with endless cuddles and head scratches, a homemade solution can be a lifesaver. Get ready to embark on a purr-fectly satisfying pet project: creating a DIY Cat Self-Petting Station that will keep your beloved furball happy, stimulated, and feeling adored, even when you’re away. This guide will walk you through crafting a simple, engaging, and cost-effective toy that promises to be a hit with any cat!
Why Your Cat Needs a Self-Petting Station: Beyond Just a Toy
In the bustling rhythm of modern life, many of us find ourselves working long hours, leaving our cherished pets home alone. While we strive to provide the best for them, the absence of constant human interaction can sometimes lead to boredom or even anxiety in cats. This is where the magic of a self-petting station comes in.
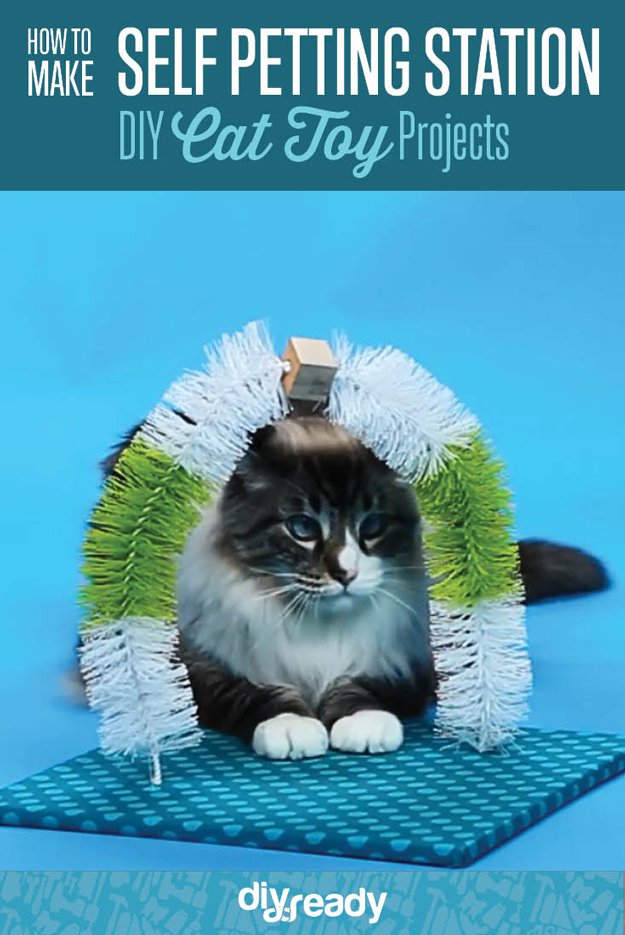
A self-petting station isn’t just another cat toy; it’s a tool for enrichment and independence. Cats are naturally curious creatures with an innate need for stimulation, scent marking, and grooming. This DIY project taps into those instincts, offering multiple benefits:
- Combats Boredom: Provides an engaging activity that keeps your cat mentally and physically stimulated throughout the day.
- Reduces Stress & Anxiety: The repetitive action of rubbing against the brushes can be incredibly soothing, helping to alleviate loneliness or separation anxiety.
- Encourages Independence: Allows your cat to engage in self-grooming and play on their own terms, fostering a sense of autonomy.
- Satisfies Natural Instincts: Cats love to rub their faces and bodies against objects to spread their scent, marking their territory and feeling secure. The brushes are ideal for this.
- Promotes Physical Activity: While not a high-energy toy, it encourages movement and stretching, contributing to overall physical well-being.
- Cost-Effective: Significantly cheaper than many commercial cat toys, offering maximum entertainment for minimal expense.
- Peace of Mind for Owners: Knowing your cat has an engaging outlet for play and comfort while you’re away can reduce owner guilt.
Imagine your furry friend joyfully rubbing against soft brushes, feeling pampered and entertained, all thanks to your creative handiwork. It’s a testament to the love you share, making it an ideal first pet project for any cat lover.
Gather Your Supplies: What You’ll Need for Your DIY Cat Toy
One of the best aspects of this DIY cat self-petting station is that it requires only a handful of readily available and affordable materials. You might even have some of these lying around your home! Here’s a comprehensive list of what you’ll need to get started, along with some considerations for each item:
- 12 x 12″ Wood Base: This will form the sturdy foundation of your station. Opt for a piece of plywood, MDF, or a similar flat, stable wood. Ensure it’s smooth and free of splinters to prevent any injury to your cat. A larger or smaller base can be used depending on your cat’s size and your available space.
- 14 x 14″ Fabric: You’ll use this to cover your wooden base, making it comfortable and aesthetically pleasing. Choose a soft, durable fabric that your cat will enjoy rubbing against. Fleece, felt, or an old cotton towel work wonderfully. Consider patterns or colors that complement your home decor!
- 2 New Toilet Bowl Brushes: Yes, you read that right! These are the stars of the show, providing the irresistible bristly texture cats love. It is absolutely crucial that these brushes are brand new and never used for their intended purpose to ensure hygiene and safety for your pet. Look for brushes with sturdy plastic bristles and durable handles.
- 1 x 1″ Wooden Cube: This small cube will serve as the central connector for your two brushes, creating a stable “petting arm.” Any small wooden block will do, as long as it’s solid enough to hold the brushes firmly.
- Staple Gun: Essential for securely attaching the fabric cover to your wooden base. Make sure you have plenty of staples.
- Wire Cutter (or sturdy pliers): Needed to remove the handles from the toilet brushes. Ensure it’s strong enough to cut through the metal or plastic rod within the brush handle.
- Drill (with appropriate drill bit): You’ll need this to create holes in both the wooden cube and the wooden base. Choose a drill bit that matches the diameter of the brush handles after they’ve been cut.
- Strong Adhesive Glue: A reliable wood glue or super glue that is non-toxic when dry will be necessary to secure the brush handles into the wooden cube and the base. Ensure it’s suitable for wood and plastic/metal.
Having all your materials gathered and tools ready before you begin will make the construction process smooth and enjoyable.
Your Step-by-Step Guide to Crafting the Perfect Self-Petting Station
Now that you have all your supplies, it’s time to bring this exciting project to life! Follow these detailed instructions carefully to ensure a sturdy, safe, and delightful self-petting station for your beloved feline.
Step 1: Preparing Your Petting Brushes
The first crucial step is to transform your new toilet bowl brushes into the primary petting elements. Take your two brand-new brushes. Using a sturdy wire cutter or strong pliers, carefully remove the long handles from both brushes. You want to cut them as close to the brush head as possible, leaving only the brush head and a short, rigid stem (approximately 1-2 inches) protruding from it. This stem will be inserted into the wooden cube and base. Ensure the cut ends are smooth and free of sharp edges that could potentially harm your cat or yourself during assembly.
Need a visual? See an example of modified brushes here for inspiration on how to prepare them.
Step 2: Drilling the Connecting Cube
Next, grab your small 1×1-inch wooden cube. This cube will act as the central hub connecting your two brush heads. Using your drill and a drill bit that matches the diameter of the brush stems you created in Step 1, carefully drill a hole through the center of the wooden cube. Aim for a straight, clean hole that passes entirely through the cube, ensuring it’s wide enough for the brush stems to fit snugly but not loosely. Safety first: always secure your wood piece before drilling and wear appropriate eye protection.
Step 3: Assembling the Petting Arms
Now, it’s time to create the iconic “petting arms” of your station. Apply a generous amount of your strong adhesive glue to the cut end of one of your prepared toilet brush stems. Carefully insert this glued end into one side of the hole you drilled through the wooden cube. Push it in firmly until it feels secure. Repeat this process with your second brush, applying glue to its stem and inserting it into the other end of the wooden cube’s hole. Ensure both brushes are aligned relatively straight and pointing outwards from the cube. Allow the glue ample time to dry completely according to the manufacturer’s instructions, ensuring a robust bond.
Step 4: Crafting the Comfortable Base
While your brushes are drying, prepare the base of your station. Take your 12×12-inch wooden base and your 14×14-inch fabric. Lay the fabric flat, face down, and center the wooden base on top of it. Now, as if you’re wrapping a gift, neatly fold the edges of the fabric over the sides of the wooden base. Using your staple gun, securely staple the fabric to the underside of the wooden base. Start by stapling the center of each side, then work your way outwards, pulling the fabric taut to avoid wrinkles. Pay special attention to the corners, folding them neatly to create a clean, professional finish. This fabric covering provides comfort for your cat and a pleasing aesthetic.
Step 5: Preparing the Base for Integration
With the fabric securely in place, it’s time to prepare your covered wooden base for the brush assembly. Carefully mark two spots on the fabric-covered top surface of your wooden base. These marks should be on opposite sides, roughly 2-3 inches in from the edge, and centered along the width, creating a balanced setup for your brushes. Using your drill and the same drill bit as before, drill two holes at these marked locations, ensuring they pass completely through the wood base. These holes should be just wide enough for the stems of your assembled petting arms to fit snugly.
Step 6: Final Assembly and Secure Fit
You’re almost there! Once the glue on your brush assembly (from Step 3) is completely dry and cured, apply a generous amount of strong adhesive glue around the exposed stems of your brush assembly, particularly where they will insert into the wooden base. Carefully insert the stems of your brush assembly into the two holes you drilled in the fabric-covered wooden base. Push them down firmly until the wooden cube rests flush against the fabric surface. Ensure the entire structure is stable and the brushes are firmly seated. Allow this final set of glue to dry and cure completely before introducing it to your cat. This ensures maximum stability and durability.
Congratulations! You’ve successfully built a fantastic DIY Cat Self-Petting Station. Wasn’t that a fun and rewarding project? Your cat is sure to adore this thoughtful creation, providing them with endless hours of independent enjoyment.
Visual Learner? Watch the Video Tutorial!
Sometimes seeing is believing, and a video tutorial can make all the difference. If you’d like a visual walkthrough of the construction process, check out this helpful video. It can provide additional clarity on each step and help you visualize the project coming together:
Elevate Your Station: Customization Ideas & Enhancements
While the basic self-petting station is fantastic, there’s always room for personal touches and enhancements to make it even more appealing to your cat. Get creative and tailor it to your feline’s unique preferences!
- Add Catnip Pouches: Sew small fabric pouches and fill them with dried catnip, attaching them discreetly to the underside of the base or near the brushes. The enticing scent will draw your cat in.
- Vary Brush Textures: While toilet brushes are excellent, consider experimenting with other types of sturdy, pet-safe brushes (e.g., specific grooming brushes) for different sensory experiences.
- Incorporate Hanging Toys: Attach small, durable cat toys (like feathers on string, crinkle balls, or soft bells) to the top bar of the brush assembly. Ensure they are securely fastened and can withstand playful batting.
- Scratching Surface: Integrate a small sisal mat or a piece of corrugated cardboard into the design, perhaps on one side of the wooden base, offering a dedicated scratching area.
- Decorative Paint or Stain: If your wooden base isn’t fully covered by fabric, consider painting or staining it with non-toxic, pet-safe finishes to match your home decor.
- Multi-Level Design: For adventurous cats, you could create a larger base or even stack two smaller platforms to create a multi-level petting and play zone.
- Aromatherapy for Cats (with caution): If your cat responds well to specific pet-safe essential oils (like diluted lavender or chamomile), a tiny drop on a fabric patch *away* from where they might lick can add another layer of appeal. Always consult a vet and research pet-safe essential oils thoroughly.
Remember, the goal is to create a safe and stimulating environment. Always introduce new elements gradually and observe your cat’s reaction.
Important Considerations: Safety and Best Practices
Your cat’s safety is paramount. Follow these guidelines to ensure your DIY self-petting station remains a source of joy, not concern:
- Use ONLY New Brushes: As reiterated, the brushes must be brand new and never exposed to any cleaning chemicals or waste.
- Non-Toxic Materials: Ensure all glues, paints, or sealants used are non-toxic once dry and safe for pets. Read labels carefully.
- Smooth Edges: Double-check all cut wood and brush stems for sharp edges or splinters. Sand them down if necessary.
- Sturdy Construction: Ensure all components are securely glued and stapled. Loose parts can be a choking hazard or cause injury.
- Initial Supervision: When you first introduce the station to your cat, supervise them to ensure they use it safely and don’t try to chew on inappropriate parts.
- Regular Inspection: Periodically check the station for wear and tear, loose parts, or damage. Repair or replace as needed.
- Keep it Clean: Over time, the brushes may accumulate cat hair or dust. Clean them gently with a pet-safe wipe or vacuum attachment to maintain hygiene.
- Still Pet Your Cat! While this station provides independent enrichment, it is never a substitute for human interaction, petting, and bonding. Continue to give your cat plenty of love and attention!
Build, Bond, and Beyond: Your Cat’s New Favorite Pastime
Creating a DIY cat self-petting station is more than just a craft project; it’s a heartfelt gesture that enriches your cat’s life and strengthens the unique bond you share. This simple yet ingenious invention offers a continuous source of comfort, play, and mental stimulation, ensuring your furry friend remains happy and engaged throughout the day, whether you’re home or away. It’s a rewarding experience that combines practicality with a profound expression of love for your pet.
Did you enjoy this tutorial on how to make a DIY cat toy? We’d love to hear your thoughts and see your creations! Share your experience in the comments section below. Do you have other brilliant craft projects for pets or unique DIY ideas you’d like to share with our community? We are always eager to discover new ways to be creative and make things ourselves.
At DIY Projects, we believe in the power of doing it yourself – transforming everyday items into extraordinary creations, beautifying your home, and finding joy in the process. We’re passionate about empowering people to tap into their creative side, offering a diverse range of tutorials from home decor and upcycling to delicious recipes and unique craft projects. Join our growing community of DIY enthusiasts!
Stay connected with us for more exciting projects and inspiration. Follow us on Facebook, Twitter, Pinterest, and Instagram!
Explore More Cool DIY Pet Projects!
If you loved creating this self-petting station, you’re in luck! We have a treasure trove of other fantastic DIY pet projects designed to keep your furry friends happy, healthy, and entertained. Dive into these posts for more inspiration:
Best DIY Pet Projects to Keep Your Furry Friends Happy
Discover a curated collection of our top DIY pet projects, from comfy beds to engaging toys, all designed to bring a smile to your pet’s face.
How To Make a Shabby Chic Dog Leash and Treat Wall Hanger | DIY Pet Project
Give your dog’s accessories a stylish home with this charming and practical DIY wall hanger, perfect for organizing leashes and treats.
15 DIY Pet Projects & Recipes for Happy Animals
Expand your DIY repertoire with this fantastic list of 15 diverse pet projects, including homemade treats and more engaging toys for all kinds of animals.