
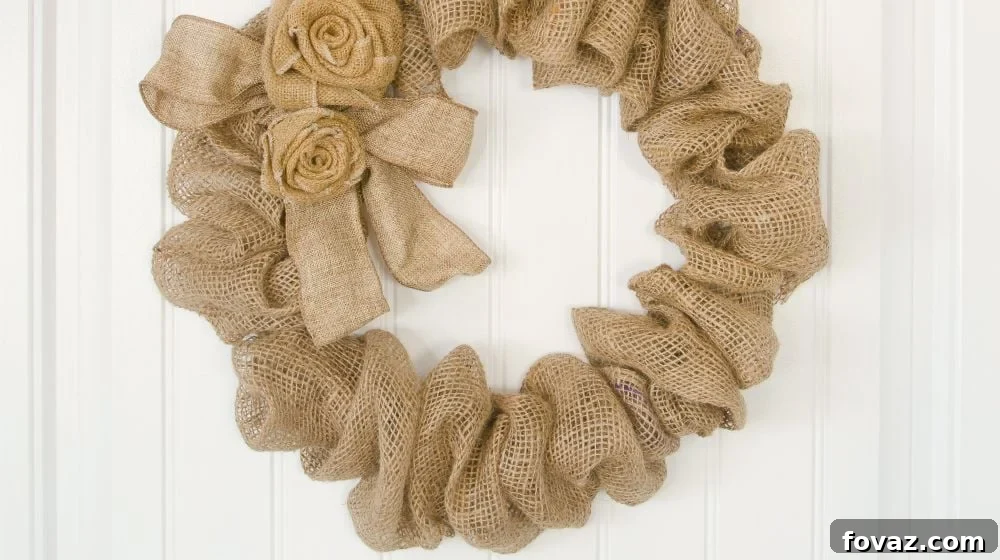
Transform your home with a touch of rustic charm! Learn how to create a stunning DIY burlap bubble wreath with this comprehensive, easy-to-follow tutorial. Perfect for adding beautiful fall decor or adapting for any season, this project is simpler than you think.
RELATED: 9 Fun Fall Wreath Ideas | How To Make Front Door Wreaths
In this article:
- Why Choose a DIY Burlap Bubble Wreath?
- Essential Supplies for Your Burlap Bubble Wreath
- Step-by-Step Burlap Bubble Wreath Tutorial
- Expert Tips & Creative Variations
How to Make a DIY Burlap Bubble Wreath: Your Guide to Rustic Elegance
Craving a charming, handmade touch for your home decor? Look no further than the DIY burlap bubble wreath. This project isn’t just about crafting; it’s about creating a welcoming statement piece that reflects your personal style and creativity. Whether you’re aiming for cozy fall aesthetics, a festive winter display, or a vibrant spring welcome, this versatile wreath provides the perfect canvas. Forget complicated techniques and expensive materials – we’re diving into one of the simplest and most rewarding wreath-making methods available.
Why Choose a DIY Burlap Bubble Wreath?
Making your own burlap bubble wreath offers a multitude of benefits, making it a beloved project among DIY enthusiasts. It’s an incredibly accessible craft, suitable for beginners and seasoned crafters alike, promising beautiful results with minimal effort and time. Here’s why this particular wreath stands out:
- Effortless Elegance: The “bubble” technique creates a full, textured, and inviting look that appears intricate but is surprisingly easy to achieve. The natural texture of burlap lends an inherent rustic elegance, making it a perfect fit for a farmhouse, traditional, or even modern aesthetic.
- Quick & Rewarding: In just about 15-30 minutes, you can transform a few basic supplies into a stunning piece of decor. This quick turnaround provides instant gratification and a tangible sense of accomplishment.
- Unmatched Versatility: One of the greatest advantages of a burlap bubble wreath is its adaptability. Its neutral base makes it a chameleon for any season or holiday. Simply change the embellishments, and your wreath is ready to celebrate spring, summer, fall, or winter. Alternatively, leave it unadorned for a timeless, natural look that complements any interior year-round.
- Cost-Effective Decor: Crafting your own wreath is significantly more economical than purchasing a pre-made one. With just a roll of burlap ribbon and a wire form, you’re already halfway to a beautiful, custom decoration, saving you money without compromising on style.
- Personal Touch: There’s immense satisfaction in displaying something you’ve created with your own hands. A DIY wreath adds a unique, personal touch to your home that store-bought items simply can’t replicate, making your space feel more inviting and authentic.
Wreaths are no longer confined to the front door; they’ve become versatile elements of home styling. Hang them on interior doors to delineate spaces, adorn windows to frame views, place them above a mantel as a seasonal focal point, or even use them as a centerpiece on a console table or dining area. The possibilities are truly endless.
We extend our sincere thanks to Linda from Craftaholics Anonymous for generously sharing the original inspiration behind this fantastic tutorial. Her creativity allows us to bring these wonderful DIY projects to you. You can explore her original article here for more crafting delights.
Essential Supplies for Your Burlap Bubble Wreath
Gathering your materials is the first exciting step in any DIY project. For this burlap bubble wreath, you’ll find that the list is short, sweet, and readily available. Investing in quality supplies, even if basic, will ensure your wreath looks its best and lasts for many seasons to come.
- Roll of 6″ Wide Burlap Ribbon (approx. 10-20 yards): This is the star of our show! The 6-inch width is ideal for creating those full, fluffy “bubbles.” You can find burlap ribbon in various lengths and sometimes even in different colors (though natural tan is classic). The amount needed can vary based on how full you want your wreath, but a 10-yard roll is a good starting point for a 12-inch form, with a 20-yard roll providing extra fullness or enough for larger forms. Consider whether you prefer a tightly woven burlap or a looser, more rustic weave.
- 12″ Wire Wreath Form: This metal base provides the structure for your wreath. Wire forms typically come with several concentric rings connected by crossbars, creating distinct sections. A 12-inch diameter is a popular size for front doors and interior decor, offering a good balance between presence and portability. You can experiment with larger or smaller forms, but adjust your burlap ribbon quantity accordingly.
- Sharp Scissors: A good pair of fabric scissors will make clean cuts through the burlap ribbon, preventing fraying and ensuring a neat finish when you trim the ends. Using dedicated fabric scissors also helps keep them sharper for longer.
- Silk Flowers and Leaves (or other embellishments): This is where your creativity truly shines! While silk flowers and leaves are excellent for a timeless look, think broadly about how you want to personalize your wreath for different seasons or occasions.
- For Fall: Incorporate mini faux pumpkins, acorns, faux berries in deep reds and oranges, pinecones, plaid or buffalo check bows, small faux sunflowers, or cinnamon sticks.
- For Winter/Holidays: Add frosted berries, glittery ornaments, small jingle bells, evergreen sprigs, faux poinsettias, or a festive velvet bow.
- For Spring: Choose pastel-colored faux flowers (like tulips, daffodils, or cherry blossoms), small bird nests with tiny eggs, or delicate green leaves.
- For Summer: Think bright floral picks, nautical elements like small seashells or starfish, or a vibrant patriotic bow.
- For Year-Round Rustic Charm: A simple monogram letter, a plain burlap bow, or dried lavender sprigs can be beautiful.
- Hot Glue Gun and Glue Sticks: Essential for securely attaching all your chosen embellishments. A low-temp glue gun is often safer, but always exercise caution when working with hot glue. Make sure you have plenty of glue sticks on hand, as you’ll use them to ensure everything stays firmly in place.
RELATED: Mesh Wreath Project: 15 DIY Mesh Wreath Ideas For All Seasons
Step-by-Step Burlap Bubble Wreath Tutorial
Now that you have all your supplies ready, it’s time to dive into the fun part: making your very own burlap bubble wreath! Follow these detailed instructions, and you’ll have a gorgeous, handmade wreath in no time.
Step 1. Prepare Your Wire Wreath Form: The Foundation
The first step is crucial for establishing a secure and neat base for your wreath. Take one end of your 6-inch wide burlap ribbon and lay it across one of the wire sections of your wreath form. Tie a simple but firm knot around this section, ensuring it’s tight enough to hold but not so tight that it distorts the wire. You want the knot to be as inconspicuous as possible, ideally tucked to the back or underside of the form, where it will eventually be hidden by the bubbles. This knot anchors your entire wreath, so make sure it’s secure.
Step 2. Begin Forming Your First Burlap Bubbles
With your burlap ribbon securely attached, you’re ready to start creating the signature “bubbles.” Begin by pushing a loop of burlap up through one of the open sections of the wire wreath form (the space between two concentric rings). Once the loop is pushed through, gently twist it sideways. This twist serves a couple of important purposes: it helps to keep the loop in place and ensures that the raw edges of the burlap are tucked inward, creating a neat, finished look for your bubble. Aim for a loop that is about 3-4 inches high – this size will give your wreath a good amount of volume and fullness. Don’t worry about perfection at this stage; you can adjust later.
Step 3. Build Volume and Cover Your Wreath Form
Continue making loops in the same manner. After forming your first bubble, push the next loop through the next available opening or section of the wire form, right beside the one you just completed. As you push each new loop through and twist it, gently push it against the previous bubble. This action helps to hold the previous loop securely in place and begins to build the dense, fluffy appearance of the wreath. Work your way around the entire wreath form, section by section, ensuring you fill each opening. You can create varying sizes of bubbles for a more organic look, or try to keep them uniform for a structured appearance. Keep pushing the burlap through and twisting until the entire wire wreath form is completely covered and as full as you desire. Don’t be afraid to use a generous amount of burlap; the more loops you create, the denser and more luxurious your wreath will appear. You might even create multiple layers of bubbles for extra dimension.
Step 4. Secure and Embellish Your Masterpiece
Once you’ve made your final bubble and are satisfied with the fullness of your wreath, it’s time to secure the end. Cut the burlap ribbon, leaving a tail of about 4-6 inches. You have two main options for finishing: you can either tie another firm knot around a wire section, similar to how you started, or you can simply tuck the end of the burlap deeply into the existing bubbles, ensuring it’s hidden and held firmly by the surrounding loops. The tucking method often provides a seamless finish. Now comes the exciting part: embellishing! Using your hot glue gun, carefully attach your chosen silk flowers, leaves, ornaments, bows, or any other decorative elements. Take a moment to arrange your embellishments before gluing to ensure a balanced and aesthetically pleasing design. Consider creating a focal point or scattering smaller elements evenly across the wreath. Safety first: always be cautious when working with a hot glue gun. Allow the glue to dry completely before hanging.
Want to see how you can make one in just 2 minutes? Then watch this video from Burlap Wreath:
Expert Tips & Creative Variations for Your Burlap Wreath
While the basic steps are straightforward, a few tips and creative ideas can elevate your burlap bubble wreath from beautiful to truly extraordinary. Embrace these suggestions to make your wreath unique and ensure it stands the test of time.
Tips for a Flawless Finish:
- Work on a Flat Surface: This makes it easier to manage the ribbon and ensure your bubbles are consistent in size and placement.
- Don’t Be Afraid to Adjust: As you go, you can always push and pull the bubbles to redistribute fullness and cover any gaps. The burlap is quite forgiving!
- Consider Burlap Color and Texture: While natural tan is classic, burlap comes in various shades (white, cream, brown, even dyed colors). Experiment with different hues or even a patterned burlap ribbon for a unique look. Some burlap is more tightly woven, while others are looser, offering different textural effects.
- Layering for Depth: For an extra lush wreath, consider using two rolls of burlap ribbon or even combining two different colors or textures of ribbon simultaneously. You can push them through together for a marbled effect or alternate colors.
- Secure Embellishments Thoughtfully: Before you start hot gluing, lay out your chosen embellishments on the wreath. Take a step back to view the arrangement from a distance. This helps ensure balance and a pleasing composition. Start with larger elements, then fill in with smaller details.
- Hanging Your Wreath: A simple ribbon tied around the top of the wreath and looped over a door hanger works wonderfully. You can also use floral wire to create a sturdy hanging loop on the back of the wreath.
- Care and Storage: To prolong the life of your burlap wreath, store it in a cool, dry place when not in use. A wreath storage bag or even a large plastic bin will protect it from dust and damage. If it gets dusty, a gentle shake or a light pass with a lint roller usually does the trick.
Creative Variations for All Seasons:
- Rustic Farmhouse Appeal: Keep embellishments minimal – perhaps a simple plaid bow, a few faux cotton bolls, or a personalized wooden initial in the center.
- Holiday Cheer: For Christmas, weave in battery-operated fairy lights, small shatterproof ornaments, and faux frosted berries. For Halloween, add spooky spiders, black crows, or orange and black ribbons.
- Coastal Charm: Incorporate seashells, starfish, a piece of driftwood, or blue and white striped ribbons for a breezy, beach-inspired look.
- Garden Fresh: Attach a small watering can or gardening tools, along with an abundance of vibrant faux flowers and greenery, for a welcoming spring or summer garden theme.
- Monogram Magic: Add a large wooden or metal monogram letter to the center of your wreath for a personalized and sophisticated touch.
- Layered Look: Hang your burlap wreath on top of another, larger grapevine wreath for added texture and dimension.
Dressing up your doors is an effortless way to express your style and impress your guests. Nothing says “Welcome Home” quite like an inviting, handmade wreath gracing your front door. This DIY burlap bubble wreath is not only a fantastic way to add charm to your own home but also makes a thoughtful and personal welcome present for friends and family. It’s so easy and enjoyable to make that you’ll likely find yourself wanting to craft more than just one!
Are you going to give this DIY burlap bubble wreath tutorial a shot? Let me know how it went in the comments section below! Share your tips, variations, and finished projects – we’d love to see them!
Up Next:
- How To Make A One Hour Harvest Wreath | Fall Wreaths
- 21 Fall Door Decorations | DIY Wreaths, Door Hangers, And More
- Recipes For Early Fall | 30 Tasty Dishes To Try This Season
Stay connected with us on Facebook, Twitter, and Instagram for more inspiring DIY ideas and tutorials!Editor’s Note: This post was originally published on September 21, 2016, and has been updated for quality and relevancy, ensuring you have the most current and helpful information for your crafting endeavors.