
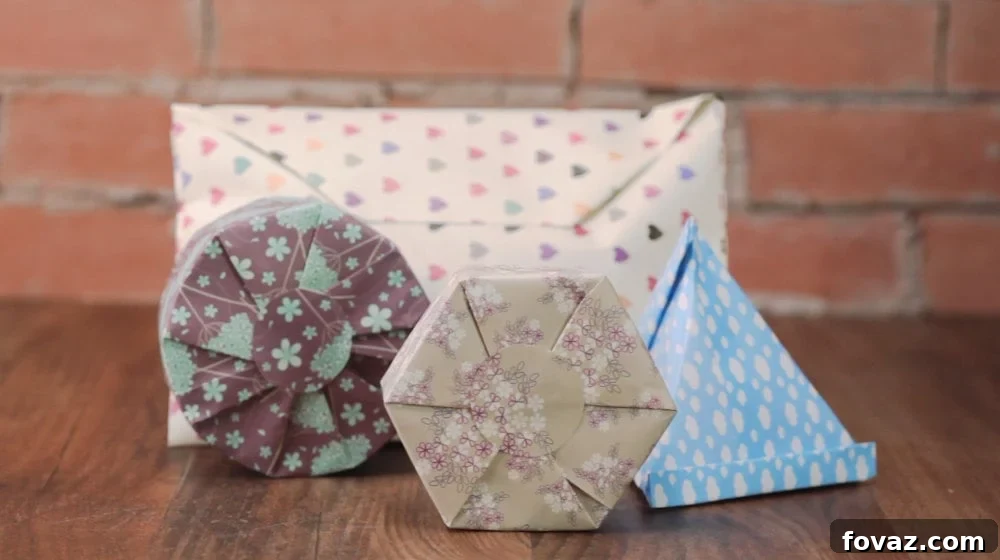
Unlock the secrets to beautifully wrapped presents this holiday season! Learn how to effortlessly wrap even the most challenging oddly-shaped gifts with these four quick, easy, and creative gift wrapping ideas for Christmas.
RELATED: 22 Awesome DIY Christmas Gift Tags For The Gift-Giving Holiday
In this article, you’ll discover:
- Mastering Oddly-Shaped Gifts for the Holidays
- How to Expertly Wrap a Stuffed Animal
- Clever Ways to Wrap a Ball
- Gift Wrapping Techniques for Cylindrical Boxes
- Creative Wrapping for Hexagon Boxes
Mastering the Art of Gift Wrapping: Creative Ideas & Expert Tips for the Holidays
The holiday season is a time for joy, giving, and beautifully presented gifts. However, the excitement can quickly turn into frustration when faced with an awkwardly shaped present that refuses to be neatly tucked into a standard box. Fret no more! This comprehensive guide is dedicated to transforming your gift-wrapping woes into moments of creative triumph. We’ll explore ingenious techniques, essential tools, and brilliant DIY ideas to help you conquer even the most challenging gift shapes with elegance and efficiency, ensuring your presents are as delightful on the outside as they are on the inside.
Conquering the Challenge: How to Wrap Oddly-Shaped Gifts for the Holidays
No Box? No Problem!
Many gifts don’t come in neat, rectangular boxes, and finding the right packaging can often be a head-scratcher. Traditional gift bags, while convenient, can be expensive, generic, and contribute significantly to holiday waste, often ending up in landfills after a single use. Our focus here is on providing easy, budget-friendly, and eco-conscious gift wrapping ideas that eliminate the need for costly specialty bags or boxes. By utilizing simple wrapping paper and clever folding techniques, you can achieve a stunning, personalized look that truly stands out under the Christmas tree, all while minimizing your environmental footprint.
Wrapping oddly-shaped gifts might seem daunting at first glance. Whether it’s a cuddly stuffed animal, a perfectly round ball, or a unique cylindrical or hexagonal container, each presents its own set of challenges. This article will arm you with practical, step-by-step tutorials that will not only make the process simple but also enjoyable. Imagine the delight on your loved one’s face when they receive a gift that’s beautifully wrapped, showing the extra thought and effort you put into its presentation!
We believe that a beautifully wrapped gift is an extension of the gift itself, adding anticipation and charm. These techniques are designed to be total time-savers, allowing you to wrap more gifts efficiently without compromising on style. Plus, by mastering these DIY methods, you’ll find them incredibly budget-friendly, making your holiday preparations smoother and more sustainable. Gone are the days of struggling with too little paper or an abundance of unsightly tape – prepare to become a gift-wrapping maestro and enjoy a stress-free holiday season!
Looking for even more inspiration to make your presents pop? Discover additional fantastic gift wrapping ideas and techniques to elevate your holiday presentations and truly impress your recipients.
Ready to transform your gift-wrapping experience from a chore into a creative joy? Dive into our detailed tutorials below, and don’t forget to share your own ingenious gift wrapping ideas in the comments section! Your insights could inspire fellow DIY enthusiasts!
Essential Tools for Perfect Gift Wrapping
Before you begin your wrapping adventure, ensure you have these fundamental tools on hand. Having the right supplies will make the process smoother, more efficient, and result in a professional-looking finish that will impress anyone who receives your thoughtful gift.
- High-Quality Wrapping Paper: Choose a sturdy paper that’s not too thin (to avoid tears, especially with sharp edges) and not too thick (to allow for crisp, manageable folds). Consider festive patterns, elegant solid colors, or even eco-friendly options like recycled paper or fabric for a unique touch.
- Sharp Scissors: A good pair of sharp scissors is crucial for clean, straight cuts, preventing jagged edges that can mar your final presentation. Investing in a dedicated pair for paper cutting will save you frustration.
- Scotch Tape (Invisible/Matte Finish): The classic choice for securing flaps and seams. Its matte finish makes it almost invisible on most wrapping papers, ensuring a seamless and polished look. Look for dispensers that allow for easy, one-handed tearing to speed up the process. Recommended Scotch Tape
- Double-Sided Tape: A secret weapon for a truly polished, professional finish! Double-sided tape allows you to create invisible seams, attach embellishments, and secure inner folds without any visible tape lines. It’s especially useful for delicate details and achieving that high-end look. Recommended Double-Sided Tape
- Optional but Highly Recommended Tools:
- Ribbons and Bows: For adding a decorative flourish, a pop of color, or an elegant texture. Experiment with different materials like satin, grosgrain, jute, or organza.
- Gift Tags: Personalize your gifts with homemade or store-bought tags. A thoughtful message can make a gift even more special.
- Ruler or Measuring Tape: Essential for precise cuts and folds, especially helpful for larger items or when wrapping gifts with geometric shapes to ensure perfect symmetry.
- Bone Folder: (For advanced wrappers) This simple tool helps create incredibly crisp creases and folds, giving your wrapped presents a professional, tailor-made appearance.
- Adhesive Dots or Glue Gun: Handy for attaching heavier embellishments like pinecones or small ornaments securely.
Tutorial #1: How to Expertly Wrap a Stuffed Animal
Wrapping a soft, squishy, and often irregularly shaped stuffed animal can be quite a puzzle. Unlike rigid boxes, stuffed animals offer no firm edges to guide your paper, leading to lumpy, uneven results with traditional methods. Our ingenious envelope-style method provides a charming and secure way to encase your plush gift, making it feel extra special and presentable.
For a dynamic visual demonstration of this technique, please refer to the animated guide often shared on popular DIY platforms, which clearly illustrates each step.
- Step 1: Prepare Your Paper. Begin by laying out a rectangular sheet of gift wrapping paper on a flat, clean surface. Ensure it’s generously sized to comfortably wrap around your stuffed animal with ample overlap, both horizontally and vertically. It’s better to have too much paper than too little.
- Step 2: Create Clean Edges. Fold the left and right sides of your paper in towards the center by approximately 1 inch each. This creates a neat, finished edge for your “envelope,” preventing raw paper edges from showing and adding a professional touch.
- Step 3: Secure the Sides. Carefully seal each newly folded side with a strip of double-sided tape. This step is crucial for achieving an invisible and clean seam, enhancing the overall presentation without any visible tape marks.
- Step 4: Form the Bottom Flap. Fold the bottom edge of the paper upward, leaving a generous few inches for what will become the top flap of your envelope. The exact measurement will depend on the size and bulk of your stuffed animal; ensure enough space for the item to fit comfortably.
- Step 5: Angle the Corners. Fold the top left and right corners of this upward-folded section down, creating two precise triangular flaps. This forms the distinctive, elegant “envelope” top that will secure your plush toy.
- Step 6: Seal the Bottom. Use double-sided tape to firmly secure these newly folded triangular flaps, ensuring they stay perfectly in place. This creates the neat, closed bottom of your gift “envelope.”
- Step 7: Insert & Seal. Gently insert your stuffed animal into the pouch you’ve created. Ensure it’s nestled comfortably without tearing the paper. Once positioned inside, fold down the top flap and seal your “envelope” with another piece of double-sided tape. Voila! A perfectly wrapped, adorable stuffed animal, ready to delight!
- Pro Tip: For very bulky stuffed animals, consider using two sheets of paper or a sturdier kraft paper to prevent tearing. You can also add a small piece of tissue paper inside for extra cushioning and a luxurious feel.
Tutorial #2: Clever Ways to Wrap a Ball
A spherical object, with its complete lack of flat surfaces, is another common gift-wrapping nemesis. Traditional methods often result in a crumpled, messy appearance, making the gift look hastily prepared. This clever technique elegantly encloses a ball, creating a smooth, professional finish that is both pleasing to the eye and surprisingly simple to execute, turning a challenging shape into a beautifully presented gift.
Observe the detailed steps in an animated tutorial for wrapping a ball, commonly found on creative crafting channels, for a clear visual guide.
- Step 1: Select Your Paper. Start with a rectangular sheet of gift wrapping paper. The width should be roughly twice the circumference of your ball (to allow for sufficient pleating), and the length should be at least one and a half times its diameter to ensure sufficient coverage for the top and bottom folds without struggling.
- Step 2: Create the Central Seam. Lay your paper flat. Fold the left and right sides of the paper in towards the center, allowing them to meet or slightly overlap. This creates the main body of the wrap.
- Step 3: Secure the Seam. Use double-sided tape to firmly seal the sides shut along the length of the paper. This creates a neat, seamless tube around which your ball will eventually sit.
- Step 4: Form the Bottom Enclosure. Fold the bottom edge of the paper in by about 1 inch. This initial fold creates a foundation for the subsequent pleats and helps to tidy the raw edge.
- Step 5: Reinforce and Pleat the Bottom. Secure this initial fold with tape. Then, gently push the edges of the bottom opening inwards, gathering the paper and folding it into a neat, star-like pattern or a series of small, even pleats. Work your way around the circle, securing each fold with tape as you go, until the bottom is fully enclosed and flat. Aim for uniform pleats for the best aesthetic.
- Step 6: Insert the Ball. Carefully place your ball inside the wrapped structure, ensuring it sits snugly at the bottom. The stability of the base will prevent the ball from shifting.
- Step 7: Seal the Top. Now, mimic the bottom enclosure process for the top edge. Fold the top edge inward, gather the paper, and create a neat, star-like pattern of folds. Secure each fold with tape until the top is completely sealed, mirroring the professional look of the bottom.
- Pro Tip: For an extra polished look, cut a small circle of matching or contrasting wrapping paper and tape it over the center of the gathered folds on both the top and bottom. This hides any imperfections, reinforces the seal, and adds a lovely decorative touch that draws the eye.
RELATED: Christmas Gifts For Friends | 11 Delightful Ideas You Can DIY
Tutorial #3: Gift Wrapping with a Cylindrical Box
Cylindrical boxes, like those for bottles, candles, or gourmet treats, can be tricky due to their continuous curved surface. The challenge lies in creating neat, flat ends without excessive bulk or messy pleats. This method, often referred to as “pleating” or “fanning,” ensures a clean, elegant finish on both ends of your cylindrical gift, making it look professionally wrapped.
A visual demonstration for wrapping cylindrical boxes using the pleating method can be found in many detailed DIY gift-wrapping video guides, offering clear steps to follow.
- Step 1: Measure and Wrap. Begin with a rectangular sheet of gift wrapping paper. Measure enough paper to wrap around the circumference of your box with a slight overlap (about 1-2 inches) for taping, plus leave 3-4 inches of excess paper at both the top and bottom of your box. This extra paper is crucial for the pleating process. Wrap the paper tightly around your cylindrical box and secure the long seam with a strip of tape.
- Step 2: Prepare the Top End. Stand the box upright on a flat surface. At the top end, begin folding the excess paper inward. Take a small section of the paper (about 1-2 inches wide) directly above the box, fold it inward into a crisp triangular shape, and press it firmly against the top circular surface of the box. Secure this first fold with a small piece of tape.
- Step 3: Continue Pleating. Continue working your way around the circular edge of the box, making small, even triangular folds. Each new fold should slightly overlap the previous one, creating a continuous, fanned pattern. Press each fold firmly and tape it securely to the top of the box as you go, ensuring the pleats are tight and symmetrical.
- Step 4: Repeat for the Bottom. Flip your box over and repeat this exact pleating process on the bottom of the box. Consistency in the size and tightness of your folds here ensures a balanced and professional look for both ends of your gift.
- Step 5: The Finishing Touch. To give your wrapped cylindrical box a truly polished appearance, cut a small circular piece of matching or contrasting wrapping paper. The circle should be just large enough to cover the center of your pleated folds on both ends. Affix this circle with double-sided tape to neatly conceal all the pleats and tape, adding a sophisticated and clean finish.
Tutorial #4: Gift Wrapping with a Hexagon Box
Hexagonal boxes, with their six distinct sides and sharp angles, offer a unique geometric appeal but can be challenging to wrap seamlessly with standard methods. This technique embraces the angular nature of the box, creating crisp, clean folds that highlight its unique shape rather than hiding it under clumsy, ill-fitting paper, resulting in an impressively tailored look.
For a detailed visual walkthrough of wrapping a hexagon box, look for animated tutorials on craft and DIY channels, which can provide invaluable guidance.
- Step 1: Measure and Wrap. Start with a rectangular sheet of gift wrapping paper. Ensure it’s wide enough to wrap around the full perimeter of your hexagon box with an overlap for taping (again, about 1-2 inches), and leave approximately 3-4 inches of excess paper at both the top and bottom of the box. Wrap the paper tightly around the sides of your box and secure the seam with tape along one of the hexagon’s edges, ensuring it runs neatly along a corner.
- Step 2: Create the Top Folds. Stand the box upright on your work surface. At the top end, choose one of the hexagon’s edges as your starting point. Take the excess paper extending upwards from this edge and fold it inward, creating a crisp triangular fold that lies flat against the top surface of the box, following the line of the edge. Secure this fold with a small piece of tape.
- Step 3: Continue Around the Edges. Move to the next adjacent edge of the hexagon. Take the remaining excess paper and create another crisp triangular fold, bringing it flush against the top surface of the box. Repeat this precise folding process for all six edges of the hexagon. You will end up with six neat triangular folds meeting precisely in the center, perfectly outlining the hexagon’s unique shape.
- Step 4: Repeat for the Bottom. Carefully flip your box over and repeat the exact folding process for the bottom end of the box. Ensure your folds are consistent and crisp on both ends for a perfectly symmetrical and polished finish, reflecting the geometric beauty of the box.
- Step 5: The Final Polish. To achieve a truly professional and elegant look, cut a small circular piece of wrapping paper (or, for an even more precise touch, a hexagonal piece) that is large enough to cover the center point where all the triangular folds meet. Attach this piece with double-sided tape to neatly conceal the seams and tape, adding a refined decorative element and completing your perfectly wrapped hexagonal gift.
Check out these four fantastic gift wrapping tutorials in the video below for a visual guide:
(Embed or link to a detailed video demonstration of these wrapping techniques, showing each step in action.)
Beyond the Basics: Elevate Your Gift Wrapping
Now that you’ve mastered the art of wrapping tricky shapes, let’s explore ways to add that extra “wow” factor to your presents. Thoughtful embellishments and creative finishing touches can transform a simple package into a memorable gift, reflecting your personal touch and creativity, making the act of giving even more special.
Creative Embellishments and Finishing Touches
- Ribbons and Bows: From classic satin to rustic twine, ribbons are essential for adding elegance and flair. Learn different bow-tying techniques, or use pre-made bows for convenience. Experiment with layering ribbons of different widths and textures for a sophisticated look.
- Personalized Gift Tags: Go beyond just names. Use tags to convey a short, heartfelt message, a inside joke, or a clue about the gift. Consider making your own DIY Christmas gift tags from cardstock, craft paper, or recycled materials for an even more personal and unique touch.
- Natural Accents: Incorporate elements from nature for a charming and eco-friendly touch. Sprigs of evergreen, dried orange slices, small pinecones, cinnamon sticks, or even tiny floral cuttings can add a beautiful, aromatic, and rustic appeal.
- Mini Ornaments: Attach a small, inexpensive ornament to the ribbon or bow. It acts as an extra little gift and can be repurposed by the recipient for their Christmas tree or home decor, extending the joy of your present.
- Stamps and Stencils: If you’re using plain wrapping paper (like kraft paper), personalize it with festive stamps or stencils. You can create unique patterns, add seasonal motifs, or even hand-letter a custom message.
- Fabric Remnants: Small scraps of fabric, lace, burlap, or even repurposed scarves can be tied around gifts for a rustic, vintage, or elegant look. This also adds a tactile element that makes the gift more inviting.
- Photos: Attach a small, printed photo of you and the recipient to the gift tag for a truly personal and sentimental touch.
Eco-Friendly Wrapping Alternatives
Reducing waste doesn’t mean compromising on style or presentation. Embrace sustainable gift wrapping practices this holiday season to lessen your environmental impact without sacrificing beauty:
- Furoshiki (Fabric Wrapping): Inspired by traditional Japanese wrapping cloth, Furoshiki uses beautiful fabric squares (like scarves, tea towels, or fabric scraps) that can be reused countless times. It’s an art form that looks incredibly elegant and becomes part of the gift itself.
- Reused Materials: Get creative with everyday items. Old maps, colorful newspaper comics, brown paper grocery bags (decorated with stamps or drawings), children’s artwork, or even sheet music can be fantastic, unique, and sustainable wrapping options.
- Reusable Gift Boxes and Tins: Invest in sturdy, attractive gift boxes or tins that can be gifted and then reused by the recipient for storage, organization, or future gift-giving. This eliminates single-use waste entirely.
- Minimalist Approach: Sometimes, less is more. A simple brown kraft paper wrap adorned with a single sprig of greenery and tied with natural twine can be incredibly chic, rustic, and environmentally conscious. Focus on quality over quantity for embellishments.
- Plantable Seed Paper: For an innovative eco-friendly option, wrap gifts in plantable seed paper. Once unwrapped, the paper can be planted to grow flowers or herbs!
There you have it, DIY enthusiasts! You’re now equipped with creative gift wrapping techniques you can rely on for gifts without boxes, or for those wonderfully oddly-shaped items that once caused so much stress. Whether you aim for practicality, artistic flair, or eco-consciousness, these smart gift wrapping ideas will serve you well, making your holiday preparations enjoyable and your gifts unforgettable.
Have fun making your presents look as thoughtful and special on the outside as they are on the inside. Happy wrapping, and happy holidays!
Do you have any brilliant gift wrapping ideas for Christmas of your own that you swear by? We’d absolutely love to hear about them and learn from your creativity! Leave a comment below and share your festive secrets with our community!
UP NEXT:
- 25 DIY Gifts You Can Make In Under An Hour
- 4 Awesome Gift Wrapping Ideas | Gift Wrapping Tutorials
- 17 DIY Placemat Ideas To Make Your Thanksgiving Table Stand Out
Stay connected with us for more DIY inspiration and creative ideas on Facebook, Twitter, and Instagram!
Editor’s Note: This post was originally published on November 29, 2016, and has been updated for quality, relevancy, and comprehensiveness to provide the best possible guide for our readers.