
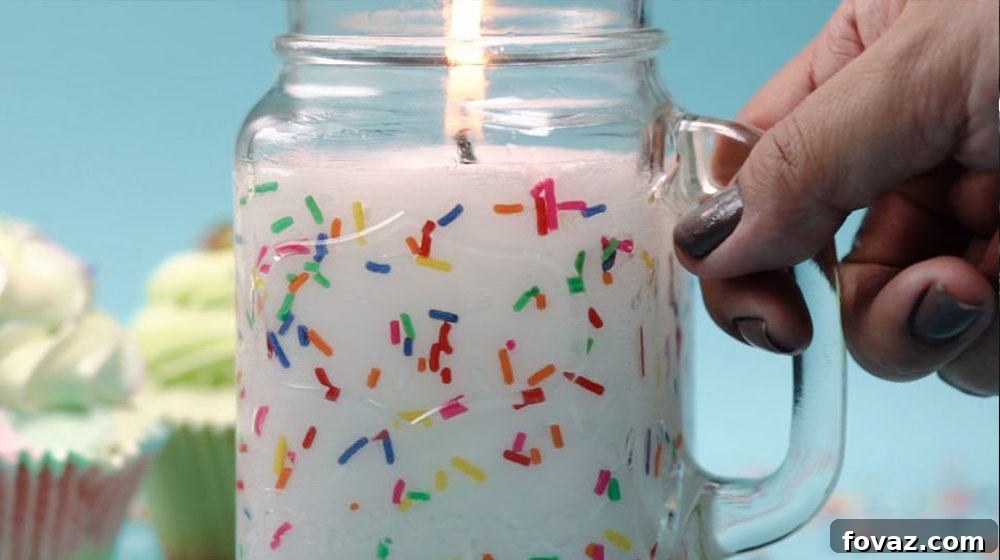
Welcome to the ultimate guide for adding a splash of joy and color to your living space! If you’re on the hunt for a unique and utterly charming home decor item or a thoughtful handmade gift, look no further. This delightful funfetti candle is a fantastic addition to any room, instantly infusing it with a sense of playful celebration. Imagine celebrating your birthday all year long or simply brightening up a dull corner with these vibrant, candy-coated creations. Plus, who can resist the whimsical charm of funfetti? Dive into our comprehensive tutorial below to discover how simple it is to craft your very own, and don’t forget to share your creative DIY candle ideas in the comments section!
Decorate Your Room With This Ingenious Funfetti Candle: A DIY Guide
Bring a perpetual party atmosphere into your home with this absolutely adorable and seemingly “tasty” funfetti candle! This engaging DIY candle project is not only incredibly quick and simple to execute but also promises hours of fun, culminating in a truly captivating piece of decor. It’s an ideal way to express your creativity, personalize your space, or craft a truly memorable gift for a loved one. Whether you choose to infuse it with a few drops of your favorite essential oil for a calming aroma or prefer to keep it unscented to let its visual charm speak volumes, this candle is sure to impress. Get ready to transform ordinary mason jars into extraordinary, candy-coated candles that sparkle and shine. Follow our detailed tutorial to create your own, and inspire others by letting us know your unique candle DIY ideas in the comments! Are you excited to embark on this fun-filled journey to make your own funfetti candle? Let’s get started!
Why Craft Your Own Funfetti Candle? The Joys of DIY Candle Making
There’s something incredibly satisfying about creating something beautiful and functional with your own hands, and making funfetti candles is no exception. Beyond the sheer enjoyment of the crafting process, there are numerous compelling reasons to embark on this particular DIY adventure. Firstly, homemade candles offer unparalleled personalization. You have complete control over the scent, the color of the wax, and, of course, the type and density of your funfetti sprinkles. This allows you to tailor each candle to specific occasions, moods, or recipient preferences, making them truly unique.
Secondly, crafting your own candles can be surprisingly cost-effective compared to purchasing high-end designer candles, especially when buying materials in bulk. This project reuses common items like mason jars, further reducing waste and enhancing sustainability. Thirdly, funfetti candles are the ultimate expression of celebratory decor. They are perfect for birthdays, baby showers, holiday parties, or simply as an everyday reminder to find joy in the small things. Imagine a row of these cheerful candles gracing your mantelpiece or acting as a vibrant centerpiece. Lastly, the act of making a candle is a wonderfully relaxing and mindful activity, a perfect way to de-stress and unleash your inner artist. It’s more than just a candle; it’s a tiny vessel of happiness you’ve created yourself.
What you’ll need to make your Funfetti Candles:
- Two pint-sized (16oz) mason jars (or jars of your preferred size)
- Pre-waxed candle wicks (with bases for easy attachment)
- Hot glue gun with glue sticks
- A pencil or wick centering tool
- Scotch tape or clothespins (for securing the wick)
- 2 tablespoons of water
- 1 tablespoon of corn syrup (light corn syrup works best)
- A small paintbrush or a soft, clean cloth
- 1/2 cup of high-quality rainbow sprinkles (ensure they are non-bleeding if possible)
- Paraffin wax flakes (or soy wax for a more natural alternative)
- Essential oils or fragrance oils (optional, for a scented candle)
- A heat-safe measuring cup with a spout (for easy pouring of melted wax)
- Double boiler setup (or microwave-safe container for melting wax)
- Thermometer (optional, but recommended for wax temperature control)
How to make this delightful Funfetti Candle: A Step-by-Step Guide
Step 1: Secure the Wick to the Bottom of the Jar
The foundation of a good candle lies in a properly centered wick. Begin by heating your hot glue gun. Once ready, apply a small dab of hot glue to the metal base of your pre-waxed wick. Carefully lower the wick into the center of the clean mason jar, pressing firmly onto the bottom glass surface. Try to center the wick as accurately as possible; a well-centered wick ensures an even burn, preventing tunneling and maximizing your candle’s lifespan. Allow the glue to cool and set completely before moving on to the next step, ensuring the wick is securely anchored.
Step 2: Prepare the Adhesive Mixture for Your Sprinkles
To ensure your vibrant sprinkles adhere beautifully to the inside of the jar, we’ll create a simple, food-safe adhesive. In a small, separate bowl, combine 2 tablespoons of water with 1 tablespoon of corn syrup. Stir the mixture until it’s thoroughly blended and smooth. This concoction acts as a gentle, transparent glue that will hold your funfetti in place without affecting the candle’s burn or aesthetics. The consistency should be slightly viscous but easy to spread.
Step 3: Coat the Inside of the Jar with the Adhesive Mixture
Now, it’s time to apply our homemade adhesive. Dip your small paintbrush or a clean cloth into the corn syrup and water mixture. Carefully and evenly coat the entire interior surface of the mason jar. Pay special attention to reaching the lower parts and ensuring comprehensive coverage, as this is where your sprinkles will stick. A consistent, thin layer is key for an even sprinkle application. Avoid making the layer too thick, as this could cause drips or an uneven distribution of sprinkles.
Step 4: Decorate the Jar with Rainbow Sprinkles
This is where the “funfetti” magic truly comes alive! Hold the jar horizontally, tilting it slightly. Add a spoonful of your rainbow sprinkles into the jar. Slowly and gently roll the jar around, allowing the sprinkles to tumble and adhere to the sticky interior walls. The goal is to create an even, colorful coating. Once you’ve covered a section, add another spoonful of sprinkles and repeat the rolling process until the entire inside of the jar is coated completely with a vibrant array of colors. Don’t be afraid to experiment with the density of sprinkles – more sprinkles mean more fun!
Step 5: Prepare and Pour the Melted Wax into the Jar
Next, it’s time for the wax. Using a double boiler method (heating wax in a heat-safe container placed over boiling water) is the safest way to melt paraffin wax. Avoid direct heat to prevent scorching. Once the wax is fully melted and clear, let it cool slightly to around 180-185°F (82-85°C) before pouring. This temperature range helps prevent the sprinkles from melting or fading. Optional: If you desire a scented candle, now is the time to add your essential oils or fragrance oils. Follow the manufacturer’s recommendations for the correct percentage, usually added just before pouring. Carefully and slowly pour the melted wax into the funfetti-coated jar, trying to minimize disturbance to the sprinkles. Pouring slowly also helps prevent air bubbles.
Step 6: Secure the Wick and Allow the Candle to Cool
Immediately after pouring the wax, ensure your wick remains centered. A simple trick is to gently wrap the top end of the wick around a pencil, then rest the pencil horizontally across the top rim of the jar. This keeps the wick upright and perfectly centered as the wax hardens. Now, the most crucial part – patience! Allow your funfetti candle to cool and set completely. This process can take anywhere from 30 minutes to 1 hour, or even longer for larger candles, depending on the room temperature. For optimal results, let it cure for a full 24 hours before its first burn, allowing the wax to fully harden and the fragrance to bind effectively.
Step 7: Trim the Wick and Enjoy Your New Funfetti Candle
Once your candle has completely cooled and cured, it’s almost ready for its debut! Before lighting, use a pair of scissors or wick trimmers to snip the wick down to about 1/4 inch (0.6 cm) in length. Trimming the wick is an essential step for a clean, even burn, preventing excessive soot and ensuring a steady flame. A longer wick can lead to a larger flame, quicker burning, and ‘mushrooming’ which can affect the candle’s performance. Now, light your beautifully crafted funfetti candle and bask in its charming glow. Enjoy your new, personalized piece of home decor, or present it as a thoughtful, handmade gift!
Personalizing Your Funfetti Candles: Endless Creative Possibilities
The beauty of DIY projects lies in their adaptability, and these funfetti candles offer a canvas for endless creativity. Don’t limit yourself to just rainbow sprinkles! Consider using specific color palettes to match your home decor or a particular season. Think pastel sprinkles for spring, red and green for Christmas, or even metallic sprinkles for a touch of elegance. You can also experiment with different jar shapes and sizes – from small votives to large apothecary jars – to create a varied collection.
For an extra layer of personalization, dive into the world of fragrance oils. Beyond basic lavender or vanilla, explore complex blends like “birthday cake” to truly complement the funfetti theme, or “ocean breeze” for a refreshing twist. You can also add a small amount of candle dye to your wax before pouring, giving the wax itself a pop of color that peeks through the sprinkles. For gifting, tie a ribbon around the jar or create a custom label to make your homemade candle even more special. The possibilities are truly boundless, allowing each funfetti candle you create to be a unique reflection of your style and imagination.
Candle Safety First: Essential Tips for Enjoying Your Homemade Candles
While your funfetti candle is a delightful addition to any space, it’s crucial to prioritize safety when burning any candle. Always keep these important tips in mind to ensure a safe and enjoyable experience.
- Never Leave a Burning Candle Unattended: This is the golden rule of candle safety. Always extinguish candles when leaving a room or going to sleep.
- Keep Away from Flammables: Place your candle on a stable, heat-resistant surface, away from anything that can catch fire, such as curtains, paper, decorations, and bedding.
- Trim the Wick: As mentioned in our tutorial, always trim your wick to 1/4 inch before each burn. This helps prevent excessive soot, a too-large flame, and uneven burning.
- Avoid Drafts: Burning candles in a drafty area can cause uneven burning, excessive dripping, and increased soot.
- Keep Out of Reach: Ensure candles are placed out of reach of children and pets to prevent accidental knocking over or burns.
- Don’t Burn for Too Long: For optimal safety and candle longevity, do not burn candles for more than 3-4 hours at a time. Allow the wax to cool completely before relighting.
- Know When to Stop: Discontinue use when only 1/2 inch of wax remains in the jar. Burning past this point can cause the jar to overheat and potentially crack or shatter.
By following these simple safety guidelines, you can safely enjoy the warm glow and festive charm of your beautiful funfetti candles for many hours to come.
Check out the full tutorial in the video below for a visual guide!
Do you have any unique DIY candle ideas of your own? We’d absolutely love to hear about them and see your creations! Share your thoughts, tips, and personal touches in the comments section below and inspire fellow crafters. Your next great idea could be someone else’s next favorite project!
And if you are looking for more fantastic DIY Christmas gifts to add to your crafting list, be sure to check out these 25 DIY gifts you can make in under an hour. These quick and easy projects are perfect for thoughtful, last-minute presents that truly come from the heart.
Stay connected and inspired with us across our social media channels! Follow us on Facebook, Twitter, Pinterest and Instagram for daily doses of DIY inspiration, tutorials, and a vibrant community of makers!