

At a Glance: Floating Witch Hat Lights
- About 10 minutes per hat. Run clear fishing line through each hat tip, center a battery light under the tip, and hang from a hook anchored in solid wood framing.
- Made for outdoor use. Choose lights and battery boxes rated for outdoors or protect the box from moisture.
- Three build levels. A basic covered-porch version, a mid-level set with outdoor-rated lights and a timer, or a durable version built to last for years.
To make floating witch hat lights, thread clear fishing line through the very tip of each hat and anchor it inside with a safety pin. Clip or attach the battery fairy light to that pin so the weight sits centered under the tip, pin the light strands under the brim for balance, and hang the hat from a screw hook set into porch framing. Jump to the steps below.
There’s a special moment on an October evening when the porch lights come on and a row of witch hats seems to hover. Wind and damp air challenge decorations designed for indoors, so this guide focuses on simple fixes that keep the hats level and lit through rainy, windy nights.
What you need to make floating witch hat lights
Per hat
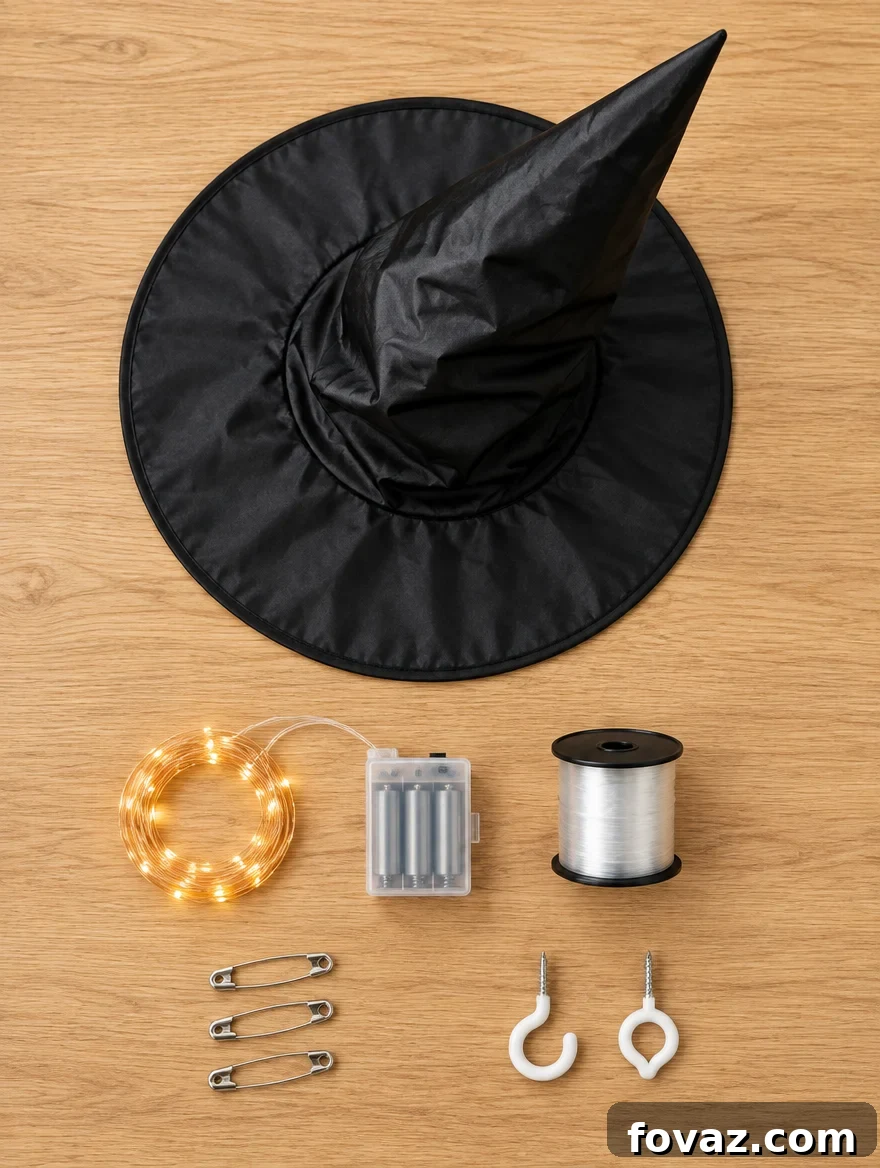
- 1 witch hat. Thin polyester with a cone that stands on its own.
- 1 strand of battery fairy lights. Preferably outdoor-rated, including the battery box.
- Clear fishing line. About 3 feet of monofilament per hat.
- About 5 large safety pins.
- 1 screw-in ceiling hook. Cup hook or screw eye that will bite into framing.
Tools: large sewing needle, scissors, drill with a small bit, and a sturdy stepladder. Optional: small fishing swivel and a plastic file folder for a cone liner.
Print supply list
Quick tip: Check that the lights (and the battery box) are labeled for outdoor use. Outdoor-rated sets resist moisture and last far longer in damp fall weather.
What can go wrong outdoors?
Hooks that let go
Adhesive hooks usually need a perfectly smooth surface and may fail on textured porch ceilings. Screw hooks can also loosen if they bite only into thin boards. Aim for the framing behind ceiling planks and follow the mounting steps below.
Battery boxes that get wet
Some light strands are rated for outdoor use but come with a battery box that is not. Moisture can enter the box through the door or switch, causing corrosion and flicker. If the box isn’t weather-resistant, protect it as described in the steps.
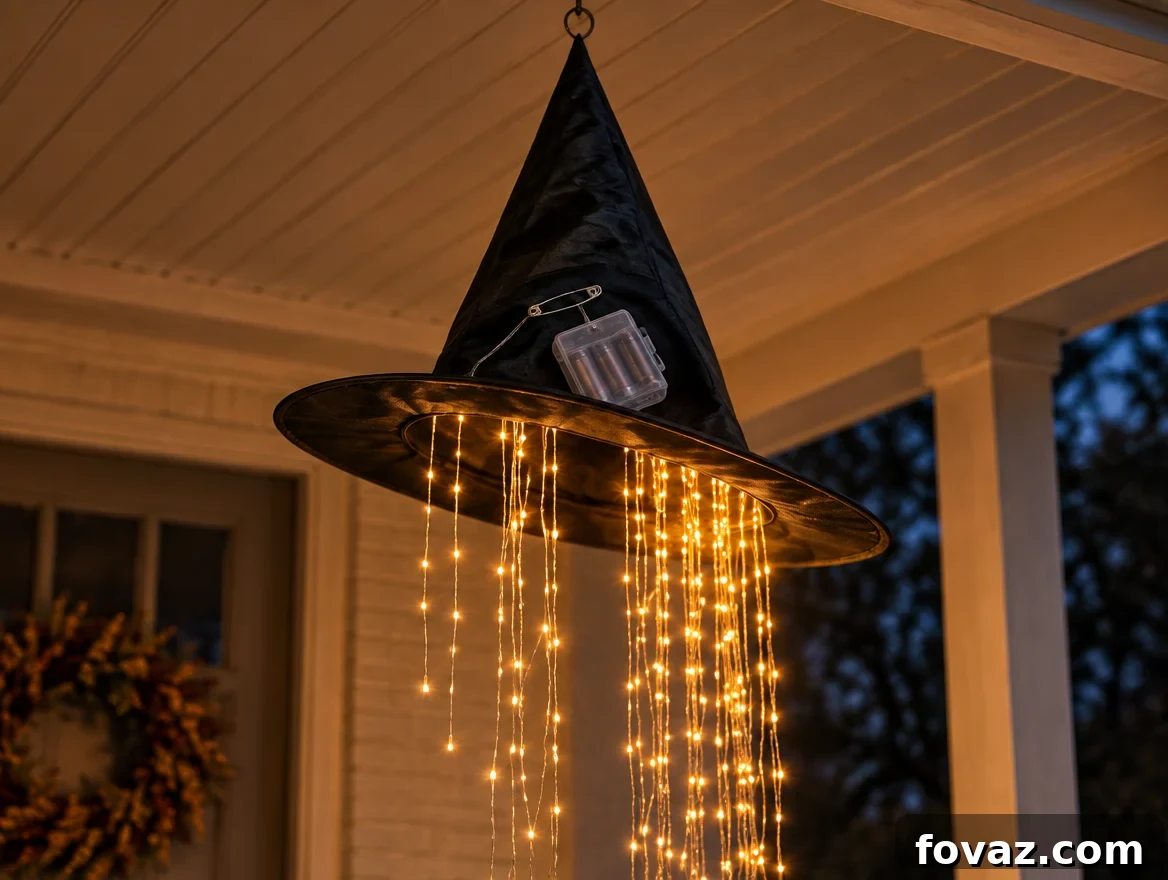
How to make floating witch hat lights
Make one test hat first and leave it outside overnight. Once it holds up, build the rest. The process breaks into four main phases: prep the hat, add the lights and balance, mount securely, and test and adjust.
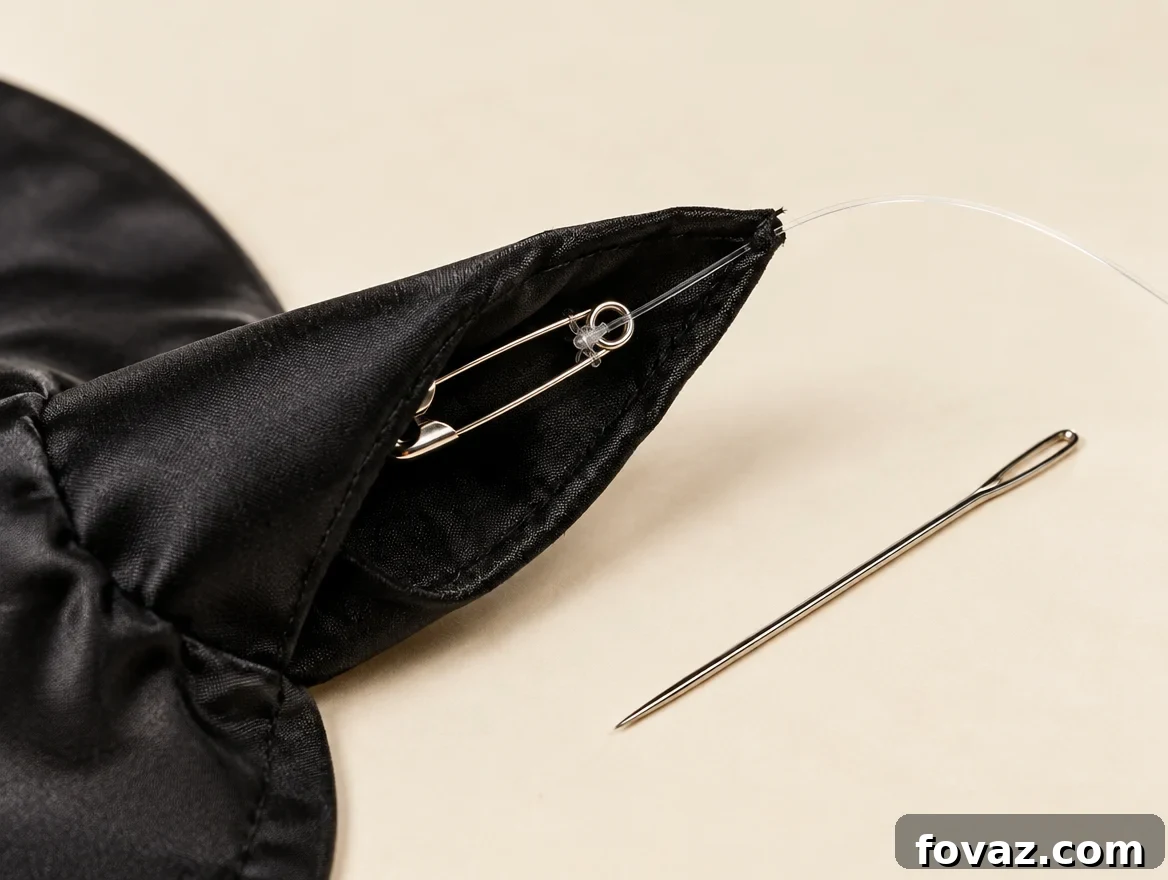
Prep the hat
Stiffen the cone with a plastic liner, run fishing line out the very tip, and anchor it to a safety pin inside so the fabric never bears the full load.
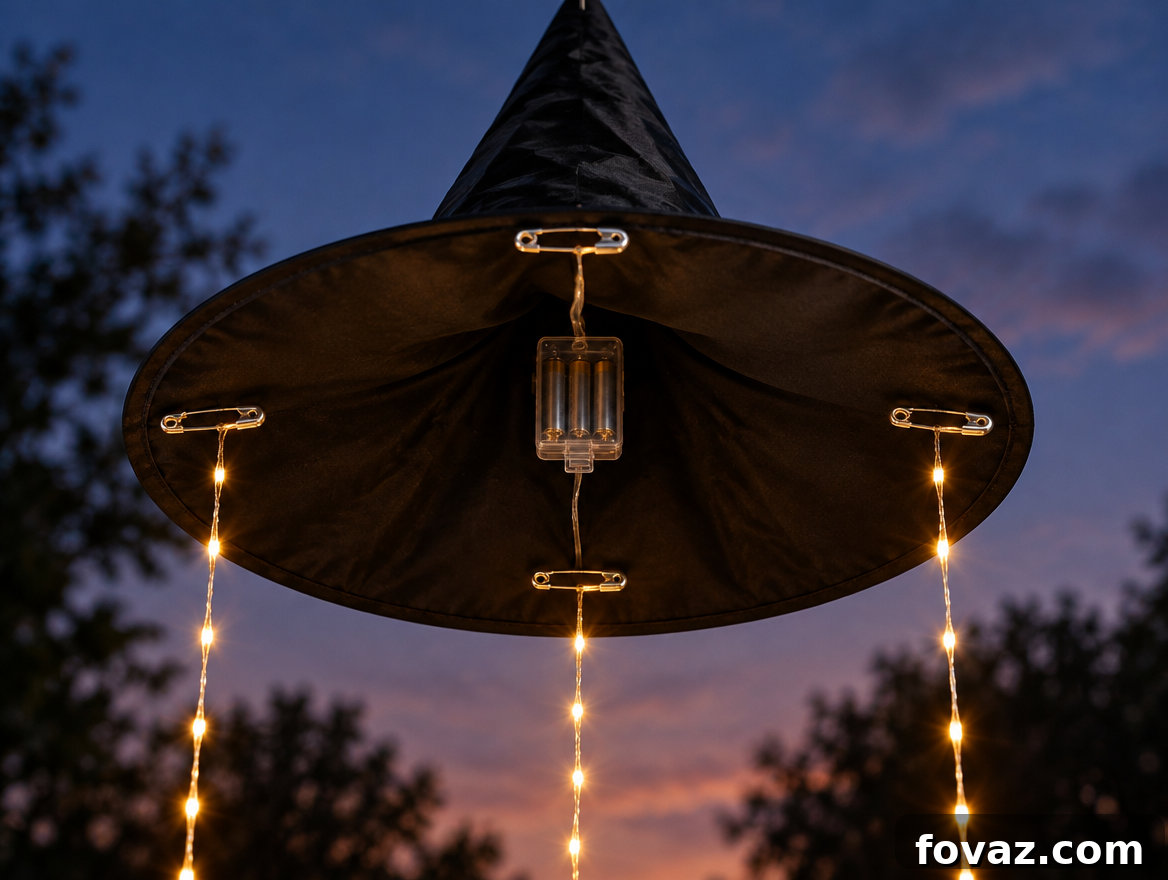
Add the glow and center the weight
Clip the battery box to the safety pin so it sits directly under the tip, then pin the light strands evenly under the brim so the hat hangs level.

Mount it so it holds
Screw hooks into solid wood framing, tie a knot that won’t slip, and add a swivel so the line won’t twist as the hat turns.

Hang, test, adjust
Stagger heights, check the row from the sidewalk at dusk, and recheck your test hat after a night outdoors to confirm balance and durability.
Detailed steps
This project is straightforward but attention to detail prevents problems. Read each step before you start.
- Shape the hat. Cheap hats often arrive creased and can sag in damp air. Cut a strip from a plastic file folder, roll it into a narrow cone, and slide it into the top half of the hat so the tip stands tall. Keep the liner out of the bottom 3 inches so the lights can sit there.
- Run the fishing line through the tip. Thread a large needle with 2–3 feet of line. Push it from inside the hat out through the exact point and leave a long tail inside. The tip is the only balanced hanging point; even a small offset causes a noticeable lean.
- Anchor the line to a safety pin. Knot the line around the bar of a large safety pin and close it. The pin spreads the load so the fabric does not tear or stretch under the pull.
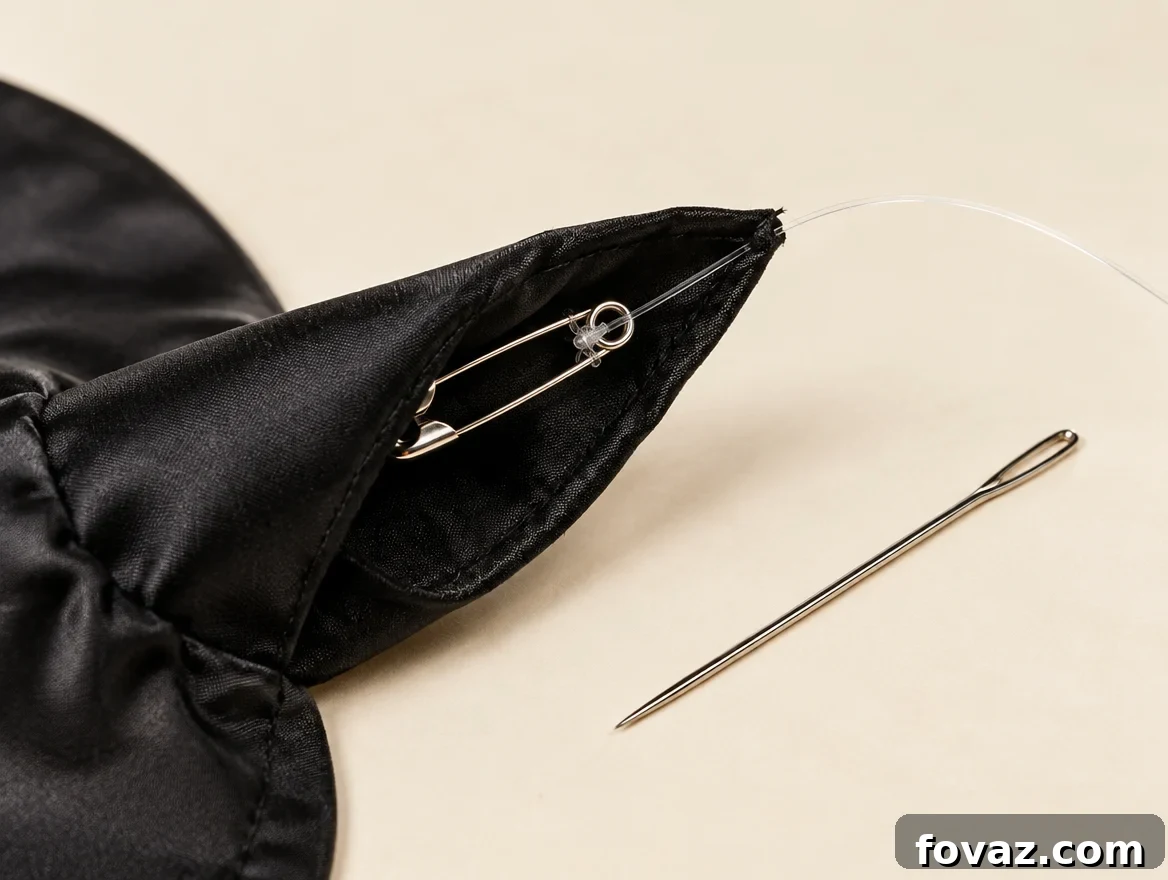
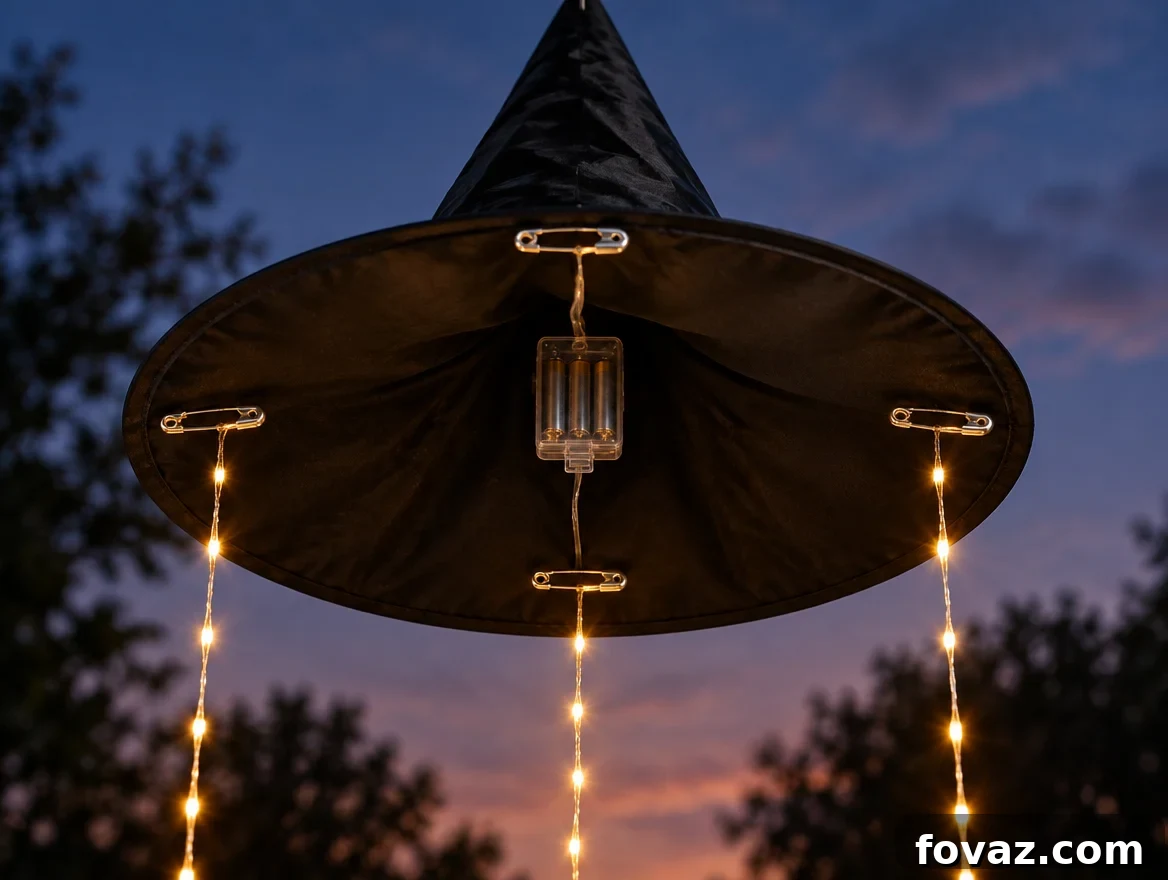
- Clip the battery box to the safety pin. Hook the box’s tab or wire onto the pin so it hangs centered under the tip. The battery box is the heaviest part; if it’s off-center the hat will list.
- Pin the lights under the brim. Let the strand drop from the box, form several long loops, and pin them to the underside of the brim with four evenly spaced safety pins. Even distribution keeps the hat balanced.
- Orient and protect the battery door. Turn the battery door to face down so water drains rather than pools. If the box isn’t weather resistant, place it in a small zip-top bag and snip a tiny corner at the bottom for drainage. Set any timer now.
- Set hooks into solid wood. Mark ceiling spots and look for rows of nail heads in the boards—framing typically runs there. Drill a pilot hole slightly smaller than the hook’s screw, then twist in a screw eye or cup hook until fully seated. Space hooks at least two brim widths apart so hats can swing freely. If you prefer not to drill, a wood tack pushed between ceiling planks can hold very light hats on a well-covered porch.
- Tie a secure knot. Fishing line is slick; use a sturdy knot. Pass the line through the hook, wrap the loose end around the main line five times, feed it back through the first loop, wet it, and tighten. Leave about a quarter inch of tail.
- Add a swivel to prevent twist. Tie the line to one end of a small fishing swivel and hang the other end from the hook. The swivel lets the hat rotate freely without twisting the line or tangling strands.
- Stagger heights and check from the sidewalk at dusk. Hang adjacent hats 6–12 inches apart in height so the row appears to drift. Walk out to the street at dusk—when the fishing line disappears—to see how the display reads. Adjust any leaning or low-hanging hats.

Porch tip: Recheck the balance and the hook on your test hat after its first night outside before making the rest.
Troubleshooting after a windy night
Inspect your test hat each morning. Here’s what to look for and how to fix common problems before finishing the rest of the set.
Line twisted or strands tangled
Add the swivel if you skipped it. If strands still wrap, shorten them and add a fifth pin under the brim; shorter strands tangle less.
Hat has dropped lower
The knot likely slipped. Retie using the secure method described above, wet the knot while tightening, and consider looping the line around the hook an extra time.
Cone is sagging
Polyester softens in damp air. Use a plastic liner for a durable fix—avoid paper liners outdoors, as they collapse in humidity.
Lights flicker or won’t turn on
Check the battery contacts for moisture or corrosion. Dry and clean them, replace batteries, and protect the box as described. On porches exposed to heavy rain, move the hat deeper under the roofline.
Hook is loose
The hook likely missed framing. Back it out, move to the nearest row of nail heads, drill a fresh pilot hole, and reset the hook. Don’t force a larger hook into a thin board; it won’t hold long.
Which build should you choose?
Cost depends on the number of hats and the quality of lights and hooks. Here are three sensible approaches for a set of six:
Budget build: basics for a covered porch
Basic polyester hats, inexpensive battery fairy lights, fishing line, safety pins, and small cup hooks. Best for deep, sheltered porches. Plan to protect battery boxes.
Mid build: the sweet spot
Same hats but with outdoor-rated fairy lights that include a timer. Add screw eyes, swivels, and plastic file folders for liners. Reliable for most porches.
Quality build: made to last
Sturdier hats that keep shape without liners and lights where both strand and box are rated for outdoor use. Choose rust-resistant hooks you can leave up year-round.
Where to hang them on your porch
Start at the front door and let the hats lead visitors toward it. Hang along the main walking path and stagger heights for a floating effect. Use odd numbers—three for a small stoop, five or seven for a long porch—and keep the lowest hat high enough that household members don’t need to duck.
Reusing hooks after Halloween
Yes—plan to use hooks year-round. Put them where seasonal items like lanterns, planters, or bunting can hang later. When you take the hats down, remove liners and nest cones inside each other so they keep their shape for next fall.
When to call a professional
This is a beginner-friendly project, but call a pro if you notice soft, stained, or sagging ceiling boards (possible water damage), if you want to hardwire lights to a porch outlet (hire a licensed electrician), if your ceiling is thin metal or vinyl (a handyman can find framing), or if the ceiling is too high or over stairs for safe ladder work.
Ladder falls are a common holiday injury—use safe ladder practices and have someone steady the base. Never stand on the top step.
How to know your display is ready
After dark, check these points from the sidewalk:
- No visible fishing line from the street.
- Each hat hangs straight with the tip pointing up.
- Light strands hang freely and don’t touch neighboring hats.
- After a breezy night, hats remain at the height you set.
- The lights still operate after the first rainy night.
If you can check all five, your porch is ready for visitors—take photos at dusk when the sky retains a bit of blue behind the glow.
Ready to light up your porch?
Floating witch hat lights are an easy, effective way to add magic to your fall porch. Make one test hat tonight and leave it out for a night of weather. Once it passes, the rest of the set goes quickly. By trick-or-treat time you’ll have a glowing row of hats that held up through wind and rain.
We’d love to see your results—share photos in the comments and save this guide for next year’s decorating plans.
A few helpful answers
Floating witch hat lights FAQs
Hanging, lighting, and storing your porch display.
How do you hang floating witch hat lights so they don’t spin?
Add a small fishing swivel between the line and the ceiling hook. The hat can still rotate in a breeze, but the line won’t twist. Pinning the light strands evenly under the brim also helps the hat settle back into place.
Can you leave floating witch hat lights on all night?
Most battery LED fairy lights run cool, but always follow the manufacturer’s instructions. A timer is the easiest solution—it saves batteries and ensures the lights turn on and off automatically.
Can I use stick-on hooks instead of screw hooks?
Only on smooth surfaces and only with adhesive hooks rated for outdoor use. Textured or grooved ceilings usually need screw hooks anchored into framing for a reliable month-long display.
Why does my witch hat hang crooked?
The weight is off center. Clip the battery box to the safety pin directly under the tip and distribute the light strands evenly around the brim. If the fishing line doesn’t exit the exact point, rethread it.
How do you store witch hats so they keep their shape for next year?
Remove the liners, then stack cones inside each other like cups. Store upright in a box with nothing heavy on top. Reinsert the liners before hanging next season.
Still have a question? Ask in the comments below.