
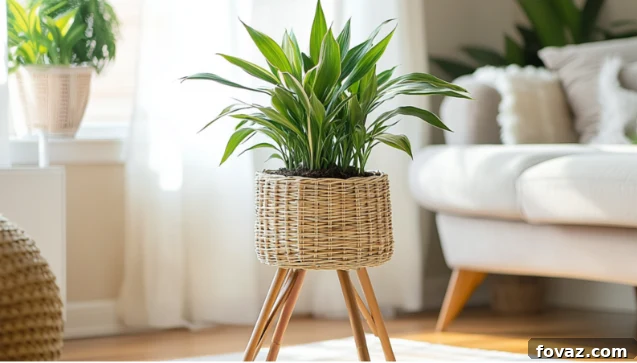
Are your unused baskets gathering dust, waiting for a purpose? It’s time to unleash their hidden potential and transform those plain wicker pieces into stylish, functional accents that breathe new life into your living space. Whether your home calls for a cozy, rustic charm or a sleek, modern aesthetic, these creative DIY basket projects offer endless opportunities to infuse handmade flair and personality into every corner.
Baskets are incredibly versatile; they’re not just for storage anymore. With a little imagination and a few simple tools, you can reimagine them as unique decorative elements, practical organizers, or even statement lighting fixtures. From enhancing your plant display to decluttering your countertops, these ideas are designed to inspire crafters of all skill levels. So, gather your baskets, prepare your tools, and let’s dive into these imaginative ideas to elevate your home decor!
Elevate Your Home with Creative DIY Basket Makeovers
Baskets are far more than simple storage containers; they are dynamic canvases awaiting your creative touch. By transforming ordinary wicker into stylish, functional decor, you can seamlessly integrate rustic charm or contemporary elegance into any room. The potential for repurposing your baskets to enhance your home is truly boundless, ranging from chic planter stands that elevate your greenery to unique lighting fixtures that cast a warm, inviting glow. These projects not only offer a sustainable way to upcycle old items but also allow you to create custom pieces that perfectly complement your interior design vision. Let’s explore some of the most inspiring ideas to kickstart your next crafting session and turn those forgotten baskets into cherished home decor statements!
Chic DIY Planter Stand
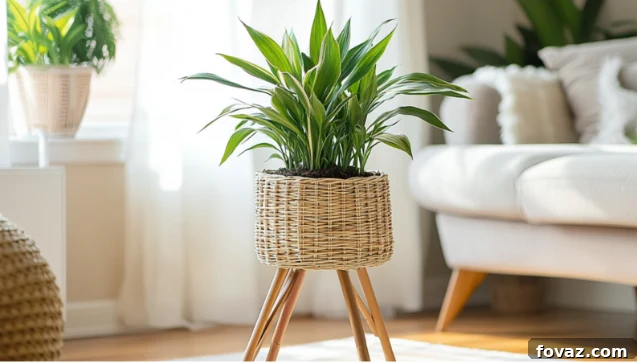
Creating a custom planter stand from a basket offers an incredibly affordable and stylish solution to uplift your space’s aesthetic appeal. This project not only showcases your favorite plants in an elevated manner but also makes plant care more accessible, especially if you opt for a mobile design. A well-designed stand adds vertical interest, making your plant arrangements feel more dynamic and purposeful.
To begin this rewarding project, select a sturdy basket with a flat base. Carefully trace the bottom of your chosen basket onto a 4-inch piece of plywood. Precision here is key for a stable stand. Using a jigsaw, meticulously cut out the traced circle. Once cut, sand all the edges thoroughly to ensure a smooth, splinter-free finish. For the legs, take a 1-inch dowel and cut it into four uniform 13-inch pieces. To give your stand an elegant, angled look, use a miter saw to cut each end of these dowel pieces at a precise 15-degree angle. These angles will splay outwards, providing both stability and visual appeal.
Next, it’s time to attach the dowel legs to your plywood circle. Position them evenly around the perimeter, approximately 2 inches in from the edge. For a robust and lasting hold, apply a strong wood glue and reinforce each leg attachment with screws. Allow adequate drying time for the glue before proceeding. Once your base structure is secure and dry, prepare your basket. If it has any unnecessary decorative details on the bottom that might interfere with attachment, carefully remove them. Then, apply a generous amount of hot glue to the top surface of your wooden base and firmly press the basket onto it, ensuring it’s centered and secure. This creates a beautifully elevated planter stand, perfect for making your favorite greenery a focal point in any room.
For added convenience and mobility, especially for larger plants that might need to be moved for light or cleaning, consider attaching a plant stand dolly. Choose a dolly with lockable wheels for extra stability. Securely attach it to the bottom of your basket or the wooden base using strong zip ties. Trim any excess zip tie material for a clean, professional finish. With these steps completed, your custom planter stand is ready to display your botanical treasures with style and ease, blending seamlessly into your home’s decor while offering practical benefits.
Rustic Rope-Wrapped Storage Box
Transforming an empty cardboard box into a rustic, rope-wrapped storage solution is a brilliant way to embrace sustainability while enhancing your home decor. This project not only aids in waste reduction by repurposing everyday materials but also results in a highly practical and aesthetically pleasing storage piece. The natural texture and warm tones of jute rope seamlessly integrate with rustic, farmhouse, or even bohemian-inspired interior designs, adding a touch of handmade charm.
Begin by preparing your cardboard box. Ensure all original flaps are neatly tucked in, creating a clean, flat top edge. This will provide a smooth surface for the rope application and contribute to a more finished look. Next, select your jute rope—or any natural fiber rope like sisal or cotton for a different texture—and a reliable hot glue gun. Starting at one corner of the box, apply a small line of hot glue and firmly press the end of the rope onto it. Immediately begin wrapping the rope tightly around the box, working your way around horizontally. Apply hot glue in sections as you go, ensuring each new coil of rope is snug against the previous one, completely covering the cardboard surface. Maintain consistent tension while wrapping to achieve a uniform and professional appearance. Continue this process until the entire exterior of the box is covered.
Once the exterior is complete, you can further enhance the box by lining the inside. Choose a decorative towel, a piece of patterned fabric, or even felt to add a pop of color, an interesting texture, or simply to create a softer interior for delicate items. Secure the lining with hot glue or fabric adhesive. This additional step elevates the box’s perceived value and ensures that it looks appealing both inside and out. This rustic storage box is more than just an organizational tool; it’s a statement piece that introduces a charming, handcrafted element to any room. It’s an incredibly simple yet effective method to repurpose basic materials into something beautiful, functional, and perfectly aligned with your home’s aesthetic. Use it to store magazines, toys, craft supplies, or throw blankets, adding both order and warmth to your living space.
Basket Wall Sconce for Ambient Lighting
If you’re drawn to warm, inviting ambient lighting, reimagining a basket into a unique wall sconce is a fantastic and engaging DIY project. This clever transformation allows you to create a distinct and functional light source that leverages energy-saving battery-operated puck lights. The beauty of this project lies in its ability to add a cozy, decorative element to your walls without the complexities or costs associated with professional electrical installation. It’s perfect for bedrooms, hallways, or any space where you desire a soft, accent glow.
To embark on this innovative lighting endeavor, you’ll need two woven tissue box covers and a battery-operated puck light. Begin by taking one of the woven tissue boxes. Apply a dab of hot glue to the inside bottom of this box, precisely centering it over the opening. Firmly press the puck light onto the glue, ensuring it is securely fixed and stable. This tissue box will serve as the base and diffuser for your light source. Next, apply a generous bead of hot glue around the top rim of this tissue box. Carefully take the second tissue box and invert it, then firmly press it onto the first, aligning the edges. This creates a seamless cylinder shape, effectively encasing the puck light within a stylish woven shell. The woven pattern will allow the light to filter through, creating beautiful shadows and a diffused glow.
Once the sconce structure is complete and the glue has fully set, it’s time to prepare it for hanging. Select a longer piece of natural jute rope or a similar sturdy material that complements the woven texture of your sconce. Carefully feed one end of the rope through the weave at the bottom-most edge of the sconce. Bring it back through an adjacent weave to create a loop, then tie a secure knot to fasten it firmly in place. Ensure the knot is robust enough to bear the weight of the sconce. You can adjust the length of the rope to determine how high or low the sconce will hang. Once hung on your wall using a suitable hook or nail, simply turn on the puck light to enjoy the instant cozy glow and unique decorative statement your new basket wall sconce provides. This project is not only fun to make but also a testament to how everyday items can be reimagined into stunning home decor pieces.
Painted Basket Accent Piece
A fresh coat of paint holds remarkable power to completely revitalize and redefine the appearance of any basket, transforming it from mundane to magnificent. This incredibly simple upgrade is a cost-effective way to inject new style and personality into any room. Even better, painting allows you to fully customize your decor to perfectly match your existing color scheme or to introduce a bold new accent without incurring significant expenses. It stands as an eco-friendly and sustainable approach to breathe new life into an old, worn, or simply outdated basket, preventing it from being discarded and giving it a second chance to shine.
To begin this straightforward yet impactful makeover, start with a light-finished wicker or woven basket. The lighter base will allow your chosen paint color to truly stand out. For a charming farmhouse aesthetic, opt for white paint. Apply it using a dry brush technique: dip your brush lightly into the paint, then offload most of it onto a paper towel before applying it to the basket. This method creates a subtle, distressed look, allowing some of the natural wicker to show through, which is characteristic of rustic styles. Alternatively, if your goal is a more contemporary or industrial feel, spray-paint the basket with an oil-rubbed bronze color, matte black, or even a metallic silver. When using spray paint, remember the golden rule: apply light, even layers. Allow each layer to dry completely before adding the next. This prevents drips and ensures a smooth, professional finish. Multiple thin coats are always preferable to one thick coat.
Once the paint is fully dry and cured, which might take several hours or even a full day depending on the paint type and humidity, it’s time to style your transformed basket. Fill it with a vibrant arrangement of fresh or faux flowers to add a splash of color and natural beauty. Alternatively, incorporate lush greenery such as ferns, eucalyptus, or even artificial succulents for a touch of serene botanical elegance. The painted basket instantly becomes an eye-catching decorative piece, whether placed on a console table, a bookshelf, or used as floor decor. This easy trick demonstrates just how effortlessly an ordinary basket can be elevated into a stylish and personalized element of your home decor, reflecting your unique taste and creativity.
Hanging Basket Light Fixture
Repurposing an old basket into a unique hanging light fixture is an ingenious way to introduce a touch of handmade artistry and rustic charm to your living space, all while providing essential functional lighting. This DIY project is not only an excellent opportunity to showcase your creativity but also a highly sustainable method to upcycle baskets, diverting them from landfills and giving them a renewed purpose. The soft, filtered light emanating from a woven basket creates a warm and inviting ambiance, perfect for dining areas, reading nooks, or even an entryway that needs a distinct focal point.
To embark on creating this captivating light fixture, select an old, sturdy basket that can accommodate a lamp cord and bulb. The size and weave of the basket will significantly influence the light’s dispersion and the overall aesthetic. Begin by carefully drilling a hole in the absolute bottom center of the basket. This hole should be just large enough to thread your lamp cord through, ensuring a snug fit. Once the hole is ready, feed the electrical cord, ideally one with a pre-wired socket, through the hole from the outside in. Tie a secure knot just above the hole on the inside of the basket to prevent the cord from slipping back through and to bear the weight of the fixture. Ensure the knot is robust and won’t unravel.
Next, enhance the basket’s exterior and introduce additional texture. Wrap the entire exterior of the basket with natural jute or twine, securing it with hot glue as you go. This step not only adds to the rustic aesthetic but also reinforces the basket’s structure. For an added decorative flourish, consider attaching fabric trim, ribbon, or even lace around the edges or the rim of the basket. This allows for further customization, enabling you to match the fixture to your specific decor style. Once your unique basket light fixture is fully assembled and decorated, it’s ready for installation. Hang it securely from the ceiling using appropriate hooks and ceiling mounts designed for light fixtures. Ensure it is safely connected to your electrical wiring, ideally by a qualified electrician if you are unsure. Once illuminated, step back and enjoy the charming, rustic ambiance and the unique statement piece that your DIY hanging basket light fixture brings to your home. It’s a testament to the beauty of repurposing and the warmth of handmade design.
Decorative Basket Tray
Transforming a flat-bottomed basket into a chic and highly functional decorative tray is a straightforward project that yields impressive results. Perfect for elegantly displaying books, arranging candles, organizing remote controls, or showcasing other decorative accents, this DIY tray adds a touch of sophistication and order to any surface. It’s an ideal way to add a personalized touch to your living room, coffee table, or kitchen island.
To begin, select a sturdy basket with a relatively flat bottom. The shape can be rectangular, square, or round, depending on your preference. First, prepare the basket for painting by ensuring it is clean and free of dust. Then, apply your chosen paint color. Classic choices like crisp white or elegant black offer a timeless look that complements most decor styles. Alternatively, if you wish to make a bold statement, opt for a vibrant hue that harmonizes with your room’s color palette. Apply the paint evenly, following the techniques suitable for your chosen paint type (brushing, rolling, or spraying). Allow the paint to dry completely and cure according to the manufacturer’s instructions before proceeding to the next step. This ensures durability and a flawless finish.
Once the paint is fully dry, it’s time to add the handles. Choose sturdy handles that complement your tray’s style – options include metal pulls, leather straps, or even thick rope. Position them symmetrically on the sides of the basket. Secure the handles firmly using screws or a strong adhesive specifically designed for the materials you are working with. If using screws, ensure they are not too long and won’t poke through the bottom or inside of the basket. The result is a custom-made tray that is not only robust and practical for serving or organizing but also a distinct statement piece. This decorative tray goes beyond mere functionality; it proudly showcases your creativity and personal style, adding a curated and thoughtful element to your home decor. Arrange it with carefully selected items to create inviting vignettes that enhance the beauty and comfort of your living space.
Explore More Creative DIY Basket Projects
If you’ve enjoyed delving into these inventive ideas, remember that the journey of creative exploration doesn’t have to end here! The world of DIY basket projects is vast and offers endless possibilities for personalized home decor. Continue to experiment with a diverse range of basket sizes, intriguing shapes, and varied materials. Each new combination can unlock an entirely different aesthetic and functionality, allowing you to craft even more unique and bespoke pieces that truly reflect your individual style. Don’t be afraid to mix and match textures, play with different paint finishes, and incorporate an array of embellishments. Think about integrating luxurious ribbons, vibrant fabrics, rustic twine, elegant leather straps, or even playful pom-poms to add character and depth to your creations.
Whether your primary goal is to create highly functional storage solutions that declutter and organize your living areas, or to design purely decorative accents that serve as eye-catching focal points, DIY basket projects offer unparalleled opportunities. They allow you to infuse your space with creativity, charm, and a sense of handcrafted authenticity that mass-produced items simply cannot replicate. Each project undertaken is not just about crafting an object; it’s about infusing your home with your personality, making it more welcoming, unique, and truly yours. So, give full reign to your imagination, embrace the joy of crafting, and start transforming those everyday baskets into standout home decor pieces that tell a story and add warmth to every room!