
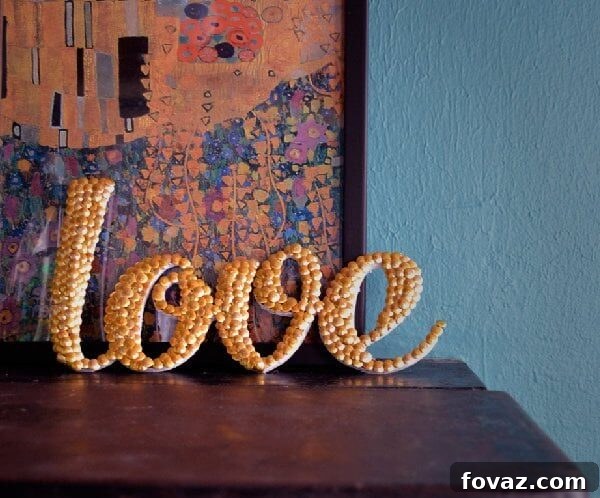
Create Stunning DIY Letter Art with Thumb Tacks: An Affordable Dollar Store Craft!
Are you dreaming of unique, personalized home decor that truly reflects your style, but without the custom price tag? While bespoke wall art can often be quite expensive, we’re thrilled to share a secret: you can craft absolutely stunning, custom letter art using just a handful of incredibly affordable items found at your local dollar store! This exciting DIY project transforms humble thumb tacks and foam core into dazzling decorative pieces that add a touch of glamour and individuality to any space. Get ready to unleash your creativity and make a statement with personalized wall art.
The inspiration struck during a visit to the dollar store, where we had an “aha!” moment, realizing the immense potential of these budget-friendly materials. With just a few sheets of foam core and a box of elegant gold tacks, we discovered a simple yet sophisticated method to create beautiful custom letter art. The most amazing part? The total cost for this entire project is incredibly low – often just a few dollars! This makes it an ideal craft for anyone looking to enhance their home decor on a tight budget.
Follow our detailed, step-by-step tutorial below to effortlessly create your very own custom letter art. If you love the timeless appeal of our “LOVE” theme, you can conveniently download our ready-to-print template HERE. We designed our piece to be relatively small to fit a specific spot on our wall, but the beauty of this project lies in its versatility. You can easily scale this design to any size you desire, whether you need a subtle accent or a grand focal point, making it perfect for any room, from a cozy bedroom to a spacious living area.
How to Craft Eye-Catching Letter Art Using Thumb Tacks: A Comprehensive Guide
Gather Your Essential Supplies:
Before embarking on this creative journey, ensure you have all the necessary materials at hand. The accessibility of these items is one of the project’s greatest advantages, as most can be found at dollar stores, craft supply shops, or even general merchandise retailers.
- Foam Core Board: This lightweight yet rigid material serves as the ideal foundation for your letter art. We strongly recommend purchasing at least two sheets, as you’ll be layering them to achieve the necessary thickness and stability for your finished piece. This double layer prevents tacks from protruding.
- Thumb Tacks (or Push Pins): These are the sparkling stars of our project! While we opted for classic gold tacks for a refined, luxurious aesthetic, don’t hesitate to explore other options. Silver, bronze, colorful plastic tacks, or even decorative tacks with unique heads can dramatically alter the look and feel of your art. Be sure to acquire a generous quantity, as you’ll need many to fully cover and embellish your chosen letters.
- X-Acto Knife (or Precision Craft Knife): A sharp, precise craft knife is absolutely critical for achieving clean, crisp cuts in the foam core. Always prioritize safety: use the knife carefully on a protected surface and away from your body. A fresh blade will make a significant difference in the quality of your cuts.
- Spray Adhesive: This provides a strong, even, and long-lasting bond for securely attaching your printed template to the foam core. Remember to use spray adhesive in a well-ventilated area to avoid inhaling fumes. As an alternative, a robust glue stick or general craft glue can also be used, ensuring even application to prevent bubbles.
- Printed Letter Template (Optional but Highly Recommended): Utilizing a pre-designed template, such as our “LOVE” script, significantly simplifies the cutting process and ensures professional-looking results. Alternatively, you can showcase your artistic flair by freehanding your design directly onto the foam board with a pencil, or by using stencils for a variety of fonts and styles.
- Cutting Mat or Protected Work Surface: Essential for safeguarding your table or workbench from knife marks and ensuring a stable surface for precise cutting.
- Ruler: A sturdy ruler is invaluable for making perfectly straight cuts when sizing your foam core pieces and for guiding your X-acto knife.
- Pencil: Useful for marking, tracing, and making any freehand adjustments before committing to a cut.
Step 1: Prepare Your Foam Core Base and Apply Your Design Template
The standard foam board commonly found at dollar stores is typically around 1/8″ thick. While incredibly budget-friendly, this thickness isn’t quite robust enough on its own for tack art; the sharp points of the tacks would likely protrude from the back, posing a potential hazard and making the finished piece feel flimsy. To create a sturdy, durable, and professional-looking piece, we’ll double the thickness of your foam core.
Begin by carefully cutting your foam core board into two identical pieces, matching the exact dimensions you intend for your finished letter art. Next, apply an even, comprehensive coat of spray adhesive to one side of one foam board piece. Carefully and precisely align the second piece of foam core on top, pressing firmly to create a single, thicker, and more stable base. Take your time to smooth out any air bubbles or wrinkles to ensure a strong, perfectly flat bond between the two layers. Allow the adhesive to cure completely according to the product’s specific instructions.
Once your robust, doubled foam core base is ready, it’s time to transfer your chosen letter design. If you’re utilizing our “LOVE” script template or any other printed design, meticulously trim it to fit your foam core. Then, apply a thin, even layer of spray adhesive to the back of your printed template. Carefully position and adhere the template onto your prepared foam core, ensuring it’s perfectly centered and aligned. Smooth it down thoroughly to eliminate any wrinkles or air bubbles, as this template will serve as your precise guide for the cutting phase. For those who prefer a more personalized touch, you can also freehand your desired lettering directly onto the foam board using a pencil, or leverage stencils to achieve various fonts and unique styles. The primary goal here is to establish a clear, distinct, and accurate outline to follow in the subsequent cutting step.

Step 2: Precisely Cut Out Your Letters
This stage demands a steady hand and a good measure of patience, but the precision you invest here will significantly impact the final quality of your letter art. Retrieve your X-acto knife, ensuring its blade is impeccably sharp. A dull blade can tear the foam core, leading to frustrating and messy results. Now, carefully begin the process of cutting out your letters by following the lines of your template with utmost accuracy.
Expert Hint for Achieving Immaculate Cuts: The key to acquiring crisp, professional-looking edges on your foam core lies in a slow, controlled, and multi-pass cutting technique. Resist the urge to try and cut through both layers of foam core in a single, forceful pass. Instead, apply light pressure for your initial cuts, merely scoring the top layer of the foam board. Then, make several subsequent passes along the exact same line, gradually increasing the pressure with each pass until your blade has cleanly sliced all the way through both layers of foam core. This gradual, multi-pass method is crucial for preventing unsightly tearing, splintering, and jagged edges, ensuring your letters boast exceptionally clean and smooth contours. Rushing this step will almost certainly result in uneven, unprofessional edges that can detract significantly from your finished piece.
Pay meticulous attention to intricate curves, delicate details, and sharp corners within your letter design. Don’t hesitate to rotate your foam core as needed to maintain a comfortable and optimal cutting angle. Once all your letters have been precisely cut out, carefully and gently peel away the paper template from the foam. You should now be left with beautifully shaped, standalone foam letters, perfectly prepared for the exciting embellishment phase.
Step 3: Begin Embellishing with Thumb Tacks – Creating the Outline
Now comes the truly transformative and exciting part where your letter art truly begins to shimmer and take on its unique character! Gather your chosen thumb tacks and prepare to meticulously decorate your precisely cut foam letters. This is where your vision starts to materialize.
We highly recommend initiating the tack placement by creating a distinct outline around the entire perimeter of each letter. This technique serves multiple purposes: it provides a beautiful, defined framework for your letters, helps guide your subsequent tack placement, and immediately establishes a sense of structure and elegance. Carefully push each tack into the foam core, making sure they are consistently spaced and pushed in to a uniform depth. The robust double thickness of the foam core is specifically designed to prevent the sharp points of the tacks from poking through the back, ensuring your finished art is safe for display, easy to handle, and protects your walls.
Expert Hint: By systematically working from the outside, inward, you naturally achieve a beautiful embossed or framed effect in the center of the word, which adds significant depth and captivating visual interest to your finished art piece.
This initial outlining step is not just about defining the shape; it also provides a clear visual boundary and a consistent starting point for when you transition to filling in the rest of the letters. Dedicate ample time to achieve clean lines and consistent tack placement, as the overall visual impact and perceived quality of a well-executed outline cannot be overstated in your finished art piece.
Step 4: Filling in Your Masterpiece with Tacks
With the meticulous outlines of all your letters now complete, it’s time for the gratifying task of filling in the remaining open spaces. This is the stage where your letter art truly comes alive, shimmering with intricate texture and captivating metallic reflection, transforming from a simple shape into a dazzling display.
Continue placing the thumb tacks using the same systematic method of working from the outside, inward. This technique is highly effective as it helps maintain a consistent pattern and uniform density across your letters, ultimately contributing to a cohesive, polished, and professional final appearance. You have the creative freedom to arrange your tacks in various patterns: neat, orderly rows for a structured look; concentric circles for a mesmerizing effect; or even a more organic, randomized pattern for a unique, artisanal feel. Experiment with the spacing between individual tacks – a denser arrangement will create a more solid, intensely metallic appearance, while wider spacing can offer a lighter, more ethereal, or even segmented look, depending on the aesthetic you aim to achieve.
As you fill, pay close attention to smaller details, tighter curves, and intricate corners within your letters. You might find it necessary to slightly adjust the size or precise placement of some tacks to fit these more challenging areas perfectly without creating an overcrowded or sparse appearance. The ultimate goal is to achieve a uniform and visually pleasing fill that significantly enhances the overall impact and beauty of your shimmering word art. Once every bit of the foam letter is covered to your complete satisfaction and every tack is securely in place, step back and proudly admire your sparkling, custom-made creation!
Tips for Displaying and Customizing Your Thumb Tack Letter Art:
Hanging Your Masterpiece:
- For lightweight pieces, Command Strips are an exceptional choice, offering a strong, secure hold without causing any damage to your walls upon removal.
- For larger or potentially heavier pieces, consider attaching a sturdy picture hanging wire to the back using strong, reliable adhesive or small, flat hooks specifically designed for foam core.
- Alternatively, simply leaning your beautifully crafted letter art on a shelf, mantelpiece, or desk provides a chic and charming display option that adds instant character to any surface.
Personalization and Creative Variations:
- Words & Phrases Beyond “LOVE”: The creative possibilities are truly boundless! Think of powerful inspiring quotes, cherished family names, elegant monograms, significant dates, or even inside jokes. Any word or phrase can be transformed into a striking piece of art.
- Unleash Color Play: Do not feel limited to just one color of tacks. Experiment by mixing and matching gold, silver, bronze, or even vibrant colorful plastic tacks to create intricate patterns, gradient (ombre) effects, or contrasting outlines.
- Dynamic Background Colors: Before you apply your template, consider painting your foam core a contrasting color. A dark background, such as black or navy, with shimmering gold or silver tacks creates a particularly striking and luxurious visual impact that makes the tacks truly pop.
- Adding Extra Sparkle: For an additional touch of dazzling glamour, consider applying a thin, even coat of clear spray sealant mixed with fine glitter after all the tacks are meticulously in place. This will add an extra dimension of shimmer.
- Framing for Refinement: To give your completed letter art an even more polished and sophisticated finish, consider enclosing it within a shadow box frame. This not only elevates its aesthetic appeal but also provides an extra layer of protection.
Maintaining Your Art:
Thumb tack art is remarkably low maintenance. To keep it looking its best and sparkling brightly, simply dust it gently with a soft, clean brush, a microfiber cloth, or use a can of compressed air to remove any accumulated dust from between the tacks. Avoid using harsh chemical cleaners, as these could potentially tarnish the metallic tacks or cause damage to the foam core material.
Frequently Asked Questions About DIY Thumb Tack Letter Art:
- Q: Can I use regular cardboard instead of foam core for this project?
- A: While you technically could use cardboard, it is generally not ideal for this specific project. Regular cardboard typically isn’t thick enough to reliably prevent the tacks from poking through, which can be a safety concern and detract from the finished look. Furthermore, achieving clean, crisp cuts on cardboard can be more challenging. Foam core offers the perfect balance of rigidity, sufficient thickness, and ease of penetration for tacks, making it the superior choice.
- Q: What should I do if my X-acto knife isn’t cutting cleanly through the foam core?
- A: The most common reason for messy or uneven cuts is a dull blade. Always ensure your X-acto knife is fitted with a fresh, extremely sharp blade before you begin. Blades dull quickly, especially when working on materials like foam core, so don’t hesitate to replace them frequently. Additionally, remember to use the multi-pass technique (multiple light cuts rather than one forceful one) to achieve the cleanest edges.
- Q: How can I ensure even spacing for my tacks when filling the letters?
- A: For consistently even spacing, you can lightly mark guide points with a pencil on your foam core before inserting the tacks. Alternatively, you can use a small ruler, a stencil, or even another tack as a temporary spacer to help maintain uniform distances between each push pin. With a little practice, you’ll naturally develop a keen eye for even placement.
- Q: Can I create shapes other than letters using this thumb tack art technique?
- A: Absolutely! This versatile technique works wonderfully for virtually any silhouette or shape you can imagine. Hearts, stars, intricate geometric patterns, simple animal outlines, or even abstract designs can be transformed into stunning and textured tack art. Just ensure that your chosen template or freehand design is clear and well-defined to facilitate accurate cutting and tack placement.
- Q: Is this DIY project suitable for children?
- A: Due to the inherent risks involved with using a very sharp X-acto knife for cutting and the pointy nature of thumb tacks, this project is best suited for adults or older teenagers who can exercise caution and precision. Younger children can certainly participate in the creative process by helping to choose colors, patterns, or the word itself, but the cutting and actual tack placement steps should always be handled by a responsible adult to ensure safety.
Unleash Your Inner Artist and Decorate Your Home on a Dime!
We genuinely hope you’ve thoroughly enjoyed learning how to craft your very own spectacular and personalized letter art using surprisingly simple and incredibly affordable materials sourced from your local dollar store! This engaging project stands as a shining testament to the fact that creating stunning, high-impact home decor does not require a hefty budget or extensive crafting experience; rather, it simply calls for a dash of creativity, a willingness to get hands-on, and a few inexpensive supplies.
Whether your goal is to infuse your living space with a deeply personal touch, to craft a unique and heartfelt gift for a cherished loved one, or simply to indulge in the satisfying process of a rewarding DIY craft, this thumb tack letter art project is an absolutely excellent choice. It offers a fantastic and accessible way to introduce a touch of bespoke glamour, texture, and individuality into any room of your home. So, gather your supplies, choose your most beloved word or phrase, and embark on your creative journey today – start tacking your way to beautiful, custom-made decor! We’d be absolutely thrilled to see your unique creations; don’t hesitate to share how you’ve brought your words to life!