
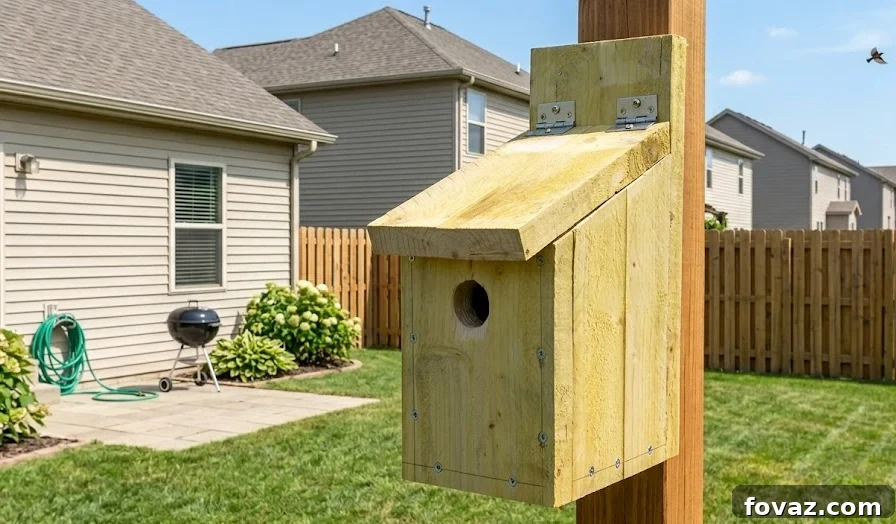
Banish Screen Time: The Ultimate Parent-Kid Weekend Build
Struggling with the modern parenting challenge of too much screen time and not enough hands-on activity? Drawing children away from tablets and into meaningful, real-world projects can feel impossible. This birdhouse build offers a focused, rewarding weekend project that encourages teamwork, practical learning, and outdoor curiosity.
This simple, classic birdhouse is ideal for parents and children to build together. The project teaches practical skills—measuring, cutting, drilling, and safe tool use—while also reinforcing basic math and spatial reasoning in a hands-on way. Beyond the skills, it delivers an immediate sense of accomplishment: a physical structure kids can point to and care for. When native songbirds move in, watching them raise a family is a powerful, ongoing connection to nature.
Below is a clear, step-by-step plan to get professional results without guesswork. Follow the precise cuts and assembly sequence for a sturdy, weather-resistant birdhouse suitable for small cavity-nesting birds such as wrens, chickadees, and bluebirds.
The Classic Slanted-Roof Birdhouse
- Skill Level: Beginner
- Time Commitment: 2 Hours
- Estimated Cost: $15 – $25
- Best Wood Choice: 1×8 Cedar or Redwood (approx. 2.0 cm actual thickness). Natural cedar resists weathering and avoids toxic finishes.
This design is optimized for small native cavity-nesting songbirds. It includes a front overhang to shed rain, built-in floor ventilation, an optional predator guard, and a back-mounted bracket for hanging. The roof slope and ventilation ensure a dry, well-aired nesting environment that lasts season after season when built from solid cedar or redwood.
Materials & Tools List
- Lumber: 1 board of 1×8 Cedar or Redwood (minimum 150 cm length)
- Fasteners: 35mm (1.5″) exterior-grade wood screws or galvanized casing nails
- Adhesives: Waterproof, non-toxic exterior wood glue
- Tools: Miter saw or handsaw, drill/driver, 5mm bit (for drainage holes), spade bit or hole saw (28–32mm for entry hole), tape measure, 120-grit sandpaper
Precise Cut List
| Part # | Component | Qty | Width | Length / Height | Special Instructions |
| 1 | Mounting Bracket | 1 | 5.0 cm | 40.0 to 60.0 cm | Optional. Pre-drill mounting holes 5 cm from top and bottom. |
| 2 | Side Walls | 2 | 17.0 cm | 28.0 cm / 24.0 cm | Cut top edge at a straight angle matching the roof slope. |
| 3 | Back Wall | 1 | 17.0 cm | 28.5 cm | Bevel top edge at an angle to fit flush under the sloped roof. |
| 4 | Front Wall | 1 | 13.0 cm | 25.0 cm | Drill entry hole centered horizontally, exactly 19 cm up from bottom. |
| 5 | Roof | 1 | 20.0 cm | 23.0 cm | Provides a defensive weather overhang on front and sides. |
| 6 | Floor | 1 | 13.0 cm | 13.0 cm | Pre-drill four 5mm drainage holes in the corners. |
| 7 | Predator Guard | 1 | 13.0 cm | 8.0 cm | Optional block. Match entry hole alignment precisely. |
Step-by-Step Assembly Guide
- Marking & Slope Cutting: Lay the board flat and mark parts 1, 3, 4, 5, 6, and 7. For the two Side Walls (Part 2), mark 28 cm on one edge and 24 cm on the opposite parallel edge. Draw a straight line between those marks and cut to create identical angled side profiles. Bevel the top of the Back Wall (Part 3) so it fits snugly under the sloped roof.
- Entry & Drainage Prep: On the Front Wall (Part 4), mark the center point 19 cm from the bottom and drill the entry hole with the appropriate hole saw or spade bit. If using a Predator Guard (Part 7), clamp it in place and drill both pieces together for perfect alignment. Drill four 5mm drainage holes in the Floor (Part 6) near the corners.
- Forming the Core U-Shape: Stand the two Side Walls (Part 2) against the Back Wall (Part 3). Apply exterior wood glue to the joints and secure with screws driven from the back panel into the side edges for a strong connection.
- Inserting the Floor & Front: Slide the Floor (Part 6) into the bottom of the U-shaped frame and fasten through the sides and back. Fit the Front Wall (Part 4) between the side walls and attach it with screws; leave two screws near the top slightly loose so the front can pivot outward for annual cleaning.
- Roof and Bracket Mount: Set the Roof (Part 5) in place so it aligns flush with the back wall and overhangs the front. Secure it with screws through the roof into the walls. Center the Mounting Bracket (Part 1) on the back face and fasten it vertically for hanging on a post or tree.
Eco Twist: Reduce waste by arranging all cuts tight on your single 1×8 board before cutting. Cedar performs well left untreated; skip paints and stains to protect birds from chemicals. If you choose to finish exterior surfaces, use low-VOC finishes and avoid sealing the interior.
FAQs
Should I seal the inside to make it last longer?
No. Do not paint or seal the interior. Nestlings need the natural, slightly rough wood texture to grip as they climb toward the entrance. Sealing interior surfaces can make them slippery and endanger young birds.
How do I ensure the roof sheds water properly?
The roof angle comes from the side wall heights: one side at 28 cm and the opposite at 24 cm creates the forward slope. Make sure the back of the roof sits flush against the back wall so water runs off the front overhang instead of seeping behind the mounting bracket.
Can plywood be used instead of cedar or redwood?
You can use exterior-grade plywood in a pinch, but it is less durable. Plywood edges can delaminate over time when exposed to moisture. If you use plywood, seal exposed cut edges with a non-toxic waterproof product and give extra attention to roof overhangs. Solid cedar or redwood remains the best choice for longevity and bird safety.