
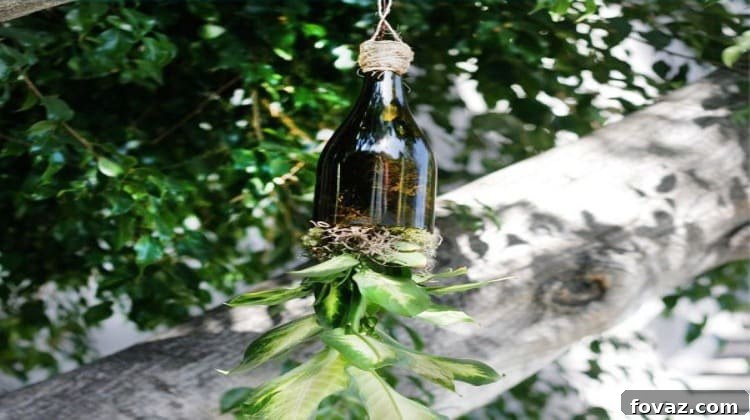
Transforming empty wine bottles into stunning and functional decor is an art form that blends creativity with sustainability. These DIY wine bottle planters are not only remarkably easy to craft, but they also offer a unique, eco-friendly way to bring vibrant greenery into your living space, making your patio or indoor areas truly shine.
Sustainable Style: Crafting Beautiful DIY Wine Bottle Planters for Your Home
Are your collection of empty wine bottles gathering dust, waiting for a purpose beyond their initial enjoyment? It’s time to uncork your creativity and embark on a rewarding upcycling project! We’ve brewed up an ingenious wine bottle craft idea that is just as satisfying to create as it was to empty those bottles: exquisite hanging wine bottle planters. Perfect for wine enthusiasts and non-enthusiasts alike, these planters offer a chic and sustainable solution for showcasing your favorite small houseplants or herbs. And much like a fine wine, these handcrafted planters will only grow more charming with time, adding character and a touch of bespoke elegance to any setting.
Beyond their aesthetic appeal, repurposing wine bottles significantly reduces waste, contributing to a more sustainable lifestyle. Instead of discarding them, you give these glass vessels a second life, turning potential landfill waste into beautiful, functional art. This project is not just about crafting; it’s about embracing a mindset of sustainability, resourcefulness, and personalized home decor. Whether you’re looking to add a whimsical touch to your garden, a modern accent to your balcony, or a unique conversation starter in your living room, these DIY wine bottle planters are the perfect blend of practicality and visual charm.
Gather Your Crafting Essentials: What You’ll Need
Before you dive into the exciting world of glass cutting and plant potting, ensure you have all your tools and materials ready. Having everything organized will make the crafting process smoother, safer, and more enjoyable. Here’s a comprehensive list of what you’ll need to create your very own wine bottle planter:
- 1 x Empty Wine Bottle: Choose a clean, label-free bottle. Darker bottles can offer a nice contrast to green foliage, while clear bottles allow you to see the roots and soil.
- 1 x Spool of Twine: Natural jute or cotton twine adds a rustic, earthy finish and is essential for both decorative wrapping and creating a sturdy hanger.
- 1 x Bag of Lichen Moss: This decorative moss helps cover exposed roots and adds a natural, forest-like aesthetic to your planter.
- 1 x Bag of Spanish Moss: Similar to lichen moss, Spanish moss provides an excellent medium for covering roots, retaining moisture, and enhancing the visual appeal.
- 1 x 8-Yard Spool of 20 Gauge Copper Wire (or Chicken Wire): This wire will be used to create a secure cage for your plant’s roots and the hanging mechanism. Copper wire is flexible and corrosion-resistant, making it ideal for this project.
- 1 x Pair of Scissors: For cutting twine, moss, and any other light materials.
- 1 x Lighter: Primarily used to singe the ends of the twine for a neat, finished look and to prevent fraying.
- 1 x Standard Candle: Crucial for the glass cutting process, providing a consistent heat source for thermal shocking.
- 1 x Glass Cutter Tool: A specialized tool designed to score glass, essential for achieving a clean break.
- 1 x Small, Lightweight Houseplant: Ivy plants, succulents, pothos, or small herbs work wonderfully due to their shallow root systems and trailing nature. Choose a plant that thrives in indirect light if hanging indoors.
- 1 x Package of Ice: Used in conjunction with hot water or a candle flame to create thermal shock, which helps the glass break cleanly.
- 1 x Small Bucket: Necessary for holding ice water and for the thermal shock process.
- 1 x Roll of Masking or Duct Tape: Provides a straight guide for scoring the bottle, ensuring a precise and even cut.
- 1 x Sheet of Sandpaper (medium to fine grit): Essential for smoothing the sharp edges of the freshly cut glass, making the planter safe to handle.
- 1 x Small Bag of Planting Soil: A good quality potting mix suitable for houseplants will provide your plant with the necessary nutrients.
- Optional Safety Gear: Safety glasses and gloves are highly recommended when working with glass and sharp tools.
Roses are red, boxed flowers are for you, made this little rhyme, for DIY crafters just like you 🎁🌸👐🏼🙌🏼 Make sure to make our site one of your #DIYspirations! Link in bio 😌 || 📷: @diykuw
A post shared by DIY Projects (@diyprojectsdotcom) on
Step-by-Step Guide: How To Make DIY Wine Bottle Planters
Step 1: Prepare Your Workspace and Tape the Bottle End
Before beginning, ensure your workspace is clean, well-lit, and, for safety during the cutting process, ideally a concrete floor or a surface that can withstand heat and minor glass fragments. Don your safety glasses and gloves. Take your empty wine bottle and determine where you want to make your cut. For a planter, cutting the bottom third or quarter of the bottle typically works best. Wrap a strip of masking or duct tape firmly around the bottle, creating a perfectly straight and level line at your desired cutting point. This tape acts as an invaluable guide for your glass cutter, ensuring your score line is precise. Double-check that the tape seams align perfectly to maintain an even circumference.
Step 2: Score the Wine Bottle with Precision
With your tape guide in place, it’s time to score the glass. Hold your glass cutter firmly and apply consistent, moderate pressure. Align the cutter’s wheel directly against the tape’s edge and carefully make one continuous, unbroken score line completely around the bottle. The goal is a single, clear score. Avoid going over the same line multiple times, as this can create microscopic fractures that lead to an uneven break. A slight scratching sound indicates the cutter is doing its job. Take your time and maintain a steady hand for the best results.
Step 3: Initiate the Thermal Shock with Candle Heat
Safety is paramount for this step, as it involves an open flame. Move your operation to a concrete floor or a heat-resistant surface, away from any flammable materials. Light your standard candle and place it securely on the floor. Hold the scored wine bottle horizontally, positioning the scored line directly over the candle flame. Begin to slowly and steadily rotate the bottle, ensuring the flame heats the entire circumference of the score line evenly. This controlled heating expands the glass along the score. As the glass heats, you should begin to hear subtle popping or cracking sounds, indicating that the thermal stress is working to separate the glass.
Step 4: Complete the Thermal Shock with Ice Water to Separate the Bottle
Immediately after heating the entire score line with the candle flame, submerge the heated portion of the bottle directly into a small bucket filled with ice water. The sudden temperature change (thermal shock) will cause the glass to contract rapidly, leading to a clean break along the score line. You might hear a more distinct ‘pop’ or ‘crack’ as the separation occurs. If the end doesn’t detach immediately, gently tap the bottle’s side against the edge of the bucket while it’s submerged. Be patient; sometimes it takes a few rotations between heat and cold to achieve a clean break. Don’t worry if the edge isn’t perfectly straight; the moss and plant will beautifully disguise any minor imperfections, adding to its rustic charm.
Step 5: Safely Sand and Smooth the Edges
Working with cut glass requires caution. Wear a dust mask or move your project outdoors for this crucial step to avoid inhaling fine glass dust, which can be harmful to your lungs. Take your sandpaper (starting with a medium grit and finishing with a finer grit for a smoother finish) and carefully buff down both the outside and inside edges of the freshly cut glass. This removes any sharp points, creating a smooth, safe rim for handling. Continue sanding until the edge is smooth to the touch. Once satisfied, dunk the cut wine bottle back into your ice water bucket one last time to rinse off any remaining glass dust and prepare it for its new role as a planter.
Step 6: Prepare Your Chosen Plant for Its New Home
Carefully remove your chosen small houseplant from its original nursery container. Gently loosen and remove any excess soil from its roots, taking care not to damage them. The goal is to expose enough of the root ball to fit comfortably into the neck of the wine bottle. Hold the plant up to the wine bottle to gauge its fit. If the root system is too dense, you may need to gently prune some of the larger, non-essential roots. Remember, small, lightweight houseplants with compact or trailing root systems, such as ivy, succulents, air plants (which require no soil), or even small herbs, are ideal for this project.
Step 7: Create a Moss and Wire Root Harness
Measure your 20-gauge copper wire and cut a length that is at least twice as tall as your wine bottle. This extra length will become your hanging mechanism. Now, carefully wrap both Spanish moss and lichen moss around the exposed roots of your plant. This moss serves several vital purposes: it helps to hide the roots from view, provides a cushion for the plant, assists in retaining moisture, and, most importantly, helps prevent the plant from slipping out of the wine bottle. Once the roots are adequately covered with moss, gently wrap the copper wire around the moss-covered root ball. It’s crucial not to wrap the wire too tightly; plants need air circulation and space for roots to breathe and for water to permeate. Twist the ends of the wire together at the top, forming one long, sturdy strand that will eventually serve as the primary hanging hook for your planter.
Step 8: Add Fresh Planting Soil
Since we removed some of the original soil from your plant, it’s essential to replenish it with fresh, nutrient-rich planting soil. To prevent soil from spilling out during this step, momentarily plug the opening of the wine bottle’s neck with a folded paper towel or a small piece of cloth. Then, carefully add about two generous handfuls of your chosen planting soil into the wine bottle, creating a base layer for your plant.
Step 9: Insert the Plant into the Wine Bottle Planter
With the soil base ready, gently remove the paper towel from the wine bottle’s opening. Carefully guide your moss-and-wire-wrapped plant, roots first, into the wine bottle. Push it down through the layer of soil until the twisted wire strand (your future hanger) emerges from the top opening of the bottle. The moss and wire harness will help secure the plant in place, providing stability within its new glass home. Take care to ensure the plant itself is positioned comfortably and not too tightly compressed.
Pro Tip: To make insertion easier, you can thread the long copper wire strand through the wine bottle first, from the cut end to the neck, before pushing the moss-covered roots into the bottle. Then, gently pull the wire from the top, guiding the plant into place. The combination of moss and wire provides excellent support, holding the plant securely within the wine bottle.
Step 10: Enhance with Decorative Twine and Finish the Hanger
To add a rustic and aesthetically pleasing finish to your wine bottle planter, take your spool of twine. Begin by wrapping the twine neatly around the lip of the bottle, covering any exposed wire or creating a decorative band. You can secure the starting end with a knot or a dab of craft glue. Continue wrapping until you achieve your desired look. Then, take the long copper wire strand that extends from the top of your plant and carefully wrap twine around it as well, creating a cohesive, natural-looking hanger. Once the twine is wrapped, use your scissors to cut the twine, securing the end with a small knot. For a clean, professional finish, carefully use your lighter to singe away any small, fuzzy fibers from the twine. Exercise extreme caution during this step to avoid burning the twine itself or yourself.
Step 11: Water Your Plant and Hang Your Masterpiece
Your little plant has worked hard and deserves a refreshing drink! Carefully pour water through the top opening of the wine bottle, over a sink, to prevent any spills. Allow the water to saturate the soil and drain thoroughly. Depending on your plant, you might need to adjust the watering frequency. Once your plant is hydrated and settled, your beautiful new wine bottle planter is ready for its grand debut! Find the perfect spot to hang it, whether indoors in a sunny window, on your patio, balcony, or porch. Secure it firmly from the twine-wrapped wire hanger. Cheers to your successful DIY project and the refreshing touch of greenery it brings!
Looking for another fantastic wine bottle craft inspiration? Check out this insightful video from ENJOY CRAFTING:
Repurposing wine bottles is a wonderfully creative and environmentally conscious way to infuse personalized decor into your home and garden. Imagine crafting a series of these charming wine bottle planters and strategically scattering them throughout your patio, garden, or even in various rooms indoors. The subtle sparkle of glass, combined with lush greenery, will undoubtedly create a stunning accent, making your plants truly shine and adding an unparalleled touch of character to your space. Each planter tells a story of transformation, sustainability, and artistic expression, turning everyday objects into extraordinary pieces of decor.
Will you be undertaking this stunning wine bottle craft project to adorn your home? We’d love to hear about your experience, tips, and the unique ways you customize your planters. Share your thoughts and creations in the comments section below!
Do you have a passion for projects that involve cutting glass bottles? If so, you’re in luck! Explore 5 more inspiring DIY projects using cut glass bottles. These ingenious crafts offer even more unique additions to elevate your home decor with a touch of upcycled elegance.
Stay connected with our vibrant DIY community and discover endless inspiration by following us on Facebook, Twitter, Pinterest, and Instagram!
Editor’s Note – This post was originally published in June 2014 and has been comprehensively updated for enhanced quality, improved relevancy, and to provide more detailed instructions for our readers.