
Dazzling DIY Candle Holders & Luminaries: Illuminate Your Home with Handmade Charm
The gentle flicker of candlelight possesses an extraordinary power to transform any environment, casting a warm, inviting glow that soothes the soul and sparks conversation. More than just a source of light, candles are essential elements of home decor, capable of setting moods, enhancing aesthetics, and creating an atmosphere of comfort and sophistication. With the right candle holders, this simple glow can be elevated into a captivating focal point, reflecting your personal style. Embracing do-it-yourself (DIY) projects for candle holders offers an unparalleled opportunity to infuse your unique personality and creativity into your living space, making each piece a bespoke expression of your taste.
This comprehensive guide is meticulously crafted to inspire and instruct you on how to create a variety of stunning candle holders and enchanting luminaries. From elegant frosted glass designs perfect for serene winter evenings to rustic wooden blocks, versatile mason jar creations, and sophisticated painted wine glass arrangements, we cover a diverse range of styles suitable for any season, holiday, or special occasion. Our easy-to-follow, step-by-step instructions ensure an enjoyable and rewarding crafting experience, culminating in truly unique decorative pieces that will brighten every corner of your home with your individual flair.
Elevate Your Ambiance: Creative DIY Candle Holder & Luminary Projects for Every Style
Creating a captivating and personalized ambiance at home is more accessible than you might imagine, especially when you harness the power of handmade candle holders and luminaries. These stunning DIY projects seamlessly blend beauty, functionality, and creativity, allowing you to imbue your space with unique charm and a warm, inviting glow. Dive into these delightful crafting ventures and discover how simple materials can be transformed into brilliant decorative accents that truly reflect your taste.
1. Frosted Glass Candle Holders: Winter Elegance and Soft Radiance
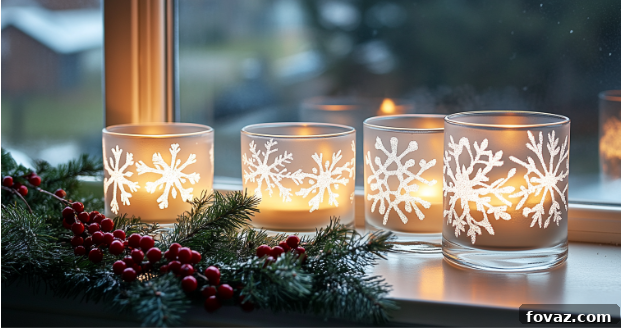
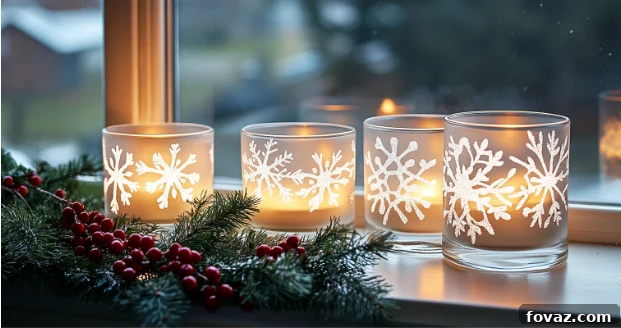
Capture the serene and delicate beauty of a frosted winter morning with these exquisitely elegant frosted glass candle holders. Their unique translucent finish gently diffuses candlelight, creating a soft, ethereal glow that instantly adds a chic, sophisticated, and seasonal feel to any room. While undeniably perfect for serene winter evenings and holiday decor, their timeless and understated appeal makes them a versatile addition to your home decor year-round, offering a touch of refined charm wherever they are placed.
Materials You’ll Need:
- Clean glass jars, votive holders, or small vases (consider varying sizes and shapes for dynamic displays)
- Frosted glass spray paint (high-quality brands are available at craft stores like Michaels or hardware stores)
- Painter’s tape or adhesive stencils (for creating patterns or designs)
- Rubbing alcohol and a lint-free cloth (for thorough cleaning)
- Optional embellishments: Fine glitter, natural twine, elegant ribbon, or small decorative charms
- Newspaper or a dedicated drop cloth (to protect your work surface)
- Protective gloves and a mask (essential for safe spray painting in a well-ventilated area)
Step-by-Step Guide to Crafting Frosted Candle Holders:
- Prepare Your Glass Holders: The foundation of a flawless frosted finish begins with immaculate glass. Start by thoroughly washing your glass jars or votives with warm soapy water. Rinse them completely and then wipe down every surface with rubbing alcohol using a lint-free cloth. This critical step removes any fingerprints, oils, or residues, ensuring optimal paint adhesion and a perfectly smooth, streak-free frosted appearance. Allow the glass to air dry completely before proceeding to the next step.
- Design Your Pattern (Optional): If you envision specific patterns or clear sections, now is the ideal time to apply painter’s tape or adhesive stencils. You can create elegant horizontal stripes, delicate snowflake motifs, bold geometric shapes, or abstract designs. Press the tape or stencil edges down firmly and meticulously to prevent any paint from bleeding underneath and blurring your crisp lines.
- Apply Frosted Glass Paint: Move to a well-ventilated outdoor area or a garage with open doors. Place your prepared glass holders on newspaper or a drop cloth. Following the specific instructions on your frosted glass spray paint can, apply thin, even layers. Hold the can approximately 8-10 inches away from the glass and use steady, sweeping motions. The key to achieving a professional, consistent frosted effect is applying multiple thin coats rather than one thick, heavy layer. Allow each coat to dry completely to the touch, typically 15-30 minutes, before adding the next. This prevents drips and ensures even coverage.
- Remove Tape/Stencils: Once the final coat of paint is dry to the touch but not yet fully cured (still slightly pliable), carefully and slowly peel off any painter’s tape or stencils. If you wait until the paint is fully hardened, it might chip along the edges, compromising your design.
- Add Optional Final Touches: For an enchanting touch of sparkle, lightly sprinkle fine glitter onto the final wet paint layer immediately after spraying. Alternatively, once the paint is completely dry and cured, you can tie natural twine, a festive ribbon, or delicate lace around the neck of the holder. Small decorative charms or tags can also be attached for added personalization and charm.
- Curing Time: Always allow your newly frosted candle holders to cure according to the specific instructions provided by the paint manufacturer. This often requires 24-48 hours, or even longer, and is crucial for the durability and longevity of the finish before they are put to use.
Creative Placement and Styling Ideas:
- Windowsill Wonderland: Arrange a charming collection of frosted holders of varying heights and sizes on a sunlit windowsill. They will beautifully capture and diffuse natural light during the day, creating a stunning, soft glowing effect that transitions into a serene, frosty ambiance as evening descends.
- Festive Table Centerpieces: Seamlessly incorporate these elegant holders into your holiday or seasonal centerpieces. Pair them with fresh evergreen branches, polished pinecones, vibrant cranberries, and sparkling ornaments for a truly festive, sophisticated, and warm touch that will impress your guests.
- Elegant Coffee Table Display: Create an eye-catching and sophisticated focal point for your living room by grouping three or five frosted candle holders on a decorative mirrored tray, a natural wood slab, or a sleek metallic surface on your coffee table or mantelpiece. The reflections will amplify their soft glow.
- Tranquil Bathroom Oasis: Place a single frosted holder on a bathroom vanity, shelf, or by the tub. The diffused light will instantly elevate the space, transforming it into a calming, spa-like sanctuary perfect for relaxation and unwinding.
- Romantic Bedroom Accent: Position a pair of frosted holders on bedside tables or a dresser to add a soft, romantic, and inviting glow, perfect for unwinding after a long day.
2. Mason Jar Luminaries: Rustic Charm and Versatile Illumination
Mason jars are the quintessential canvas for countless DIY projects, celebrated for their charming rustic aesthetic, inherent durability, and incredible adaptability. Their simple yet sturdy design makes them perfect for crafting versatile luminaries that can be effortlessly customized for any holiday, special occasion, or simply to enhance your everyday home decor with a touch of farmhouse chic or whimsical charm.
Materials You’ll Need:
- Mason jars (stock up on various sizes – pint, quart, wide-mouth, regular-mouth – for diverse displays)
- A selection of decorative fillers: Consider faux snow, dried cranberries, small pinecones, acorns, polished river stones, beach sand, seashells, coffee beans, colorful beads, or even small battery-operated fairy lights.
- Candles: Tea lights, votive candles, or LED flameless candles (highly recommended for safety, especially when using flammable fillers).
- Embellishments for the exterior: Natural jute twine, rustic burlap ribbon, elegant satin ribbons, delicate lace, small decorative charms, or personalized tags.
- Hot glue gun and glue sticks (optional, for securely attaching exterior embellishments).
How to Craft Your Enchanting Mason Jar Luminaries:
- Prepare Your Jars: Begin by ensuring all your mason jars are sparkling clean and completely dry, both inside and out. Any residue could affect the appearance or pose a fire hazard with real candles.
- Layer Decorative Fillers: The artistic beauty of mason jar luminaries often originates from their carefully chosen base. Start by gently layering your selected decorative fillers at the bottom of the jar. For a cozy winter theme, consider soft faux snow, bright red cranberries, or miniature pinecones. For a natural, earthy look, you might use dried beans, small pebbles, or even fragrant coffee grounds. The quantity of filler should be balanced to allow your candle to sit securely while still being visible and projecting light.
- Insert a Candle: Carefully place your chosen tea light, votive candle, or LED flameless candle on top of the layered filler. If using real candles, ensure there is ample space around the flame and above the filler material to prevent any fire hazards, especially if your fillers are combustible. LED candles are an excellent, safe alternative, particularly when incorporating dried leaves, cotton, or other potentially flammable decorative elements.
- Embellish the Neck and Exterior: This step adds significant character and personalized charm to your luminaries. Wrap natural jute twine, rustic burlap, colorful satin ribbon, or delicate lace around the neck of the jar. You can tie a simple, elegant bow, attach a small decorative charm, or even string a short strand of battery-operated fairy lights either inside the jar (among the fillers, ensuring safety) or around the exterior for an extra magical, twinkling glow.
Creative Variations for Every Aesthetic:
- Coastal Chic Luminaries: Achieve a breezy, beach-inspired feel by filling your jars with clean, fine sand, a collection of small, polished seashells, and a pale blue or white candle. Complete the look by wrapping the neck with natural twine, raffia, or a piece of fishing net material for authentic nautical appeal.
- Festive Holiday Style: Create a dazzling and celebratory display for the holiday season. Use a vibrant base of fresh or faux cranberries, miniature ornaments, and sprigs of fresh evergreen or holly. A rich red, deep green, or shimmering gold candle will perfectly complement this joyous design.
- Rustic Farmhouse Appeal: For an inviting and charming rustic look, incorporate dried lavender sprigs, small bundles of wheat, preserved moss, or even burlap scraps. Pair these with a wide burlap ribbon tied around the jar’s neck and a vanilla, cinnamon, or lavender-scented candle for a truly inviting aroma.
- Spring Garden Delight: Fill your mason jars with small polished river stones, artificial moss, and a few artificial flowers or miniature bird nests. Use pastel-colored candles (pink, blue, yellow) to evoke the fresh, vibrant energy of spring.
- Spooky Halloween Glow: Paint the outside of the jars with spooky silhouettes (bats, ghosts, haunted houses) using black acrylic paint. Inside, add orange or purple fairy lights or an orange LED candle for a hauntingly good glow.
3. Wooden Block Candle Holders: Earthy Charm and Modern Minimalism
For those who appreciate the robust beauty of natural materials and a harmonious blend of rustic warmth with modern minimalism, wooden block candle holders are an exceptional choice. These handmade holders effortlessly introduce an organic, earthy element into your decor, reminiscent of farmhouse, industrial, or clean Scandinavian styles. They are not only inherently sturdy and incredibly versatile but also surprisingly simple to craft, allowing for extensive customization to perfectly match any existing interior theme or color scheme.
Materials You’ll Need:
- Wooden blocks or scraps (softwoods like pine are beginner-friendly; hardwoods like oak or maple offer durability and a refined finish. Reclaimed wood adds character!)
- Saw (a miter saw for precise cuts, or a hand saw if preferred)
- Sandpaper (a range of grits: 80 for rough shaping, 120 for smoothing, 220 for a fine finish)
- Electric drill with a spade bit or Forstner bit that precisely matches your candle diameter (e.g., 1.5 inches for standard tea lights/votives).
- Wood stain, paint, natural wax finish, or oil finish (e.g., linseed oil, tung oil) for personalization.
- Clear varnish, polyurethane sealant, or clear acrylic spray (to protect and seal the wood).
- Ruler, measuring tape, and pencil (for accurate marking).
- Wood clamps (optional but highly recommended for securing wood during drilling for safety and precision).
- Protective eyewear and work gloves (safety first when working with power tools).
- You can find all necessary woodworking tools and materials at local hardware stores such as Home Depot or Lowe’s.
Step-by-Step Guide to Crafting Your Wooden Block Candle Holders:
- Cut Wooden Blocks to Size: Begin by safely cutting your chosen wood into blocks. Experiment with different heights and widths (e.g., 3x3x3 inches, 3x3x5 inches, or 4x4x2 inches) to create dynamic visual interest when displayed as a set. Once cut, meticulously sand all edges and surfaces. Start with a coarser grit (80 or 100) to shape and remove major imperfections, then move to medium (120-150) and finally a fine grit (220) until the wood is completely smooth to the touch, free of any splinters or rough patches. Wipe away all sanding dust.
- Drill Candle Holes: Using a ruler and pencil, accurately mark the exact center of the top surface of each block where you intend your candle to sit. Select a spade drill bit or Forstner bit that perfectly matches the diameter of your candles (e.g., 1.5 inches for standard tea lights or votives). Carefully drill a hole to a depth that allows the candle to sit securely and safely, usually about half to three-quarters of an inch deep. If possible, use wood clamps to firmly secure the wood piece to your workbench while drilling for enhanced safety and precision.
- Stain, Paint, or Finish the Wood: Now comes the exciting personalization stage! You can apply a natural wood stain to beautifully highlight the wood grain and infuse warmth into your decor, or opt for bold, opaque paint colors to perfectly match or contrast with your existing interior design. Consider distressed finishes for a charming farmhouse aesthetic, a sleek matte black for modern industrial appeal, or a natural oil finish for an understated, organic look. Always apply finishes in thin, even coats, following product instructions, and allow sufficient drying time between layers.
- Seal the Wood for Protection: Once your stain or paint is completely dry and cured, apply a clear protective layer. This could be a clear varnish, polyurethane, or a natural wax sealant. This crucial protective coating is essential for preventing unsightly wax stains, shielding the wood from moisture, and significantly enhancing the longevity and durability of your beautiful candle holders. Carefully follow the product instructions for application and subsequent curing times to achieve the best results.
Inspiring Styling and Arrangement Suggestions:
- Layered Centerpiece Ensemble: Create a visually rich and engaging centerpiece by clustering several wooden blocks of varying heights, sizes, and perhaps even different finishes, on a decorative tray. This tray could be made of metal, natural stone, or another wood type. Enhance the display by adding elements like polished river rocks, soft moss, or transparent glass beads around the base of the blocks for an organic, layered, and sophisticated look.
- Seasonal Accents for Every Occasion: Elevate their seasonal vibe by thoughtfully surrounding them with appropriate natural elements. For a cozy autumn theme, integrate mini pumpkins, vibrant dried leaves, or textured acorns. For a festive winter display, incorporate fragrant pinecones, fresh evergreen sprigs, and bright faux berries. During spring, use small potted succulents or artificial flowers.
- Versatile Tabletop Decor: These sturdy and elegant wooden holders are perfectly suited as centerpieces for both relaxed, casual family dinners and more formal gatherings. Their solid construction makes them reliable and safe for any tabletop setting, adding a touch of understated elegance.
- Curated Shelf or Mantel Statements: Arrange them strategically on open shelving units, along a fireplace mantel, or on a console table. Mix them harmoniously with books, small potted plants, sculptural objects, or other decorative items to craft curated vignettes that draw the eye and add character to your space.
4. Seashell Candle Holders: Coastal Serenity and Organic Beauty
Bring the serene and tranquil beauty of the ocean directly into your home with these exquisitely unique seashell candle holders. Their inherent one-of-a-kind shapes, intricate natural textures, and subtle, earthy colors make them a truly standout addition to any decor. They effortlessly evoke a sense of coastal serenity, exotic charm, and a refreshing vacation vibe. These holders are perfect for beach-themed rooms, creating a calming bathroom oasis, or for anyone yearning for a subtle touch of seaside elegance.
Materials You’ll Need:
- Large, sturdy seashells (clams, scallops, conchs, or other shells with a stable base are ideal for holding candles securely)
- Tea lights or small votive candles (LED flameless candles are highly recommended for optimal safety, especially when decorating with natural, potentially flammable elements like dried sea moss).
- Adhesive putty (e.g., museum putty) or a hot glue gun (for firmly securing candles within the shells).
- Optional embellishments: Metallic paint pens (gold, silver, copper), fine glitter, clear sealant spray, small pebbles, sand, or sea glass.
- Soft brush and water (for thoroughly cleaning the shells).
How to Create Your Beautiful Seashell Candle Holders:
- Select and Clean Your Shells: Carefully choose large, robust seashells that possess a relatively flat base or can be made stable with a small amount of adhesive putty underneath. Ensure that each shell is thoroughly cleaned of any lingering sand, dirt, or debris using a soft brush and lukewarm water. Once cleaned, allow them to air dry completely to prevent any moisture issues.
- Secure the Candle: Gently place a tea light or a small votive candle into the hollow or cup of the selected shell. Use a small amount of adhesive putty, pressed firmly onto the bottom of the candle, to secure it in place. This prevents it from wobbling, shifting, or tipping over unexpectedly. Alternatively, a tiny dab of hot glue can also provide a secure hold, especially if you don’t anticipate removing the candle frequently. For maximum safety, particularly when using real flames, always ensure the shell itself is stable on its chosen surface and wide enough to safely contain any potential wax drips.
- Decorate the Shell (Optional): While the innate, raw beauty of natural shells is often captivating enough on its own, you can choose to enhance them further. Use metallic paint pens (in shades of gold, silver, or copper) to delicately highlight the edges, natural ridges, or intricate patterns of the shell for a subtle touch of glamour and sophistication. A light dusting of fine glitter can add a ethereal sparkle, or a clear sealant spray can protect the shell’s surface while imparting a lovely, subtle sheen. For a truly organic and understated feel, simply leave them in their pristine natural state.
Inspiring Ideas for Placement and Styling:
- Coastal Vignette: Curate a harmonious and cohesive beach-themed display by pairing your seashell candle holders with complementary elements such as weathered pieces of driftwood, smooth sea glass, a small bowl of clean beach sand, or a few scattered sea urchins. This creates a charming vignette on a console table, mantelpiece, or shelving unit.
- Spa-like Bathroom Ambiance: Arrange a thoughtful selection of seashell holders on a bathroom shelf, nestled beside a luxurious bath, or carefully placed on the edge of a tub (ensuring extreme safety). The gentle glow will instantly transform your bathroom into a calming, spa-like sanctuary, perfect for moments of relaxation and unwinding.
- Vanity and Side Table Accents: Utilize these delicate holders as charming accents on bedroom vanities, intimate nightstands, or living room side tables. They introduce a subtle, constant whisper of the ocean into personal and communal spaces, creating a serene and inviting atmosphere.
- Outdoor Patio or Deck Decor: If you’re using LED flameless candles, seashell holders become wonderful additions for decorating outdoor dining tables, patio railings, or garden nooks. They provide a relaxed, natural glow for al fresco dining and evening gatherings without the concern of wind extinguishing real flames.
5. Painted Wine Glass Candle Holders: Upscale Elegance and Personalized Gifts
Transform ordinary wine glasses into extraordinary decorative elements with this clever and artistic DIY project. Painted wine glass candle holders ingeniously combine elegant artistic expression with functional home decor, offering a unique and sophisticated way to elevate your table settings for special occasions or to create truly one-of-a-kind, personalized gifts. They are particularly striking when used as inverted luminaries, where the candle is perched gracefully on the base and miniature, charming scenes are artfully encapsulated within the inverted bowl.
Materials You’ll Need:
- Wine glasses (stemmed glasses are best suited for this inverted design, various sizes can add interest)
- Acrylic or glass paint (a variety of colors, chosen to match your theme or decor)
- Small paintbrushes, sponges, or adhesive stencils (for detailed designs or uniform patterns)
- Clear acrylic spray sealant or varnish (essential for protecting your painted designs)
- A selection of small decorative fillers: Consider faux snow, fine glitter, miniature pinecones, tiny ornaments, colorful beads, small figurines, artificial flowers, or even dried petals.
- Candles: Votive candles, tea lights, or LED flameless candles (LEDs are highly recommended for safety, especially with internal fillers).
- Rubbing alcohol and a lint-free cloth (for preparing the glass surface).
- Newspaper or a drop cloth (to protect your work area during painting).
How to Create Your Exquisite Painted Wine Glass Candle Holders:
- Prepare and Paint the Glass: Begin by meticulously cleaning your wine glasses. Wash them thoroughly with warm, soapy water, then wipe every surface with rubbing alcohol using a lint-free cloth. Allow them to dry completely to ensure optimal paint adhesion. Now, unleash your artistic flair! Using acrylic or glass paint, you can apply intricate patterns, charming seasonal designs (e.g., delicate snowflakes, vibrant autumn leaves), abstract swirls, or even personalize them with monograms, names, or significant dates. Focus your painting efforts on the bowl and stem of the glass, typically leaving the base unpainted if you intend for the candle to sit there. Allow the paint to dry completely according to the manufacturer’s instructions, which can take up to 24 hours.
- Seal the Painted Design: To prevent chipping, scratching, and ensure the longevity of your beautiful artwork, this step is crucial. Once the paint is completely dry, generously spray your painted glasses with a high-quality clear acrylic sealant or varnish. Apply several thin, even coats, allowing each coat to dry thoroughly before applying the next. This creates a durable protective layer, especially important if the glasses will be handled frequently or used for gifting.
- Flip and Fill the Bowl: Once the sealant is fully cured and dry, carefully turn the wine glass upside down. In this inverted position, the sturdy base of the glass now serves as a stable, elevated platform for your candle, while the spacious, inverted bowl transforms into a captivating miniature display case or “dome.” Fill this glass dome with your chosen small decorative fillers. This could be a magical winter scene with faux snow and tiny miniature trees, a vibrant display of colorful beads for a festive look, delicate dried petals for a romantic touch, or small figurines to create a whimsical tableau.
- Add the Candle: Finally, carefully place a votive candle, a tea light, or an LED flameless candle on the elevated base of the inverted wine glass. This innovative arrangement creates a stunning, elevated glow that beautifully highlights the charming scene you’ve meticulously crafted within the glass bowl, offering a unique focal point for any setting.
Essential Safety Tips for Your Candle Displays: A Priority for Every Home
While DIY candle holders are designed to enhance the beauty and warmth of your home, ensuring safety should always be your utmost priority. Thoughtfully following these crucial guidelines will ensure that your beautiful handmade creations bring warmth and ambiance without any unnecessary risks.
- Maintain Safe Distances from Flammables: Always position burning candles well away from any and all flammable materials. This includes, but is not limited to, curtains, paper decorations, bedding, upholstery, dried flowers, and even overhanging shelves or draperies. A general recommendation is to maintain a minimum clearance of at least 12 inches (approximately 30 cm) around all sides and above the flame.
- Never Leave Candles Unattended: This is the most critical and non-negotiable rule: absolutely never leave burning candles unsupervised. Extinguish all candles before you leave a room, step out of the house, or go to sleep. A flickering flame can quickly become a hazard.
- Embrace LED Alternatives for Enhanced Safety: For households with curious children or playful pets, or for areas where real flames are simply impractical or unsafe (such as inside bookshelves, near fabrics, or in high-traffic zones), LED flameless candles are a fantastic, highly recommended alternative. They offer the same aesthetic appeal and warm glow without any associated fire risk, making them an ideal choice for peace of mind.
- Ensure Maximum Stability: Always place your candle holders on a flat, perfectly stable, and heat-resistant surface. This crucial step prevents accidental tipping, which could lead to spilled hot wax or, worse, a fire. Before lighting, double-check that the holder itself is balanced and won’t easily be knocked over by a slight bump.
- Regularly Trim Wicks: Before each and every use, take a moment to trim candle wicks to approximately ¼ inch (about 6mm). This simple habit helps to prevent excessive smoke, minimize soot buildup around the holder, and ensures a cleaner, more efficient, and significantly longer burn life for your candles.
- Avoid Drafts and Vents: Position candles away from open windows, active fans, air conditioning vents, or any areas prone to drafts. Drafts can cause flames to flicker excessively, leading to uneven burning, increased soot production, and potentially increasing the risk of ignition of nearby flammable items.
- Properly Extinguish Candles: Use a snuffer to extinguish candles, rather than blowing them out. This prevents hot wax from splattering and reduces smoke. Ensure the wick is fully extinguished before leaving.
Illuminate Your Home with Stunning DIY Candle Holders: A Final Touch of Personal Charm
Candle holders transcend their basic function as mere receptacles for candles; they are integral components of your home’s narrative, enhancing the beauty, character, and overall ambiance of your decor. The enriching journey of crafting your own DIY candle holders, as thoroughly explored in this comprehensive guide, offers a deeply satisfying experience that culminates in bespoke, unique pieces that beautifully reflect your individual style and creative spirit.
Whether you choose to embrace the refined, almost ethereal charm of frosted glass holders that evoke a peaceful winter landscape, the boundless versatility and rustic appeal of mason jar luminaries that effortlessly adapt to any theme or season, or the grounded, modern elegance of wooden block holders that anchor your space with natural warmth and minimalist sophistication, each project offers distinct aesthetic advantages and a unique story. For those who yearn for truly exceptional and personal designs, the delicate allure of seashell holders transports you to tranquil coastal havens, while the ingenious transformation of painted wine glass holders allows you to showcase unparalleled artistic creativity and flair, making each piece a conversation starter.
These DIY projects are not only simple and accessible to execute, even for beginners, but also offer immense potential for personalization and stylistic customization. They empower you to gather basic, readily available supplies and, with just a touch of imagination and a dash of effort, brighten not just your evenings but the entire ambiance and character of your home. By choosing to create and handcraft, you infuse your living spaces with a unique warmth, soul, and personality that mass-produced, store-bought items simply cannot replicate. Embrace the joy of making and watch your home transform into a haven of handmade beauty and light.
Ready to Light Up Your Home with Handmade Beauty and Unique Charm?
Embrace the joyful and rewarding process of crafting and embark on creating your favorite design from this guide today! We warmly invite you to share your beautiful, unique creations with us or tell us which project from this guide inspired you the most. Join our vibrant and supportive community of makers and let your creativity shine brightly, transforming ordinary moments into extraordinary, candlelit memories. Don’t wait—gather your supplies, unleash your inner artisan, and start crafting your perfect, personalized candlelit atmosphere now to bask in the warm, inviting glow of your handmade masterpieces!
Frequently Asked Questions About DIY Candle Holders and Luminaries
- Can I use regular spray paint instead of frosted glass paint for glass holders?
No, it is highly recommended to use frosted glass paint specifically designed for that unique translucent effect. Regular spray paint typically creates an opaque finish, which would completely block the light from shining through the glass, ultimately defeating the purpose of a glowing candle holder. Frosted glass paint is specially formulated to achieve a beautiful, diffused light. - Are mason jar luminaries safe for outdoor use, and what considerations should I have?
Yes, mason jar luminaries can be safe and charming for outdoor use, especially if you opt for LED flameless candles. If you choose to use real candles outdoors, ensure they are adequately protected from wind to prevent uneven burning, excessive flickering, or potential fire hazards. Always place them on a stable, non-flammable outdoor surface away from dry leaves, fabrics, or other combustible elements. - What type of wood works best for wooden block candle holders, considering ease of use and durability?
Softwoods like pine, cedar, or spruce are excellent choices for beginners because they are relatively inexpensive and very easy to cut and drill. Hardwoods such as oak, maple, or walnut offer superior durability, a richer grain pattern, and a more refined, polished finish, though they naturally require more effort and specialized tools to work with. Reclaimed wood is also a fantastic, eco-friendly option that adds unique character and history to your pieces. - How can I effectively prevent paint from chipping or scratching on my painted wine glass holders?
The most effective way to prevent chipping and ensure the longevity of your painted designs is to use a high-quality clear acrylic spray sealant or varnish once the paint is completely dry. Apply several thin, even coats, allowing sufficient drying time between each layer. Additionally, choosing acrylic paints specifically designed for glass or multi-surface adherence can significantly improve durability. - Can I creatively mix different styles of DIY candle holders within the same space or room?
Absolutely! Mixing different styles of candle holders is a wonderful and encouraged way to add rich visual interest, texture, and a curated, eclectic look to your decor. For example, combining the soft, ethereal glow of frosted glass with the natural, rustic texture of wooden blocks or the charming versatility of mason jars can create a dynamic, harmonious, and truly personalized display. Focus on a cohesive color palette, a common theme, or similar material finishes to tie them all together beautifully. - How can I effectively add an inviting scent or fragrance to my DIY candle holders?
The simplest and most direct way to add scent is to use scented candles (votives, tea lights, or pillar candles) within your holders. Alternatively, for luminaries that incorporate decorative fillers like pinecones, dried potpourri, or porous stones, you can add a few drops of your favorite essential oils directly onto these non-flammable fillers. Always ensure that any added essential oils or scented elements are kept a safe distance from any open flame. - Are there specific eco-friendly options or considerations for these DIY candle holder projects?
Yes, many of these DIY projects are inherently eco-friendly! You can significantly minimize waste by using upcycled materials such as old glass jars (mason jars, food jars, wine bottles), leftover wood scraps from other projects, or naturally found items like seashells and pinecones. Opting for LED flameless candles also reduces the consumption of wax and wicks, further contributing to a more sustainable approach. Repurpose, reuse, and recycle whenever possible to minimize your environmental footprint. - Where can I find even more ideas and inspiration for creative DIY candle holders?
Beyond this comprehensive guide, a wealth of creative inspiration awaits! Explore popular DIY blogs for fresh ideas, browse extensive image collections on visual platforms like Pinterest, or visit dedicated craft and home improvement websites such as Michaels, HGTV, or Etsy for handmade ideas and trends. YouTube tutorials are also an excellent resource for visual learners, offering step-by-step video guidance. - What is the recommended skill level for completing these various DIY candle holder projects?
Most of the projects outlined, particularly the Frosted Glass, Mason Jar, and Seashell holders, are highly suitable for beginners with minimal prior crafting experience. The Wooden Block holders require basic woodworking tools like a saw and a drill, making them ideal for those with a bit more comfort in DIY projects or intermediate skill levels. The Painted Wine Glass holders fall somewhere in between, depending heavily on the complexity and detail of your chosen painted design. - How long does it typically take to complete one of these DIY candle holders, from start to finish?
The actual hands-on crafting time for most projects (excluding necessary drying or curing times) typically ranges from a quick 15 minutes to about an hour per holder, depending on the complexity of the design and the number of desired embellishments. Projects involving paint, stain, or sealant will require additional waiting periods for coats to dry and fully cure, which can extend the overall project duration to 24-48 hours or even longer to ensure optimal results and durability.