
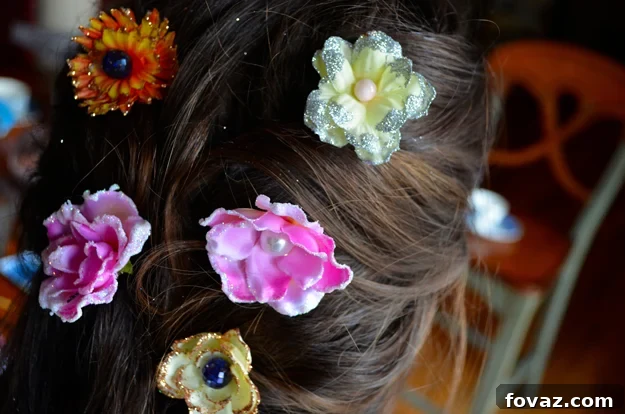
Enchanting DIY Flower Hair Accessories: Craft Your Own Fairytale Look
Have you ever dreamed of adding a magical, delicate touch to your hairstyle, perhaps reminiscent of a fairytale princess? Or maybe you’re searching for a unique and personal gift for a loved one. Look no further! This comprehensive DIY tutorial will guide you through creating exquisite flower hair accessories, perfect for elevating any look, from everyday elegance to special occasion glam. Get ready to unleash your inner crafter and adorn your locks with beautiful, handmade floral creations.
Last month, I had the pleasure of revisiting a beloved classic at the movies: Disney’s Cinderella. The film captivated me entirely, exceeding all my expectations. Having grown up with the enchanting tales of Cinderella, Jaque, and Gus, my standards were high, and this cinematic rendition delivered on every front. From the breathtakingly sparkly gowns to Cinderella’s unwavering joyful spirit, I was utterly charmed.
Inspired by the stunning costumes and the overall whimsical aesthetic of Cinderella, I felt compelled to embark on a craft project that would capture a piece of that magic. This tutorial is born from that inspiration, inviting you to create charming flower hairpins that will make anyone feel like royalty. It’s a delightful activity to share with your own little princess, or simply a treat for yourself to add a touch of sparkle to your day!
Why Craft Your Own Flower Hair Accessories?
Choosing to DIY your hair accessories offers a myriad of benefits beyond just cost savings. It’s an opportunity for personalization, creativity, and producing truly unique pieces. Here’s why you’ll love making your own:
- Unleash Creativity: You have full control over colors, flower types, and embellishments, allowing you to match them perfectly to an outfit or occasion.
- Budget-Friendly: Crafting these beautiful pieces yourself is often significantly cheaper than purchasing similar boutique accessories.
- Unique Style: Your creations will be one-of-a-kind, reflecting your personal style and ensuring you stand out from the crowd.
- Personalized Gifts: Handmade flower pins make thoughtful and cherished gifts for friends, family, or bridal party members.
- Eco-Conscious Choice: By reusing faux flowers and crafting supplies, you contribute to a more sustainable approach to fashion.
Materials You’ll Need for These Elegant DIY Flower Hair Accessories:
Gathering your supplies is the first exciting step in any craft project. For these delicate flower hairpins, you’ll need a few readily available items:
- U-shaped or Regular Bobby Pins: U-shaped pins offer more surface area for wrapping and securing, providing a sturdier hold, especially for thicker hair. Regular bobby pins also work well for lighter designs or finer hair. Choose colors that blend with your hair or match your flowers for a seamless look.
- Small-sized Faux Flowers: Opt for high-quality silk or fabric flowers that can be easily deconstructed. Varieties like cherry blossoms, primroses, hydrangeas, or tiny roses are ideal due to their individual petal structure and delicate appearance. Look for flowers that have a small hole in their center or can be easily pierced.
- Rhinestone or Pearl Buttons/Beads: These add a gorgeous focal point and a touch of sparkle or classic elegance to the center of your flowers. Consider different sizes and shapes to experiment with various aesthetics. Small flat-backed rhinestones can also be glued directly.
- Craft Wire: Thin, flexible craft wire (26 or 28 gauge is usually perfect) is essential for securing your flowers to the bobby pins. Choose a color that will blend in, such as silver, gold, or even a floral green.
- Wire Cutters: A small pair of wire cutters will be indispensable for neatly snipping your craft wire to the desired lengths. Precision is key here for a clean finish.
- Strong Craft Glue: A quick-drying, clear-drying craft glue will ensure your glitter and any additional embellishments stay put. E6000 or similar jewelry/fabric glue is highly recommended for its strong bond.
- Fine Glitter: To achieve that magical, princess-like sparkle, fine glitter is perfect. Holographic, iridescent, or silver glitters work wonderfully to catch the light. You can also experiment with colored glitters to match your flower hues.
- Tweezers: A pair of fine-tipped tweezers will be invaluable for precise application of glue and glitter to the delicate flower petals.
- Small Containers: Two small, disposable containers will be useful for pouring out glue and glitter, making dipping easier and cleaner.
Step-by-Step Guide to Crafting Your Glittering Flower Hairpins:
Step 1: Deconstructing Your Faux Flowers
Begin by carefully deconstructing your chosen silk or fabric flowers. Most faux flowers are assembled in layers; gently pull apart the individual flower blossoms from their stems or central plastic pieces. The goal is to obtain single, separated flower heads. You’ll notice that many of these individual blossoms already have a small hole in their center, which is perfect for the next steps. If your flowers don’t have a pre-existing hole, you can gently pierce one with a needle or the tip of a craft knife, being careful not to fray the fabric.
Step 2: Adding a Touch of Sparkle with Glitter
Pour a small amount of your strong craft glue into one disposable container and an equally small amount of glitter into another. Using tweezers for precision, grasp the edge of an individual flower blossom. Carefully dip only the very outer edges of the flower petals into the glue, ensuring a thin, even coat. The aim is to create a delicate shimmer rather than a heavily coated look. Repeat this for all the petals on the blossom, or just the outer layer if you’re working with a multi-layered flower.
Step 3: Glitter Application and Drying
Immediately after coating the edges with glue, gently dip the glue-coated edges of the blossom into the glitter. Make sure to tap off any excess glitter to prevent clumps and ensure a clean, sparkling finish. Set the glitter-kissed blossom aside on a clean, non-stick surface (like wax paper or parchment paper) to dry completely. Drying time will vary depending on the glue used, so always check the manufacturer’s instructions. Repeat this process for all the flower blossoms until you’ve reached your desired quantity of glittering flowers. Allow ample time for them to dry thoroughly before moving to the next step, ideally a few hours or overnight, to prevent smudging.
Step 4: Assembling Your Flower Hairpins
Once your glitter-blossoms are completely dry, it’s time to assemble them into beautiful hairpins. Take a rhinestone or pearl button/bead and thread it through the central hole of a flower blossom. Next, cut a length of craft wire, approximately 4-6 inches long. Thread this wire through one of the button-holes (if using a button) or directly through the bead and then through the flower’s central hole, coming out from the back of the blossom. If you prefer a fuller, more elaborate flower, consider layering two or three blossoms together before adding the button, creating a lush, multi-dimensional effect. Once the wire is through, position the button securely in the center of your flower.
Now, take a bobby pin (U-shaped or regular). Slip the two ends of the craft wire through the “U” opening of the bobby pin. Bring the wire ends together, twisting them gently a few times directly under the blossom to secure the flower to the pin. Then, wrap the remaining wire tightly and neatly around the base of the bobby pin, working your way down the pin’s stem. Ensure the wire is wrapped securely and tucked in so there are no sharp ends that could snag hair or scratch the scalp. Trim any excess wire with your wire cutters. This careful wrapping ensures your beautiful flower stays firmly attached to the bobby pin.
Step 5: Styling with Your Princess Pins
Your magical princess pins are now ready to adorn your hair! These versatile accessories look absolutely stunning sprinkled throughout an elegant updo, a sophisticated half-updo, or even nestled into braids for a whimsical touch. For an extra secure hold and to ensure your delicate blossoms stay in place all day or night, lightly mist your styled hair with hairspray before inserting the pins. This creates a slightly grippier surface, preventing the pins from slipping. Experiment with different placements – a cluster of pins near the crown, scattered individually along a braid, or accenting a romantic side-sweep. The possibilities are endless!
Create a Dreamy Princess Half-Updo Hairstyle:
To perfectly complement your new flower hair accessories, try this simple yet elegant Princess Half-Updo, ideal for any occasion:
- Prepare Your Hair: Start by curling your hair into soft, bouncy ringlets using a curling iron or heatless curling methods. Once curled, gently break up the curls with your fingers and set them with a light mist of flexible-hold hairspray. This provides a beautiful foundation for your style.
- Create the Part: Part your hair neatly in the center, or slightly to the side if that suits your face shape better.
- Twist and Pin: Take a section of hair from just above your ear on one side. Softly twist this section backward, away from your face, moving towards the back of your head. Secure this twist at the back of your head with a bobby pin, ensuring it’s hidden under the hair. Repeat this process on the other side, twisting the section back and pinning it adjacent to the first twist. You can crisscross the pins for extra security.
- Optional Bun (for a more formal look): If you desire a more elaborate half-updo, gather the remaining loose hair from the twisted sections (the part that hasn’t been twisted back yet). Gently twist this hair into a small, neat bun at the back of your head, just below where your twisted sections meet. Secure the bun firmly with additional bobby pins. This creates a more polished and structured look.
- Adorn with Flowers: Now for the magical touch! Carefully sprinkle your handmade princess flower pins throughout your half-updo. Place them along the twisted sections, around the bun, or subtly nestled within your curls. Think about how the flowers adorned Cinderella’s beautiful ball gown and replicate that delicate, scattered effect.
- Extra Sparkle (Optional): For an ultimate touch of fairytale enchantment, consider lightly sprinkling a dash of very fine, iridescent body glitter over your hair. This will catch the light and add an ethereal glow, truly making you feel like royalty.
Caring for Your DIY Flower Hair Accessories:
To ensure your beautiful handmade flower hairpins last for many occasions, a little care goes a long way:
- Storage: Store your pins in a jewelry box or a dedicated accessory organizer to prevent them from getting crushed or tangled with other items. Keep them away from direct sunlight to prevent color fading.
- Cleaning: If they gather dust, gently brush them with a soft, dry paintbrush. Avoid getting them wet, as this could damage the fabric flowers or loosen the glue.
- Handling: Always handle your pins gently, especially when inserting and removing them from your hair, to avoid bending the wire or detaching the flowers.
Unleash More Creativity: Customization Ideas
These flower hairpins are just the beginning! Here are a few ideas to customize your creations:
- Vary Flower Types & Sizes: Mix small blossoms with slightly larger ones for a dynamic cluster effect.
- Color Palettes: Experiment with ombré effects by using flowers of graduating shades or create contrasting looks with bold color combinations.
- Add Greenery: Incorporate small faux leaves or sprigs to give your flowers a more natural, garden-fresh look.
- Beaded Vines: Instead of just wrapping wire, string tiny seed beads onto the wire before attaching the flower, creating delicate beaded tendrils around the bobby pin.
- Different Bases: Instead of bobby pins, consider attaching your flowers to hair combs, alligator clips, or even headbands for different styling options.
- Scented Flowers: Lightly spray the fabric flowers with a floral-scented perfume or essential oil for an extra sensory detail (test on an inconspicuous area first).
We absolutely love exploring cool DIY projects, from craft creations and home decor ideas to upcycling challenges, delicious recipes, and insightful tutorials. Our mission is to inspire you to connect with your creative side and discover the immense satisfaction of doing things yourself. We believe that with a little guidance, anyone can become a DIY enthusiast, and every project is just a click away! We thrive on building a vibrant community of crafters and innovators, so we’d love to hear from you!
Did you enjoy learning how to make these enchanting flower hair accessories? We’d love to know what you think in the comments section below! Do you have any other craft projects you’d like to share, or perhaps a unique styling tip for these pins? Share it with us, and we might just give it a try! Stay connected with our creative community on Facebook, Twitter, Pinterest, and Instagram for more inspiration and exciting projects!
Discover More Inspiring DIY Projects:
How to Make a Woodland Flower Crown | Your Guide to DIY Hair Accessories
If you loved creating these dainty hairpins, you’ll adore making a full flower crown! Learn the techniques to craft a whimsical woodland-inspired headpiece perfect for festivals, weddings, or just a magical day out.
Unlock Your Creativity with Homemade Resin Jewelry Made from Pressed Flowers
Transform your favorite pressed flowers into stunning, wearable art. This guide will walk you through the process of encapsulating nature’s beauty in clear resin to create unique necklaces, earrings, and more.
Master the Art of How To Perfectly Press Flowers for Crafts and Decor
Before you can craft with pressed flowers, you need to know how to preserve them beautifully. This essential tutorial covers various methods and tips for perfectly pressing flowers, ensuring vibrant colors and flat results every time.