
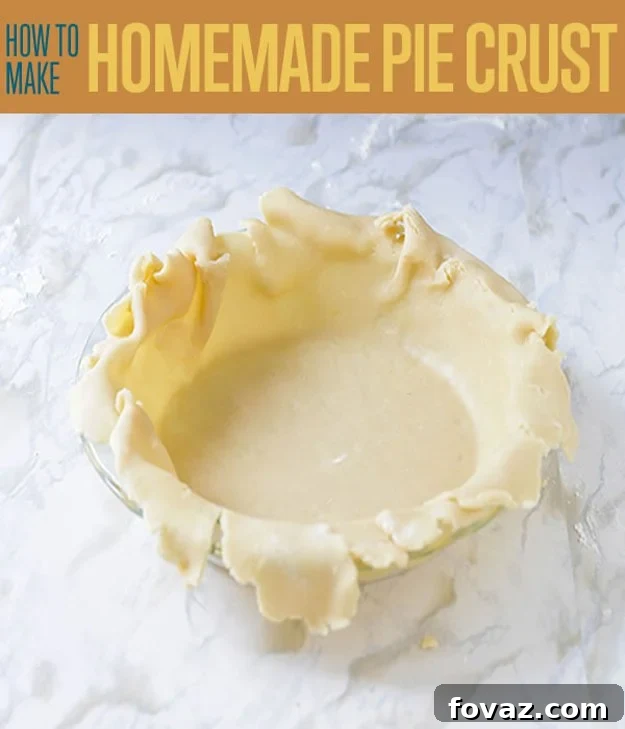
The Ultimate Guide to Flaky Pie Crust: An Easy Food Processor Recipe
Are you ready to elevate your baking and create truly show-stopping pies? The secret to any incredible pie lies in its crust. While making pie crust from scratch often intimidates home bakers, we’re here to tell you it doesn’t have to be a daunting task. If you’ve been searching for the best pie crust recipe that’s both reliable and simple, you’ve landed in the perfect spot.
This comprehensive guide will walk you through creating a consistently flaky, tender, and utterly delicious homemade pie crust using a fantastic shortcut: your food processor. Imagine crafting the foundation for any sweet or savory pie, from classic apple to hearty chicken pot pie, with confidence and ease. This is a culinary skill that will undoubtedly come in handy, especially during festive holiday gatherings and special occasions!
Demystifying Pie Crust: Overcoming Common Fears
For many aspiring bakers, the thought of making pie crust conjures images of frustration and failure. Perhaps you’ve harbored the same doubts:
- “Isn’t pie crust notoriously finicky and hard to handle?”
- “Will the dough stick stubbornly to my counter?”
- “Am I going to overwork the dough and melt the butter, resulting in a tough crust?”
- “What if the crust cracks, making it impossible to transfer to the pie pan?”
These are all very valid concerns, and I can assure you that I’ve navigated these exact trials and tribulations in my own baking journey. My initial attempts at crafting a flaky pie crust from scratch often resulted in disheartening outcomes. I recall my first few crusts being disappointingly hard, crumbly, and sometimes even scorched around the edges. I was so fixated on achieving those elusive flaky layers that I barely mixed the flour and butter, leading to an underdeveloped dough. Conversely, my anxiety about keeping the butter cold sometimes led me to add too much ice water, resulting in a wet, sticky dough that would crack and tear with the slightest manipulation.
The turning point in my pie crust endeavors arrived when I received a food processor as a gift (a huge thank you to Grandma!). After watching a few tutorials showcasing its magic, I decided to give homemade pie dough another shot. And what a transformative experience it was! The food processor dramatically simplifies the most crucial step of pie crust making: cutting the cold butter into the flour. It effortlessly creates the perfect pea-sized butter pieces that are essential for developing those coveted flaky layers.
With a food processor, your pie crust dough comes together in under a minute, achieving an ideal consistency without the risk of overworking it. Moreover, it provides unparalleled control over the amount of ice water added, ensuring you use just enough liquid to bind the ingredients into a cohesive dough, but not so much that it becomes waterlogged or tough. Today, I’m thrilled to share this method, allowing you to whip up an astonishingly delicious and beautiful easy pie crust in mere minutes, often at a fraction of the cost of store-bought alternatives. Your trusty food processor is truly the key to unlocking this baking magic!
Essential Ingredients for Your Perfect Homemade Pie Crust
Creating a stellar pie crust begins with quality ingredients, kept at the right temperature. Here’s what you’ll need:
- 1 ¾ cups All-Purpose Flour: The foundation of our crust. All-purpose flour provides the necessary structure.
- 1 teaspoon Granulated Sugar: A touch of sugar enhances flavor and helps with browning, especially for sweet pies. For savory pies, you can omit or slightly reduce this.
- 1 ½ sticks (12 tablespoons) Unsalted or Salted Butter: Cold and cut into ½-inch cubes. The cold butter is paramount for flakiness. If using unsalted butter, you’ll add salt separately. If using salted butter, you may want to reduce or omit the added salt based on your preference.
- ¼ cup Ice Water: Crucial for bringing the dough together without developing too much gluten. Ensure it’s genuinely ice-cold!
- ½ teaspoon Salt (if using unsalted butter): Salt balances the sweetness and enhances the overall flavor of the crust.
Understanding the Role of Key Ingredients:
Each ingredient plays a vital part in achieving the perfect pie crust:
- Cold Butter: This is the secret to a flaky crust. When cold butter pieces melt in the oven, they create pockets of steam, which separate the layers of dough, resulting in that desirable flaky texture.
- Flour: Provides the structure. Avoid over-measuring by spooning flour into your measuring cup and leveling it off.
- Ice Water: Minimizes gluten development, which keeps the crust tender. The colder the water, the less the butter will melt during mixing.
- Sugar & Salt: Flavor enhancers. Sugar also contributes to browning.
Tools and Supplies You’ll Need
Having the right equipment makes the pie crust process smoother and more enjoyable:
- Food Processor: Our star tool! This makes quick work of cutting butter into flour.
- Rolling Pin: For evenly flattening your dough.
- Plastic Wrap: Essential for chilling the dough and aiding in the rolling process.
- Parchment Paper: Another key aid for rolling out and transferring the dough effortlessly.
- 9.5-inch or 10-inch Pie Pan: The standard vessel for baking your pie. This recipe yields enough dough for a single 9.5-inch to 10-inch pie crust, offering ample “wiggle room” for beginners.
Step-by-Step Guide to Your Flaky Pie Crust
Follow these detailed instructions to create a truly exceptional pie crust:
Step 1: Combine Dry Ingredients
Begin by adding all of your dry ingredients into the bowl of your food processor. This includes the all-purpose flour, granulated sugar, and salt (if using unsalted butter). Secure the lid firmly onto the food processor. Now, pulse the mixture a few times for about 5-10 seconds in total. This ensures that the dry ingredients are thoroughly combined and evenly distributed, setting the stage for consistent dough.
Step 2: Incorporate Cold Butter in Batches
Divide your pre-cubed, cold butter into two roughly equal batches. Add the first batch of butter cubes directly into the food processor bowl with the dry ingredients. There’s no need for exact measurements here; the goal is simply to prevent overcrowding the bowl, allowing the blades to work efficiently.
Step 3: Pulse Butter Until Pea-Sized
Ensure the lid is securely fitted onto your food processor – many models have safety mechanisms that prevent operation if the lid isn’t locked. Pulse the mixture in short bursts, about 2-3 seconds at a time. Initially, you’ll hear the butter cubes clanking against the blades. Continue pulsing, and after 10-15 total pulses, the sound will soften, indicating the butter is being finely cut into the flour. Check the consistency: you’re looking for a mixture that resembles coarse meal, with visible pea-sized clumps of butter. These small butter pieces are crucial for creating those coveted flaky layers. Repeat this step with the second batch of butter until all of it is incorporated to the same pea-sized consistency.
Pro Tip: Don’t over-process during this stage. The goal is small butter pieces, not a smooth paste. Over-processing will melt the butter and develop too much gluten, resulting in a tough crust.
Step 4: Gradually Add Ice Water
Keep the food processor lid on, but make sure the feed tube (the spout where you can add ingredients while processing) is open. If your lid has a pusher, remove it. Turn your food processor on continuously (do not pulse). As the blades whir, slowly pour a very small and steady stream of ice water through the feed tube. Think of a stream as thin as a skewer stick. The exact amount of water needed can vary slightly based on your climate’s humidity and your altitude, so you might not use the entire ¼ cup.
Watch the dough carefully. After about 10-20 seconds, you’ll notice the dough beginning to clump together and form a large ball that rides around the blade. The moment you see this happening, immediately stop pouring water. Allow the dough ball to continue clumping for just a few more seconds to ensure it’s fully cohesive, then turn off the food processor. The dough should look shaggy but hold together when pressed. It shouldn’t be wet or sticky.
Troubleshooting Tip: If the dough still looks too crumbly and doesn’t quite come together after adding all the water, add another teaspoon of ice water at a time, pulsing until it just forms a ball. Be cautious not to add too much.
Step 5: Remove Dough from Processor
Carefully empty the contents of the food processor bowl onto a clean, cool surface that has been lightly dusted with flour. Be extremely cautious of the sharp blades; they can be very dangerous. I typically invert the bowl to dump the dough, then carefully remove the blade from the center of the dough mass before proceeding.
Step 6: Form and Flatten the Dough
Gently gather the shaggy dough together and form it into a ball. Avoid kneading or overworking it. Then, gently flatten the ball into a disc shape, roughly 1 inch thick. Try to make the edges as round and smooth as possible. Remember, minimal handling is key here; prolonged contact with warm hands will melt the butter, compromising the flakiness of your finished crust.
Step 7: Chill the Dough for Optimal Flakiness
Wrap the pie dough disc(s) tightly in plastic wrap. If you’re making a double-crust pie, divide the dough in half and wrap two separate discs. Place the wrapped dough in the refrigerator for at least one hour. This chilling period is non-negotiable! It allows the gluten to relax, making the dough easier to roll out, and, more importantly, it re-chills the butter. Cold butter is essential for preventing the crust from shrinking in the oven and for achieving that desirable tender, flaky texture.
Make-Ahead Tip: Pie dough can be refrigerated for up to 3-4 days, or frozen for up to 3 months. Thaw frozen dough in the refrigerator overnight before use.
Step 8: Prepare for Rolling
When you’re ready to bake, remove the chilled pie dough disc(s) from the refrigerator. Allow them to sit on the counter for about 10-15 minutes. This brief resting period lets the dough warm up just slightly, making it more pliable and much easier to roll out without cracking. If the dough is too cold, it will be stiff and challenging to work with.
Step 9: The Parchment Paper Rolling Method
Tear off two pieces of parchment paper, each slightly larger than your pie pan (around 12-13 inches for a 9.5-inch pan). Lightly dust one piece of parchment paper with flour. Place your slightly warmed dough disc on top of the floured parchment. Now, cover the dough with the second piece of parchment paper. Take your rolling pin and begin to gently roll the dough flat. The dough will feel firm at first, but with gentle, even pressure, it will quickly become pliable and spread.
Why use parchment paper and plastic wrap (or two sheets of parchment)? There are three main reasons this method is a game-changer:
- Non-Stick Surface: Pie dough can get quite sticky, and rolling it between two non-stick surfaces (parchment paper or plastic wrap) significantly minimizes sticking, making it much easier to handle.
- Reduced Handling: This technique drastically reduces the direct contact your warm hands have with the dough. This is crucial for keeping the butter cold and those flaky layers intact.
- Effortless Transfer: Transferring the delicate pie dough into the pie pan becomes significantly easier when you can simply peel it from the parchment paper directly over the pan, minimizing stretching or tearing.
Step 10: Roll Evenly for a Round Crust
Roll the dough once from the center upwards, then once from the center downwards. Rotate the entire parchment paper setup by about 45 degrees, then repeat the rolling motion. Continue this pattern – rolling up, rolling down, then rotating – until your dough disc is roughly 12-13 inches in diameter and about ⅛ to ¼ inch thick. This rotating method ensures an even, round crust without overworking any single section of the dough. A major benefit of using parchment paper is that you can rotate the paper itself, rather than trying to awkwardly maneuver the fragile dough.
Step 11: Transferring to the Pie Pan
Carefully remove the top layer of parchment paper (or plastic wrap). Now, gently lift the bottom piece of parchment paper with the dough still attached and invert it, placing the dough (parchment-side up) directly over your pie pan. Try to center the dough as best as possible, ensuring you have an equal overhang around the edges. Slowly and carefully peel the parchment paper away from the pie crust, starting from one edge and working your way across. As you peel, the pie crust should gracefully fall into the contours of the pan.
Step 12: Fitting and Finishing the Crust
Once the parchment is removed, gently lift an edge of the pie crust and carefully press the dough around the bottom and sides of the pan. Work your way around the entire pan. Don’t worry if the dough tears slightly; pie dough is remarkably forgiving! Simply pinch off a small piece from the excess crust around the edges and use it to patch any holes. If you notice any trapped air bubbles beneath the crust, gently prick them with a toothpick and press the crust back down to flatten. Trim the excess dough around the edges to about ½ to ¾ inch overhang, then fold it under and crimp or flute the edges as desired for a beautiful finish.
The Final Touches: Chilling and Baking Your Pie
Congratulations! You’ve successfully made a beautiful homemade pie crust. Before you bake, there are a few more critical steps to ensure perfection.
Once you’ve added your desired filling (whether sweet fruit, creamy custard, or savory meat), place the entire pie in the refrigerator for at least 30 minutes. This second chilling period is crucial. It allows the butter to firm up again and the gluten to relax one last time, which significantly helps prevent the crust from shrinking excessively during baking and contributes to a wonderfully tender texture. While your pie chills, preheat your oven to 375ºF (190ºC).
After 30 minutes, carefully transfer your chilled, filled pie to the center rack of your preheated oven. Bake for approximately 45-60 minutes, depending on your filling. Begin checking on your pie around the 30-minute mark. If you notice the edges of your pie crust are browning too quickly, gently tent the edges with aluminum foil. This protects the delicate crust from over-browning while the filling continues to cook and set.
Your pie is typically ready when the crust is a rich golden-brown, and the filling is bubbly and set (for fruit pies) or firm with a slight wobble (for custard pies). Once baked, remove the pie from the oven and, as tempting as it is, allow it to cool completely on a wire rack before slicing and serving. This cooling period is vital; it allows the filling to fully set, preventing a runny mess, and ensures the crust maintains its crispness. Patience is a virtue in pie-making!
Troubleshooting Common Pie Crust Issues
- Shrinking Crust: Often caused by insufficient chilling. Ensure your dough rests for at least an hour (or longer) in the fridge before rolling and again before baking. Overworking the dough can also contribute.
- Tough Crust: The primary culprit here is overworking the dough, which develops too much gluten. Handle the dough as little as possible, and rely on the food processor and parchment paper method.
- Soggy Bottom: This can be due to a too-wet filling, insufficient preheating of the oven, or not blind baking the crust for certain types of pies. For very wet fillings, consider a quick blind bake (pre-baking) of the crust before adding the filling.
- Cracked Dough: Usually happens if the dough is too cold when you try to roll it. Let it sit out for 10-15 minutes to slightly warm up and become more pliable.
Share Your Pie-Making Journey!
Did you enjoy our comprehensive tutorial on how to make flaky pie crust using a food processor? We hope this guide empowers you to bake with confidence and delight. We’d love to hear your thoughts on this easy pie crust recipe. What kind of pie did you make? Do you have any special tips or variations you’d like to share with fellow bakers? Drop a comment below and let us know!
Here at DIYProjects.com, we are passionate about inspiring creativity through hands-on projects. Whether it’s craft ideas, home decor transformations, clever upcycling, or delicious recipes like this one, we believe in the joy of creating things yourself. Our mission is to connect people with their creative side and show them how rewarding DIY can be.
Join our vibrant community of DIY enthusiasts, where a wealth of projects is just a click away. Stay connected and share your creations with us on Facebook, Twitter, Pinterest, and Instagram!
Discover More Delicious Recipes to Try:
Homemade Pesto Recipe with Fresh Basil
The Best Homemade French Bread Recipe You’ll Ever Make
How to Make Delicious Homemade Pop Tarts from Scratch