

Transform your approach to organization with a touch of color and creativity! Dive into the world of **DIY paint chip crafts** and discover how to create a vibrant, reusable dry-erase calendar that keeps your busy schedule perfectly on track without breaking the bank. This engaging project is not only incredibly satisfying to make but also brings a personalized, artistic flair to any space, proving that functional items can also be beautiful pieces of **DIY home decor**.
RELATED: DIY Chalkboard Wall Calendar | Easy DIY Projects
DIY Paint Chip Calendar | A Step-by-Step Guide to Crafting Your Own Reusable Wall Calendar
Crafting Your Own Reusable Paint Chip Wall Calendar
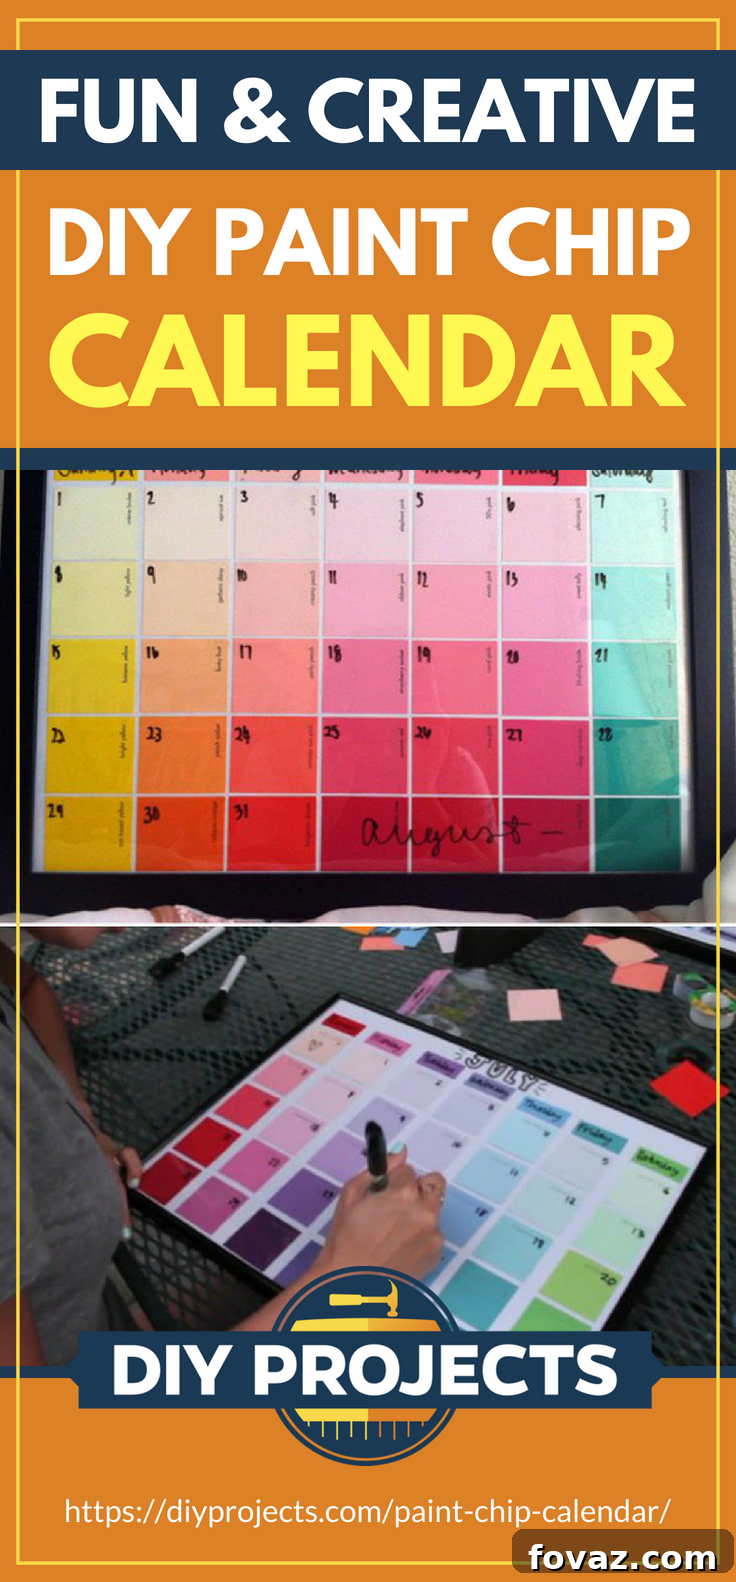
Imagine never having to purchase another calendar again. With this ingenious **paint chip wall calendar** project, that dream becomes a reality! Utilizing simple and affordable paint swatches or chips, you can construct a durable, eye-catching, and entirely reusable calendar that adapts to your needs year after year. This isn’t just a craft; it’s a smart organizational solution that doubles as stunning **DIY home decor**. Its vivid colors and unique design make it a standout piece, perfect for brightening up a child’s bedroom, adding a splash of inspiration to your home office, or simply managing family appointments in a central living area.
Beyond its aesthetic appeal, the practicality of a dry-erase surface cannot be overstated. Jot down appointments, erase completed tasks, and easily update it for each new month—all without waste. This project is ideal for crafters of all skill levels, offering a straightforward yet rewarding experience. Get ready to gather your materials and embark on a journey to create your very own **customizable calendar** that reflects your personal style and keeps your life beautifully organized.
Essential Materials for Your DIY Calendar Project:
Before we begin transforming ordinary paint chips into an extraordinary organizational tool, ensure you have all the necessary supplies. Most of these items are readily available at craft stores, hardware stores, or even around your home, making this an incredibly **affordable DIY project**.
- 1 large 12″ x 16″ picture frame: Opt for a frame with a smooth glass surface, as this will serve as your dry-erase board.
- 35 paint swatches/paint chips (variety of colors): These are often free samples from hardware stores! Choose a diverse palette that brings you joy and complements your decor.
- Scotch tape: Essential for securely affixing your paint chips to the backing.
- Scissors: Sharp scissors are crucial for precise cuts.
- Ruler: For accurate measurements to ensure uniform squares.
- Dry-erase marker: For writing and easily erasing your monthly schedule directly onto the frame’s glass.
Explore inspiring designs for vibrant wall calendars. Perfect for adding a personalized, organized touch to your home or office. Discover creative layouts and color schemes to spark your next DIY project.
Buy on Amazon
Step-by-Step Guide to Assembling Your Paint Chip Calendar
Step 1: Preparing Your Calendar Background
The foundation of your **reusable dry-erase calendar** starts with the picture frame. Carefully open your 12″ x 16″ picture frame and remove the existing paper insert or picture. You’ll notice that most frames come with a blank piece of paper or cardstock on the reverse side of any pre-printed image. This blank, sturdy surface is exactly what we need for our calendar’s backing.
Once you have the blank background ready, it’s time to prepare your first paint chip. Using your ruler, measure one of your chosen paint chips and carefully cut it into a square measuring approximately 3 and a quarter inches on each side. Precision here is key, as this will be the standard size for all your calendar squares. This step sets the stage for a neat and uniform calendar grid.
Step 2: Crafting All Your Paint Chip Squares
Now that you have your first perfectly sized square, use it as a template. The next crucial step is to cut the remaining paint chips into identical squares. You will need a total of 35 squares to create a full month’s worth of days (a grid of 5 rows by 7 columns). To achieve this, it’s helpful to use your first cut square as a guide for all subsequent cuts. Place the template square over a new paint chip, trace its outline, and cut meticulously.
Embrace the opportunity to create a visually dynamic calendar by selecting a wide variety of colors. Mix and match vibrant hues, or create a gradient effect – the choice is yours! The more diverse your collection of **paint swatches**, the more striking your finished **DIY wall calendar** will be. Take your time with this step; uniform squares contribute significantly to the calendar’s polished look.
- This bulk pack of 2.5″ wide chip brushes is versatile for various applications including painting, staining, and crafting.
- Features 1.5″ long all-natural china bristles and a durable, solid wood handle for comfort and control.
- These utility brushes are ideal for both home improvement tasks and creative art projects, suitable for most paints, stains, varnish, acrylic, and gesso.
- An economical choice for workshops, businesses, and industrial uses where disposable brushes are preferred.
Buy on Amazon
Step 3: Arranging and Securing Your Calendar Grid
With all 35 paint chip squares cut, it’s time for the artistic arrangement! Lay out your background paper on a flat surface. Begin arranging your colorful squares in a grid pattern. A standard calendar typically has 7 columns for the days of the week (Sunday through Saturday) and 5 rows for the weeks of the month. Experiment with different color combinations and patterns. You might arrange them in a rainbow gradient, alternating colors, or even a completely random, mosaic-like design. This is where your personal style truly shines!
Once you’re satisfied with the layout, it’s time to secure them permanently to the background. For each paint chip square, roll a small piece of scotch tape and stick it to the back, then firmly press the square onto your background paper. This method ensures a strong hold while keeping the front of your calendar neat. Additionally, remember to cut extra scraps of paint chips into smaller rectangles to label the days of the week (Sun, Mon, Tue, etc.) at the top of your calendar grid. Secure these labels in the same manner, making sure they are perfectly aligned above each column.
RELATED: 17 Amazing DIY Paint Chip Projects for Creative Minds
Step 4: Assembling the Frame
Now that your vibrant paint chip grid is securely taped to the background paper, it’s time to integrate it with the picture frame. Carefully place your newly decorated background paper back into the frame. This step requires a bit of attention: ensure that the colorful paint chips are facing downwards, pressed against the inside of the glass. The glass of the frame will be the outward-facing surface of your calendar, serving as the crucial dry-erase writing board.
Gently close and secure the back of the picture frame. This not only protects your meticulously arranged paint chips but also firmly holds them in place behind the glass. This clever use of a picture frame is what elevates this from a simple craft to a functional, reusable calendar, showcasing why the frame is an indispensable component of this **easy DIY craft** project.
Step 5: Labeling Your New Reusable Calendar
The final and most satisfying step is to bring your calendar to life with your dry-erase marker. With the frame securely closed and the glass facing outward, you can now write directly onto the glass surface. Use your dry-erase marker to clearly label the current month at the top of your calendar. Then, fill in the dates for each day, corresponding to your paint chip squares.
The beauty of this design is its complete reusability. As each month passes, simply wipe the glass clean with a soft cloth or dry-erase eraser, and then relabel it for the new month. This **customizable calendar** means you can tailor it to any month, any year, providing endless organizational possibilities and making it a truly sustainable tool for managing your busy life. Enjoy the flexibility and vibrant aesthetic of your very own **DIY paint chip calendar**!
Your Colorful DIY Project is Complete!
And there you have it! You’ve successfully transformed simple, inexpensive paint chips into a functional and eye-catching **DIY wall calendar**. This project is a testament to how creativity and a few basic supplies can result in a truly unique and practical item for your home. This **fun and colorful paint chip calendar** is more than just a way to keep track of dates; it’s a piece of personalized art that reflects your ingenuity and dedication to organization.
Its vibrant appearance makes it an instant conversation starter and a joyful addition to any room. Plus, the satisfaction of creating something beautiful and useful with your own hands is truly unparalleled. Whether it’s for managing family activities, work schedules, or personal goals, your new calendar is ready to serve as a reliable, reusable, and endlessly customizable helper.
- This unique creative game allows players to craft spontaneous poems using paint chip cards and prompt cards.
- Composing poetry becomes an easy and entertaining activity with this colorful and imaginative game, perfect for all ages.
- Offers endless poem combinations with a comprehensive set of 400 paint chip cards, 40 prompt cards, and 10 variation cards.
- An excellent tool for brainstorming and overcoming writer’s block, making it a great addition to any creative gathering.
- Created by the acclaimed bestselling author Lea Redmond, ensuring a high-quality and engaging experience.
Buy on Amazon
Watch another paint chip calendar tutorial in action in this video by WhatsUpMoms:
This vibrant **DIY paint chip calendar** offers superior convenience and a more personalized touch than many store-bought alternatives. The freedom to select and combine your favorite colors means your calendar can perfectly match your existing decor or introduce an exciting new focal point. It’s a fantastic way to infuse personality into your organizational tools.
The best part is its sustainable nature; simply wipe clean and update for the next month, making it an eco-friendly choice that saves you money in the long run. Enjoy the endless customization options and the sheer delight of a truly unique and functional piece of **DIY home decor** that you crafted yourself.
Did you enjoy our easy DIY paint chip calendar tutorial? Let us know in the comments section below!
UP NEXT:
- Learn How to Make a Tin Lantern | DIY Lantern
- 57 Easy Crafts To Make And Sell
- 18 DIY Felt Balls Projects And Crafting Ideas
Stay connected with us on Facebook, Twitter, Pinterest, and Instagram!
Editor’s Note: This post was originally published on February 8, 2015, and has been updated for quality and relevancy.