
Hello fellow creators and DIY enthusiasts! My name is Hunt Ethridge, and I’m thrilled to welcome you to my new column, “Hunt & Gather.” My passion lies in the convergence of tools and creativity. There’s immense satisfaction in bringing an idea to life with your own hands, whether it’s designing and building something entirely new, meticulously restoring an antique, or ingeniously upcycling a forgotten item into a functional masterpiece. If I can get my hands dirty and transform raw materials into something meaningful, I’m truly in my element!
Today, we’re diving straight into the heart of any productive workspace: the workbench. Join me as I walk you through the journey of constructing my very own custom workbench, a project that laid the foundation for countless future endeavors in our new home.
My wife and I recently embarked on an exciting new chapter, purchasing and moving into our first “adult house” after years of apartment living in the bustling NYC metro area. The sheer space and the boundless potential for home improvement projects filled me with an exhilarating sense of anticipation. However, before I could tackle any grand schemes, a fundamental necessity presented itself: a dedicated workspace and, more specifically, a robust workbench tailored to my needs.
Naturally, I decided to build one to my precise specifications. Below, you can catch a glimpse of the raw canvas that was my basement—a decent, if unrefined, area brimming with possibilities.
Essential Tools for Your Workbench Project
Having the right tools is paramount for any successful DIY project. Here’s a list of the foundational instruments I used. Many of these are versatile tools that belong in every home workshop:
- Power Drill: Indispensable for driving screws and drilling pilot holes. A good cordless drill offers unmatched portability and convenience.
- Circular Saw: Your go-to for making straight, efficient cuts in larger sheet goods and dimensional lumber. Precision is key!
- Hammer: For tapping pieces into place, driving nails (if needed), or even gentle persuasion.
- Large Square (Framing Square or Speed Square): Crucial for ensuring all your corners are perfectly square, guaranteeing a sturdy and level build.
- Triangle (Small Square): Handy for smaller marking tasks and checking angles in tighter spaces.
- Level: Essential for making sure your workbench top is perfectly flat and all supports are vertically aligned. A bubble level or a laser level can be used.
- Clamps: You can never have too many clamps! They hold pieces securely while you measure, drill, and fasten, acting as an extra set of hands.
- Tape Measure: The most basic yet vital tool for accurate measurements. Always measure twice, cut once!
- Pencil: For marking cuts, drill points, and design outlines directly on your materials.
Materials List: Building Your Foundation
Selecting the right materials is just as important as using the right tools. Here’s a detailed breakdown of the supplies I gathered for my custom workbench:
- (11) 2”x4”x6’ Lumber: These form the backbone of the workbench frame, offering excellent structural support. You might consider purchasing 8-foot lengths and cutting them down to minimize waste, but having extra is always a good safety net.
- 6’x3’x1” MDF Board: This will serve as your primary work surface. MDF (Medium-Density Fiberboard) is prized for its smooth, consistent surface, making it ideal for precision work and easy cleanup.
- 6’x2’x1” MDF Board: This piece will be used for the lower shelf, providing additional storage space.
- (2) 2’x4’ Pegboards: The perfect solution for organized tool storage, allowing for quick access and clear visibility of your most-used items.
- Pegboard Hooks and Kit: Essential for hanging tools, small bins, and other accessories on your pegboard. Invest in a good variety to accommodate different tool shapes and sizes.
- Wood Screws (2 ½” and 3”): A combination of lengths ensures strong, secure fastening for different joints and thicknesses of wood. Self-driving screws can save time by eliminating the need for pilot holes in some applications.
Building Your Own Workbench: A Step-by-Step Blueprint
Step #1: Designing the Workbench – The Blueprint of Your Vision
The journey of building my workbench was, in many ways, a nostalgic one, echoing the days I spent watching my father craft wonders in his own workspace. In fact, he built my first workbench, sparking my lifelong love for hands-on projects. Fortunately, my dad was in town when I started this project, allowing us to brainstorm together. We discussed the ideal look, dimensions, and functionalities, sketching out several plans on my trusty graphing pad. It’s fascinating how closely the finished product resembled our initial, albeit rough, sketches! This collaborative design phase reinforced the importance of planning—don’t just jump into cutting. Consider your workflow, the types of projects you’ll undertake, and the tools you’ll need at arm’s reach. Your workbench should be an extension of your creative process.
When designing, think about:
- Ergonomics: What height is comfortable for you when standing and working, or sitting on a stool? (More on this in Step #3)
- Space: How much space do you have available, and how much workbench surface do you truly need?
- Storage: Beyond the main surface, how will you store tools, supplies, and project components?
- Future Expansion: Will you want to add a vise, grinder, or other fixed tools later? Design with adaptability in mind.
Step #2: Figuring Out the Materials Needed – Quality and Quantity
My preference for MDF boards as a work surface stems from their exceptional smoothness and solidity. Unlike natural wood, MDF offers a consistently flat surface, which is crucial for precision work, and it’s surprisingly durable under constant hammering and banging. However, you certainly have alternatives like particle board (more economical but less durable) or high-grade plywood (stronger, but may require more sanding for a smooth finish). Whichever material you choose, ensure it’s solid and provides a level, unblemished surface that will withstand years of use.
Knowing I wanted integrated pegboard for tool organization, I budgeted for two 2×4 sheets. For the frame, 2×4 lumber provides robust support. I allocated three 2x4s for the back supports, four for the main cross beams, and two each for the front legs and additional supports. While buying longer 8-foot pieces might reduce waste, I deliberately opted for 6-foot lengths with a plan: to have extra material on hand. This “over-purchasing” strategy (typically 10-20% more than calculated) is a golden rule in my book. It saves countless trips back to the hardware store when an unexpected mis-cut occurs, or a piece splits, or you simply need a few extra screws. Plus, the scraps form a valuable stockpile for smaller, future projects.
Step #3: Start Laying Out and Marking the Wood – Precision Before Power
Before making any cuts, I always advocate for a dry run. Laying out your lumber on the floor helps you visualize the structure, gauge spacing, and ensure everything aligns as anticipated. What looks perfect on paper doesn’t always translate perfectly in practice. My goal was a workbench height of 42 inches, ideal for my 6-foot stature, allowing me to work comfortably both standing and sitting on a stool. This is a critical ergonomic consideration—customize the height to your personal comfort to prevent back strain and improve efficiency. Once you’ve visually confirmed your layout and precisely marked all your cutting lines with a pencil, it’s time to fire up the saw. Always double-check your measurements; the adage “measure twice, cut once” is your best friend here.
Step #4: Get Outside Structure Built with Legs, Support, and Crossbeam – The Core Frame
The foundation of stability lies in the initial frame. I began by securely attaching the back crossbeam to the two outside back support legs. This immediately established the main height and length of the workbench. Next, I added the corresponding supports to each leg and then installed the front legs. For initial stability and the flexibility to make adjustments, I recommend using just one screw per joint for the front legs. This allows you to use your large square and level to meticulously double-check all angles, ensuring everything is perfectly plumb and square. Only once I was absolutely confident in the alignment did I drive in the remaining screws. This step is significantly easier and safer with an extra set of hands – a huge shout-out to my dad for his invaluable assistance!
Step #5: Add the Rest of the Supports and Beams – Reinforcing the Structure
With the main frame established, I proceeded to integrate the third back leg and the top crossbeam. A common misconception is to flush the 2×4 frame directly to the front edge of the workbench for maximum support. While structurally sound, this approach neglects a crucial functional element: an overhang or “lip.” I deliberately designed an 8 ½-inch front lip and 3 ½-inch side lips. These lips are essential for securely attaching vises, C-clamps, and other work-holding tools, transforming your workbench into a truly versatile workhorse. Furthermore, I laid the support boards “flatwise” (on their wider 3.5-inch side) for two key reasons: 1) it provides a broader surface area for supporting the workbench top, enhancing stability, and 2) it simplifies the process of attaching the surface later (as we’ll see in Step #7). Finally, I installed the bottom shelf supports 16 inches off the floor, perfectly positioned for future storage.
Step #6: Measure Desired Depth of Bottom Shelf – Smart Storage Solutions
While maximizing storage is always a goal, practicality and safety should guide your decisions. I chose a 19-inch deep shelf for the bottom. This depth provides ample storage without extending too far forward, preventing the painful “barking of shins” that an overhanging shelf might cause. To maintain a small lip for the bottom shelf, allowing for easy access and preventing items from easily rolling off, I added a front crossbeam for the shelf 15 inches from the back edge. At this point, the primary structural base of the workbench was complete and incredibly sturdy, ready for its working surfaces.
Step #7: Attaching the Surfaces – The Heart of Your Workspace
For my primary work surface, I cut the MDF board to a generous 72 inches by 30 inches. I carefully considered the depth; going much deeper would make it difficult to reach tools stored at the back of the bench. For the rear edge of the top, I screwed directly down into the 2×4 supports. Since this inch of space wouldn’t be part of the primary work area, exposed screw heads weren’t an aesthetic concern. However, for the front, where a smooth, unblemished surface is paramount for precision work, I screwed *up* from underneath into the MDF. This method keeps the top surface perfectly flat and clear. I used 2 ½-inch self-driving wood screws, which negated the need for pre-drilling pilot holes, saving significant time and effort while ensuring a strong hold.
Step #8: Add the Pegboard – Vertical Tool Organization
The integration of pegboard is a game-changer for tool organization. I purchased two 2’x4’ sheets. The first sheet was installed on its side, to the left of the main bench area, providing an immediate vertical storage solution. The installation was straightforward: simply screwing the pegboard directly into the 2×4 frame members. Pegboard not only keeps tools visible and accessible but also frees up valuable drawer and shelf space.
Step #9: Measure and Cut Wood for Shelves – Custom Storage for Small Items
Even with a pegboard, dedicated small shelves are invaluable for organizing hardware, safety glasses, tape, pencils, and other frequently used odds and ends. The beauty of a custom workbench is that you can tailor these shelves to your specific needs. I decided on four shelves, utilizing some of the leftover MDF (a perfect example of why over-purchasing materials is a smart move!). I cut these shelves to approximately 18 inches by 4 ½ inches. You can already see in the process photo how I leveraged the existing lips on the workbench to clamp the wood while cutting—a testament to efficient workspace design. A quick safety reminder: always wear safety glasses when operating power tools!
Step #10: Install Shelves and Backing – Maximizing Vertical Storage
Just like the main workbench height, the height of your small shelves should be customized to the items you plan to store. For instance, I wanted my bottom shelf to comfortably accommodate spray paint cans, so I placed it at 9 ¼ inches from the workbench surface. The remaining shelves were eye-balled, settling at heights of approximately 4 to 5 inches, perfect for smaller items. I secured them by screwing directly into the side of each 2×4 support. For the main backing of these shelves, I once again opted for pegboard. One piece was measured, cut, and then attached from the back, screwing into the supporting 2x4s to create a cohesive and functional storage wall.
Step #11: Finish the Top of the Pegboard – The Final Touch
To give the pegboard backing a clean, finished look and to add a bit more vertical storage, I used the remaining portion of the second pegboard sheet. I cut a long piece to cap off the top of the backing, creating a seamless transition. My feline assistant, Brigit, always an eager inspector of my handiwork, gave it her seal of approval! These small finishing touches contribute significantly to the overall aesthetic and perceived quality of your custom build.
Step #12: Add Finishing Touches – Enhancing Functionality and Aesthetics
The “finishing touches” phase is where your workbench truly becomes a personalized hub. This might involve:
- Power Strips: Installing a surge protector or dedicated power strip directly onto the workbench or pegboard for easy access to power tools and chargers.
- Lighting: Adding task lighting, such as an LED strip or an adjustable lamp, to illuminate your work area.
- Protective Finish: Applying a clear sealant or polyurethane to the MDF top to protect it from spills, stains, and minor damage, extending its lifespan.
- Casters: If mobility is important, consider adding heavy-duty locking casters to the legs so you can move your workbench around your garage or workshop.
These enhancements might seem minor, but they significantly improve the functionality, safety, and longevity of your new workspace.
Final Step: Hang Up Your Tools and Fill Up Your Shelves – The Grand Reveal
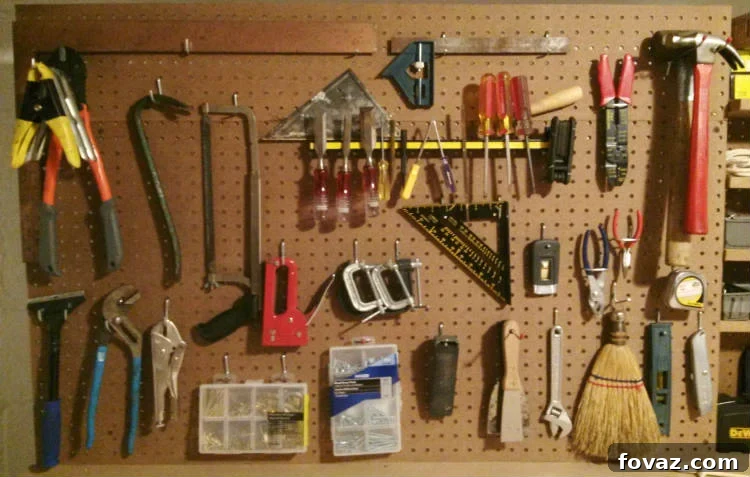
Congratulations! Your custom workbench is complete. Take a moment to savor its pristine, organized state, because let’s be honest, it will likely never look this neat and clean again once the projects begin! Now comes the satisfying task of organizing your tools. When purchasing hooks and accessories for your pegboard, I highly recommend investing in a magnetic strip. It’s incredibly useful for holding small metal items like drill bits, screws, and oddly shaped tools that might not fit neatly on hooks. I also repurposed several small containers from my old toolbox, adding them to the new shelves for storing fasteners, washers, and other tiny components. Use whatever organizational systems work best for you, but ensure you have ample containers and hooks for all the little things you’ll constantly reach for.
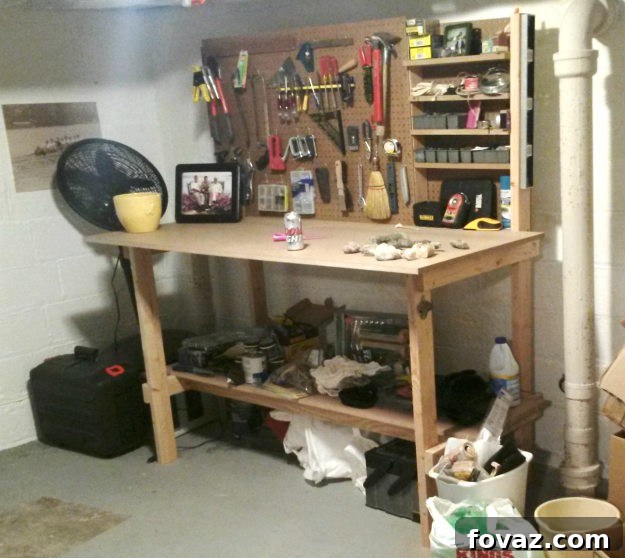
Another view:
A pulled back view of the whole workbench. Already getting messy!
Lessons Learned: What Went Wrong (and How to Fix It)
No DIY project, no matter how carefully planned, ever goes exactly as anticipated. This section isn’t about discouraging you but rather about transparency and equipping you with knowledge to anticipate and troubleshoot potential pitfalls. Here’s what I encountered and how I dealt with it:
- Uneven Flooring: I discovered that the basement floor nearest the wall was about an inch higher than the rest of the floor. This could have led to a wobbly workbench. My initial options were to cut the back legs an inch shorter (a permanent solution) or add shims underneath the front legs (a simpler, adjustable fix). Instead, I found a quick and effective solution: I simply pulled the workbench away from the wall by a small margin. This allowed it to sit level on the flatter portion of the floor, resulting in a much more stable and sturdy bench. For future projects, consider adjustable feet for your workbench, especially if your workshop floor is known to be uneven.
- Mis-measured Lumber: Despite my “measure twice, cut once” mantra, I mis-measured one 2×4. I had intended to get two specific pieces from it, but due to the error, I only salvaged one. This is precisely why the 10-20% extra material rule is so crucial! I simply grabbed an extra board from my surplus, and the mis-cut piece was added to my scrap wood pile, ready to be repurposed for a smaller project another day. Don’t let a small mistake derail your progress; factor in a little wiggle room in your material budget.
- Accessibility Challenges: Attaching the small shelves and the pegboard backing from behind the workbench proved to be quite problematic. The confined space made it difficult to maneuver and accurately drive screws. This led to a few missed screws, which, while not a major structural flaw, was a minor annoyance. The lesson here is to consider accessibility during your design phase. If possible, pre-assemble modules or design in a way that allows easier access to fastening points. For future builds, I’d explore attaching these elements before the entire workbench is pushed against a wall, or using angled screw pockets (with a Kreg Jig, for example) from the front where aesthetically acceptable.
These minor setbacks were all easily manageable and part of the learning process. Embrace them as opportunities to refine your skills and problem-solving abilities.
Up Next
: Off-Grid Solar Survival: Top 5 Things to Consider Before Diving In
Did you enjoy this comprehensive guide on how to build your own workbench? We’d love to hear about your DIY experiences, questions, or tips in the comment section below! Share your workbench stories with us!