
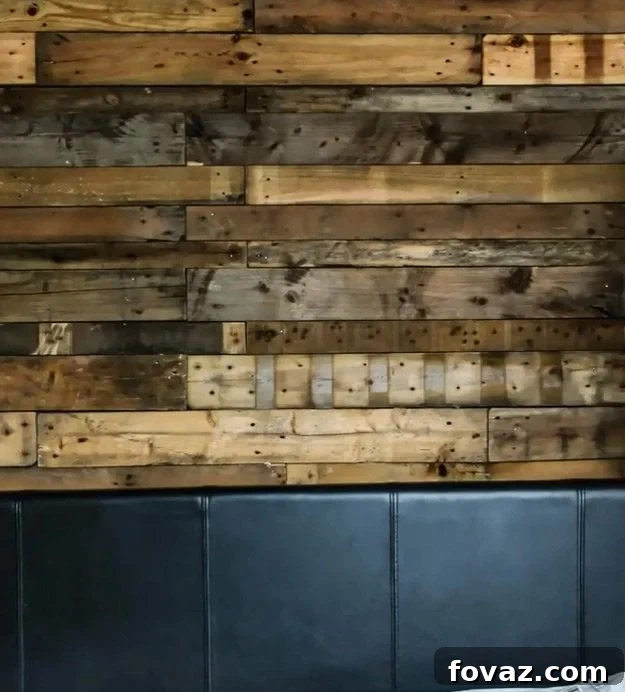
Transform Your Space: A Comprehensive Guide to Building a Stunning DIY Wood Pallet Wall
Are you yearning for a home makeover that transcends the ordinary? If your walls are crying out for character and a simple coat of paint just won’t cut it, consider embarking on a captivating project that blends rustic charm with sustainable living: a DIY wood pallet wall. This isn’t just a trend; it’s a statement, offering an unparalleled blend of warmth, texture, and personality to any room. While it requires a bit of dedication and hands-on effort, the process of creating your own pallet accent wall is remarkably straightforward once you understand the fundamentals. Get ready to turn reclaimed wood into a breathtaking feature that will garner compliments for years to come.
Why Choose a DIY Pallet Wall for Your Home?
The allure of a wood pallet wall extends far beyond its aesthetic appeal. It represents a conscious choice for homeowners looking to infuse their living spaces with authenticity, sustainability, and a touch of handcrafted artistry. Here’s why this project has captivated DIY enthusiasts globally:
Unrivalled Rustic Charm and Character
Few materials can rival the inherent beauty and character of reclaimed wood. Each pallet plank tells a unique story, displaying varying grain patterns, natural imperfections, and a charming patina that instantly adds a cozy, rustic feel to your bedroom, living room, or even a home office. Unlike mass-produced wall coverings, a pallet wall offers a bespoke, organic texture that becomes an instant focal point, transforming a bland space into an inviting sanctuary.
Cost-Effective and Sustainable Home Decor
One of the most compelling reasons to choose a DIY pallet wall is its incredible cost-effectiveness. Pallets are often available for free or at very low prices from local businesses, construction sites, or distribution centers. By repurposing these materials, you’re not only saving money on expensive wall treatments but also contributing to environmental sustainability by diverting waste from landfills. It’s an eco-friendly project that aligns perfectly with a conscious lifestyle.
Customization and Versatility
The beauty of a wood pallet wall lies in its versatility. You have complete creative control over its final appearance. Whether you prefer the raw, distressed look of untreated wood, a uniform stained finish to match existing decor, or even a vibrant painted design, the possibilities are endless. You can arrange planks horizontally, vertically, or in more intricate patterns like herringbone, making each pallet wall truly unique to its creator and space.
A Rewarding DIY Experience
Embarking on a project like building a pallet wall provides immense satisfaction. From the initial hunt for pallets to the final placement of each plank, every step is a testament to your hard work and creativity. The tangible result—a beautiful, handcrafted wall—serves as a constant reminder of your DIY prowess and adds a deeply personal touch to your home.
Pre-Project Essentials: Planning, Safety, and Preparation
Before you jump into deconstructing pallets, thorough planning and preparation are crucial. This foundational stage ensures a smooth process, a safe working environment, and a professional-looking finished product.
Sourcing and Selecting Your Pallets
The quality of your finished wall heavily depends on the pallets you choose. Look for HT (Heat Treated) stamps on the pallets, indicating they were not chemically treated (avoid MB – Methyl Bromide treated pallets). Inspect pallets for excessive damage, rot, mold, or chemical spills. Aim for pallets of similar dimensions if you want a uniform look, or gather a variety for a more eclectic, distressed style. Remember, it’s always better to collect more pallets than you think you’ll need to account for unusable planks or mistakes.
Essential Tools and Materials for Your DIY Pallet Wall
Having the right equipment on hand will make this project significantly easier and safer. Here’s a comprehensive list of what you’ll need:
- Wood Pallets: Estimate roughly one pallet per 20-30 square feet of wall space, but always gather extra.
- Safety Gloves and Eye Protection: Non-negotiable for working with wood, nails, and power tools.
- Pry Bar and Hammer: For careful pallet deconstruction.
- Reciprocating Saw or Circular Saw: Essential for cutting planks, especially for difficult-to-remove boards.
- Jigsaw or Miter Saw: For precise cuts, particularly around edges, outlets, and for filling gaps.
- Measuring Tape and Pencil: For accurate measurements and markings.
- Level: Crucial for ensuring your planks are perfectly straight.
- Stud Finder: To locate wall studs for secure nailing.
- Sandpaper or Electric Sander: To smooth rough edges and remove splinters (optional, but highly recommended).
- Construction Adhesive/Wood Glue: High-strength adhesive designed for wood and wall applications.
- Nails or Finish Nails: Galvanized nails (1.5-2 inches) are good.
- Nail Gun (with air compressor) or Hammer: A nail gun significantly speeds up installation and ensures strong adhesion.
- Wood Stain or Sealant (Optional): To protect the wood and enhance its appearance.
- Cleaning Supplies: Rags, soap, water, or a wall cleaner.
Wall Preparation: The Canvas for Your Creation
A clean, prepared wall is essential for proper adhesion and a professional finish. Start by thoroughly cleaning the wall surface, removing any dust, dirt, or grease. If your wall is unevenly colored or you anticipate small gaps between planks, applying a base coat of a neutral-colored paint (e.g., black or dark brown for a rustic look) can help hide imperfections and create depth. Use your stud finder to mark the locations of wall studs; this is where you’ll want to nail your planks for maximum stability.
Step-by-Step Guide: Building Your Dream Wood Pallet Wall
With your materials ready and your wall prepped, it’s time to bring your vision to life. Follow these detailed steps to construct your beautiful new pallet wall.
Step 1: Deconstructing Your Pallets Safely and Efficiently
This is arguably the most labor-intensive part of the project, but mastering it will save you time and frustration. The goal is to remove the planks from the pallet stringers with minimal damage. Wear your safety gloves and eye protection throughout this process. Discover the easiest way to deconstruct a pallet here!
Start by using a pry bar to gently separate the planks from the stringers. Work slowly, prying up one end of a plank, then the other, gradually working your way along. For stubborn planks, you might need to use a reciprocating saw to cut through the nails between the plank and the stringer. Once separated, carefully remove any remaining nails from the planks using the claw of your hammer. Sorting your planks by size, condition, and desired aesthetic (e.g., heavily weathered vs. cleaner boards) will simplify the installation phase.
Step 2: Preparing Your Wall for the Pallet Transformation
Before any wood touches your wall, ensure it’s in optimal condition. Thoroughly clean the entire wall surface with a damp cloth or a mild cleaner to remove any dust, grime, or cobwebs that could hinder adhesive bonding. If you plan to apply a base coat of paint, now is the time to do so. Allow it to dry completely. Next, accurately measure the dimensions of your wall (height and width) to estimate the precise amount of pallet wood required and plan your layout. Mark your wall studs with a pencil line from floor to ceiling – these lines will guide your nailing for a secure installation.
Step 3: Laying the Foundation – Applying Pallet Planks
Begin your installation from the bottom of the wall, working your way up. It’s critical to ensure your first row is perfectly level, as this will dictate the straightness of every subsequent row. Apply a generous bead of high-quality wood-compatible construction adhesive to the back of your first pallet plank. Don’t skimp on the glue; even distribution is key for lasting adhesion. Carefully position the plank onto the wall, pressing firmly to ensure good contact. Use your level to verify it’s perfectly horizontal before proceeding.
Step 4: Securing and Continuing the Installation Process
Once your first plank is glued in place, it’s time to secure it mechanically. Using your nail gun or hammer, drive nails through the plank and into the wall studs you marked earlier. Aim for at least two nails per stud per plank for optimal hold. For a more rustic look, you might use exposed finish nails; for a cleaner look, counter-sink the nail heads and fill them later. Repeat steps 3 and 4, working row by row, carefully aligning each new plank. To achieve a more natural and less uniform look, stagger the joints of your planks, similar to how brickwork is laid. This adds visual interest and strengthens the overall structure.
Step 5: The Finishing Touches – Edge Work and Customization
As you near the edges and top of your wall, you’ll inevitably encounter spaces that require custom-cut pieces. This is where your measuring tape, pencil, and miter saw or jigsaw become indispensable. Measure each gap precisely, transfer the measurement to a pallet plank, and make clean, accurate cuts. Fit these custom pieces snugly into place, applying glue and nails as before. Take your time with these cuts for a professional, seamless finish.
PRO TIP for Customization: If you desire a more refined rustic aesthetic, consider sanding your pallet planks before or after installation to smooth out rough edges and remove potential splinters. Once your wall is complete, you can truly personalize it. Applying a wood stain will not only enhance the natural grain and add depth of color but also provide a protective layer, sealing the wood and making it easier to clean. Alternatively, you could paint sections or the entire wall for a pop of color, or apply a clear sealant to preserve the natural, raw beauty of the wood.
Congratulations! You’ve successfully transformed a plain wall into a stunning focal point using repurposed pallet wood. This easy wood craft project is perfect for adding DIY room decor to your bedroom, creating a feature wall in your living room, or simply bringing a unique rustic touch to any space in your house. Enjoy the warmth and character your new accent wall brings!
Inspiring Your Next Pallet Project
Seeking inspiration? While the original video has been removed from YouTube, you can explore a similar and equally helpful tutorial by Valhalla Woodworks here:
We hope you thoroughly enjoyed our comprehensive tutorial on how to build a pallet wall. We’re eager to hear about your experiences and see your creations! Please share your thoughts and any clever tips you discovered during your project in the comments section below. Do you have other brilliant DIY projects you’d like to showcase or suggest? We absolutely love diving into cool DIY ideas, from creative craft projects and unique home decor to ingenious upcycling hacks, delicious recipes, and helpful tutorials. Our passion is to empower people to tap into their creative side and realize the endless possibilities of doing it themselves. Join our thriving community of DIY enthusiasts, where every project is just a click away. We’d love to connect with you!
Stay connected with us on Facebook, Twitter, Pinterestand Instagram!
Looking for More Exciting Pallet Project Ideas? Check Out These Related Posts:
Build a Charming Fence with Mason Jar Lights
Creative DIY Outdoor Pallet Furniture Projects
Craft Your Own DIY Pallet Wine Rack | Upcycled Furniture Ideas