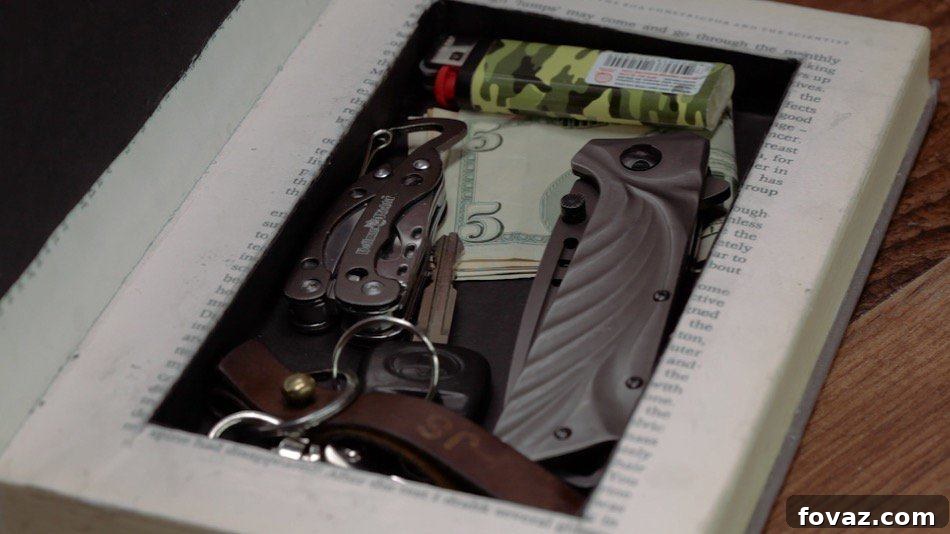
Are you looking for an ingenious way to safeguard your cherished valuables, important documents, or emergency cash? The secret hollow book, a classic of discreet storage, offers an unparalleled solution. On the outside, it appears to be an ordinary, unassuming hardcover book, easily blending into any bookshelf. Yet, within its cleverly disguised pages lies a hidden compartment, ready to conceal your most prized possessions in plain sight. This comprehensive DIY guide will walk you through creating your very own secret book safe, providing peace of mind and a touch of old-world intrigue to your home security.
Craft Your Own Secret Hollow Book Safe: A Comprehensive DIY Guide
In a world where security often feels complex and expensive, sometimes the simplest solutions are the most effective. A DIY hollow book safe isn’t just a clever craft project; it’s a practical, accessible, and remarkably discreet method for protecting small but significant items. Imagine tucking away expensive jewelry, sensitive information, or an emergency stash of money right on your bookshelf, hidden amongst hundreds of other books. This tutorial will empower you to transform a common hardcover into a cunning concealment device, ensuring your valuables remain safe, secure, and completely unsuspected.
Why Create a Secret Hollow Book Safe?
The allure of a hollow book safe goes beyond mere novelty. It offers several compelling advantages for home security and organization:
- Unrivaled Discretion: Unlike a traditional safe, which often signals the presence of valuables, a hollow book blends seamlessly into its environment. It’s the ultimate “out of sight, out of mind” solution, unlikely to attract any unwanted attention.
- Cost-Effective Security: Building a DIY book safe is significantly more affordable than purchasing a conventional safe. Most materials are readily available and inexpensive, making it a budget-friendly security upgrade.
- Personalized Protection: You choose the book, giving your secret safe a unique character. You can select a book that perfectly fits your existing decor or one that holds personal significance, adding an extra layer of camouflage.
- Accessibility and Convenience: For items you need to access occasionally but still want to keep secure, a hollow book offers a perfect balance. It’s easily accessible to you, but invisible to others.
- An Engaging DIY Project: Beyond its practical benefits, crafting a hollow book safe is a rewarding and enjoyable DIY project that yields a genuinely useful outcome.
Essential Materials You’ll Need
Gathering your tools and materials before you begin will ensure a smooth and enjoyable crafting experience. Most of these items can be found at your local craft store or even around your house.
- Hardcover Book: This is the foundation of your secret safe. Choose a sturdy book with a thick cover and plenty of pages. Its size should be appropriate for the items you intend to store. Remember, you’ll be gluing this book shut, so pick one you don’t mind sacrificing!
- Mod Podge (Matte or Gloss): This all-in-one glue, sealer, and finish will bind your pages together, creating a solid, impenetrable block. Matte finish is often preferred as it maintains a natural book look.
- Paintbrush: A medium-sized brush (1-2 inches wide) is ideal for applying an even layer of Mod Podge to the pages.
- Card Stock or Wax Paper: Essential for preventing the Mod Podge from gluing the *entire* book shut. It acts as a barrier between the first few glued pages and the rest of the book.
- Heavy Block of Wood or Several Books/Clamps: You’ll need something substantial to apply even pressure to the book while the glue dries, ensuring a strong, flat bond.
- Ruler: Crucial for marking precise lines when cutting your compartment, ensuring a neat and professional finish.
- Boxcutter or X-Acto Knife: A sharp utility knife is vital for carefully cutting through multiple pages. Safety is paramount here; always use a fresh, sharp blade.
- Construction Paper or Felt: This will be used to line the inside of your newly carved compartment, giving it a clean, finished look and protecting your stored items.
Step-by-Step Guide: How to Make Your Secret Hollow Book
Creating your book safe is a process that requires patience and precision, but the results are incredibly satisfying. Follow these detailed steps for a successful project:
Step 1: Selecting Your Foundation – The Hardcover Book
Begin by carefully choosing your hardcover book. Consider its overall size and thickness – a thicker book will allow for a deeper compartment. Ensure it has a strong binding and stiff covers, as these will contribute to the durability of your finished safe. If you plan to store it amongst other books, try to pick one with a similar aesthetic to avoid drawing attention.
Step 2: Preparing the First Pages
Open your chosen book to the very first page you wish to remain intact – typically the title page or a flyleaf. This page, along with the cover, will form the exterior of your book safe. You’re essentially creating a “shell” that looks like a normal book when closed.
Step 3: Initial Sealing for Durability
Using your paintbrush, apply a thin, even layer of Mod Podge over the entire surface of this first page. Make sure to get close to the spine and edges without over-saturating the paper. The goal here is to seal this page to the cover and the following pages, creating a sturdy base for your secret compartment. A thin layer is key to avoiding excessive warping or buckling of the page.
Step 4: Ensuring a Strong Bond
Gently close the book, applying firm, even pressure to the cover for about 20-30 seconds. This helps to press the Mod Podge into the paper and establish a strong initial bond. You might even want to rub your hand over the cover to ensure good contact across the entire surface.
Step 5: Continuing the Sealing Process
Open the book again, now turning to the very next page that immediately follows the one you just glued. Coat this page with another thin, even layer of Mod Podge, extending from edge to edge. This step is crucial for creating a solid block of pages that will house your hidden compartment.
Step 6: Reinforcing the Pages
Once again, close the book and apply firm pressure for another 20-30 seconds. Repeat this process for approximately the first 10-20 pages of the book, depending on its thickness and how sturdy you want the front “block” to be. The more pages you seal at the beginning, the more robust and natural your book’s opening will feel when accessed.
Step 7: Preventing Accidental Adhesion
After you’ve glued and pressed the desired number of initial pages, carefully place a sheet of card stock or wax paper between the last glued page and the next unglued page. This critical step prevents the remaining, unglued pages from sticking to your sealed block. Close the book over the card stock, ensuring it’s securely in place.
Step 8: Edge Sealing for a Unified Look
Now, with the book closed, paint a thin, even coat of Mod Podge along the three exposed edges of the book (top, bottom, and front). This seals all the pages together along the exterior, creating a solid, unified block that looks like a regular, unblemished book edge. Be careful not to get too much glue on the covers themselves, as this can make the book stick to your work surface.
Step 9: Finalizing the Initial Glue Set
Immediately after sealing the edges, place your heavy block of wood, several heavy books, or clamps firmly on top of the closed book. Allow it to press down for at least 30 seconds, or even longer, to ensure a strong, flat seal across all glued pages and edges. The longer and more consistent the pressure, the better the bond.
Step 10: Precision Cutting – Creating the Compartment
Once the Mod Podge is completely dry (this can take several hours, or even overnight, depending on humidity and glue thickness), it’s time for the most delicate part. Open the book to the page where your glued block ends and the unglued pages begin (where you placed the card stock). Carefully remove the card stock. Using a ruler and a sharp boxcutter, mark out the outline of your desired compartment on the first unglued page. Leave at least a 1/2-inch to 1-inch border from the outer edges of the page to maintain the book’s structural integrity. Carefully and slowly cut through the pages, a few at a time, following your marked lines. Work methodically, applying consistent pressure. You might want to place a cutting mat underneath to protect your work surface.
Step 11: Hollowing Out the Interior
Continue cutting and removing the cut-out sections of pages until your desired depth is achieved and the space is completely hollowed out. Be mindful of not cutting too deep, as you want to leave a solid block of pages at the back of the book as well. Ensure the walls of your compartment are straight and smooth. This step requires patience; rushing can lead to uneven edges or accidental cuts beyond your intended compartment.
Step 12: Finishing the Inside – A Neat Interior
Once the compartment is fully hollowed out, apply a thin layer of Mod Podge to the raw, cut edges of the pages inside the compartment. This seals the edges and prevents fraying. While the glue is still wet, cut pieces of construction paper or felt to fit the bottom and sides of your compartment. Carefully press these liners into place, smoothing out any bubbles or wrinkles. This step not only makes the compartment look neat and professional but also protects your stored items from any lingering glue residue or rough paper edges.
Step 13: Curing Time and Readying Your Book Safe
Allow the Mod Podge and any lining materials to dry completely. This can take several hours, or even a full 24 hours, to ensure everything is thoroughly cured and odorless. During this time, keep the book open to the compartment to allow for proper airflow. Once dry, your hollow book safe is ready for use!
Step 14: Populating Your Secret Stash
Now for the fun part – filling your custom-made secret compartment! Carefully place items of your choice inside. Once your book is full, close it and return it to its natural habitat on a shelf, blending seamlessly with other books. Your secret is now safely tucked away, right in plain sight, ready for any emergency or simply to keep your treasures secure.
Tips for a Perfect Secret Book Safe
- Patience is Key: Rushing the drying process or the cutting can lead to a messy or less durable result. Allow ample drying time between Mod Podge applications.
- Sharp Blade: Always use a fresh, sharp boxcutter or X-Acto blade. A dull blade will tear pages rather than cut them cleanly, making your compartment look ragged.
- Safety First: When using a boxcutter, always cut away from your body, and keep your fingers clear of the blade’s path. Consider wearing protective gloves.
- Practice Makes Perfect: If you’re nervous about cutting, consider practicing on a less important book first to get a feel for the tool and the technique.
- Customization: Don’t be afraid to personalize your book safe! You can paint the inside of the compartment, add velvet lining, or even attach a small latch for added security (though this might compromise its “secret” nature slightly).
What to Store in Your Hollow Book Safe
The possibilities for your secret book safe are vast, limited only by its size. Here are some ideas for items that benefit from discreet storage:
- Emergency Cash: A small stash of bills for unexpected situations.
- Valuable Jewelry: Rings, earrings, or watches that aren’t worn daily.
- Important Documents: Copies of passports, birth certificates, or small financial papers.
- Spare Keys: A hidden key for your home or car.
- Digital Media: USB drives with sensitive data or backup files.
- Small Heirlooms: Sentimental items that are small enough to fit.
- Personal Mementos: Letters, photos, or small tokens with personal significance.
See the DIY in Action!
Sometimes, seeing is believing! Watch this video to get a visual demonstration of the entire process, helping you tackle each step with confidence and clarity.
Do you have any other brilliant DIY storage ideas or clever ways to hide valuables? We’d love to hear about them and learn from your creativity! Share your thoughts and tips in the comments section below.
For more inspiring DIY projects, crafty news, and innovative home hacks, be sure to follow us on social media!
Connect with us on Facebook, Twitter, Pinterest and Instagram for daily inspiration!
Discover More Ingenious Storage & DIY Ideas You’ll Love:
24 Smart DIY Toy & Crafts Storage Solutions
DIY Storage Ideas to Reduce Clutter in the New Year
Quick and Easy DIY Home Projects You Can Do This Weekend