
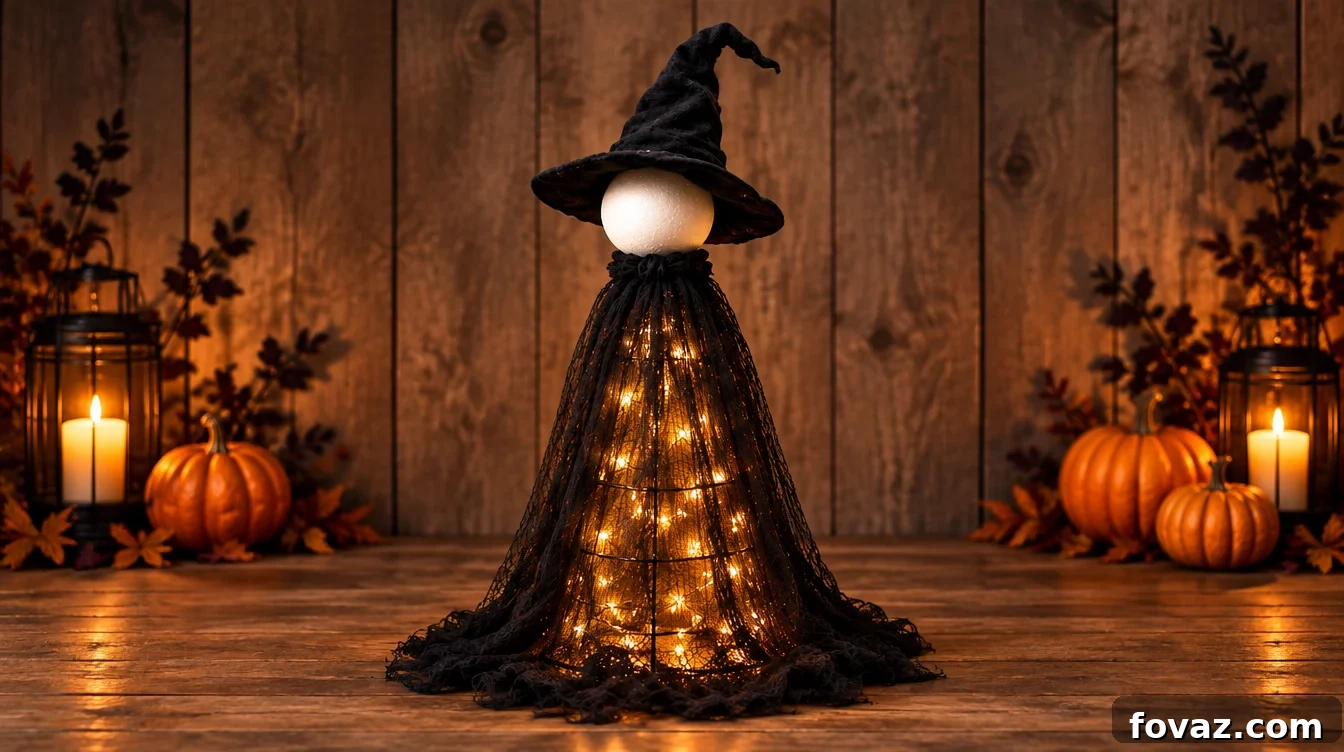
At a Glance: Tomato Cage Witch
- Four simple steps, about 20 minutes. Flip the cage, zip‑tie the prongs into a neck, wrap battery LED lights, then add the head and drape the cheesecloth.
- Light it before you dress it. Wrap the fairy lights first so you can check how evenly it glows before the fabric goes on.
- Battery LEDs only. Use battery-powered LED lights — never plug-in bulbs, and never a real candle inside a cheesecloth figure.
To build a tomato cage witch, invert a tabletop wire tomato cage so the three prongs point upward, bundle and zip‑tie them to form a neck, spiral a strand of battery-powered LED fairy lights from the bottom ring up, push a foam ball onto the bundled prongs for a head, then drape black cheesecloth over the frame and cinch it at the neck. Jump to the supplies or go straight to the steps.
It’s an easy afternoon project that really takes about twenty minutes. Most of that time is spent arranging the lights and shaping the cheesecloth — two minutes of careful spacing make the difference between a smooth, even glow and a patchy, lopsided look. Below are the safety basics and the full how‑to.
Will the Lights Catch Fire Under the Cheesecloth?
This is the top safety question people ask. You are wrapping lights around a metal frame and then pulling a loose cotton fabric over them, so it’s worth being clear. The answer has two parts:
Use battery-powered LED fairy lights and the cheesecloth can safely rest against them. LED bulbs run cool to the touch, which makes them the right choice for this build. Avoid plug‑in mini lights for this project.
Never put a real flame inside the figure. Do not use candles, votives, or real tealights inside or beneath a cheesecloth figure. Authorities on fire safety recommend flameless, battery-operated candles as a safe alternative and advise keeping open flames well away from anything that can burn.
Cheesecloth is loose cotton with airflow through it, so it should never be near an open flame. A small, inexpensive flameless LED tealight gives the same flicker effect without the risk. Those two simple rules — battery LEDs and no real flames — are the whole safety story for this decoration.
What Do You Need to Make a Tomato Cage Witch?
For one tabletop witch
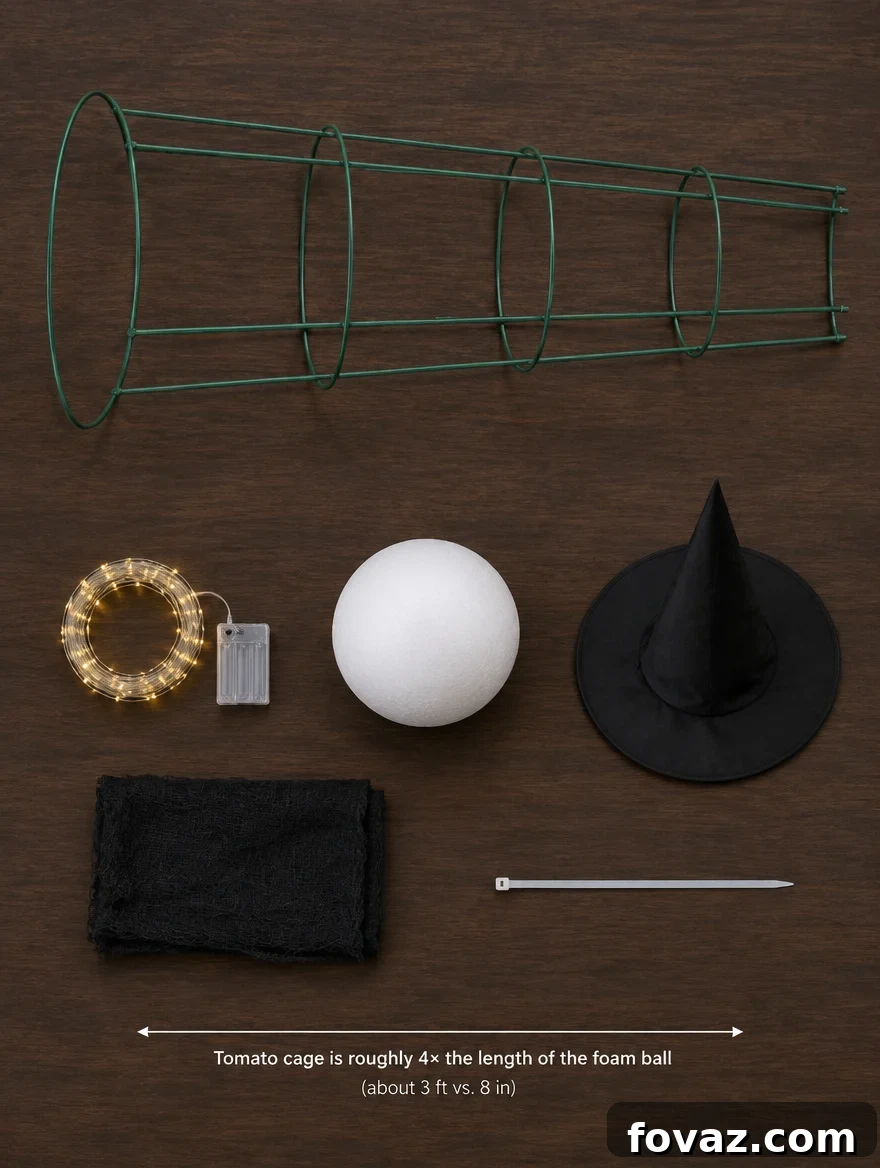
- 1 wire tomato cage. A standard tabletop size works best.
- 1 strand battery-powered LED fairy lights. Do not use plug-in mini lights.
- 1 foam ball, about 8 inches. Match the size to your cage and hat.
- 1 witch hat. Sized to sit on the ball without swallowing it.
- Black cheesecloth. One layer is fine; two layers help folds hold their shape.
- 1 zip tie. Keep a couple of extras on hand.
Tools: scissors. Optional: black spray paint for the cage, a flameless LED tealight for a subtle base flicker.
Print supply list
Quick tip: match the foam ball to the cage and the hat. An 8‑inch ball suits a standard tabletop cage; if the ball is too small the hat brim will hide it, and if it’s too large it’ll look stuck on. If possible, buy the hat and ball together so the brim sits naturally on the “head.”
What Can Go Wrong With a Tomato Cage Witch?
It Glows Patchy
If one side is bright and the other dim, the light strand probably bunched in one spot. Wrap the lights from the bottom ring upward in even spirals and switch them on before you add the cheesecloth. Fix spacing now — it’s quick. Fixing it after the fabric is on means undoing everything.
The Cheesecloth Looks Like a Rag
Cheesecloth has very little body, so if you just smooth it down it will hang flat. Instead, cinch it tightly at the neck, then arrange loose vertical folds and let the hem pool unevenly. Those three moves give shape and a polished look.
How Do You Make a Tomato Cage Witch?
Four steps, about 20 minutes. Tap any one to jump to the full details below.
Flip the Cage
Zip‑tie the three prongs together to form a firm neck.
Wrap the Lights
Spiral from the bottom up and then test the glow.
Add the Head and Hat
Seat the foam ball on the prongs and set the hat at a slight angle.
Drape, Tie, and Fluff
Gather the cloth at the neck, then shape the folds to create shoulders and a skirt.
Every Step, in Detail
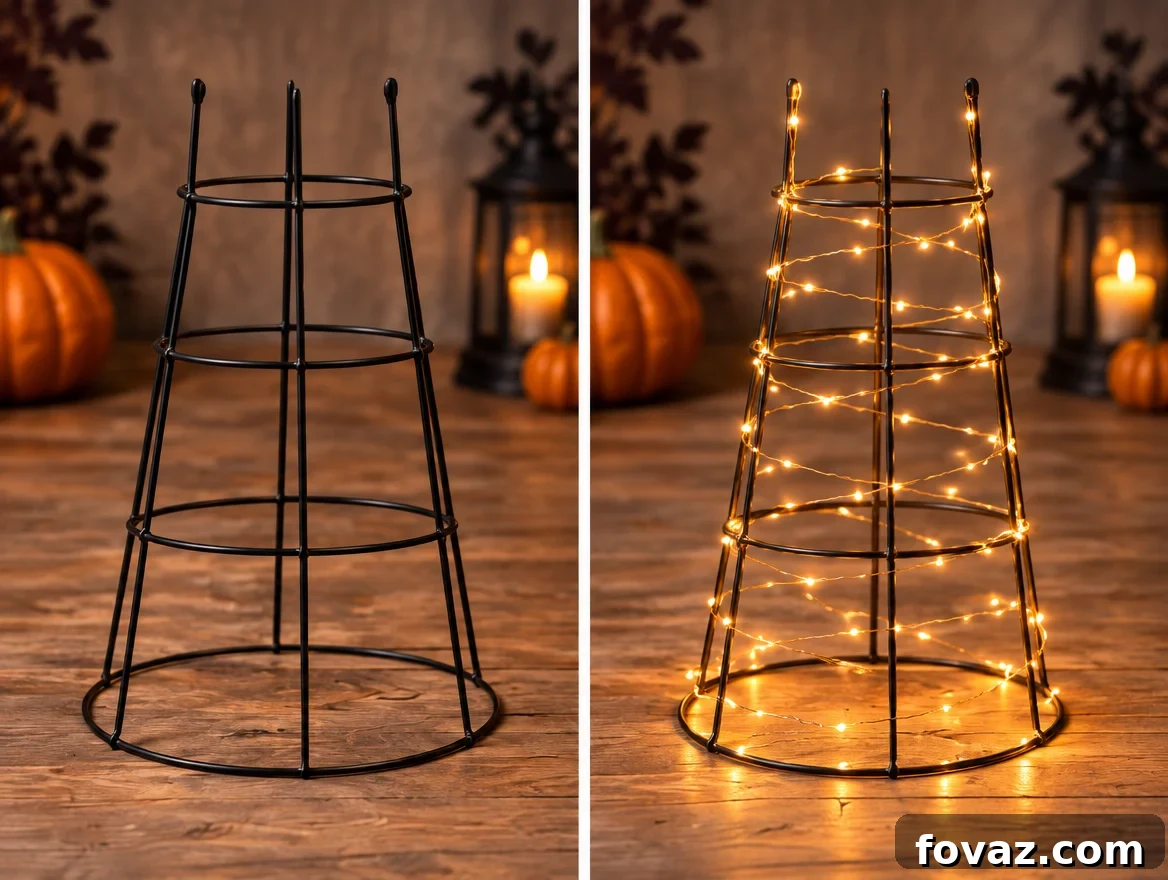
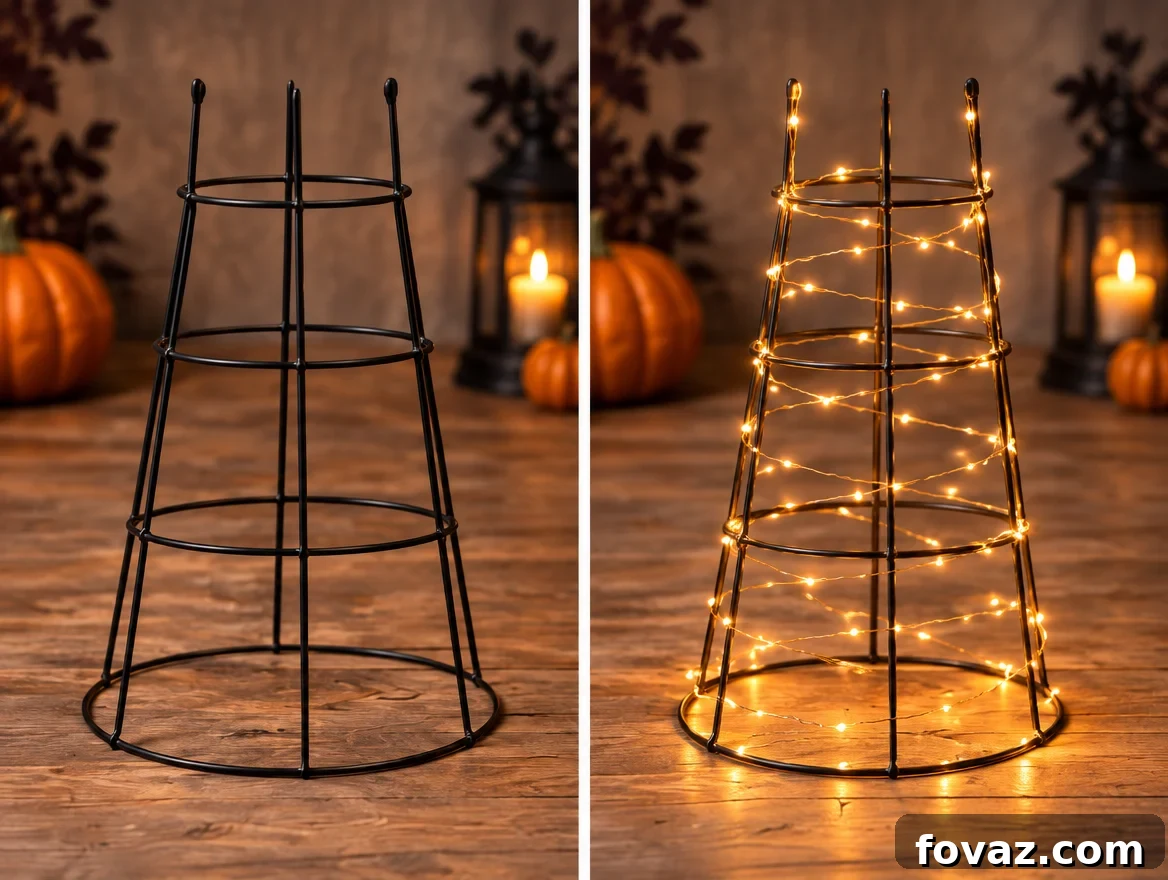
- Flip the cage upside down. The three prongs that usually go into the soil should now point upward.
- Bundle the prongs into a neck. Gather all three together and zip‑tie them about an inch below the tips. Pull the tie tight and trim the tail. The bundle supports the head, so it should be secure and not wiggle.
- Spiral the lights upward. Start at the bottom ring and wrap the battery LED strand up the frame with even spacing between each pass. Tuck the battery pack into the back of the bottom ring where the switch remains accessible.
- Switch them on and check the glow. Step back a few feet. If the light is even from top to bottom you’re good. If one section is too bright, unwind that section and spread it out now while it’s easy to adjust.
- Press the foam ball onto the bundled prongs. Push it straight down until it stops so the head sits level instead of leaning.
- Set the hat on top, tilted slightly. A small tilt gives character; a perfectly level hat looks flat. A drop of glue at the crown will keep the brim from sliding if needed.
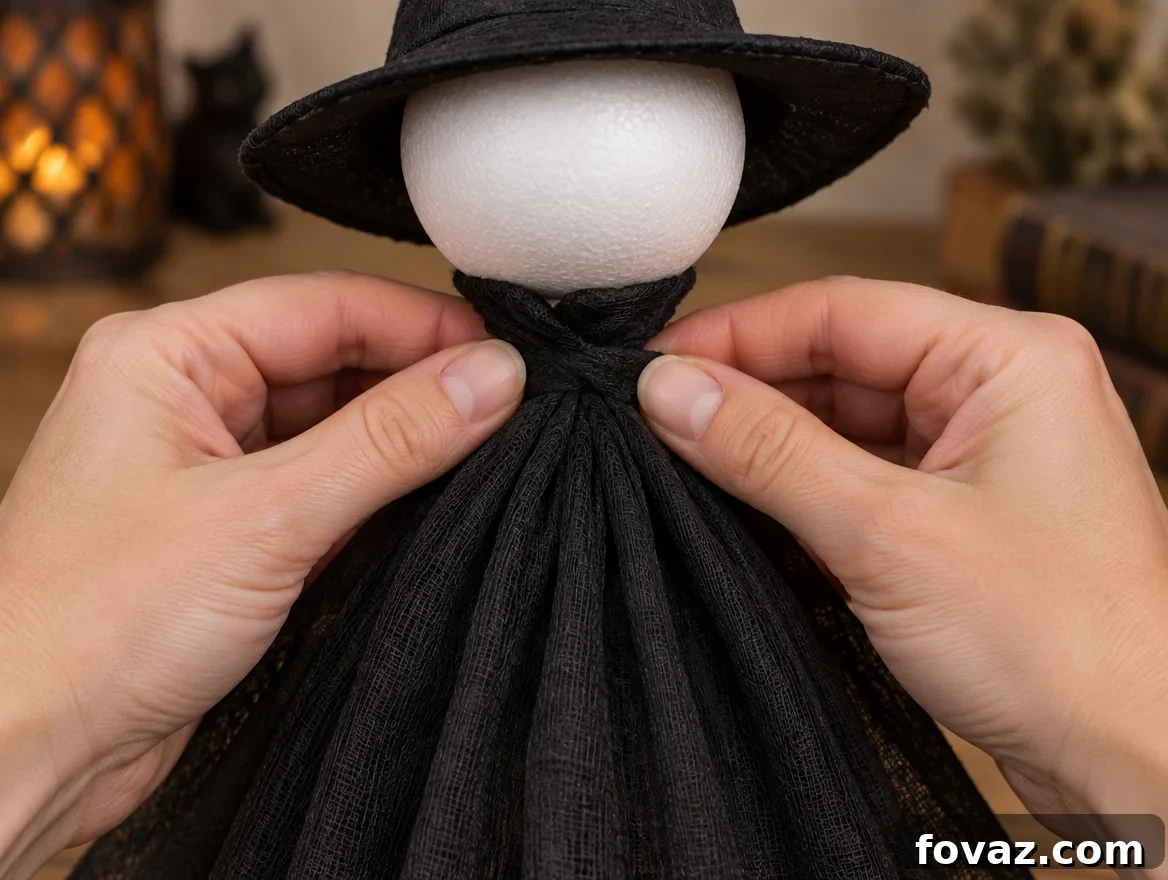
- Drape the cheesecloth over the frame. Center it so a similar amount hangs on all sides and push it back slightly off the ball so the pale head remains visible under the hat brim.
- Gather and cinch the neck. Bunch the cloth tightly just below the head and secure it with a zip‑tie or a twist of the fabric. That single gather forms the shoulders.
- Fluff the folds and let the hem pool. Work downward, creating vertical folds rather than smoothing the fabric flat. Let the bottom edge puddle unevenly for a natural skirt. Switch the lights on once more and make sure the glow comes through in soft bands.
Porch tip: keep this piece indoors or on a covered porch. Nothing in the build is weather rated and cheesecloth soaks through and becomes heavy in the rain.
Why Does the Head Tip or Sink?
Problem: The Head Leans
If the head tilts, the prongs are likely still splayed instead of bundled into a single post. Fix it: tighten the zip‑tie an inch below the tips and pull until the prongs can’t spread.
Problem: The Head Sinks
If the head slowly slides down, the ball wasn’t pressed on far enough. Fix it: remove the ball, cinch the prongs tighter, then press the ball back on firmly until it stops.
Three Ways to Build a Tomato Cage Witch
The Six‑Item Build
Cage, lights, ball, hat, cheesecloth, and one zip‑tie — that’s all you need for a single tabletop witch.
Looks Better
Add a second layer of cheesecloth for better fold retention, a few extra zip‑ties, a flameless LED tealight for a subtle base flicker, and black spray paint if your cage is bright green underneath.
Make a Set
Build three at staggered heights — tall, medium, and short — with slightly different hats. A row of three reads as a deliberate display in a way one alone rarely does.
Where Should You Put It?
This is primarily an indoor decoration or something for a covered porch. It’s sized for a mantel, console table, or shelf rather than for placement alone in the yard.
Keep it away from heat. Don’t put it above a working fireplace, next to a radiator, or near any heat source. Keep open flames and hot surfaces well away from decorations made of fabric or paper. A decorative, unlit fireplace is fine; an active one is not.
Keep it out of pets’ reach. Cheesecloth can unravel into long threads a dog or cat might chew and swallow, and a foam ball is tempting. Place it on a high shelf to prevent curious paws.
If You Want a Ghost Instead
A cheesecloth ghost is a different technique. Ghosts get their shape from liquid starch rather than a wire frame, producing a hollow, free‑standing shape lit from beneath. The two silhouettes work nicely together if you want a coordinated display.
You Nailed It If
- The lights are on in a dark room and the glow is even from top to bottom, with no single bright patch.
- The silhouette shows a clear head under the hat, defined shoulders, and a skirt that widens below.
- No bright green cage wire is visible through the cheesecloth.
- The hat stays put when nudged and the head does not sink or swivel.
Conclusion
A tomato cage witch is a quick, inexpensive Halloween project. The difference between a good one and a rushed one comes down to three details: bundle the prongs tight, wrap and check the lights before you add fabric, and spend the final minutes shaping and fluffing the cheesecloth rather than smoothing it flat. Get those right and you’ll have a glowing mantel piece that stores flat until next year.
Show Us Your Set
Share a photo of your finished witch in the comments below — lights on — and tell us whether you built one or a whole row. If you made multiple, describe how you varied hats and heights for the display.
A few helpful answers
Tomato Cage Witch FAQs
Common questions and short answers about this project.
Will the lights catch fire under the cheesecloth?
Use battery-powered LED fairy lights and the cheesecloth can safely rest against them. Never place a real candle or tealight inside the figure. Use a flameless LED tealight if you want a flicker safely.
How do you keep the cheesecloth from looking flat?
Gather it tightly at the neck first, then fluff. That gather creates shoulders. Pull the fabric below into vertical folds and let the hem pool unevenly. Two layers of cheesecloth hold folds better than one.
What size foam ball and cage do you need?
An 8‑inch foam ball suits a standard tabletop cage. Match the ball and hat so the brim reads correctly; a ball that’s too small hides under the brim and one that’s too big looks glued on.
Can a tomato cage witch go outside?
Only on a covered porch and only while dry. This build is not weather rated; cheesecloth soaks and sags in the rain. If you want an all‑season outdoor figure, use a different frame and weatherproof fabric.
How long does it take to make one?
About twenty minutes. Most of that time is draping and shaping the cheesecloth. Once you’ve built one, making two more at staggered heights is almost as quick as making the first.
One Witch or a Whole Row: How Many Should You Build?
Decide what fits your space: one for a small console or shelf, three staggered for a wide mantel, or a set that matches the surface you’re decorating. Tell us in the comments how many you planned and how many you actually built.