

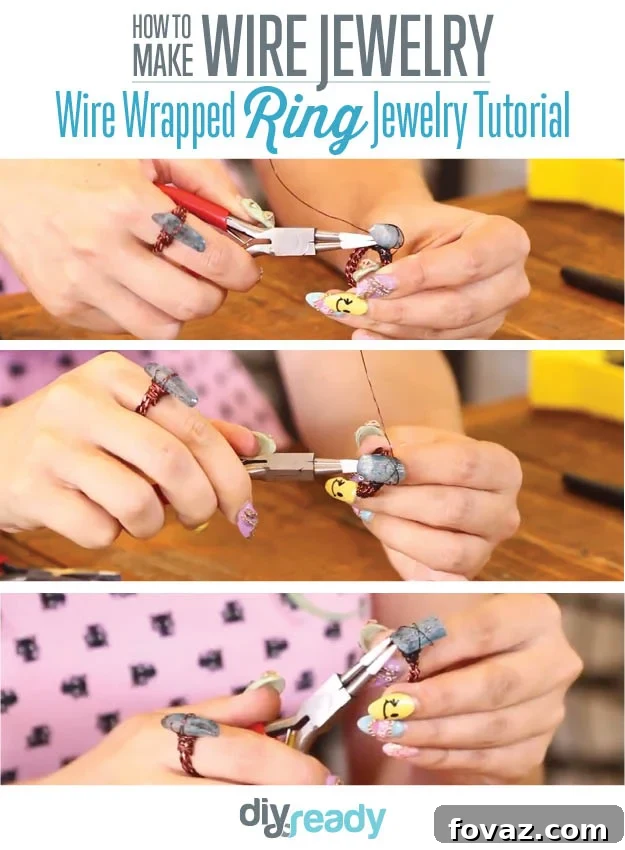
Mastering Wire Jewelry: Your Guide to Wire Wrapping Gemstone Rings
Unleash Your Creativity: Project 2 – Wire Wrapping a Beautiful Gemstone Ring
Embark on an exciting journey into the world of wire jewelry making with our comprehensive guide to wire wrapping. This project, focusing on creating a stunning wire-wrapped gemstone ring, serves as an ideal entry point for beginners and a fantastic skill refresher for seasoned crafters. Wire wrapping is a timeless art form that allows you to transform simple wire and beautiful stones into intricate, wearable masterpieces. From delicate rings to statement necklaces, the possibilities are endless once you grasp the fundamental techniques.
In this detailed lesson, we’ll walk you through the entire process of crafting your own unique ring. Not only will you master the basics of ring construction, but you’ll also learn the essential skill of securely encasing a precious gemstone, adding a personal and luxurious touch to your creation. The ability to wire wrap stones is incredibly versatile, extending far beyond rings. Imagine adorning pendants, earrings, bracelets, brooches, or even hairpins with your favorite gems. This tutorial will equip you with the knowledge to bring those visions to life, starting with a charming and customizable ring.
Why Wire Wrapping? The Allure of Handmade Jewelry
Wire wrapping is more than just a craft; it’s an art that combines precision, creativity, and a touch of magic. Unlike soldering or casting, wire wrapping doesn’t require heat or complex machinery, making it accessible to anyone eager to create beautiful jewelry from home. It’s a therapeutic and rewarding hobby that allows for immense personalization. You can choose your favorite gemstones, experiment with different wire gauges and metals, and design pieces that perfectly reflect your style or the personality of a loved one.
Handmade wire-wrapped jewelry carries a unique charm and story that mass-produced items simply cannot replicate. Each twist, coil, and curve is a testament to the artisan’s skill and dedication. Learning to wire wrap opens up a world of creative expression, enabling you to craft thoughtful gifts, develop a unique personal style, or even start a small business selling your bespoke creations. This gemstone ring project is the perfect stepping stone, teaching you foundational skills that are applicable across countless other wire jewelry designs.
What You Will Master in This Comprehensive Guide:
- The Art of Wire Wrapping a Stone: Discover various techniques for securely encasing both drilled and undrilled gemstones, ensuring they remain firmly in place while enhancing their natural beauty.
- Crafting a Wire Wrapped Ring: Learn the essential steps involved in shaping and forming a comfortable and durable ring band, customized to your desired size.
- Concealing Edges with Precision: Master the professional finishing touches that hide wire ends, create a smooth profile, and ensure your jewelry is comfortable and snag-free.
- Insider Tips and Tricks: Benefit from expert advice on wire handling, tool usage, troubleshooting common issues, and creative enhancements to elevate your designs.
- Selecting the Right Materials: Understand the different types of wire and gemstones, and how to choose the best ones for your projects.
- Basic Tool Proficiency: Get acquainted with the essential wire wrapping tools and learn how to use them effectively for optimal results.
Essential Tools and Materials for Your Wire Wrapped Ring
Before diving into the actual wrapping process, gathering the right tools and materials is crucial. Investing in quality tools will make your crafting experience much smoother and yield more professional-looking results. Here’s what you’ll need for this project:
Tools:
- Round-Nose Pliers: Indispensable for creating perfect loops, curves, and coils. Their tapered jaws allow for precise manipulation of wire.
- Flat-Nose Pliers: Used for gripping, bending, and straightening wire. Their flat jaws provide a secure hold without marring the wire.
- Chain-Nose Pliers: A versatile tool with both flat and slightly rounded jaws, perfect for reaching into tight spaces, opening and closing jump rings, and manipulating wire.
- Flush Cutters: Essential for making clean, precise cuts on your wire, leaving a smooth, flush end. Avoid using household scissors, as they will damage the wire and dull the blades.
- Ring Mandrel: A tapered, cylindrical tool used to size and shape your ring band accurately. Available in various materials like steel, wood, or plastic, often marked with ring sizes.
- Nylon-Jaw Pliers (Optional but Recommended): These pliers have soft nylon jaws that prevent scratching or marring your wire, especially when straightening or flattening it.
- Ruler or Measuring Tape: For accurately measuring wire lengths.
- Permanent Marker (Optional): To mark wire lengths or specific points.
Materials:
- Craft Wire: For a beginner project, a non-tarnish copper wire (e.g., 20 or 22 gauge for the band, and 24 or 26 gauge for wrapping the stone) is excellent for practice. Once comfortable, you can graduate to sterling silver, gold-filled, or even fine silver wire. Choose a dead-soft or half-hard temper for ease of manipulation.
- Gemstone Cabochon: A smooth, flat-backed gemstone is ideal for your first wire-wrapped ring. Sizes like 10x14mm or 13x18mm are good starting points. You can also experiment with faceted stones or even tumbled stones once you’re more confident.
- Polishing Cloth: To clean and shine your finished ring, especially if using sterling silver wire.
Step-by-Step Guide: Crafting Your Wire Wrapped Gemstone Ring
Now that you have your tools and materials ready, let’s dive into the exciting process of creating your beautiful wire-wrapped gemstone ring.
Step 1: Preparing Your Wire for the Ring Band
Start by cutting two pieces of your heavier gauge wire (e.g., 20 gauge) for the ring band. The length will depend on your ring size and how much embellishment you plan, but a good starting point is around 8-10 inches (20-25 cm) for each piece. You’ll trim off excess later, so it’s better to have too much than too little. Use your flush cutters for a clean cut. For the binding wire (e.g., 24 or 26 gauge), cut a generous length, perhaps 15-20 inches (38-50 cm), as this will be used to secure the gemstone and add decorative elements.
Step 2: Forming the Ring Band Base
Take one of your longer, heavier gauge wires. Find the center point and place it against your ring mandrel at the desired ring size. Gently begin to bend the wire around the mandrel, using your fingers and nylon-jaw pliers (if available) to ensure a smooth, rounded curve. Repeat this with the second piece of heavier gauge wire, aiming to create two identical, U-shaped wire pieces that will form the foundation of your ring band. These two pieces will run parallel to each other.
Step 3: Creating the Stone Setting Frame
Hold your gemstone (e.g., cabochon) against the two parallel wires you’ve just formed on the mandrel. The stone should sit comfortably between them. Using your fine-gauge binding wire, begin to wrap one end of it around the two parallel wires, just below where the stone will sit. Make 3-4 tight, even wraps to secure the two wires together. This creates a strong base for your stone setting. Repeat this on the opposite side, ensuring the space between these wrapped sections is roughly the width of your gemstone.
Step 4: Securing the Gemstone
Now, carefully position your gemstone within the frame you’ve created. The key here is to create a secure cradle for the stone. Take your remaining length of fine-gauge wire and begin to wrap it around the two parallel wires and over the edges of the gemstone. For a cabochon, you might create a simple ‘bezel’ by making small loops that curl over the top edge of the stone, or by creating a criss-cross pattern across the face. For undrilled stones, you’ll want to build a cage-like structure that holds the stone firmly from all sides. Ensure the wire presses gently but firmly against the stone, preventing it from wiggling or falling out. Continue wrapping until the stone feels completely secure, making sure your wraps are even and aesthetically pleasing. Periodically check the ring on your mandrel to maintain its shape.
Step 5: Decorating and Refining the Band
Once the gemstone is securely wrapped, you can use the remaining fine-gauge wire to add decorative elements to the ring band. This might involve creating small coils, twists, or weaving patterns along the parallel wires. You can also use this wire to further reinforce the stone setting, if needed. Play with the design, letting your creativity guide you. Remember to keep the inside of the ring band as smooth as possible for comfort.
Step 6: Finishing Touches and Concealing Edges
This is where your ring transforms from a project into a polished piece of jewelry. When you’re ready to finish, use your flush cutters to trim any excess wire ends. The critical step here is to ensure all wire ends are neatly tucked away and smoothed down. Use your flat-nose or chain-nose pliers to gently press down any sharp points, coils, or ends that might snag on clothing or irritate the skin. You can also use the tip of your round-nose pliers to curl tiny wire ends into a small loop or coil, making them safe and decorative. Run your finger along the inside and outside of the ring to check for any rough spots. Polish your finished ring with a polishing cloth to bring out its shine.
Advanced Tips and Tricks for Wire Wrapping Success
- Wire Temper: Experiment with different wire tempers. Dead-soft wire is easiest to manipulate but can deform. Half-hard wire offers more rigidity but requires more effort.
- Work Hardening: As you bend and manipulate wire, it naturally becomes harder (work-hardened). This is good for durability but can make complex bending difficult. If your wire becomes too stiff, you can ‘anneal’ it (heat it) to soften it, but this is typically for specific metals and advanced techniques. For most projects, aim to minimize excessive bending and unbending.
- Symmetry vs. Organic: Decide if you want a perfectly symmetrical design or a more organic, free-flowing look. Both are beautiful, but one requires more precise measuring and bending.
- Practice with Different Stones: Once comfortable with cabochons, try wrapping faceted stones, drilled beads, or even irregularly shaped crystals. Each will present unique challenges and opportunities for creative wrapping.
- Oxidation for an Antique Look: For copper or sterling silver wire, you can use liver of sulfur or other oxidizing agents to create an antique patina, adding depth and character to your finished piece. Always follow safety instructions when using chemicals.
- Troubleshooting Common Issues:
- Loose Stone: If your stone is wobbly, gently tighten the wires around it using your pliers. You may need to add an extra wrap or two.
- Uneven Wraps: Practice makes perfect! Focus on consistent tension and spacing between your wraps.
- Wire Kinks: Avoid bending wire back and forth excessively, as this can create permanent kinks. Use gentle, deliberate movements.
- Scratched Wire: Be mindful of how you handle your pliers. Using nylon-jaw pliers for straightening can prevent scratches.
- Design Variations: Don’t limit yourself to a single stone. Consider incorporating multiple small stones, adding wire beads, or creating more intricate coiling patterns along the band or around the stone.
The Journey Continues: Beyond the First Ring
Congratulations! You’ve successfully created your first wire-wrapped gemstone ring. This achievement is not just about the beautiful piece of jewelry you now possess, but also about the valuable skills you’ve acquired. Wire wrapping is a journey of continuous learning and artistic growth. Each project refines your technique, expands your creative vision, and builds your confidence as a jewelry maker.
Remember, consistency and patience are your best friends in this craft. Don’t be discouraged by initial imperfections; every mistake is a learning opportunity. The beauty of handmade jewelry lies in its unique character, so embrace the subtle variations that make your pieces truly one-of-a-kind. Share your creations with friends and family, and perhaps even inspire them to join you in this wonderful hobby.
Keep exploring different wire gauges, metal types, and an endless array of gemstones. Experiment with new wrapping patterns and design concepts. The world of wire jewelry is vast and exciting, offering limitless possibilities for self-expression. We encourage you to continue practicing and expanding your repertoire. What will you create next?
Click Here for the Next Lesson >>
<< Click Here to go back to the Table of Contents