
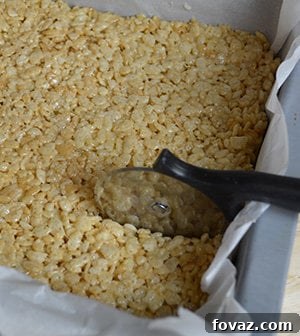
The Ultimate Guide to Homemade Rice Krispie Treats: An Easy & Delicious Recipe
Few desserts evoke the same comforting nostalgia and simple joy as a classic Rice Krispie Treat. These delightful, chewy, and crispy squares are a beloved staple at potlucks, birthday parties, and school lunchboxes, cherished by both children and adults alike. While store-bought versions offer convenience, there’s an incomparable magic in crafting these treats from scratch. The moment you bite into a freshly made Rice Krispie Treat, with its perfect balance of gooey marshmallow and crisp cereal, you’ll understand why homemade is always the superior choice. This comprehensive guide will walk you through every step to create the most incredible homemade Rice Krispie Treats, offering tips for perfection, creative variations, and practical advice to ensure your batch is an absolute hit.
Making Rice Krispie Treats at home is not only incredibly easy but also remarkably quick. With just a handful of common pantry ingredients and minimal cooking time, you can transform simple components into a crowd-pleasing dessert that’s far superior to any pre-packaged alternative. The vibrant freshness, the customizable flavors, and the sheer satisfaction of creating something delicious with your own hands make this recipe a must-try for any home cook. Prepare to impress your family and friends with a dessert that’s as fun to make as it is to eat!
Essential Ingredients for Perfect Rice Krispie Treats
The beauty of Rice Krispie Treats lies in their simplicity, requiring only a few core ingredients. Opting for fresh, high-quality ingredients will elevate your treats from good to absolutely extraordinary. Here’s what you’ll need to gather for this classic recipe:
-
1/4 cup (approximately 57 grams) Unsalted Butter: Butter forms the rich, foundational flavor and helps bind the mixture. While margarine can be used, unsalted butter offers a superior taste and texture. Ensure it’s fresh for the best results.
-
5 cups (approximately 250 grams or one 10-ounce bag) Fresh Mini Marshmallows: Freshness is key here! Stale marshmallows can lead to a tougher, less gooey treat. Mini marshmallows melt more evenly and quickly, but larger ones can be used if cut down. You can also reserve about 1 cup of marshmallows to stir in at the very end for extra pockets of chewiness.
-
5 1/2 cups (approximately 130 grams) Puffed Cereal: While classic rice cereal (like Rice Krispies) is the original and most common choice, this recipe is incredibly versatile. Any puffed cereal will work wonderfully. Consider these delicious alternatives to experiment with different flavors and textures:
- Cocoa Puffs: For a chocolatey twist.
- Cheerios (plain or honey nut): Adds a slightly different crunch and flavor profile.
- Fruity Pebbles: For a vibrant color and a sweet, fruity explosion.
- Corn Flakes: Offers a more subtle, crisp texture.
- Peanut Butter Puffs: For a delightful peanut butter and marshmallow combination.
-
Softened Margarine or Butter (for pressing): A small amount of butter or margarine to grease your hands or a piece of parchment paper will prevent sticking when pressing the mixture into the pan. This is optional if using parchment paper directly on the treats.
Essential Equipment for Making Rice Krispie Treats
Having the right tools on hand will make the preparation process smooth and enjoyable. You won’t need anything fancy, just standard kitchen items:
-
Large Saucepan: Crucial for melting the butter and marshmallows, and large enough to comfortably mix in the cereal without spilling. A 4-quart or 5-quart saucepan is ideal.
-
9×13-inch Rectangular Baking Pan: The standard size for this recipe, yielding perfectly sized squares.
-
Parchment Paper or Nonstick Cooking Spray: Essential for preventing sticking and making removal and cutting a breeze.
-
Large Heat-Resistant Spoon or Spatula: For stirring the mixture and spreading it into the pan. A sturdy rubber spatula works well.
-
Measuring Cups: For accurately portioning butter, marshmallows, and cereal.
-
Knife or Pizza Cutter: For cleanly cutting the cooled treats into squares or rectangles. A pizza cutter is surprisingly efficient for this task.
Step-by-Step Recipe for Irresistible Rice Krispie Treats
Step 1: Prepare Your Baking Pan
Before you even begin melting, it’s crucial to prepare your baking pan. This simple step will save you a lot of frustration later when it comes to removing and cutting your treats. You have two excellent options:
Option A: Parchment Paper. Line a 9×13-inch rectangular baking pan with parchment paper, leaving an overhang on the sides. This overhang acts as handles, allowing you to easily lift the entire slab of treats out of the pan once cooled. This method makes cutting incredibly simple and mess-free.
Option B: Nonstick Cooking Spray. Alternatively, generously spray the interior of your baking pan with a high-quality nonstick cooking spray. Ensure all surfaces, especially the corners, are well-coated. While effective, parchment paper often makes the cleanup and cutting process even smoother.
I personally prefer using parchment paper. It ensures a completely non-stick surface, makes lifting the whole block of treats out of the pan effortless, and simplifies the cutting process significantly. Once the treats are set, you can just pull up the paper and cut them on a clean cutting board.
Step 2: Gently Melt the Butter
Place your large saucepan over low heat. Add the 1/4 cup of unsalted butter. Allow the butter to melt slowly and evenly. The key here is “low heat” – you don’t want to brown the butter, just melt it until it’s a smooth, golden liquid. Once the butter has completely melted, remove the saucepan from the heat temporarily. This prevents the marshmallows from overheating in the next step, which can make them tough.
Step 3: Introduce the Marshmallows
With the heat off, add all 5 cups of fresh mini marshmallows to the saucepan with the melted butter. Give them a quick stir to coat them slightly with the warm butter. Keeping the heat off initially prevents scorching and ensures a more gradual, even melt.
Step 4: Melt Marshmallows to Gooey Perfection
Return the saucepan to low heat. Begin to gently stir the marshmallows with your heat-resistant spoon or spatula. Continue stirring constantly as the marshmallows slowly melt into a smooth, gooey liquid. This process requires patience and a watchful eye. It’s crucial not to overheat the marshmallows; high heat can cause them to become stiff and rubbery once cooled, rather than soft and chewy. Once the marshmallows are fully melted and appear smooth and lump-free, remove the saucepan from the heat immediately. A perfectly melted marshmallow mixture should be silky and easily stirred.
Step 5: Incorporate the Cereal
Turn the heat off completely before adding the cereal. Carefully measure 5 1/2 cups of your chosen puffed cereal (classic rice cereal or your preferred alternative) and add it directly to the melted butter and marshmallow mixture in the saucepan. The pan should be large enough to accommodate the cereal comfortably for easy mixing.
Step 6: Stir Until Evenly Combined
Using your sturdy spoon or spatula, gently fold and stir the cereal into the marshmallow mixture. Begin by scooping from the bottom of the pan, ensuring all the cereal gets coated with the sticky marshmallow. Continue stirring until the cereal is evenly coated and thoroughly combined. This process usually takes only a couple of minutes. Be careful not to overmix, as this can crush the cereal and result in a denser, less crispy treat. The goal is a uniform, sticky mixture where every piece of cereal is glistening with marshmallow.
Step 7: Transfer the Mixture to Your Prepared Pan
While the mixture is still warm and pliable, immediately pour it into your previously prepared 9×13-inch baking pan (lined with parchment paper or coated with nonstick spray). Use your spoon or spatula to scrape out all the mixture from the saucepan, ensuring none of that delicious goodness is left behind. Working quickly here is beneficial, as the mixture will become stickier and harder to manage as it cools.
Step 8: Gently Spread and Distribute the Mixture
Once the mixture is in the pan, use the back of a flat spoon or a spatula to gently spread it evenly across the pan. You want to achieve a uniform thickness throughout. Avoid pressing down too firmly at this stage, as excessive compression can make the treats hard and dense instead of delightfully chewy and crisp. A light, even spread is all that’s needed.
Step 9: Press and Flatten for a Smooth Surface
To achieve a perfectly flat and even surface without sticking, cut a piece of parchment paper or wax paper slightly larger than the surface of your treats. Place this paper directly on top of the mixture in the pan. Now, using your hands, gently but firmly press down on the paper, flattening the Rice Krispie Treat mixture into the pan. Make sure to press it into all corners and sides to create a compact, even slab. The paper prevents the sticky marshmallow from adhering to your hands, allowing you to get a perfectly smooth finish. Remember, press gently but firmly – avoid crushing.
Step 10: Allow Rice Krispie Treats to Cool and Set
Patience is a virtue! Allow your freshly pressed Rice Krispie Treats to cool and set completely at room temperature for at least 15 minutes, or ideally 30-60 minutes. Rushing this step will result in messy cuts and potentially sticky, falling-apart treats. Resist the temptation to put them in the refrigerator, as this can make them hard and compromise their signature chewy texture. Let them set naturally.
Step 11: Cut into Perfect Squares
Once the treats are fully cooled and firm, use the parchment paper overhang to carefully lift the entire slab out of the baking pan and place it onto a clean cutting board. For clean, precise cuts, a pizza cutter is often the easiest tool. Otherwise, a sharp, lightly greased knife will work well. Cut the large slab into even squares or rectangles. Start by making long cuts in one direction, then rotate the slab 90 degrees and cut across in the other direction to form your desired shape and size.
Step 12: Separate and Indulge!
Gently separate your freshly cut Rice Krispie Treats and arrange them on a serving platter. Now comes the best part – it’s time to enjoy your delicious creation! Serve them while they are fresh for the ultimate experience of gooey, crispy perfection. You’ll be truly amazed by the incredible difference homemade makes.
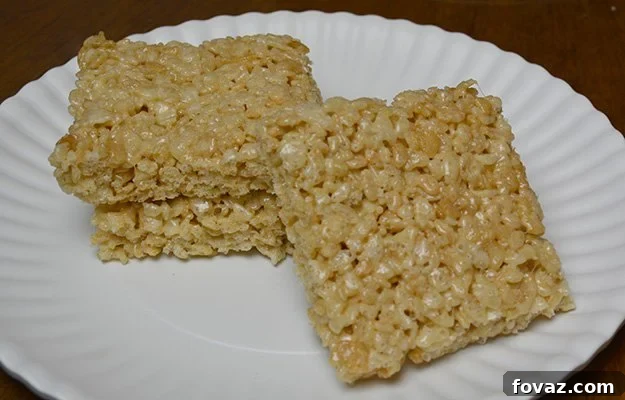
Tips for Achieving Rice Krispie Treat Perfection
While the recipe is simple, a few expert tips can elevate your treats from good to absolutely phenomenal:
-
Use Fresh Marshmallows: This cannot be stressed enough! Stale marshmallows won’t melt as smoothly and can result in tough, hard treats. Always use a fresh bag.
-
Low Heat is Your Friend: When melting butter and especially marshmallows, always use low heat. High heat can crystallize the sugar in marshmallows, making them brittle and hard once cooled.
-
Don’t Overcook Marshmallows: Melt them just until smooth and combined, then remove from heat. The longer they cook, the tougher they become.
-
Work Quickly: The marshmallow mixture sets fast. Have all your ingredients measured and your pan prepared before you start melting.
-
Grease Everything: Lightly grease your spoon/spatula and your hands (if pressing directly) to prevent sticking. Parchment paper is a game-changer for this!
-
Gentle Pressing: When pressing the mixture into the pan, be firm but gentle. Over-compressing the treats can result in a dense, hard texture rather than light and airy.
-
Resist Refrigeration: While it speeds up cooling, refrigerating Rice Krispie Treats can make them hard and less enjoyable. Allow them to cool at room temperature for the best chewy texture.
Creative Variations: Customize Your Rice Krispie Treats
One of the most exciting aspects of making Rice Krispie Treats is how easily they can be customized. Feel free to unleash your creativity and try these delightful variations:
-
Chocolate Drizzle: Melt some chocolate chips (milk, dark, or white) and drizzle it artistically over the cooled treats. Let the chocolate set before serving.
-
Sprinkle Fun: Stir in some colorful sprinkles with the cereal, or scatter them on top of the mixture immediately after pressing it into the pan, before it sets. Perfect for parties!
-
Peanut Butter Bliss: Add 1/2 cup of creamy peanut butter to the melted butter and marshmallow mixture before adding the cereal for a rich, nutty flavor.
-
Vanilla Extract: A teaspoon of vanilla extract stirred into the melted marshmallows can enhance their flavor profile.
-
Candy Mix-Ins: Fold in M&M’s, chopped candy bars, mini chocolate chips, or crushed Oreos along with the cereal. This adds texture and a burst of extra flavor.
-
Seasonal Themes: Use themed sprinkles or food coloring to match holidays. For example, green food coloring and red sprinkles for Christmas, or orange and black for Halloween.
-
Nutty Crunch: Add about 1/2 cup of chopped nuts (pecans, walnuts, almonds) for an extra layer of crunch and flavor.
-
Citrus Zest: A touch of orange or lemon zest can brighten the flavor, especially if using a fruity cereal.
Storing Your Homemade Rice Krispie Treats
To maintain their fresh, chewy, and crispy texture, proper storage is key.
-
Airtight Container: Store cooled and cut Rice Krispie Treats in an airtight container at room temperature. This prevents them from drying out and becoming hard.
-
Separating Layers: If stacking multiple layers, place a piece of parchment paper between them to prevent sticking.
-
Shelf Life: Enjoy your homemade treats within 2-3 days for optimal freshness and texture. While they might last a bit longer, their quality will diminish.
-
Avoid Refrigeration: As mentioned, refrigeration tends to make them hard and chewy in an undesirable way. Room temperature is best.
Serving Suggestions for Any Occasion
Rice Krispie Treats are incredibly versatile and perfect for a multitude of occasions:
-
Party Favorite: A guaranteed hit at birthday parties, potlucks, and gatherings. They’re easy to transport and universally loved.
-
Lunchbox Surprise: Pack them in school or work lunchboxes for a delightful mid-day treat.
-
Quick Snack: Satisfy a sweet craving with these simple, ready-to-eat squares.
-
Coffee or Milk Companion: Enjoy them alongside a glass of cold milk or a warm cup of coffee for a comforting snack.
Conclusion: Embrace the Joy of Homemade
And there you have it – your comprehensive guide to making the most delicious, perfectly chewy, and crispy homemade Rice Krispie Treats! This classic dessert proves that sometimes, the simplest recipes yield the most satisfying results. The difference between a freshly made treat and a prepackaged one is truly incredible, making the small effort entirely worthwhile.
From gathering your ingredients to savoring the last bite, the process is straightforward, enjoyable, and creates memories as sweet as the treats themselves. Whether you stick to the traditional recipe or venture into creative variations, these homemade delights are guaranteed to bring smiles and satisfy cravings. So go ahead, gather your ingredients, follow these steps, and experience the pure joy of making and sharing these timeless, gooey, crispy masterpieces. Happy baking, and enjoy every single bite!