
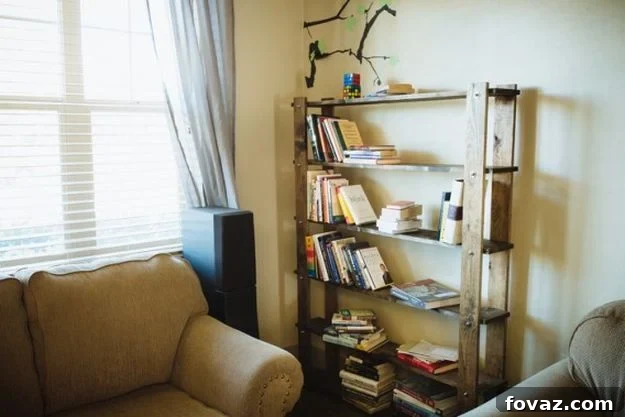
Have you been dreaming of a personalized space for your treasured book collection? Imagine a sturdy, stylish bookshelf that perfectly complements your home decor, built by your own hands. You’re in the right place! This comprehensive guide will walk you through every step of creating your very own DIY bookshelf, transforming simple materials into a functional work of art.
Bookshelves are more than just storage; they’re an essential element of home design, offering a practical yet elegant solution for organizing, displaying, and preserving your beloved books. While custom-built or high-quality store-bought bookshelves can be quite expensive, opting for a DIY project offers significant cost savings and the immense satisfaction of crafting something truly unique. Get ready to unleash your inner carpenter, as we embark on this rewarding journey!
Build Your Own Custom Bookshelf: A Step-by-Step DIY Guide
—This post was originally by ForRent.com, and shared with permission—
Books are far more than just ink on paper; they are windows into different worlds, keepers of knowledge, and cherished mementos of experiences. Much like your favorite travel photos or invaluable keepsakes, books deserve a prominent place where they can be admired and easily accessed. And what better way to showcase your literary treasures than with a bespoke, homemade bookshelf that reflects your personal style?
A custom DIY bookshelf makes a fantastic addition to any room – be it a cozy bedroom, an elegant living room, a quiet den, a dedicated study, or a bustling home office. It can serve as a stunning focal point, effectively tying together your interior design scheme. However, before you can proudly arrange your personal home library, it’s crucial to grasp the intricacies of the “do” in “do-it-yourself.” To ensure your project starts and finishes smoothly, we’ve compiled this detailed, step-by-step guide to help you construct a beautiful and durable bookshelf.
Step 1: Setting Up Your Efficient DIY Workshop
One of the most appealing aspects of building your own furniture is the flexibility it offers. You don’t necessarily need a sprawling, dedicated workshop to successfully complete the task. As long as you have the right tools, sufficient space to work safely and comfortably, and a clear plan, you’re all set to begin.
For this specific bookshelf project, consider the convenience of building your unit directly in the room where it will ultimately reside. This approach eliminates the heavy lifting and logistical challenges of moving a finished piece, especially if it’s large or heavy. Regardless of your chosen location, ensure your work area is meticulously organized. A well-ordered space prevents frustration, saves time, and significantly reduces the risk of misplacing essential tools or materials. To streamline cleanup, lay down an old bed sheet or a protective tarp on the floor. This will not only shield your flooring from scratches and spills but also efficiently collect wood shavings, sawdust, and any other debris, making the post-project tidying a breeze.
Essential Tools and Materials You’ll Need:
Gathering all your supplies before you begin is a critical first step for a smooth building process. Here’s a detailed list of what you’ll need for this bookshelf:
Wood and Hardware:
- (3) 8′ 1×8 #2 and better pine board: These will form the main horizontal shelves of your bookshelf. Pine is an excellent choice for DIY projects due to its affordability, workability, and attractive grain.
- (2) 12′ 1×4 #2 and better pine board: These pieces will serve as the vertical uprights, providing structural support and framing for your shelves.
- (12) 9-⅜” long pieces of 1/4-20 all-thread rod (approximately 13′ total): All-thread rods are threaded along their entire length and will be used to secure the uprights and shelves together, creating a robust framework.
- (24) 1-¼” fender washers: Washers distribute the load of a fastener, preventing damage to the wood and ensuring a tighter, more secure connection. Fender washers have a larger outer diameter, offering greater surface area coverage.
- (24) ¼-20 ‘acorn’ nuts or ‘cap’ nuts: These nuts are used with the all-thread rods to fasten the components together. Acorn nuts have a domed top, which provides a more finished and aesthetically pleasing look while protecting the threads.
- (1) ¼-20 Wingnut: A wingnut is useful for temporarily securing the all-thread rod during the cutting process.
Tools for the Job:
- Hand or power saw for wood: A circular saw, miter saw, or even a good hand saw will work for cutting your lumber. If you don’t own one, many local lumberyards or hardware stores offer cutting services.
- Hand or power saw for metal: A hacksaw or an angle grinder with a metal cutting disc will be needed for the all-thread rods. Again, check if your local store offers this service.
- Tape measure: Essential for precise measurements. “Measure twice, cut once” is the golden rule!
- Square (combination square or speed square): For marking perfectly straight lines and ensuring your cuts and drill holes are perpendicular to the board edges.
- Pencil: For marking all your measurements and drill points.
- Drill (corded or cordless): A versatile tool for creating holes in your wood.
- ⁹/₃₂” drill bit for wood: Specifically chosen to create holes that allow the ¼-20 all-thread rod to pass through smoothly without being too loose.
- A ⁷/₁₆” wrench or socket and driver: For tightening the nuts securely.
- Pliers: Useful for gripping, bending, and in some cases, cutting.
- Sandpaper/power sander (optional but highly recommended): For smoothing rough edges and preparing the wood for staining. Various grits (e.g., 100-150 grit for initial sanding, 180-220 grit for finer finish) will be beneficial.
- Wood stain of your choice: To enhance the natural beauty of the wood and protect it.
- Old rag or brush: For applying the wood stain evenly.
- Safety glasses and gloves: Always prioritize personal safety when working with tools and chemicals.
- Clamps (optional but recommended): To hold pieces securely in place during cutting and drilling, ensuring accuracy and safety.
Step 2: Precision Cutting of Your Wood Components
Before you even think about assembly, it’s highly recommended to get all your cutting done in one go. This creates a more efficient workflow and allows you to focus solely on assembly later. You might be able to leverage the cutting services offered at your local hardware store, or you can tackle the task yourself with the right tools and attention to detail.
- Measure with Utmost Care: This particular bookshelf design is engineered for minimal material waste. Consequently, the success of your project hinges on making exceptionally precise measurements and cuts. Any significant error could mean starting over with new, costly materials. Double-check every measurement before making a single cut.
- Cutting the 1×8 Boards: Using your tape measure, mark the 1×8 boards precisely. Carefully cut each board down to exactly 4 feet (48 inches) in length. You should end up with a total of six 4-foot long sections, which will serve as your main shelves.
- Cutting the 1×4 Boards: Next, use your tape measure to mark the 1×4 boards. Precisely cut these boards down to exactly 5 feet 3 inches (63 inches) in length. You should yield four such sections; these will function as the vertical uprights of your bookshelf.
- Preparing the All-Thread Rod: Begin by running a wingnut onto one end of the all-thread rod. This wingnut will help repair the threads as you cut. Carefully cut the all-thread rod into 16 distinct segments, each measuring exactly 9-⅜ inches long. After each cut, remove the wingnut by threading it off the freshly cut end. This action is crucial as it helps to re-form and clean up the threads that may have been damaged during the cutting process, ensuring nuts can be easily threaded on later.
Do your shelves measure up? Take a #shelfie and let us know! https://t.co/TNlkewv2w5
— DIY Projects (@DIY Projects) May 17, 2016
Step 3: Precise Drilling for Structural Integrity
Accurate drilling is paramount for the stability and appearance of your bookshelf. These holes will house the all-thread rods, creating the connections that hold the entire structure together. Precision here ensures everything aligns perfectly.
- Marking the First 1×4 Board: Take one of your 1×4 boards. Hook the end of your tape measure over the right-hand end of the board. Lay the board flat on your workbench. With a pencil, make clear marks at 1 inch, 13 inches, 25 inches, 37 inches, 49 inches, and 61 inches along the length of the board. These marks represent the vertical positions of your shelves.
- Extending Marks and Creating Divots: Use a square to carefully extend each of your pencil marks into a straight line across the width of the board. Along each of these six lines, measure 1-¾ inches from one edge. This specific measurement should bring you to the very center of the 1×4 board’s width (assuming a true 1×4 dimension is ¾” x 3 ½”). To help guide your drill bit, use a nail, awl, or center punch to create a small, shallow divot or impression at each of these six central points. These divots will prevent the drill bit from wandering when you start drilling.
- Drilling the Pilot Board: Equip your power drill with the ⁹/₃₂” drill bit. Place the drill bit precisely into each divot you created. Carefully drill completely through the wood at each of the six marked locations. It is absolutely crucial to keep the drill perfectly straight and perpendicular to the board’s surface throughout this process. Any angling of the drill can result in crooked holes, which will make assembly difficult and affect the overall stability of your bookshelf.
- Creating a Drilling Template for Uniformity: To ensure all four 1×4 uprights have identical, perfectly aligned holes, use the first drilled board as a template. Lay the completed (drilled) board directly on top of one of the remaining undrilled 1×4 boards, making sure their edges and ends line up perfectly. Securely clamp the two boards together to prevent any movement. Now, simply drill directly through the already-drilled holes in the top board. This will create perfectly matching holes in the board underneath. Repeat this process with the remaining two 1×4 boards, using your “template” board each time to guarantee uniformity across all four uprights. This method significantly reduces the chance of errors and ensures consistent shelf placement.
Step 4: Enhancing Aesthetics with Finishing Touches
While an unfinished bookshelf is perfectly functional, adding a bit of finesse through sanding and staining can dramatically elevate its appearance, giving it a professional and polished look that complements your home decor. This step is where you transform raw wood into a beautiful piece of furniture.
- Thorough Sanding for Smoothness: Begin by gently but thoroughly sanding all the edges, faces, and surfaces of your cut wood pieces. Use a power sander for larger flat areas and sandpaper wrapped around a block or by hand for edges and smaller sections. Start with a medium-grit sandpaper (e.g., 100 or 120 grit) to remove any rough spots, splinters, pencil marks, or minor imperfections. Follow up with a finer-grit sandpaper (e.g., 180 or 220 grit) to achieve a smooth, silky finish. Pay special attention to removing any sharp edges that could cause splinters or snags. A smooth surface is not only pleasant to touch but also allows for better stain absorption and a more even finish.
- Applying Your Chosen Stain: Once all surfaces are perfectly smooth and dust-free (wipe down with a tack cloth or damp rag), you’re ready to apply the wood stain. Choose a stain color that matches your desired aesthetic. Using an old rag, a foam brush, or a natural bristle brush, apply the stain evenly along the grain of the wood. Don’t apply too much at once; thin, even coats are key. Allow the stain to penetrate the wood for the recommended amount of time, as indicated by the manufacturer on the product can (usually 5-15 minutes). For a lighter finish, wipe off excess stain sooner; for a darker, richer color, allow it to sit longer before wiping. Always follow the manufacturer’s instructions for drying times between coats and before proceeding to assembly. You might consider applying a second coat for deeper color, and potentially a clear protective finish (like polyurethane) once the stain has fully dried, for added durability and protection.
Step 5: Bringing It All Together – Bookshelf Assembly
With all your pieces cut, drilled, and beautifully finished, it’s time for the exciting final stage: assembly. This step requires patience and careful alignment to ensure a sturdy, wobble-free bookshelf.
- Preparing the Upright Pairs: Take two of your 1×4 upright boards. Run two of the cut lengths of all-thread rod through the very top holes and the very bottom holes on these two uprights. This will create your first skeletal frame.
- Securing the Rods: On either end of each all-thread rod that extends beyond the uprights, place a fender washer. Ensure the rough side of the washer faces the wood for better grip. Follow this with an acorn nut or cap nut. Hand-tighten these nuts initially; you’ll adjust them more precisely later.
- Positioning the First Shelves: Carefully slide two of your 1×8 shelf boards onto the all-thread rods, positioning them between the two uprights. Allow approximately 2 inches of the shelf to extend past the outside edge of each upright board. Adjust the nuts on the all-thread rods until the uprights snugly clamp the shelves in place. This initial clamping provides stability for the next steps.
- Adding More All-Thread Rods and Washers/Nuts: With the first two shelves secured, fill the remaining four empty holes in your uprights with the remaining all-thread rods. For each rod, attach a washer and an acorn nut (gently) on both ends, just as you did with the top and bottom rods. Do not fully tighten yet.
- Threading the Remaining Shelves: Now, carefully thread the remaining four 1×8 shelf boards onto the all-thread rods, sliding them down the length of the unit until they rest in their designated positions between the uprights. Ensure the 2-inch overhang is consistent on both sides of each shelf.
- Snapping Shelves into Place: With all shelves roughly positioned, use your hands or a rubber mallet to gently tap and snap the shelves fully into their final positions, ensuring they are flush against the uprights and evenly spaced.
- Final Tightening for Stability: This is the most crucial tightening phase. Systematically tighten all the acorn nuts using your ⁷/₁₆” wrench or socket. As you tighten each nut, apply gentle inward pressure on the individual shelves towards the uprights. Work your way across the unit, tightening a little bit at a time on each rod and each side. This gradual and even tightening process is key to eliminating any wobbling and ensuring the entire unit is incredibly sturdy and stable. When done correctly, you’ll have a bookshelf that can safely hold a substantial collection of books, yet remains light enough to be portable if needed.
For the basic materials outlined, this DIY bookshelf project should cost you no more than approximately $70, and potentially even less if you source materials strategically or already own some of the tools. From preparation to final assembly, you should be able to complete the entire project efficiently within a single afternoon, making it a perfect weekend endeavor.
The most important principle to remember while tackling any DIY project, especially one involving precision and power tools, is patience. Take your time. Measure multiple times before making any cuts or drilling any holes. Never rush to the next step until you are absolutely confident that the current one is executed perfectly and everything is precisely where it needs to be.
Attempting to rush the project, failing to properly align connections, or trying to “eyeball” measurements will inevitably lead to frustration and a pile of expensive wood scraps. Save yourself valuable time, money, and energy by exercising caution and precision, ensuring you build your DIY bookshelf correctly on your very first attempt. Furthermore, always prioritize safety: whenever using power tools, wear appropriate personal protective equipment, such as safety glasses and hearing protection, and follow all manufacturer safety guidelines. No bookshelf is worth risking your personal well-being.
Wrap Up: Showcase Your Skills and Your Books!
It’s time to liberate those cherished books from dusty boxes, crowded floors, and forgotten storage spaces. Building DIY built-in bookshelves (or standalone units, as in this guide) is an incredibly rewarding and elegant way to not only organize your literary collection but also to flaunt your impressive woodworking and furniture-building skills. Imagine the conversations sparked by your beautifully displayed books, all resting on a piece crafted with your own hands. It’s a testament to your creativity and practical ability.
What do you think? Are you inspired to make your own DIY bookshelf after reading this guide? Let us know your thoughts and plans below in the comments section!
Stay connected with us on Facebook, Twitter, Pinterest, and Instagram!
Next: 17 Amazingly Cheap Home Decor | DIY Crafts