
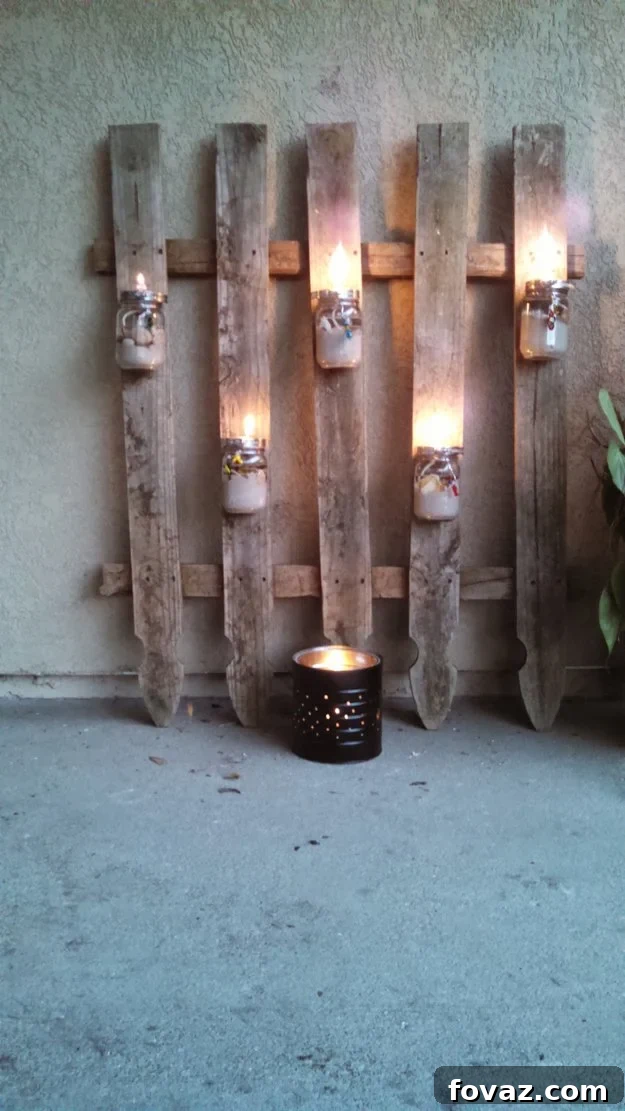
Looking for a whimsical DIY backyard project that adds charm and a touch of rustic elegance? Discover how to transform an old fence into a stunning illuminated feature with this step-by-step guide to mason jar lighting.
DIY Enchanting Mason Jar Fence Lighting: A Step-by-Step Upcycling Guide
Are you yearning to infuse your backyard with a unique blend of rustic charm and warm ambiance? Look no further than this delightful DIY decor project, ingeniously combining an often-overlooked old fence with the timeless appeal of mason jars. This upcycling endeavor not only beautifies your outdoor space but also champions sustainability by giving new life to forgotten items. Prepare to be inspired by the crafty vision of Ellen from Beechbaby, whose innovative approach to mason jar lighting demonstrates how gorgeous and impactful such a simple project can be!
ENHANCE YOUR OUTDOOR AMBIANCE: How to Make a DIY Mason Jar Chandelier
Transform Your Backyard: The Allure of DIY Mason Jar Fence Lights
Every home has those forgotten corners, those overlooked items that some might call “clutter,” but for a true DIY enthusiast, they’re simply untapped potential waiting for the right spark of creativity. My husband might occasionally suggest I have a problem with accumulating things, but this time, even he had to admit I was onto something spectacular. My latest discovery was a charming piece of picket fence, patiently biding its time in what we affectionately call our “back forty” – a somewhat wilder, less manicured section of our yard. It sat on the porch for weeks after a good brushing, a silent canvas awaiting inspiration. Sometimes the perfect idea strikes instantly, a lightning bolt of genius; other times, it’s a slow burn, an evolving concept that demands patience and contemplation. This project was definitely the latter, and the result was worth every moment of reflection.
The beauty of this DIY fence lighting project lies in its simplicity and the profound impact it has on an outdoor setting. Mason jar lights evoke a sense of nostalgia, warmth, and handcrafted care. When integrated into an old fence, they create a focal point that is both functional and aesthetically pleasing. Imagine soft, flickering lights casting a gentle glow across your patio or garden path as dusk settles, transforming your backyard into an enchanting haven perfect for evening gatherings or quiet reflection. This project isn’t just about adding light; it’s about adding character, telling a story, and embracing the unique charm of upcycled decor.
Why settle for generic outdoor lighting when you can craft a personalized piece that truly reflects your style and creativity? This project provides an opportunity to not only beautify your space but also to engage in a rewarding hands-on experience. It’s a testament to the fact that with a little imagination and some readily available materials, extraordinary transformations are entirely within reach. Plus, repurposing an old fence contributes to a more sustainable lifestyle, giving a cherished item a second life instead of sending it to a landfill. This kind of thoughtful upcycling is at the heart of conscious living and allows us to create beautiful things with minimal environmental impact.
Essential Materials for Your DIY Mason Jar Fence Lighting Project
Gathering your materials is the first exciting step in bringing this vision to life. The beauty of this project is its flexibility; many items can be sourced from around your home or local thrift stores, making it a budget-friendly and eco-conscious endeavor. Here’s a comprehensive list of what you’ll need, along with a few considerations to help you get started:
- Old Fence Section: Look for a sturdy piece of picket fence or any wooden fence section that has a rustic appeal. Clean it thoroughly to remove dirt, loose paint, or splinters. A well-weathered piece adds character, but you can also paint or stain it for a different look.
- Mason Jars: Standard canning jars work perfectly. You can use various sizes to add visual interest, but ensure the openings are compatible with your wick holders. Clear jars are ideal for maximum light, but colored jars could create a unique glow.
- Lamp Oil: Choose a high-quality lamp oil designed for indoor/outdoor use. Paraffin-based oils are common and burn cleanly. Always store lamp oil safely and out of reach of children and pets.
- Wicks and Glass Holders/Inserts: These are crucial for safe and efficient burning. The glass holders typically fit into the mason jar lids and secure the wick. I found an excellent selection of wicks and glass holders specifically designed for mason jars here. This store is a treasure trove for anyone looking to upcycle mason jars, offering everything from conversion kits for wine bottles to various wick styles.
- Zip Ties: Heavy-duty, UV-resistant zip ties are recommended for outdoor use. They will be used to secure the pipe hangers to the fence, providing a strong and discreet attachment.
- Decorative Charms or Embellishments: Small glass beachy charms, seashells, beads, twine, or even miniature decorative elements can be strung around the neck of the jars or placed inside. This is where you can truly personalize your lighting.
- Drill and Drill Bits: A power drill is essential for creating the holes in the fence pickets. You’ll need drill bits appropriate for wood and wide enough to accommodate the zip ties.
- Pipe Hangers (3-1/2″ or suitable size): These metal clamps will securely hold the mason jars. Ensure they are the correct size to snugly fit around the jars you’ve chosen.
- Measuring Tape or Ruler: For precise spacing of your mason jars.
- Sharpie Marker or Pencil: For marking drilling points.
- Circular Saw (Optional, for cutting fence): If you need to adjust the length or number of pickets on your fence section. Always prioritize safety when using power tools.
- Children’s Play Sand, Pebbles, or Shells: These are placed at the bottom of the jars for stability and decorative purposes. They also help to absorb any potential oil spills and elevate the wick.
Step-by-Step Guide: Crafting Your Mason Jar Fence Masterpiece
Now that you have your materials, let’s dive into the exciting process of assembling your beautiful mason jar fence lighting. Don’t be intimidated by power tools; they can be incredibly empowering and fun to use!
1. Preparing Your Fence Section
Begin by thoroughly cleaning your old fence section. Remove any loose dirt, cobwebs, or flaking paint. If you desire a more uniform look, you can gently sand the wood and apply a fresh coat of outdoor paint or wood stain. For a truly rustic aesthetic, a simple brush-off is often sufficient. My fence section originally had six pickets, but my plan involved five mason jar lights. This meant a minor adjustment was needed.
While my husband was out, I seized the opportunity to try out a new skill: using a circular saw! (Full disclosure: it was my very first time, and I must say, it was surprisingly exhilarating. Why don’t men ever mention how much fun power tools can be?) I carefully measured and cut off one of the pickets, transforming the six-picket section into a five-picket one. Always ensure you’re following proper safety guidelines when operating power tools, including wearing eye protection and keeping your work area clear.
2. Marking and Drilling Holes for Attachment
With your fence section prepared, it’s time to mark the spots where your mason jars will hang. Consistency in spacing is key for a visually balanced display. My “measuring” technique often involves a bit of artistic eyeballing, followed by a practical verification. I used my tablet cord as a makeshift string to stretch across the boards, ensuring relatively even spacing between the points where each jar would be positioned. Once satisfied with the visual layout, I marked these spots with a Sharpie marker on each picket.
Next, it was time for another power tool adventure – the power drill! This was also a first for me, and just as much fun as the circular saw. Select a drill bit that creates a hole wide enough to comfortably thread your zip ties through. Carefully drill a hole at each marked spot. Take your time, apply steady pressure, and ensure the holes are clean and free of splinters. These holes will serve as the attachment points for your mason jar hangers.
3. Assembling Your Mason Jar Lights
With the fence ready, the focus shifts to preparing the mason jars themselves. This is where your creativity can truly shine. I purchased five 3-1/2″ pipe hangers, one for each jar. These hangers will securely cradle the jars and attach them to the fence.
- Decorative Base: To add stability and a charming aesthetic, I filled the bottom of each mason jar with some children’s play sand and a collection of beautiful shells I had gathered from the Charleston beaches. You could also use small pebbles, colored glass beads, or even coffee beans for a unique aroma when the lamp is lit.
- Adding Embellishments: Around the neck of each jar, I wrapped some wire and attached delicate glass “beachy” charms. This small detail adds a touch of personalized elegance. Consider using twine for a rustic look, ribbons for a pop of color, or even small metal tags.
- Wick and Holder Installation: Insert the wick and its glass holder into the lid of each mason jar. Ensure the wick is centered and secured. The glass holder prevents the wick from falling into the oil and ensures a steady flame.
4. Attaching Jars to the Fence
This stage brings all the elements together. First, position your pipe hangers on the fence at the drilled holes. Thread the zip ties through the drilled holes and around the pipe hangers, securing the hangers firmly to the fence pickets. Ensure they are tight enough to hold the weight of the filled jars without slipping.
Next, take your prepared mason jars (without the oil added yet, for safety during attachment). Carefully screw the pipe hangers to the lids of the jars. It’s crucial to tighten these screws securely to ensure the jars remain safely in place once filled with lamp oil. Double-check each attachment point to verify stability.
5. Adding Lamp Oil and Final Assembly
Once all the jars are securely attached to their lids and the lids to the fence, it’s time to add the lamp oil. Carefully pour the lamp oil into each jar, ensuring you don’t overfill them. Leave enough space for the wick to fully absorb the oil without spilling. Allow the wicks to soak for at least 15-20 minutes before lighting for a steady, even flame. Finally, screw the jars onto their lids, creating a sealed unit. Your enchanting mason jar fence lighting is now complete and ready to illuminate your outdoor space!
Safety First: Important Considerations for Mason Jar Oil Lamps
While incredibly beautiful, oil lamps require careful handling to ensure safety. Always use high-quality lamp oil, never gasoline or other volatile fuels. Keep the wicks trimmed to about 1/4 inch to prevent excessive smoking and large flames. Never leave burning lamps unattended, especially around children or pets. Position your fence lighting away from flammable materials like dry leaves, curtains, or wooden structures, and always ensure a stable placement. If you plan to move the fence section, extinguish the flames and allow the jars to cool completely first. Consider using an outdoor-rated snuffer to extinguish the flames safely.
Beyond the Fence: Creative Variations and Future Enhancements
The completed fence section, beautifully lit with its mason jar lamps (I even tried it with one of my coffee can lights for a test run!), took me just an afternoon from start to finish. I loved that it was a project I could complete in one sitting, offering instant gratification without interruptions. The transformation was remarkable, turning an ordinary fence scrap into a captivating outdoor feature.
While leaning against a wall works for now, I’m already envisioning ways to make this piece even more versatile. I’m exploring options to attach sturdy hangers on the back to serve as “legs.” This would allow the fence to stand freely, making it portable and adaptable to various outdoor settings – whether it’s out in the open yard for a larger gathering or nestled on the porch for a more intimate setting. This added stability would also make it much safer, especially in areas with foot traffic.
My current thoughts lean towards those charming, old-fashioned drawer pulls that are experiencing a delightful resurgence in style, or perhaps some robust hinges that could fold out to provide support. A trip to the hardware store seems imminent, as exploring the aisles often sparks new ideas and solutions. Another fantastic alternative for those who prefer not to use open flames is to replace the lamp oil and wicks with solar-powered mason jar lid lights or battery-operated LED fairy lights. These options offer a similar aesthetic with added convenience and safety, making the project even more adaptable to different preferences and environments.
Ultimately, this project turned out wonderfully, proving that sometimes, simply “winging it” with a clear vision can lead to the most delightful discoveries. And for my husband? Well, he now has a much better understanding of my seemingly endless obsession with saying, “NO…don’t throw that away yet!” Every piece of “clutter” is a potential masterpiece waiting to happen.
Join Our DIY Community: Share Your Creative Lighting Projects!
Did you enjoy embarking on this rewarding mason jar craft journey with us? We’d love to hear your thoughts and experiences in the comments section below! What unique twists would you add to this lighting project? Do you have any other cool DIY projects or upcycling ideas that have transformed your space? Share your creations with our community, and we might even give them a try ourselves!
At DIYProjects.com, we are passionate about fostering creativity and empowering individuals to explore their crafting potential. We believe that doing cool DIY projects – whether it’s intricate craft projects, inspiring home decor ideas, innovative upcycling solutions, delicious recipes, or helpful tutorials – is a fantastic way to connect with your inner maker. Our mission is to inspire you to tap into your creative side and realize just how many incredible things you can accomplish with your own two hands. We’re dedicated to building a vibrant community of DIY enthusiasts where every project, big or small, is celebrated and shared. Join us, and let’s make something amazing together!
Stay connected with our ever-growing community and discover endless inspiration by following us on Facebook, Twitter, Pinterest and Instagram!
More Inspiring DIY Crafts to Illuminate Your World:
Want even more brilliant DIY crafts and decor ideas to brighten your home and garden? Explore these related posts for further inspiration:
Easy DIY Mason Jar Lanterns: Quick & Charming Decor
How to Make a DIY Mason Jar Chandelier: A Dazzling Centerpiece
DIY Pallet Projects: Creative Outdoor Furniture Ideas