
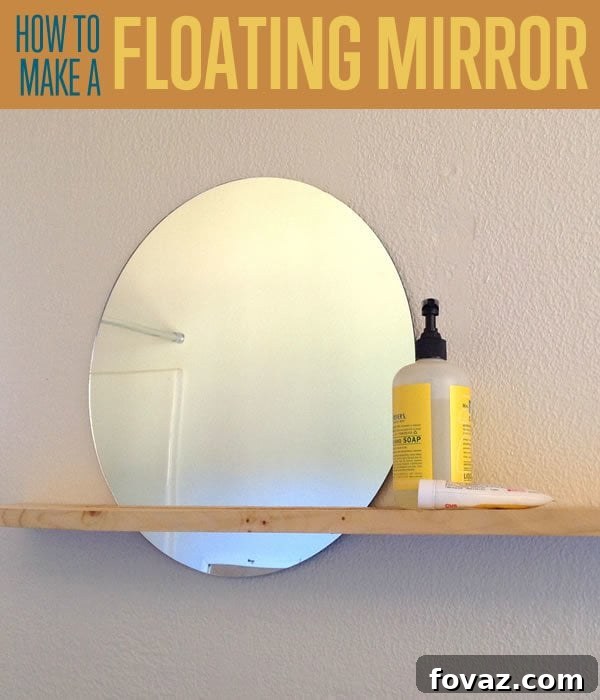
Transform your living space with a touch of modern elegance and innovative design. This DIY Horizon Mirror project offers a sleek, minimalist alternative to traditional medicine cabinets, perfect for those who appreciate clean lines and sophisticated aesthetics. Imagine a mirror seamlessly integrated with a floating shelf, providing both reflection and discreet storage without clutter. While it shines brightly above a bathroom sink, its versatile design makes it a welcome addition to any room, perhaps as an accent over a tall dresser or an eye-catching feature in an entryway. This tutorial guides you through creating a unique piece that not only serves a functional purpose but also acts as a stunning focal point in your home decor.
Why Choose a DIY Horizon Mirror? Elevate Your Home’s Style and Functionality
The Horizon Mirror isn’t just a looking glass; it’s a statement piece. Its ingenious design features an ‘invisible’ shelf, perfectly integrated to display your toiletries, small plants, or decorative items without visible brackets, maintaining a smooth, uninterrupted visual flow. Unlike bulky medicine cabinets that can dominate a wall, this modern mirror brings an open, airy feel to any room. By undertaking this DIY project, you’re not just saving money; you’re infusing your personality into your home. Customization options abound, from the choice of wood and finish to the shelf’s length and mirror size, allowing you to tailor it perfectly to your existing decor. Create a unique, SEO-friendly focal point that visitors will undoubtedly admire, making your space feel more bespoke and thoughtfully designed.
Before You Begin: Essential Skills, Tools, and Safety First
This woodworking project is designed for individuals with some foundational knowledge of power tools and basic carpentry techniques. Beginners are strongly encouraged to seek assistance from an experienced friend or mentor to ensure both safety and successful execution. Working with tools like a table saw and drill requires careful attention to detail and adherence to safety protocols. Always wear appropriate personal protective equipment (PPE), including safety glasses, hearing protection, and gloves. Familiarize yourself with your tools’ operation manuals before starting. Precision is key in woodworking, so take your time, double-check measurements, and prioritize safety at every step. This tutorial will walk you through the process, but your prior experience will contribute significantly to a smooth and enjoyable build.
Supplies for Your DIY Horizon Mirror: Gather Your Materials
To embark on this exciting woodworking adventure and craft your stunning Horizon Mirror, gather the following high-quality materials and essential tools. Having everything prepared beforehand ensures a seamless and efficient building process.
- – 1 1” X 6” wood board (consider premium white-wood for a clean finish and durability)
- – 3/8” diameter dowel, cut into 1.75” pieces. The exact quantity will depend on the length of your shelf and the number of support points needed (refer to STEP 4 for guidance)
- – Table saw (essential for precise cuts and creating the mirror channel)
- – Drill with a 3/8” bit for dowel holes and a countersinking bit for flush screw installation
- – Box of wood screws (appropriate length for wall mounting, typically 2.5-3 inches)
- – Doweling jig (crucial for accurate and perfectly aligned dowel holes)
- – Polyurethane satin finish (or your preferred wood stain/paint for protection and aesthetic appeal)
- – 1 16” round mirror (or a mirror of your desired shape and size)
- – Strong wood glue (for securing dowels)
- – Measuring tape or ruler
- – Pencil for marking
- – Clamps (for securing wood pieces during drilling and marking)
- – Safety glasses and hearing protection
STEP 1: Precision Cutting for Your Shelf Length
Begin by using your table saw to cut your 1” X 6” wood board to the desired length for your mirror’s shelf. The length you choose will largely depend on the available wall space and the intended placement of your mirror. For instance, a 36-inch length offers a generous surface for display and provides ample width to accommodate an off-center mirror. Remember, precise measurements are crucial for a professional-looking finish. Mark your cut line clearly and ensure your table saw fence is set accurately before making the cut. Take your time to achieve a clean, straight cut, as this forms the foundation of your entire project.
STEP 2: Ripping the Board for Your Shelf Components
With your board cut to length, return to the table saw. Carefully rip the board lengthwise into two distinct pieces. You will need one piece that is precisely 1 inch wide and another that is 3 inches wide. The 1-inch piece will serve as the hidden wall-mounting bracket and mirror channel, while the 3-inch piece will form the visible floating shelf. Discard any remaining excess wood. This step requires careful attention to safety, as ripping thin pieces can be challenging. Ensure your saw blade is sharp, and use push sticks to maintain a safe distance from the blade. These two pieces are integral to the unique, invisible shelf design of your Horizon Mirror.
STEP 3: Crafting the Mirror Cutout – The Horizon Channel
This step defines the “horizon” aspect of your mirror. First, determine the exact position where you want your mirror to sit along the length of your shelf. For example, positioning it about 6 inches from the left edge of a 36-inch shelf creates a visually appealing asymmetrical balance. Next, decide how far the bottom edge of your mirror should extend below the shelf. A larger cutout allows the mirror to sit lower, providing more reflective surface above the shelf. For a 16-inch round mirror, a 12-inch long cutout allows approximately 2 inches of the mirror to show below the shelf while leaving ample unobstructed mirror space above for reflection.
Once you’ve finalized your placement and cutout dimensions, mark these on the surface (top) edge of the 1-inch wide piece of wood. Your markings should define the length of the cutout (e.g., 12 inches) and its position along the board’s length. Adjust your table saw’s blade height so it’s just slightly taller than the thickness of your mirror. Position your wood with the marked edge facing you, and the side that will ultimately rest against the wall positioned against the table saw fence for stability. Align your right-hand cutout marking with the saw blade. Carefully run the saw, sliding your 1-inch piece of wood back and forth over the blade. Between each pass, inch the wood slightly to your right, gradually “chewing out” a channel of wood between your two markings. This creates the precise recess for your mirror, ensuring it rests perfectly within the shelf assembly. Exercise extreme caution during this operation, making shallow passes until the desired depth is achieved.
Upon completion, your 1-inch piece of wood should feature a clean, defined channel, ready to cradle your mirror.
STEP 4: Strategic Dowel Placement for Shelf Stability
The dowels are critical for joining your two shelf pieces securely and providing robust support. Carefully select three or more strategic locations along the length of your board for these dowel pieces. It’s imperative that no dowel is positioned directly in front of the mirror cutout, as this would obstruct the mirror. For a 36-inch shelf with an asymmetrically placed mirror (e.g., 6 inches from the left), it’s advisable to place one dowel on the shorter side (left of the mirror) and two on the longer side (right of the mirror) to ensure balanced support. If your mirror is centrally located, an equal number of dowels on each side will work best. For exceptionally long shelves, increase the number of dowels to enhance stability.
To ensure perfect alignment, clamp both your 1-inch and 3-inch shelf pieces together, ensuring the edges that will meet are flush. Mark the dowel positions on the ¾-inch sides of both boards simultaneously. Then, at each mark, draw a small “bulls-eye” by crossing the mark in the absolute center of the board’s thickness. This precision marking will guide your doweling jig in the next step, guaranteeing accurate and strong connections.
STEP 5: Setting Up Your Doweling Jig
The doweling jig is an indispensable tool for drilling perfectly straight and accurately positioned holes. To prepare for drilling, carefully center the ⅜-inch hole of your doweling jig directly over a centered bulls-eye marking on the 3-inch wide piece of your shelf. Secure the jig firmly in place according to its instructions. This setup ensures that your dowel holes will be precisely perpendicular to the wood surface, which is essential for a tight and seamless fit between the two shelf components. Repeat this process for each marked dowel location.
STEP 6: Drilling Dowel Holes with Precision
Now, with the doweling jig securely in place, drill through its ⅜-inch hole into the 3-inch piece of wood. For this piece, drill to a depth of approximately 1.25 inches. As you drill, maintain a steady hand and ensure your drill remains perfectly level to prevent angled holes. Once the first hole is drilled, unscrew the doweling jig and move it to the next bulls-eye mark on the 3-inch piece. It’s crucial to ensure the jig retains its precise alignment to guarantee all holes line up perfectly. Repeat this process for all remaining marks on the 3-inch piece.
Next, move to the 1-inch wide piece of wood. Repeat the drilling process, using the doweling jig over each corresponding bulls-eye. However, for this piece, only drill to a depth of about 0.75 inches. This difference in depth is strategic, allowing the dowels to be glued into one piece while remaining unglued in the other for easier assembly and disassembly during mounting. Should you accidentally drill all the way through the 1-inch piece to the side with the cutout, don’t worry excessively; this side will eventually be against the wall, making any small exit holes invisible once the mirror and shelf are installed.
STEP 7: Preparing for Secure Wall Mounting
To ensure your Horizon Mirror shelf is firmly anchored to the wall, you’ll need to drill mounting holes on the 1-inch piece. On the same side where you drilled your dowel holes, use a countersinking bit to drill holes approximately every 4 inches along the length of the board. While the spacing doesn’t need to be absolutely exact, aim for consistent distribution to provide adequate support for your shelf and any items it will hold. The countersinking bit creates a tapered opening, allowing the screw heads to sit flush with the wood surface, resulting in a cleaner, more professional appearance. These holes will be used to attach the 1-inch piece (the hidden bracket) directly to your wall studs or with appropriate wall anchors.
At this stage, your two meticulously prepared boards should feature a series of precisely drilled dowel holes and countersunk mounting holes, ready for finishing.
STEP 8: Applying the Desired Finish
Now that all cutting and drilling are complete, it’s time to apply your chosen finish to both shelf pieces. A polyurethane satin finish is an excellent choice, offering durable protection and a subtle sheen that enhances the natural beauty of the wood. Alternatively, you might opt for a wood stain to complement your existing decor or paint for a bold, custom look. Apply the finish according to the manufacturer’s instructions, ensuring even coats. Allow each coat to dry completely before applying the next, and consider a light sanding with fine-grit sandpaper between coats for an ultra-smooth, professional result. This step not only protects the wood from moisture and wear but also significantly contributes to the overall aesthetic appeal of your finished mirror.
STEP 9: Pre-Assembly and Dowel Gluing
Before committing to glue, perform a dry fit. Gently pop your cut dowel pieces into the shallower holes on the 1-inch side of your shelf. Then, carefully align and fit the 3-inch side over the protruding dowels from the 1-inch piece. Check to ensure that the two sides of the shelf align seamlessly, with no gaps or misalignment. This test fit is crucial for identifying any issues before the glue sets.
If everything aligns perfectly, you can proceed with gluing. Carefully wiggle the dowels out of the 1-inch side. Apply a small amount of strong wood glue into the holes on the 1-inch piece only, and then insert the dowels firmly into these glued holes. It is essential to *only* glue the dowels into the 1-inch piece. This critical detail ensures that the 3-inch visible shelf piece can still be detached from the 1-inch wall-mounted bracket when it’s time to secure the bracket to the wall. Allow the glue to cure fully according to its instructions before proceeding.
STEP 10: Secure Wall Mounting of the Hidden Bracket
With the dowels firmly glued into the 1-inch piece, it’s now time to attach this hidden bracket to your wall. Position the 1-inch piece against the wall at your desired height, ensuring the side with the mirror cutout is facing upwards, ready to receive the mirror. Using the pre-drilled countersunk holes, screw the bracket firmly into the wall. If you are drilling into drywall, it is highly recommended to use appropriate wall anchors (such as toggle bolts or self-drilling anchors) to provide superior strength and stability, especially if you plan to place heavier items on your shelf. For maximum security, try to align your screws with wall studs if possible. This 1-inch piece acts as the fundamental support for both the shelf and the mirror, so ensure it is level and securely fastened.
STEP 11: Final Assembly and Mirror Installation
Once the 1-inch hidden bracket is securely mounted to the wall, it’s time for the grand reveal. Carefully fit your 3-inch visible shelf piece over the dowels protruding from the wall-mounted bracket. The precise alignment of the dowel holes from Step 6 will ensure a snug and seamless fit, creating your ‘invisible’ floating shelf.
Next, hang your chosen mirror on the wall. The mirror should be positioned so that its bottom edge dips perfectly into the cutout channel you created in the 1-inch piece. You can use various methods to hang your mirror, such as D-rings and picture wire, command strips, or specialized mirror hanging hardware, ensuring it’s securely fastened to the wall directly behind the shelf. Once positioned, step back and admire the elegant simplicity and modern aesthetic of your brand-new DIY Horizon Mirror! Observe how seamlessly the mirror integrates with the floating shelf, enhancing the chic appeal of your space and perhaps making you look even more fabulous.
Beyond the Build: Customization, Maintenance, and Sharing Your Creation
Your newly crafted Horizon Mirror is a testament to your creativity and skill. But the journey doesn’t have to end here! Consider customizing your next build with different wood species like oak or walnut for varied aesthetics, or experiment with unique mirror shapes beyond a simple round design. Varying the shelf length and depth can also adapt this concept to different rooms and storage needs. To maintain its beauty, simply wipe the wood with a damp cloth and a mild cleaner, and use a glass cleaner for the mirror. Regular dusting will keep it looking pristine.
Thank you for following our comprehensive tutorial for creating this super simple yet stunning DIY Horizon Mirror. We hope you found the process as rewarding as the final product is beautiful! We’re eager to see your interpretations and hear about your experiences. Do you have questions or need further clarification on any step? Please don’t hesitate to leave your feedback or inquiries in the comments section below, and our team will get back to you as soon as possible.
Are you dreaming of a fantastic DIY project that you’re yearning to bring to life? Tell us about it! We love exploring creative and inspiring new ideas and might even turn your suggestion into our next tutorial. We’re always on the lookout for fresh talent to join our contributor network, so if you’re passionate about DIY and enjoy sharing your knowledge, please get in touch! We would be thrilled to have you write for us and share your unique projects with our growing community.
Don’t forget to sign up for our newsletter to receive the latest and greatest DIY projects, tips, and inspiration directly in your inbox. Stay connected and keep building!
Connect With Us and Share Your Favorite Projects
Join our vibrant DIY community! Like us on Facebook and pin your favorite projects to Pinterest to share your creations and inspire your friends. Let’s spread the joy of DIY together!
Thanks again, and happy DIY’ing!
Check out some related posts here:
How to Make a Beautiful Butterfly Shadow Box
DIY Patina Projects: Transform Your Decor with Faux Paint Effects
Mason Jar Craft Ideas: How to Make a Charming Terrarium