
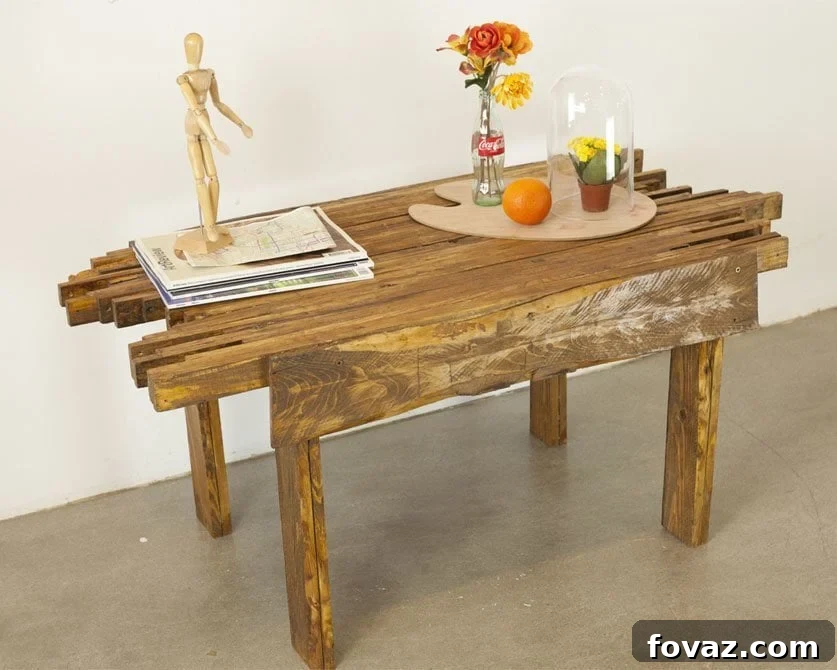
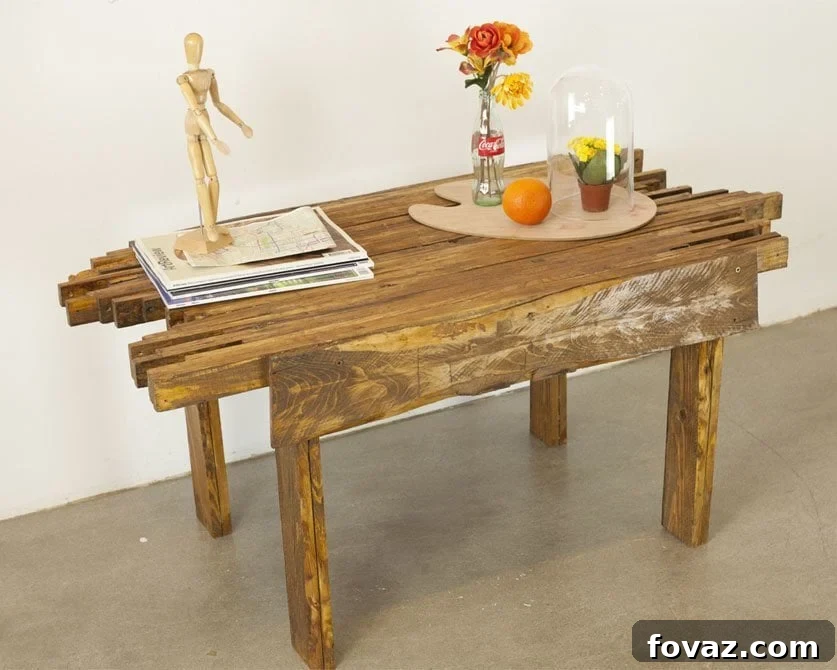
Transforming Pallets: Build a Stunning DIY Pallet Coffee Table
Are you searching for unique, sustainable, and budget-friendly pallet furniture ideas? Look no further! This comprehensive guide will walk you through the exciting process of crafting a beautiful and incredibly sturdy pallet coffee table using just three readily available wood pallets. Unlike many DIY pallet projects that often result in an uneven or wobbly surface, our meticulously designed approach ensures a stable, smooth, and perfectly flat tabletop. This isn’t just another piece of furniture; it’s a conversation starter, a testament to your craftsmanship, and a vibrant addition to any living space. Embrace the art of upcycling, dive into woodworking, and discover the immense satisfaction of creating a functional masterpiece with your own hands. This project is perfect for both seasoned DIY enthusiasts and beginners eager to explore the world of reclaimed wood furniture.

Watch Our Detailed Video Tutorial: Crafting Your Pallet Coffee Table
Essential Supplies for This Wood Pallet Coffee Table Project:
- 3 Wood Pallets: The quantity can be adjusted based on your desired table size and number of pieces needed. Always opt for ‘HT’ (Heat Treated) pallets to ensure they are free from harmful chemicals. Avoid those marked ‘MB’ (Methyl Bromide).
- Hammer: A versatile tool, indispensable for both initial deconstruction and minor adjustments throughout the build.
- Chisel: Key for carefully prying apart stubborn pallet boards, minimizing damage to the reclaimed wood.
- Nail Remover (or Reciprocating Saw with Metal Blade): For safe and efficient extraction of nails. A reciprocating saw can significantly speed up the deconstruction if you are experienced with power tools.
- Circular Saw (or Handsaw): Essential for precise and straight cuts. A circular saw offers speed and uniformity, while a handsaw provides a traditional, accessible alternative.
- Basic Drill: Required for drilling pilot holes and securely fastening screws, crucial for strong joints.
- 4 Clamps (C-Clamps or Bar Clamps): Indispensable for holding pieces firmly in place during gluing and assembly, ensuring strong, even bonds.
- 5/32 inch Drill Bit: The ideal size for creating pilot holes that prevent wood splitting when driving 2 ½ inch screws.
- 2 ½ inch Wood Screws (Small Box): High-quality wood screws are vital for robust and lasting construction.
- Wood Glue: We highly recommend a strong, waterproof wood adhesive like Gorilla Wood Glue or Titebond III. These glues provide exceptional bonding strength suitable for both indoor and potential outdoor use (refer to our video tutorial for specific brand recommendations and application tips).
- Measuring Tape & Pencil: For all your accurate measurement and marking needs.
- Safety Gear: Always wear safety glasses, hearing protection (when using power tools), and sturdy gloves to protect your hands from splinters and nails.
Step 1 – Safely Deconstructing Your Wood Pallets
The journey to a beautiful DIY pallet coffee table begins with the careful deconstruction of your wood pallets. First, acquire your pallets. The more pallets you collect, the greater flexibility you’ll have in terms of table size and design variations. For this specific project, we effectively utilized three standard wood pallets to construct a stylish, low-sitting coffee table – a perfect height for modern living spaces. Remember to select pallets marked ‘HT’ (Heat Treated) to ensure they are safe and free from chemical treatments. Avoid any pallets marked ‘MB’ (Methyl Bromide).

You have a choice for deconstruction: a power saw for speed or hand tools for precision. While a reciprocating saw with a metal-cutting blade is the quickest way to separate the boards, requiring minimal effort, not everyone has access to such a tool. If you’re working with basic tools, a hammer, a sharp chisel, and a reliable nail remover will be your primary companions. This manual method requires patience but is equally effective in salvaging the precious wood.

To manually pry a board, select the one you wish to remove from the pallet. Carefully position the tip of your chisel into the crevice between the board and one of the side rails (stringers). With light, controlled taps from your hammer on the back end of the chisel, gently wedge it deeper into the gap. The goal is to embed the chisel deep enough so it can stand on its own, providing a stable and secure point of leverage. This technique minimizes splitting and preserves the integrity of the wood planks, ensuring more usable material for your pallet woodworking project.

Once the chisel is securely wedged, use the pallet rail as a fulcrum. Apply steady upward pressure to the chisel handle, carefully prying the board away. Work methodically to avoid sudden movements that could damage the wood. Repeat this prying process along the length of the board – specifically targeting the middle and bottom sections – until the board detaches completely from the pallet frame. This systematic approach ensures maximum wood recovery, leaving you with quality planks for your reclaimed wood project.

After you’ve created a pile of detached boards, you’ll undoubtedly find nails still protruding. This is where your nail remover tool becomes essential. Safety is paramount: always wear sturdy work gloves to protect your hands from sharp nails and potential splinters. Efficient and complete nail removal is critical for creating a smooth, safe, and ready-to-use surface for your unique custom coffee table.

To make nail removal easier, use your hammer to gently strike the protruding tip of the nail. This action slightly pushes the nail head upwards, creating a small but crucial gap between the nail head and the wood surface. This gap will allow you to comfortably fit the claw or notch of your nail remover underneath the nail head, preparing it for extraction without forcing or damaging the surrounding wood.


Once the gap is created, firmly insert the nail head into the notch of your nail remover tool. Ensure you have a secure grip on both the tool and the board. Different nail removers have various designs, so understand how yours provides optimal leverage for a clean pull. This firm grip is essential for a successful and controlled removal.

Now, using the robust bar of the nail remover as a lever, apply steady and firm pressure to pull the nail out of the wood. It’s common for the nail to bend during extraction, which indicates the leverage is working. Continue applying pressure until the nail is completely free from the board. Safely collect and discard all removed nails to prevent any future injuries. With all nails expertly removed, your reclaimed wood is now clean, smooth, and perfectly prepared for its transformation into a stunning upcycled coffee table.

Upon completing this meticulous deconstruction process, you will be left with an impressive pile of smooth, nail-free reclaimed wood. This valuable material is now perfectly prepared and awaiting its transformation into your bespoke pallet coffee table!

Step 2 – Preparing the Sturdy Legs for Your Pallet Coffee Table
With your reclaimed wood pile gleaming, the next crucial step is to prepare the foundation of your coffee table: the legs. From your collection of deconstructed boards, carefully select the four best-looking planks and two sturdy pallet rails. These chosen pieces will form the robust and aesthetically pleasing foundation of your DIY furniture project, ensuring both stability and visual appeal. Opt for boards with minimal imperfections and straight grains for the leg components.

To create extra-thick, exceptionally durable legs, you will be laminating boards together. Take two of the selected planks and apply a generous, even layer of high-quality wood glue (such as Gorilla Wood Glue, renowned for its superior bonding strength) to one inside edge. Carefully stack the second board precisely on top of the first, ensuring all edges align perfectly. Repeat this exact process with the other pair of boards. Once the glue has thoroughly dried and cured, you will have two significantly thicker, stronger boards from which to cut your table legs. This double-thickness technique not only enhances the structural integrity and durability but also gives the legs a more substantial, premium, and professional finish.
For optimal adhesion and a truly strong bond, applying consistent pressure during the curing phase is crucial. Place the two newly glued double-thick pieces side by side on a flat, level surface. Utilize several clamps – C-clamps or bar clamps are highly effective – to apply even and firm pressure across the entire length of the glued surfaces. Allow ample drying time, typically several hours or even overnight, strictly adhering to your chosen wood glue’s specific instructions. A strong, cured bond at this stage is absolutely vital for the overall stability and longevity of your finished pallet coffee table design.
Step 3 – Precision Cutting for Your Pallet Coffee Table Top
While your leg components are securely clamped and drying, shift your focus to preparing the individual boards that will form your unique tabletop. Take the remainder of your reclaimed wood boards and prepare to cut them in half lengthwise. Precision is key here: use a measuring tape to find the exact midway point of each board’s width and mark this spot clearly with a pencil. To ensure a perfectly straight cut, make a second mark at the same measured length further down the board, creating a clear reference line.

Once you have your two precise marks, connect them with a straight line using your pencil. A spare, straight-edged board, a carpenter’s square, or a large ruler can serve as an excellent guide to help you draw a perfectly straight line from one end of the board to the other. This meticulous marking process will significantly contribute to a more uniform and visually appealing table top, reducing discrepancies during assembly.


With your cut lines clearly marked, it’s time to cut the boards in half. For maximum speed and efficiency, we highly recommend utilizing a power saw, such as a circular saw. A significant advantage of using a circular saw is its ability to precisely cut multiple stacked boards simultaneously, saving considerable time and effort. If a power saw is not available, a handsaw will work just as effectively, albeit requiring more manual effort and time. Remember, the absolute perfection of these cuts isn’t critical, as these edges will form the underside of your pallet table DIY project and will not be visible in the finished product. Repeat this step for all your remaining boards until you have a generous supply of uniformly halved pallet planks, ready for tabletop assembly.

Step 4 – Assembling and Gluing the Unique Table Top Together
Now for the creative heart of your pallet furniture design: assembling the tabletop. Once all your boards are meticulously cut, take the time to arrange them on a flat surface. Sort them by color variations, interesting grain patterns, and slight differences in size. Experiment with various configurations until you achieve a visually appealing layout that perfectly matches your aesthetic vision. This is your prime opportunity to create that distinctive “staggered look” we highlighted earlier, imbuing your table with a truly unique and handcrafted character that will captivate attention.

Once completely satisfied with your arrangement, carefully flip all the boards over so that what will eventually be the top surface is now facing the ground. It’s common for the exposed, upward-facing side to appear somewhat uneven at this stage, but do not worry! The side currently flush with your work surface is the one that will become your perfectly flat, smooth, and aesthetically pleasing table top after the gluing and curing process. This ingenious method ensures a professional, level finish for your woodworking project.
To manage the gluing process effectively, especially for larger tabletops, it’s beneficial to work in manageable sections. Assess how many boards your clamps can comfortably and securely hold at one time. Divide your entire tabletop arrangement into the fewest possible sections necessary to glue all the pieces together securely and efficiently. In our specific project, utilizing our available vice grips, we found it most effective to partition the tabletop into four distinct sections. This sectional approach prevents the wood glue from drying prematurely and ensures strong, consistent, and durable bonds across the entire tabletop surface.
Take the first section of your carefully partitioned tabletop. Apply a thin, even bead of high-quality wood glue along all touching edges of the individual boards. A helpful tip: if you are gluing together two pieces of slightly different sizes, concentrate the glue application primarily on the smaller piece to minimize excessive squeeze-out. Ensure complete and thorough coverage to achieve a robust and lasting bond between the planks. This step is absolutely vital for the long-term durability and structural integrity of your custom pallet table.

By this stage, your double-thick table legs, prepared in Step 2, should have completely dried and cured. Remove the clamps from the leg pieces and immediately re-purpose them to firmly clamp your first tabletop section together. Begin clamping in the very middle of the section and meticulously work your way outwards, spacing the clamps as evenly as possible along the entire length of the boards. This strategic clamping technique ensures consistent pressure distribution, preventing any bowing or warping, and ultimately results in a perfectly straight, tightly fitted tabletop segment that will maintain its shape long after the glue has fully cured. This attention to detail is what distinguishes a good DIY craft from an exceptional, professional-quality creation.

Once the first section is securely clamped, carefully flip it over to expose what will be the top surface. Promptly wipe away any excess glue that oozes from the cracks or seams. If you’re using a foaming glue like Gorilla Glue, be aware that it will continue to seep and foam even after your initial wipe. You can periodically wipe away the foam as it appears, or for an even cleaner finish, allow it to dry fully and then meticulously chisel off the hardened excess. This crucial step ensures a clean aesthetic and prepares the surface beautifully for any future sanding, staining, or other finishing treatments you envision for your pallet table project.

Step 5 – Expert Assembly of the Robust Table Legs
As the glue on your initial tabletop sections continues its curing process, you can efficiently shift your focus to the final assembly of the table legs. This parallel workflow optimizes your overall building time. Once the first sections of the tabletop are dry, you can proceed to glue the remaining sections using the same meticulous clamping and cleaning process detailed in Step 4. In the interim, let’s assemble those sturdy, double-thick legs!
Retrieve one of the pallet rails you prudently set aside earlier. Measure out a precise length that closely matches the approximate width of your intended coffee table. This rail will serve as the crucial crossbar, connecting your two double-thick leg pieces and providing essential lateral stability. Repeat this precise measurement process with the second rail you put aside. For our specific design, the table was narrow enough that we were able to cut both required sections from a single rail, but having two rails readily available provides flexibility for various table sizes and designs. Always remember the carpenter’s golden rule: “Measure twice, cut once!”

Using your chosen saw – a circular saw for rapid, consistent cuts or a handsaw for careful, deliberate precision – carefully cut these measured sections from the pallet rails. Ensure your cuts are as straight and clean as possible for the best fit and strongest joints. These rail sections will be instrumental in creating a strong, stable, and rigid leg structure for your unique reclaimed wood table, preventing any lateral movement.

Now, take the two double-thick boards you meticulously prepared in Step 2. These substantial pieces will form the primary vertical supports of your table legs. Determine your desired overall table height. For our project, we opted to cut these boards roughly in the middle, which resulted in legs approximately 19 inches tall – a comfortable height for a coffee table. The true beauty of DIY pallet crafts lies in customization, so feel free to adjust the leg length to perfectly suit your personal preference or specific needs. However, it is absolutely crucial that all four leg pieces are cut to the exact same length to ensure a perfectly level and incredibly stable table. Making small, additional cuts and using a precise measuring tool may be necessary to achieve this perfect uniformity.

To assemble each robust leg unit, take one of your precisely cut double-thick leg pieces and position it perpendicularly to one of the rail sections you just cut. The objective is to create a strong ‘L’ shape. To guarantee perfect alignment and ensure the leg is absolutely flush with the rail, you can ingeniously use scrap pieces of pallet wood (or even one of the other leg pieces) as temporary spacers or guides. Position these scraps to ensure both the leg and the rail are perfectly flush with your working surface. Additionally, use the other rail section (or another scrap piece of identical thickness) to prop up the foot end of the leg, ensuring it remains perfectly level with the rail you are fastening it to. This meticulous alignment is paramount for a professional-looking and incredibly stable final product.
Before driving any screws, it is absolutely crucial to drill pilot holes. This vital step prevents the wood from splitting, especially when working with dense, reclaimed, or slightly aged wood. Using your 5/32 inch drill bit, drill two pilot holes directly through the leg piece and deeply into the rail section. Ensure these holes are strategically placed for maximum structural strength and avoid drilling too close to the edges of the wood, which could weaken the joint.

With the pilot holes expertly drilled, take your 2 ½ inch wood screws and use your drill to firmly fasten the leg onto the rail. Drive the screws until they are snug and secure, but be careful to avoid overtightening, which can strip the wood fibers and weaken the joint. Repeat these exact steps to attach the second double-thick leg piece to the opposite end of the same rail, thereby creating one complete and incredibly sturdy leg assembly. Then, meticulously follow these instructions again to construct the second identical leg section using the remaining leg pieces and rail. You’re building a foundation of strength!


Step 6 – Attaching the Robust Legs to Your Beautiful Pallet Tabletop
Congratulations, you’re in the home stretch of building your magnificent pallet coffee table! By now, both of your sturdy leg assemblies should be complete, and all sections of your unique tabletop should have fully cured, showcasing their beautiful staggered design. It’s time to bring these crucial components together to form your magnificent creation. Carefully lay out your cured tabletop sections on a clean, flat work surface in the precise order and configuration you originally envisioned during Step 4. This ensures aesthetic continuity in grain and color, significantly enhancing the table’s overall visual appeal.

Carefully push the tabletop sections together, ensuring they form a single, cohesive, and continuous surface with minimal gaps. The tight clamping and thorough gluing in the previous step should make this relatively easy, creating a strong bond. Once perfectly aligned, gently but firmly flip the entire assembled tabletop over, so the underside is now facing you. Place your pre-assembled leg units onto the bottom side of the tabletop, carefully positioning them exactly where you want them to be, ensuring they are equidistant from the edges for balanced support. Double-check that all tabletop pieces remain tightly pushed together during this placement to maintain the integrity and flushness of your design.

Now for the critical step of fastening the legs to the tabletop. This requires precision and a systematic approach for maximum stability and structural integrity. Begin by firmly attaching the two middle sections of the tabletop to the leg rails. Using your 5/32 inch drill bit, drill pilot holes through each rail and deeply into the corresponding tabletop sections. These pilot holes are absolutely essential to prevent the reclaimed wood from splitting when the screws are driven in, especially near edges. Once the pilot holes are expertly drilled, use your 2 ½ inch screws to firmly fasten the rail to the tabletop, securing these central connections first for foundational strength.

For the crucial corners of the tabletop, an additional, robust fastening technique is employed to significantly enhance stability and prevent any potential wobbling. Instead of drilling straight through, you will drive the screws through the rail at an angle, as precisely demonstrated in the original tutorial video. This diagonal fastening creates a much stronger, interlocking joint, effectively locking the leg assembly into the tabletop corners and virtually eliminating any lateral movement or wobbling. Always drill a diagonal pilot hole first, just as you did for the straight screws, to accurately guide your screw and prevent any splitting of the wood.

Once the diagonal pilot hole is expertly drilled, firmly fasten a 2 ½ inch screw through the leg and securely into the tabletop. Repeat this diagonal fastening technique on the inside of the rail as well, ensuring each corner is braced from two distinct angles for ultimate strength. If you’ve meticulously followed these instructions, each set of legs should be secured with a total of six screws – four straight screws for the main body and two diagonal screws for the corners – providing exceptional rigidity, durability, and stability for your bespoke DIY furniture piece.

Repeat these steps for the remaining three corners of your table until both leg sections are firmly, immovably, and securely attached to the tabletop. After all screws are meticulously in place, gently test the table for any hint of wobbling. If the legs feel at all unstable or wobbly, do not hesitate to add more screws, strategically placed, for extra stability and peace of mind. It is always better to over-secure your furniture than to have an unsteady table. Once completely satisfied with the table’s rock-solid stability, it’s time for the grand reveal!
Now, with a sense of immense pride and accomplishment, gently flip your newly constructed custom pallet coffee table over and stand back to admire your incredible handiwork! You have successfully transformed humble, discarded pallets into a functional, stylish, and durable piece of furniture that you’ve built with your own hands.

For an even smoother, more professional-looking finish, you might notice some slight uneven sections or minor variations on the tabletop, which is a common characteristic when working with reclaimed wood. To achieve a perfectly flat and silky-smooth surface, you can use a wood plane shaver or an orbital sander. Carefully shave down any high spots until the entire tabletop is uniform, level, and pleasing to the touch. This optional but highly recommended extra step truly elevates the quality and feel of your reclaimed wood project.

If you desire a cleaner, more concealed aesthetic for the underside of your table, you can easily hide the leg assembly and screw placements. Simply take a piece of scrap pallet wood – ideally one with an appealing grain pattern – and screw it to the front of the table, creating a decorative skirt that discreetly covers the structural components. This adds another layer of refinement and a polished touch to your unique DIY pallet table.

And there you have it! A truly stunning, cool pallet coffee table with a distinctive staggered top, crafted entirely from repurposed wood pallets. The possibilities for finishing are as endless as your imagination: sand it down to a silky-smooth finish and apply a rich stain to bring out the natural beauty and character of the reclaimed wood, making it a captivating centerpiece for your living room. Alternatively, embrace its rustic charm and use it as a robust, incredibly durable workbench in your garage or workshop, perfect for stacking tools and supplies. This sustainable DIY project not only provides a highly functional and beautiful piece of furniture but also actively contributes to environmental consciousness and celebrates the art of upcycling. Happy Table Making, and enjoy your amazing creation!
 Loved crafting this project?
Stay Connected: Discover More DIY Pallet Projects and Updates!
If you found this guide inspiring and enjoyed the process of creating your own pallet wood furniture, be sure to connect with us on social media! Follow us to never miss out on our latest project updates, innovative DIY articles, and inspiring craft ideas. Join our growing community of makers and discover the endless possibilities of upcycling and creative construction!
Pin It and Save: Your Go-To Resource for Pallet Crafts!
Don’t let these fantastic ideas get lost! Pin this project to your Pinterest boards so you can easily come back to it whenever you’re ready to start building or looking for inspiration. Follow us on Pinterest to receive instant updates on our newest project pins and a constant stream of creative inspirations for pallet wood furniture and beyond. Your next project idea is just a click away!
Ready to Dive Deeper into Pallet Wood Creations? Explore Our Other DIY Pallet Guides!
19 Cool Pallet Projects | Pallet Furniture and More
How to Know if a Pallet is Safe to Use
Free Wood Pallets – Where to get Pallets and Reclaimed Materials
DIY Smoker How To Build A Smokehouse From Pallets for Less than $100
Compost Bin DIY: Quick Pallet Project
Make a Pallet Workbench in Under 2 Hours
Pallet 101: Types, Standard Pallet Size and More
The Easy Way to Deconstruct a Pallet
Your Feedback Matters! Share Your Thoughts in the Comments Below!
We absolutely love hearing from our passionate readers! Share your experiences, ask questions about this project, or simply provide feedback in the comments section below. Your input is invaluable to us. The more engagement and interest we receive on our posts, the more inspired we are to create similar content and bring you even more exciting and innovative pallet DIY ideas and woodworking guides. Your feedback truly helps shape our future projects!