
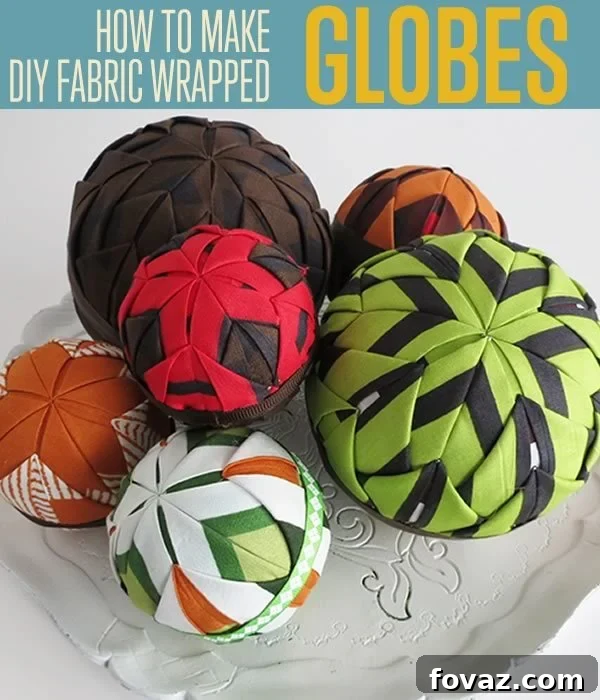
Transforming your living space doesn’t have to be a costly or complicated endeavor. Sometimes, the most charming and personalized decor pieces are those you create yourself, especially when they utilize materials you already have on hand. If you’re looking to inject a burst of color, texture, and unique personality into your home without breaking the bank, then this DIY project is tailor-made for you. We’re about to embark on a delightful crafting journey to create stunning decorative fabric balls – versatile accents that can elevate any room’s aesthetic. The beauty of this project lies in its simplicity and sustainability; you’ll only need a handful of basic supplies, and it’s an excellent way to give new life to your cherished scrap fabrics.
You’ve likely admired these elegant fabric spheres gracing coffee tables, nestled in decorative bowls, or adding a touch of softness to shelves in various homes. Often spotted as minimalist yet striking table decor, they exude a handcrafted charm that store-bought items simply can’t replicate. What many don’t realize is just how incredibly easy they are to make. Interior decorating can sometimes feel daunting, a continuous quest for that perfect piece. However, with our straightforward, step-by-step tutorial, you’ll discover the joy and satisfaction of crafting your own bespoke decor. Get ready to unleash your creativity and witness the remarkable results!
DIY Scrap Fabric Covered Styrofoam Balls: A Guide to Elegant Home Accents
Let’s dive straight into the heart of this creative process. One of the many advantages of this project is its adaptability. You are not confined to a single size; in fact, crafting a collection of varying sizes often yields the most visually appealing display. Think about the aesthetic impact of a cluster of small, medium, and large spheres nestled together – it adds depth and interest. While styrofoam balls are the go-to choice due to their lightweight nature and ease of use, remember that you can technically use any spherical object that readily accepts glue and pins. This opens up possibilities for repurposing old ornaments or even small plastic balls. Now, let’s gather our materials and begin crafting these beautiful, personalized decorative elements!
Essential Supplies You Will Need:
- Styrofoam Balls: Available in various sizes at craft stores. Consider purchasing a mix to create a dynamic display.
- Fabric Scraps: This is where your creativity truly shines! Utilize remnants from old sewing projects, clothing, or even patterned scarves. A variety of patterns, colors, and textures will add visual interest.
- Ribbon: Choose a ribbon that complements your fabric choices. This will be used for a neat finish around the middle seam or to create a hanging loop.
- Straight Pins: Small, sharp pins are crucial for securing fabric without excessive bulk.
- Fabric Scissors: Sharp scissors will ensure clean cuts and prevent fraying.
- Hot Glue Gun & Glue Sticks: Essential for a secure and quick finish, particularly for the ribbon.
- Iron and Ironing Board (Optional but Recommended): For crisp fabric folds.
Step-by-Step Guide to Crafting Your Fabric Spheres
Step 1: Preparing Your Fabric Squares
Begin by cutting your chosen fabric into small squares. The size of these squares will directly correlate with the size of your styrofoam ball and the desired aesthetic. For larger styrofoam balls (e.g., 4-5 inches in diameter), aim for approximately 4” x 4” squares. For smaller balls (e.g., 2-3 inches in diameter), 3” x 3” squares will be more appropriate. Consistency in square size for each ball will contribute to a more uniform and polished final look. Don’t worry if they’re not perfectly precise; a slight variation adds to the handmade charm.
Step 2: Folding and Pressing Your Fabric
Take each fabric square and fold it in quarters, ensuring the “right” or decorative side of the fabric is facing outwards. Once folded, it’s highly recommended to press these folds with an iron. Ironing creates crisp creases, which not only makes the fabric easier to handle during the pinning process but also contributes to a neater, more professional finish on your decorative ball. This small step makes a significant difference in the overall quality of your finished product.
Step 3: Initiating the Fabric Application
Unfold one of your prepared fabric squares. Locate the precise center of the square and firmly insert a straight pin through it. With the pin now securely holding the fabric at its center, push the pin into the styrofoam ball. Position this first fabric square at the very top (or any starting point) of your styrofoam ball. This initial placement is key to anchoring your design.
Step 4: Securing the First Fabric Layer
Once the central pin is in place, gently fold the fabric over the top of this first pin. This creates a neat, covered center. To further secure this initial fabric square, place a second pin a short distance lower down from the first, pushing it into the styrofoam ball through the folded fabric. This ensures that the fabric remains taut and in position as you continue building your design.
Step 5: Forming the First Diagonal Fold
Now, take one of the sides of the fabric square and fold it diagonally. This diagonal fold should extend from the top center towards the side, creating a triangular point. Once you have the desired diagonal shape, fasten the edge of this fold with another pin, pushing it firmly into the styrofoam ball. This begins to define the segmented, patterned look of your fabric ball.
Step 6: Completing the First Triangular Segment
Repeat the diagonal folding process with the opposite side of the fabric square. Fold it diagonally, mirroring the previous step. Secure this second diagonal fold with a pin along its edge, pressing it into the styrofoam. At this point, your first fabric square should be secured to the styrofoam ball, forming a distinct, neat triangular segment.
Step 7: Building the Top Layer of Triangles
You have now successfully created your first triangular fabric segment. To cover the top portion of the styrofoam ball, you will repeat steps 3 through 6. Typically, four such triangles will perfectly cover the uppermost section of most standard-sized styrofoam balls, creating a cohesive, symmetrical peak. Ensure each new triangle slightly overlaps the previous one to avoid any visible gaps in the styrofoam.
Step 8: Beginning the Second Row of Triangles
With the first row of triangles complete, it’s time to start the second layer, which will add depth and continue the pattern around the ball. To achieve a seamless, staggered look, position the next fabric square so that its center falls approximately halfway between two of the sides of the triangles from the previous row. This creates an interlocking pattern that completely conceals the styrofoam.
Step 9: Securing the Second Row’s Fabric Base
Just as you did with the first row, take the new fabric square, stick a pin through its center, and push it into the styrofoam ball at your chosen position (halfway between the first row’s triangles). Fold the fabric over the pin to conceal it, and then add a second pin a bit lower to securely fasten the fabric square to the ball. This establishes the foundation for the next set of fabric triangles.
Step 10: Folding the Second Row’s Diagonal Edges
Now, fold both sides of this newly pinned fabric square diagonally, just as you did in Step 5 and 6. Fasten each of these diagonal edges with pins, pushing them into the styrofoam. You should now have another distinct triangular segment, but this one will be positioned to interlock with the first row, creating a beautiful overlapping effect.
Step 11: Covering the Ball with the Second Row
Continue repeating steps 8 through 10 to completely cover the styrofoam ball with the second row of triangles. Work your way around the ball, ensuring each new triangle is neatly positioned halfway between the segments of the previous row. This meticulous placement is key to achieving a professional and attractive finish.
Step 12: Adding the Third Row and Beyond
Proceed to make a third row of triangles, following the same method as before. Continue this process, adding subsequent rows of triangles, always aiming to place them in an overlapping, staggered pattern to ensure full coverage of the styrofoam ball. The goal is to carefully position each triangle to minimize gaps and maintain a consistent, appealing pattern.
Step 13: Reaching the Midpoint Coverage
Continue adding rows of fabric triangles until approximately half of the styrofoam ball is fully covered. The number of rows required will vary depending on the size of your styrofoam ball and the dimensions of your fabric squares. For example, a medium-sized ball might require five rows of triangles to reach this halfway point, as demonstrated in many tutorials.
Step 14: Trimming Excess Fabric at the Midpoint
Once half of the ball is covered, carefully inspect the edges of the fabric pieces that extend beyond the exact halfway line of the ball. Using your fabric scissors, trim away any excess fabric to create a relatively straight and even line around the circumference of the ball. Add a few extra pins along this trimmed edge if necessary to ensure all fabric pieces are securely fastened and prevent any lifting or unraveling.
Step 15: Covering the Remaining Half of the Ball
Now, you will repeat the entire fabric application process (steps 3 to 14) for the other half of the styrofoam ball. Start from the opposite pole and work your way down towards the trimmed edge you just created. Maintain the same attention to detail and overlapping technique to ensure a consistent look across both halves of the ball.
Step 16: The Finishing Touch with Ribbon
With both halves of your styrofoam ball covered in fabric, it’s time for the final, elegant touch. You will notice a seam or line where the two halves of fabric meet around the ball’s circumference. Using your hot glue gun, carefully apply a thin bead of hot glue along this seam. Press your chosen ribbon firmly onto the glue, ensuring it covers the seam completely and creates a neat, polished finish. Trim any excess ribbon, making sure the ends meet seamlessly. You can also form a small loop with the ribbon before gluing to create a hanging ornament.
Unleash Your Creativity: Variations and Display Ideas
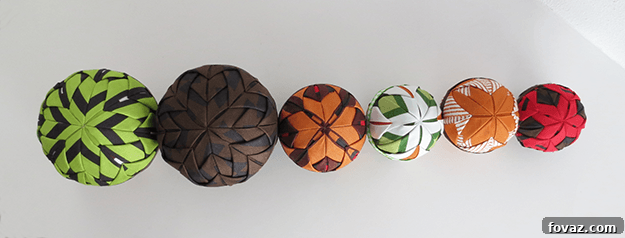
The beauty of these handmade fabric balls lies in their immense versatility. You can truly make them your own by experimenting with any size styrofoam ball, a kaleidoscope of colors, and a diverse range of fabric patterns. Imagine the texture added by a mix of cottons, silks, or even velvet scraps! Don’t shy away from mixing and matching patterns – a plaid with a floral, or a solid with a subtle stripe, can create a surprisingly sophisticated look. For an extra touch of charm, consider adding a small ribbon loop to the top, transforming them into hangable ornaments for a Christmas tree, a decorative garland, or even unique gift toppers.
Once your beautiful fabric creations are complete, the possibilities for displaying them are endless. Arrange a collection of varying sizes and patterns in a decorative bowl or basket for an inviting coffee table centerpiece. Group them on a tiered tray alongside candles and small trinkets for a rustic or farmhouse vibe. Place individual balls on bookshelves or mantels to add soft texture and a pop of color. For seasonal decor, choose fabrics that match the holiday theme – reds and greens for Christmas, pastels for Easter, or oranges and browns for autumn. You can even string them together to create a charming fabric garland!
This project is more than just a craft; it’s an opportunity to infuse your personal style into your home decor, to be environmentally conscious by repurposing fabrics, and to enjoy a therapeutic creative process. We are always thrilled to see the unique twists and personal touches our readers add to their DIY projects. Please share how your decorative fabric balls turned out! If you have your own blog or creative space you’d like to share, let us know in the comments section below, and we’ll be sure to check it out. Do you have a specific craft idea you’d love to see us attempt? Your feedback fuels our creativity, so don’t hesitate to share your thoughts and suggestions. The more you engage, the more we’re inspired to bring you exciting new craft projects like this in the future.
Stay Connected for More Inspiring DIY Projects!
Be sure to like us on Facebook to get all the latest and greatest DIY projects, home decor ideas, and crafting tips delivered straight to your feed. And don’t forget to pin your favorite projects to Pinterest to share with your friends and build your own creative inspiration boards!
Thank you for joining us on this creative journey, and happy DIY’ing!
Here are some fun related projects to spark your next creative adventure: