
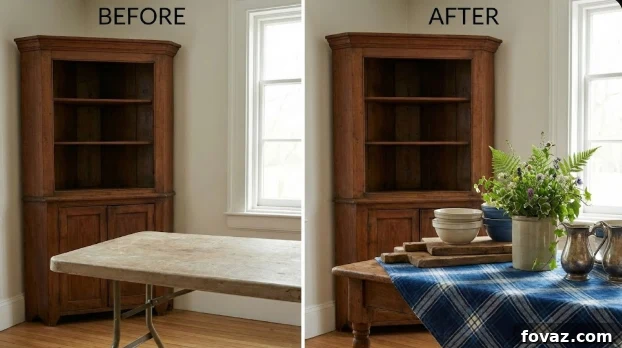
Embrace the Mini Reni Trend: Quick, Budget-Friendly Furniture Transformations
Tired of extensive, costly home renovations? This year, the focus shifts from grand, drawn-out projects to the refreshingly simple and impactful concept of “Mini Renis.” These small-scale renovations, championed by design icon Joanna Gaines, offer a smart way to update your living spaces without the need for demolition, construction skills, or a hefty budget. A Mini Reni allows you to breathe new life into a room or even a single piece of furniture in a matter of hours or days, proving that significant change doesn’t always require significant effort or expense.
- Mini Renis are swift, small-scale makeovers, celebrated by Joanna Gaines, designed to refresh any space in about a week using cosmetic updates.
- The Art Forward Vignette offers an instant focal point for any flat surface, utilizing thrifted easels and textured art in just 20 minutes.
- The Heritage Table Reset transforms a dining area with layered plaid runners and stoneware, creating a beautifully styled tablescape in 60 minutes.
- The Scalloped Cloud Shelf project elevates plain shelves with pre-cut scallop trim and a fresh coat of paint, completed in approximately 2 hours.
- Each Mini Reni project detailed here costs under $50 and requires no specialized tools, demolition, or construction expertise, making them accessible for everyone.
What Exactly Is a Mini Reni in Home Decor?
A Mini Reni, short for “mini renovation,” signifies a small-scale makeover strategy focused on cosmetic updates rather than structural changes or full-blown construction. Imagine refreshing a room with new paint colors, updated trim work, thoughtful furniture rearrangement, and strategic styling – all without knocking down walls or replacing major systems. It’s about maximizing impact with minimal disruption.
This innovative concept gained widespread popularity thanks to Joanna Gaines and her hit Magnolia Network show, “Mini Reni,” which debuted in 2023. The show captivated audiences by demonstrating that a truly transformative home update doesn’t demand months of construction or an exorbitant budget. In each episode, Joanna masterfully refreshes three distinct rooms within a single week, employing ingenious budget-friendly cosmetic adjustments that deliver stunning results.
The core philosophy underpinning Mini Renis is simple yet powerful: “refresh, don’t rebuild.” While Joanna often applies this approach to comprehensive room makeovers – such as reimagining kitchens, dining rooms, and living areas without the chaos of demolition days – the versatility of the Mini Reni concept extends beautifully to smaller, more focused projects. This philosophy can be perfectly applied to individual furniture pieces, curated styling vignettes, or even the transformation of a single accent wall, allowing for immediate gratification and impressive visual impact.
Beyond the aesthetic appeal, Mini Renis offer a sustainable alternative to constant buying and replacing. By focusing on updating existing pieces and spaces, homeowners can reduce waste and embrace the charm of personalized, curated interiors. It’s a movement that encourages creativity, resourcefulness, and a deeper connection to your home.
Unlock Your Creativity: How to Apply a Mini Reni to Your Furniture
Furniture pieces often serve as the backbone of a room’s design, yet they can be the first to signal a dated aesthetic. The brilliance of a furniture Mini Reni lies in its targeted approach: identify the single element that makes a piece feel old or tired, then focus your efforts solely on remedying that specific issue. This method prevents overwhelm and ensures a quick, satisfying transformation. Ready to revitalize your home? Here are three inspiring projects you can tackle this very weekend, turning ordinary furniture into extraordinary statements.
Project 1: The Art Forward Vignette (Estimated Time: 20 Minutes)

Creating an instant focal point in your home doesn’t require commissioning expensive art or investing in elaborate frames. This Mini Reni project demonstrates how a humble, thrifted tabletop easel can become the star of your display. Paired with textured art – whether a store-bought piece or a simple DIY creation – this vignette achieves a gallery-worthy finish that feels both sophisticated and personal.
The Core Mini Reni Concept: A thrifted tabletop easel combined with a textured canvas equals an instant focal point that radiates luxury and artistic flair without the high cost.
Ideal Surfaces for Styling: This project is perfect for any console table, mantelpiece, bookshelf, or entry table that currently appears plain, uninspired, or lacking visual interest.
Materials You’ll Need:
- Thrifted Tabletop Easel: Look for wood or metal easels, ideally 12-18 inches tall. (Estimated Cost: $5-10)
- Textured Canvas Art or Blank Canvas Board: An 8×10 or 11×14 inch canvas with visible texture. (Estimated Cost: $8-15 if purchased, $5 if DIY)
- Acrylic Paint (Optional for DIY Art): 2-3 neutral tones (e.g., white, beige, grey, soft black). (Estimated Cost: $3-6)
- Palette Knife or Old Credit Card: Essential for creating textured effects with paint.
- Decorative Base Objects (2-3 items): A small candle, a tiny plant, a vintage book, or a decorative stone. (Estimated Cost: $0-15, often found around your home)
- Small Wooden Tray or Board (Optional): To serve as a cohesive base for your vignette. (Estimated Cost: $8-12)
Step-by-Step Tutorial: Elevating Your Display in Minutes
- Discover and Prepare Your Thrifted Easel: Embark on a treasure hunt at your local thrift store, scouting the art supply or home decor sections for a small tabletop easel. Once acquired, give it a thorough wipe-down with a damp cloth to remove any dust or grime, ensuring a clean foundation.
- Curate or Create Your Textured Art Piece: Select an abstract canvas featuring prominent texture and neutral colors. Alternatively, unleash your inner artist by applying thick layers of acrylic paint onto a blank canvas board using a palette knife or an old credit card, creating sweeping, expressive strokes for a unique textured finish.
- Strategic Easel Placement: Position the easel slightly off-center on your chosen surface – avoid placing it dead center. This creates a more dynamic and natural arrangement. Ensure ample space remains on one or both sides for accompanying decorative objects.
- Angle Your Canvas: Gently rest your textured art piece on the easel, angling it back slightly. This allows it to lean naturally and gracefully, preventing any forward tipping and achieving that effortless, curated look.
- Integrate Supporting Base Objects: Thoughtfully arrange 2-3 small decorative items around the base of the easel. Consider a delicate candle, a touch of greenery in a simple vase, or a stack of charming vintage books. Crucially, ensure these objects remain lower in height than your canvas, allowing the artwork to command attention.
- Refine and Balance Your Vignette: Take a step back and observe your creation from a distance. Assess the balance and flow of the arrangement. Adjust the placement of your objects as needed until the entire vignette feels organic and cohesive, as if it evolved naturally rather than being rigidly staged.
Joanna’s Mini Reni Secret for Vignettes: Always work with odd numbers (e.g., 1 easel + 2 side objects, or 1 easel + 1 candle + 1 plant) and vary the heights of your elements. This intentional asymmetry is key to achieving that coveted “unscripted” and effortlessly chic vibe that Joanna Gaines so perfectly embodies.
Total Active Time: 20 minutes
Estimated Total Cost: $15-40
Project 2: The Heritage Table Reset (Estimated Time: 60 Minutes)
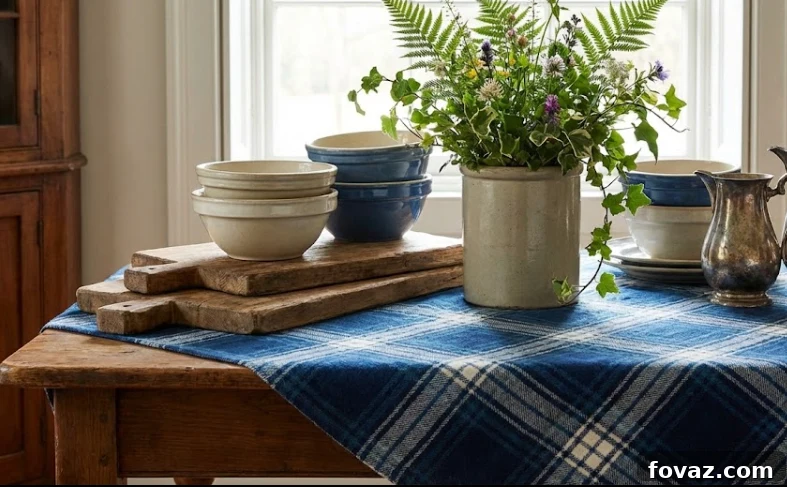
Joanna Gaines is renowned for her masterful approach to layered tablescapes, creating inviting and visually rich dining experiences. This Mini Reni project demonstrates that you don’t need expensive china or a degree in interior styling to replicate her signature look. A strategically placed plaid runner instantly infuses a warm, modern farmhouse aesthetic, while carefully layered stoneware pieces evoke a charming vintage feel without the prohibitive cost of actual heirlooms.
The Core Mini Reni Concept: A classic plaid runner paired with beautifully layered stoneware creates a styled tablescape that looks meticulously arranged over days, but takes mere minutes.
Ideal Tables for Styling: This project is perfect for any dining table or kitchen table that currently sits bare, awaiting a touch of warmth and personality.
Materials You’ll Need:
- Plaid Table Runner: Choose a buffalo check, gingham, or tartan pattern, approximately 72-90 inches long to ensure proper overhang. (Estimated Cost: $15-25)
- Stoneware Dinner Plates: 4-8 plates in versatile neutral tones (e.g., cream, beige, soft gray), depending on your table size. (Estimated Cost: $20-40 for a set)
- Stoneware Bowls: To match or thoughtfully coordinate with your dinner plates. (Estimated Cost: $15-30 for a set)
- Cloth Napkins: Linen or cotton in coordinating colors to add a touch of softness. (Estimated Cost: $10-20 for a set of 4-8)
- Flatware Set: Utilize the flatware you already own. (Estimated Cost: $0)
- Centerpiece Elements: Pillar candles of varying heights, fresh or faux eucalyptus stems, a small wooden bowl, or seasonal natural elements. (Estimated Cost: $10-20)
- Charger Plates (Optional): In natural materials such as wood or woven rattan, for an added layer of texture and sophistication. (Estimated Cost: $20-40 for a set)
Step-by-Step Tutorial: Crafting a Collected Tabletop
- Position Your Plaid Runner: Carefully drape your chosen plaid runner lengthwise down the precise center of your table. Ensure an even overhang of about 6-12 inches on both ends for a balanced and inviting look.
- Place Dinner Plates: At each seating position, place one stoneware dinner plate directly onto the table. If you’re incorporating charger plates, slide them underneath the dinner plates now. Ensure even spacing between each setting.
- Layer with Bowls: Center a stoneware bowl on top of each dinner plate. This classic layering technique is a hallmark of Joanna’s signature tablescapes, adding depth and visual interest.
- Fold and Place Napkins: Neatly fold your cloth napkins into simple rectangles. You can choose to place them either artfully inside each bowl or elegantly to the left of each individual place setting.
- Arrange Flatware: Position forks on the left side of each plate, and knives and spoons on the right. Aim for a relaxed, approachable placement rather than a stiffly formal arrangement, reflecting the lived-in charm of a Mini Reni.
- Construct Your Centerpiece: Along the length of the runner, arrange 2-3 pillar candles of varying heights. Tuck fresh or high-quality faux eucalyptus stems between the candles to introduce organic movement and a touch of natural beauty.
- Add Optional Charger Plates or Accents: If you decided to use charger plates, ensure they are neatly positioned under the dinner plates for that extra layer of texture and visual weight.
- Refine and Balance: Take a moment to walk around your table. Observe the sightlines across the table – can guests easily converse? Adjust any objects that appear too crowded or too sparse, aiming for an overall sense of comfortable balance and natural flow.
Joanna’s Mini Reni Secret for Tablescapes: Don’t get caught up in perfecting complex napkin folds or obsessing over millimeter-perfect spacing. The beauty of the Heritage Table Reset lies in its ability to look “collected” and wonderfully lived-in. Opt for neutral stoneware (creams, beiges, soft grays) to allow the plaid runner to truly shine as the star of your table without competing colors. This Mini Reni is remarkably versatile, perfectly suited for both everyday family meals and special occasions, striking that coveted balance between casual comfort and elevated style.
Total Active Time: 60 minutes
Estimated Total Cost: $40-50 (potentially less if you already own stoneware and linens)
DII Give Thanks Plaid Fall Table Decor, Autumn & Thanksgiving Tabletop Linens, 14×108 Table Runner
- FOR YOUR TABLE: This table runner measures 14×108″ in size, appropriate for a table that can seat 4-8 people.
- EASY CARE: Made from 100% cotton, machine wash on a gentle cycle, tumble dry low, and iron on low heat if needed for easy maintenance.
Buy on Amazon
(As an Amazon Associate, we earn from qualifying purchases.)
Project 3: The Scalloped Cloud Shelf (Estimated Time: 2 Hours)
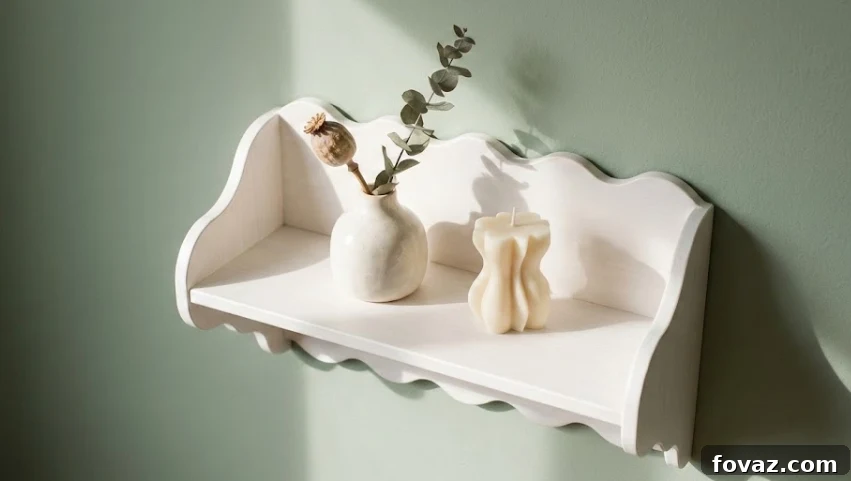
This particular Mini Reni project has the remarkable power to make people believe you’ve invested in a custom carpenter. The secret? Readily available pre-cut scallop trim, often sold by the foot at craft stores, which simply glues onto the front edge of an otherwise plain shelf. A fresh coat of paint then cohesively ties the entire piece together, creating a sophisticated, custom look. The best part? No advanced sawing skills are required beyond a single, simple straight cut.
The Core Mini Reni Concept: Pre-cut scallop trim combined with a fresh coat of paint results in a custom-looking shelf that instantly elevates any wall in your home.
Ideal Shelves for Transformation: This project is perfectly suited for any plain floating shelf, basic wall shelf, or a thrifted shelf that currently appears builder-grade, lacking character, or simply boring.
Materials You’ll Need:
- Plain Floating or Wall Shelf: New or thrifted, ideally 24-36 inches long. (Estimated Cost: $10-20)
- Pre-cut Scallop Wood Trim: Available by the foot at most craft or hardware stores. Ensure you purchase enough to cover the entire front edge of your shelf. (Estimated Cost: $8-12)
- Wood Glue or Construction Adhesive: For strong, lasting adhesion of the trim. (Estimated Cost: $4-6)
- Chalk Paint or Latex Paint: 1 pint in your chosen color. Chalk paint offers a forgiving, matte finish, while latex paint provides durability. (Estimated Cost: $8-15)
- 220-Grit Sandpaper: For light scuffing and smoothing. (Estimated Cost: $3-5)
- Paintbrush or Foam Brush: Approximately 2 inches wide for even application. (Estimated Cost: $3-5)
- Measuring Tape: For accurate measurements.
- Miter Saw or Hand Saw: For one clean, straight cut. (Estimated Cost: $0 if borrowing, or ask your hardware store for a cut service)
- Small Finishing Nails or Brad Nailer (Optional): For additional security and hold. (Estimated Cost: $5-10)
- Tack Cloth: Essential for removing fine dust particles before painting. (Estimated Cost: $2-4)
Step-by-Step Tutorial: Crafting Your Custom Shelf
- Prepare Your Shelf: If your shelf is already installed, carefully remove it from the wall. Using 220-grit sandpaper, lightly sand all surfaces of the shelf. This “scuffing” creates a rougher texture, allowing the paint and glue to adhere properly for a durable finish.
- Measure the Shelf’s Front Edge: With your measuring tape, precisely determine the exact length of the front edge of your shelf – this is where the scallop trim will be attached. Accuracy here is key for a seamless look.
- Cut the Scallop Trim: Using either a miter saw for precision or a hand saw for a simple straight cut, carefully cut your pre-cut scallop trim to the exact measurement obtained in Step 2. Aim for a clean, straight edge.
- Apply Wood Glue to Trim: Squeeze a continuous, even bead of wood glue along the entire flat back surface of your scallop trim piece. For optimal adhesion, spread the glue evenly across the surface using your finger or a scrap piece of cardboard.
- Affix Trim to Shelf: Carefully align the scallop trim with the front edge of your shelf. Press it firmly into place, holding it steady for 30-60 seconds to ensure a strong initial bond. Take your time to get the alignment perfect.
- Optional: Secure with Finishing Nails: For enhanced durability and peace of mind, consider tapping 3-4 small finishing nails through the trim into the shelf edge, spacing them evenly. Alternatively, if you have access to a brad nailer, this offers an even quicker and more secure method.
- Allow Adhesive to Cure: Set the shelf aside on a flat, protected surface and allow the wood glue to cure for at least 30 minutes. Always consult your specific glue bottle for precise curing times to ensure maximum strength.
- Apply First Coat of Paint: Once the glue has sufficiently cured, apply your first coat of paint to the entire shelf, meticulously covering both the shelf surface and the newly attached scallop trim. Use long, smooth brush strokes, always painting in the direction of the wood grain for a professional finish.
- Apply Second Coat: Allow the first coat of paint to dry completely to the touch, which typically takes 2-3 hours. Once dry, apply a second coat of paint. This ensures full, even coverage and a polished, professional appearance.
- Cure and Rehang: Let the paint cure overnight, ideally for 24 hours, to achieve full hardness and durability. Once fully cured, reinstall your beautifully transformed shelf on the wall. Finally, style it with your favorite books, small potted plants, or other decorative objects to complete your elevated display.
Joanna’s Mini Reni Secret for Shelves: When selecting scallop trim, opt for designs with soft, gentle, cloud-like curves rather than sharp, dramatic scallops. This subtle choice perfectly captures that beloved modern farmhouse vibe that Joanna Gaines adores. Crucially, paint the entire shelf – both the shelf surface and the scallop trim – in one cohesive color. This approach prevents visual competition; the unique scallop shape itself provides ample visual interest. Classic Mini Reni shelf colors like soft white, creamy beige, soothing sage green, or warm gray are always excellent choices, seamlessly integrating into any room’s decor.
Total Active Time: 2 hours (plus overnight cure time)
Estimated Total Cost: $35-50
Sandpaper 220 Grit, Wet Dry Sanding Sheets 9 x 3.6 Inch for Wood Furniture Finishing, Metal Sanding…
- High-Precision Abrasive Paper: This Shineboc 9×3.6 inch sandpaper set comes with 21 sheets of 220 grit, ideal for various finishing tasks.
- Premium Material: Crafted from high-quality silicon carbide and electrostatically coated to provide a consistent, effective sanding experience.
Buy on Amazon
(As an Amazon Associate, we earn from qualifying purchases.)
The Philosophy of Mini Renis: More Than Just a Quick Fix
Beyond the immediate visual appeal, the Mini Reni philosophy represents a shift in how we approach home design. It’s about empowerment—showing homeowners that they have the ability to transform their spaces without needing professional help or a vast budget. This approach fosters a sense of accomplishment and encourages creativity, turning decorating into an accessible and enjoyable hobby rather than a daunting chore.
Furthermore, Mini Renis align with principles of sustainability. By opting to refresh existing furniture and decor rather than constantly buying new, we contribute to reducing waste and promoting a more eco-conscious lifestyle. Upcycling and repurposing are core tenets of this trend, giving beloved items a second life and injecting unique character into our homes.
This trend also taps into the desire for personalization. In a world of mass-produced goods, Mini Renis allow individuals to inject their unique personality and style into every corner of their home. Each project, no matter how small, becomes an expression of personal taste, creating spaces that truly reflect who we are.
Why Choose a Mini Reni for Your Furniture?
Furniture Mini Renis offer a compelling array of benefits that make them an ideal choice for anyone looking to update their home. Here’s why this approach stands out:
- Cost-Effectiveness: Dramatically reduce expenses compared to buying new furniture or undertaking major renovations. Many projects utilize thrifted items or materials you already own.
- Time-Saving: Complete impressive transformations in a single weekend, or even a few hours, rather than weeks or months of disruption.
- Skill-Level Accessibility: Designed for beginners and experienced DIYers alike, Mini Renis require minimal tools and specialized skills. They are a fantastic entry point into the world of home improvement.
- Immediate Gratification: Witness a significant visual change almost instantly, providing a powerful boost to your home’s aesthetic and your personal morale.
- Sustainability and Upcycling: Give old or dated furniture a new lease on life, preventing items from ending up in landfills and contributing to a greener planet.
- Personalized Style: Infuse your unique taste and personality into your decor, creating a home that truly feels like “you” rather than a showroom.
- Low Commitment: Experiment with new styles or trends without the pressure of a long-term, expensive investment. If your tastes change, another Mini Reni is always an option!
General Tips for Successful Furniture Mini Renis
To ensure your Mini Reni projects go smoothly and achieve professional-looking results, consider these general tips:
- Plan Ahead: Even for small projects, a little planning goes a long way. Gather all your materials before you start to avoid interruptions.
- Clean Thoroughly: Always start with a clean surface. Dust, grime, or old residue can prevent paint and glue from adhering properly.
- Prep Properly: Don’t skip steps like light sanding or priming if recommended for your chosen paint. Proper prep ensures durability and a smooth finish.
- Embrace Imperfection: Part of the charm of DIY and upcycled pieces is their unique character. Don’t strive for factory perfection; embrace the handmade touch.
- Consider Color Palettes: Stick to a cohesive color palette within your home or a specific room. Neutral tones are often the safest and most versatile for Mini Renis.
- Thrift Store Savvy: Frequent local thrift stores, antique shops, and flea markets. They are treasure troves for unique, affordable items that are perfect for Mini Renis.
- Seek Inspiration: Browse design magazines, Pinterest, and Instagram for ideas. Save images of looks you love and try to identify the key elements that make them appealing.
- Take Your Time (Within Limits): While Mini Renis are quick, rushing crucial steps like drying or curing times can compromise the end result. Follow product instructions carefully.
Mini Reni Projects FAQs
What is a Mini Reni?
A Mini Reni (mini renovation) is a highly effective, small-scale makeover that completely transforms a room or specific space, typically within about a week. It focuses on cosmetic updates such as painting, strategic styling, adding trim work, and rearranging furniture, rather than requiring any disruptive demolition or extensive construction. Joanna Gaines famously popularized Mini Renis on her Magnolia Network show as an accessible, faster, and more affordable alternative to large-scale, “Fixer Upper”-style gut renovations. The core principle of a Mini Reni is to refresh and revitalize a space with minimal fuss and maximum impact.
How long do furniture Mini Renis take?
Furniture-focused Mini Renis are designed for efficiency, typically requiring anywhere from 20 minutes to 2 hours of active hands-on work, depending on the specific project’s complexity and your chosen approach. For instance, “The Art Forward Vignette” can be conceptualized and styled in as little as 20 minutes from start to finish. “The Heritage Table Reset” takes approximately 60 minutes to layer and arrange all its elements. “The Scalloped Cloud Shelf,” while requiring about 2 hours of hands-on effort, also needs additional overnight cure time for the paint. While Joanna Gaines completes entire room Mini Renis (often three distinct spaces) within a single week on her show, these smaller, single-project furniture Mini Renis are perfectly suited to fit into a relaxing weekend afternoon, without consuming your entire month.
What supplies do I need for Mini Renis?
One of the many appealing aspects of Mini Renis is their accessibility in terms of supplies. Basic Mini Reni supplies typically include common household items that you likely already own or can easily borrow from a friend or neighbor: paintbrushes, sandpaper, wood glue, a measuring tape, and other fundamental hand tools. Unlike major renovations that often demand specialized power tools, contractor-grade materials, and highly specific equipment, Mini Renis generally rely on simple, readily available materials. This makes them incredibly approachable for beginners and allows anyone to confidently tackle these transformative projects.
What kind of furniture works best for Mini Renis?
Mini Renis are incredibly versatile and can be applied to a wide range of furniture pieces. The best candidates are often those that are structurally sound but visually dated, plain, or just need a personality boost. Think wooden dressers, console tables, bookshelves, nightstands, coffee tables, dining chairs, or even small accent tables. Pieces with good bones that can benefit from a fresh coat of paint, new hardware, added trim, or creative styling are ideal. The key is to look for pieces that have potential for a cosmetic uplift rather than requiring major structural repair.
How can I find inspiration for my Mini Reni projects?
Inspiration for Mini Reni projects is everywhere! Start by browsing popular home decor platforms like Pinterest, Instagram, and design blogs. Search for terms like “DIY furniture makeover,” “budget home decor,” “upcycled furniture,” or “modern farmhouse DIY.” Look at magazines, visit local antique shops or flea markets for unique pieces, and even take cues from your favorite home decor shows (like Joanna Gaines’ “Mini Reni”). Pay attention to color palettes, textures, and specific design elements that catch your eye. Don’t be afraid to combine elements from different inspirations to create a look that’s uniquely yours.