

The Ultimate DIY Checklist for New Homeowners: 9 Essential Tasks to Protect Your Investment
- Discover 9 preventative maintenance tasks, prioritized by their potential to save you the most money.
- Find the perfect tool for each job with our recommendations for budget, mid-range, and high-quality options.
- Understand the clear boundaries for DIY, so you know exactly when to call a professional for help.
You’ve signed the papers, you have the keys, and the house is officially yours. Congratulations! As the excitement settles, the real journey of homeownership begins. If you’re a first-time home buyer, the learning curve can feel steep. That faint strange smell, the first mysterious ceiling spot—these are the moments when a little preventative knowledge goes a long way.
This comprehensive guide is designed to bridge the gap between being a new homeowner and a confident one. We’ve identified and ranked nine critical DIY tasks based on their power to prevent catastrophic damage and save you thousands of dollars in repairs. For each task, we’ll outline the essential tool you need and explain why this simple maintenance is non-negotiable. Follow this checklist to arm yourself with the right gear, master basic home care, and safeguard your most valuable asset from day one.
1. Locate and Label Your Main Utility Shutoffs (Water, Gas, Electric)
Before you do anything else, this is the absolute number one task to complete. An emergency is the worst time to be searching for a hidden valve. Methodically find your home’s main water shutoff (often a lever or wheel-style valve located in the basement, a utility closet, garage, or where the main water line enters the foundation). Next, find the main gas shutoff, which is typically located at the gas meter outside. Finally, open your electrical panel and identify the main breaker that cuts power to the entire house. Label all three clearly and prominently.
Why this is critical: A burst pipe can release gallons of water per minute. The difference between a minor cleanup and a $40,000 disaster involving new floors, drywall, and mold remediation is how quickly you can shut off the water. Knowing where these shutoffs are allows anyone in your household to react instantly, turning a potential catastrophe into a manageable repair.
Essential Tool: A set of durable, high-visibility vinyl labels and a permanent marker. These are waterproof and easy to read in low light, ensuring anyone can find the shutoffs during a stressful emergency.
2. Deploy Smart Water Leak Detectors in High-Risk Areas
Water leak detectors are the most cost-effective insurance policy you can buy for your home. These small devices sit on the floor and sound a loud alarm—or send an alert directly to your smartphone—the moment they detect moisture. They are your early warning system for leaks that often go unnoticed until significant damage is done. Create a starter network by placing one under every sink (kitchen and bathroom), behind the washing machine, next to the water heater, behind each toilet, and near your sump pump if you have one.
Why this is critical: Slow, hidden leaks are a new homeowner’s nightmare. They can rot subfloors, destroy cabinets, and lead to widespread mold growth long before you notice a damp spot. A single $30 smart detector that alerts you to a leaking toilet supply line can prevent thousands of dollars in structural repairs and mold remediation. It pays for itself the very first time it alerts you.
Essential Tool: A multi-pack of Wi-Fi-enabled smart water leak detectors. They provide instant peace of mind by sending alerts to your phone, allowing you to take action even when you’re not home.
3. Clean Your Gutters and Downspouts Twice a Year
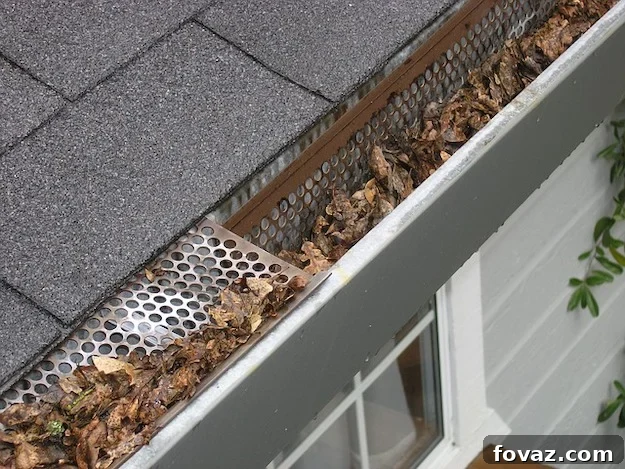
Your gutter system is your home’s primary defense against water infiltration. When gutters become clogged with leaves, twigs, and other debris, rainwater has nowhere to go. It backs up, flows under your roof shingles, soaks the wooden fascia boards, runs down your siding, and eventually pools around your foundation. This is a primary cause of leaky basements and cracked foundations. Make it a routine to clean your gutters every spring after the trees have dropped their seeds and pollen, and again in the fall after most of the leaves have fallen.
Why this is critical: Neglected gutters are one of the leading contributors to foundation damage, which can cost upwards of $15,000 to repair. A few hours of maintenance on a Saturday morning can prevent erosion, basement flooding, siding rot, and even pest infestations. This simple task protects the structural integrity of your entire home.
Essential Tool: A sturdy, well-fitting extension ladder, a gutter scoop, and heavy-duty gloves. For a safer and more efficient cleaning, a telescoping gutter cleaning wand that attaches to a hose allows you to flush debris from the ground or a small step stool.
4. Clear Your HVAC Condensate Drain Line Seasonally
Your central air conditioner works by pulling humid, warm air over a cold evaporator coil. This process creates condensation, which drips into a pan and drains away through a small PVC pipe. Over time, algae, mold, and sludge (a biofilm) can grow inside this damp pipe, creating a clog. When the line is blocked, the drip pan overflows, sending water cascading into your attic, ceiling, or closet, causing extensive damage.
Why this is critical: An overflowing condensate pan is one of the most common—and entirely preventable—causes of summer water damage claims. You can easily prevent this by using a wet/dry shop vac to suction the clog out from the exterior drain opening. Do this in the spring and fall. For ongoing prevention, pour a half-cup of distilled white vinegar down the line every two to three months to kill biofilm growth.
Essential Tool: A wet/dry shop vacuum. This versatile tool is indispensable for this task and dozens of other home maintenance jobs, making it a fantastic investment for any homeowner.
5. Replace HVAC Air Filters on a Strict Schedule
This is arguably the easiest and most frequently forgotten task on this entire home maintenance checklist. A dirty, clogged air filter restricts airflow, forcing your HVAC system to work much harder to heat or cool your home. This leads to higher energy bills, increased wear and tear on expensive components, and can even cause the evaporator coils to freeze over, resulting in a system shutdown on the hottest day of the year.
Why this is critical: A $20 air filter is the best defense against a $500 emergency service call. Regular filter changes not only save you money on utility bills but also significantly extend the lifespan of your HVAC unit, which can cost over $10,000 to replace. Set a recurring calendar reminder on your phone now. Most standard one-inch filters need to be changed every 1-3 months, especially if you have pets.
Essential Tool: The correct size pleated air filter (MERV 8-11 is a good balance for most homes) and a marker. Write the date you install the new filter directly on its cardboard frame so you never have to guess how old it is.
6. Inspect and Re-caulk All Wet Zones
Caulk is the flexible, waterproof sealant that fills the gaps between your bathtub and tile, your kitchen sink and countertop, and around your shower fixtures. It is the only barrier preventing water from seeping into your walls and subfloor. Over time, caulk can shrink, crack, or peel away, creating invisible pathways for water to get in. By the time you notice soft floorboards or puffy drywall, the damage is already extensive.
Why this is critical: Failed caulk is the number one cause of bathroom floor rot. Water that gets behind tiles can destroy the subfloor and even the floor joists below, leading to a multi-thousand-dollar structural repair. Every 2-3 years, take an afternoon to carefully cut away old caulk, clean the surface thoroughly, and apply a fresh bead of 100% silicone sealant.
Essential Tool: A high-quality dripless caulk gun and a tube of 100% silicone caulk designed for kitchens and baths. Silicone is more flexible, durable, and mold-resistant than cheaper acrylic latex caulk, making it essential for high-moisture areas.
7. Perform a Semi-Annual Attic Inspection
Your attic provides a wealth of information about the health of your roof and ventilation system, yet it’s a space most homeowners never enter. Twice a year, once in the spring and once in the fall, take a powerful flashlight and inspect your attic. Look for water stains on the underside of the roof sheathing, any visible daylight peeking through, signs of pests like droppings or nests, areas of wet or compressed insulation, and frost on the roofing nails during winter (a sign of poor ventilation).
Why this is critical: Roof leaks often start small and can cause significant rot and mold in the attic long before a stain appears on your living room ceiling. Catching a small flashing leak or a pest intrusion early can be the difference between a $300 repair and a $10,000 roof replacement. These twice-yearly checks are your best early-warning system.
Essential Tool: A powerful rechargeable LED headlamp or flashlight. A headlamp is ideal as it keeps both of your hands free for safely navigating the attic space.
8. Flush Your Water Heater Annually
Over time, minerals and sediment from your water supply (like calcium and magnesium) settle at the bottom of your water heater’s tank. This layer of sediment acts as an insulator, forcing the heating element or burner to work harder and longer to heat the water. This not only wastes energy but also causes premature failure of the unit. A water heater that should last 12 years may fail in as little as 6 without this basic maintenance.
Why this is critical: A new, professionally installed water heater can cost between $1,500 and $2,500. An annual flush, which takes less than an hour, can effectively double the lifespan of your existing unit. Simply connect a garden hose to the drain valve at the bottom of the tank, run it to a floor drain or outside, and open the valve to flush the sediment until the water runs clear.
Essential Tool: A durable garden hose and an adjustable wrench to open the drain valve. This simple kit is all you need to perform this high-impact, money-saving task.
9. Test All Smoke and Carbon Monoxide Detectors Monthly
This is the fastest and most important life-saving task on your list. Once a month, press and hold the “test” button on every smoke and carbon monoxide (CO) detector in your home. If it beeps loudly, it’s working. If it doesn’t, replace the batteries immediately. If it still fails to test, replace the entire unit. Also, check the date of manufacture printed on the back. Smoke detectors should be replaced every 10 years, and CO detectors every 5-7 years, as their sensors lose effectiveness over time.
Why this is critical: According to safety agencies, the leading cause of alarm failure in a fire is dead or missing batteries, followed by the unit being past its expiration date. This ten-minute monthly check is a simple, non-negotiable step to protect your family.
Essential Tool: A stock of the correct replacement batteries (usually 9V or AA) and replacement smoke and CO detector units for any that are expired. Don’t wait until one starts chirping at 3 a.m.
Your Path to Confident Homeownership
These nine tasks aren’t glamorous home improvement projects. You won’t be posting before-and-after pictures of your clean condensate line on social media. But mastering this routine of preventative maintenance is what separates proactive, financially-savvy homeowners from those who are constantly caught off guard by expensive, unexpected repairs. Tackle this list in order, starting with the highest-impact items today. Set reminders on your phone for recurring tasks. Bookmark this guide and use it as your semi-annual checklist to keep your home safe, sound, and secure for years to come.
New Homeowner DIY: Frequently Asked Questions
1. What are the most crucial DIY skills for a new homeowner?
Focus on damage prevention first. Every new homeowner should know how to: locate and operate main utility shutoffs, install and monitor water leak detectors, clean gutters, change HVAC filters, clear the AC condensate line, inspect and apply caulk in wet areas, perform a basic attic inspection, flush a water heater, and test all life-safety detectors. Mastering these nine tasks will help you prevent about 80% of the common problems that cause panic for first-time buyers.
2. What are the essential tools every new homeowner should own?
Instead of buying a massive, low-quality toolkit, build your collection around specific tasks. For this checklist, you’ll need: a cordless drill/driver, a wet/dry shop vacuum, a dripless caulk gun, an adjustable wrench, a powerful LED headlamp, a non-contact voltage tester (for safety), a durable 50-foot garden hose, and a sturdy step stool or ladder. This core set will empower you to handle most basic home maintenance and repairs.
3. How often do I really need to clean my gutters?
The non-negotiable minimum is twice a year: once in the late spring and again in the late fall. However, if your home is surrounded by mature trees, especially pines, oaks, or maples that shed heavily, you should inspect and clean them three or even four times a year. Clogged gutters are a direct threat to your foundation, and keeping them clear is one of the best preventative measures you can take.
4. Are these DIY tasks safe for someone with no experience?
Yes, the tasks on this list are specifically chosen because they are beginner-friendly and low-risk. The key is to know your limits. You should always hire a licensed professional for any work involving your main electrical panel, gas lines, major plumbing, or structural components like load-bearing walls. A good rule of thumb: if a mistake could result in fire, flood, or serious injury, call a pro.
5. What is the single most expensive mistake a new homeowner can make?
Ignoring a “small” water leak. That seemingly minor drip from a drain pipe under your sink can silently saturate your cabinet, subfloor, and even the joists beneath over months. By the time you notice the damage, you could be facing a repair bill of $5,000 to $20,000 that includes demolition, mold remediation, and reconstruction. This is precisely why a $30 water leak detector is the best investment you can make for your home.