
The Ultimate Guide to DIY Valentine’s Gifts for 2026: Heartfelt Handmade Ideas
This Valentine’s Day, elevate your gift-giving by creating something truly unique and meaningful. Forget the predictable flowers and chocolates; a handmade gift speaks volumes, conveying thoughtfulness, effort, and genuine affection that mass-produced items simply can’t match. Our comprehensive guide for 2026 offers 14 simple, budget-friendly DIY projects that promise to impress without breaking the bank or requiring extensive crafting skills.
At a Glance: Your Handmade Valentine’s Day Toolkit
- Discover 14 step-by-step projects, each taking 10-30 minutes with full material lists and costs under $15.
- Uncover why handmade gifts resonate more deeply than store-bought options and how personalized touches create lasting memories.
- Learn to match your gift perfectly to your relationship stage, whether you’re just starting out or celebrating years together.
- No crafting experience necessary – most projects only require basic supplies like glue, markers, or items you already own.
Picture this: Instead of a generic drugstore plush toy or a factory-made box of chocolates, you present a gift that unmistakably says, “I poured my heart and soul into this, just for you.” These 14 DIY Valentine’s gifts are designed to be quick, affordable, and incredibly personal. Each project takes 30 minutes or less to complete and costs under $15, proving that the most profound expressions of love are custom-built, not assembly-line manufactured.
Why Choose Handmade DIY Valentine’s Day Gifts This February 14th?
In a world saturated with commercialism, a handmade gift stands out as a beacon of genuine sentiment. Anyone can spend a significant amount on a bouquet of roses that will wilt within a week, but a gift crafted by hand? That’s a testament to intentionality, a quiet declaration of, “I thoughtfully considered what would truly delight you, and then I brought it to life with my own two hands.” This approach transforms an ordinary occasion into an extraordinary celebration of your bond.
The true magic ingredient in DIY gifting isn’t exotic materials or intricate techniques; it’s **specificity**. A generic heart-shaped necklace merely signifies that you went shopping. However, a keychain meticulously stamped with the GPS coordinates of the exact spot where you first met whispers, “I cherish and remember that precise, life-changing moment.” Such personalized details elevate a simple item into an invaluable treasure, imbued with shared history and deep emotional resonance. Opting for DIY also champions sustainability, reducing waste associated with mass production, and allows for budget-friendly creativity that doesn’t compromise on impact.
Essential Quick Safety Tips Before You Begin Your Crafting Journey
- Embrace Salt or LEDs for Candle-Themed Projects: To ensure a worry-free and safe ambiance, opt for alternatives like decorative salt layers with embedded LED tea lights or battery-operated candles instead of open flames. This provides a warm, inviting glow without any fire hazards.
- Release the Pressure of Diamonds: Your affection isn’t measured by carat weight. Demonstrate the depth of your love by transforming raw, simple materials into something uniquely customized for your partner. True value lies in the effort and thought, not the price tag.
- Always Include a Handwritten Note: A personal, handwritten message adds an irreplaceable layer of warmth and intimacy to any gift. It explains your intentions, shares a memory, or simply articulates your feelings, ensuring your heartfelt creation never feels “cold” or impersonal.
14 One-of-a-Kind DIY Valentine’s Gifts for a Memorable 2026
1. Fingerprint Photo Frame: A Touch of Personal Connection
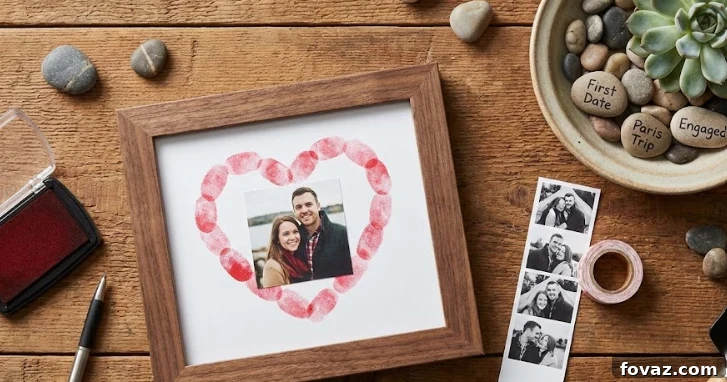
Time: 15 minutes | Cost: $5
This “hands-on” keepsake literally allows you to leave your unique mark on a shared memory. It’s a beautiful, tangible representation of your bond, transforming a simple photo into a personalized piece of art. The intertwining fingerprints symbolize the unique connection you share, making it an incredibly tender and cherished item.
Materials:
- A plain picture frame (wood, ceramic, or cardboard will work well)
- An ink pad (washable and non-toxic is ideal)
- Your favorite printed photo of you two (a candid shot often works best)
Steps:
- Carefully remove the backing and glass from the picture frame.
- Dip your finger (and your partner’s, if they’re around to help!) lightly into the ink pad.
- Stamp ink-dipped fingerprints onto the frame backing, arranging them in a heart-shaped border or an interlocking pattern around where the photo will sit. You can also create small individual hearts with two prints.
- Once satisfied with the pattern, insert your chosen photo into the frame.
- Allow the ink to dry completely and thoroughly before handling or wrapping to prevent smudging.
- Multicolor inkpad for a rainbow of stamping fun
- Includes 6 bright ink colors (red, orange, yellow, green, blue, purple)
Buy on Amazon
(As an Amazon Associate, we earn from qualifying purchases.)
2. DIY Photo Booth Strip: Instant Nostalgia
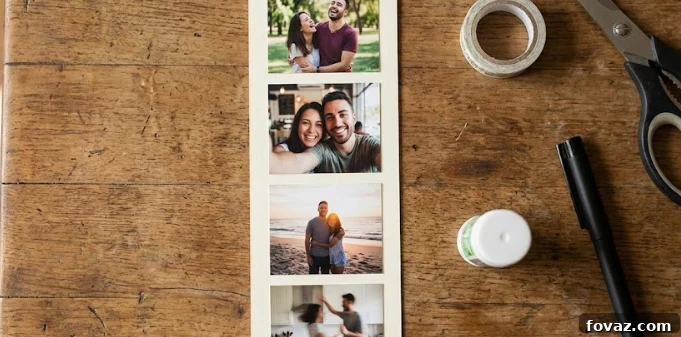
Time: 10 minutes | Cost: $2
Recreate the fun, spontaneous feel of a classic retro photo booth with your own candid moments. This simple yet charming gift captures a sequence of genuine expressions, telling a mini-story of your affection. It’s a wonderfully nostalgic way to celebrate your shared joy, perfect for displaying on a fridge or tucked into a wallet.
Materials:
- Sturdy cardstock (black or white works best for a classic look)
- 4-5 printed candid photos of you and your partner
- A reliable glue stick or double-sided tape
- Scissors or a paper trimmer for precise cuts
Steps:
- Select your favorite candid photos. Crop each photo into equal squares or rectangles to mimic the traditional photo booth format. Aim for a consistent size.
- Carefully glue the cropped photos vertically onto a strip of cardstock. Ensure there’s a small, even space between each photo to maintain the authentic photo booth aesthetic.
- Once the photos are securely attached, use scissors or a paper trimmer to carefully trim the cardstock, leaving a slight, even border around the entire strip. This border is key to achieving that genuine, vintage photo booth look.
3. The “Living Memory” Garden: A Growing Love Story
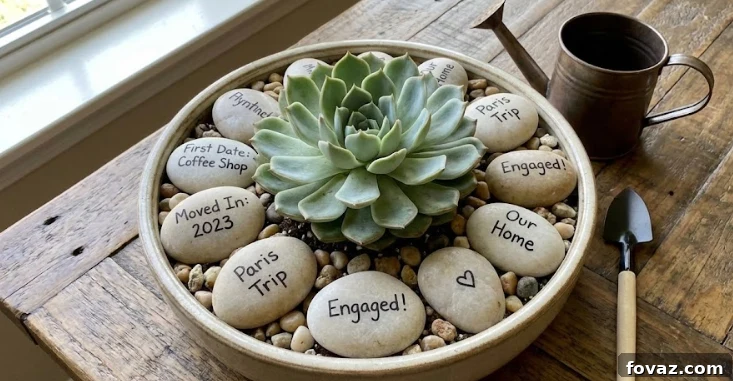
Time: 20 minutes | Cost: $15
This is a truly meaningful gift that symbolically grows alongside your relationship. A small succulent plant, representing enduring love, is surrounded by stones etched with your most cherished relationship milestones. It’s a living map of your shared journey, a constant reminder of how far you’ve come and the beautiful memories you’ve created together.
Materials:
- A small, low-maintenance succulent plant
- A decorative pot that complements your home decor
- Several smooth, flat stones (river stones or crafting stones work best)
- A permanent marker (like a fine-tip Sharpie) or paint pen
- Potting soil suitable for succulents
Steps:
- Gently pot the succulent into the decorative pot using fresh potting soil, ensuring it’s stable and well-drained.
- On individual smooth stones, write down significant relationship milestones, inside jokes, important dates, or cherished memories. Examples include “First Kiss,” “Our First Trip,” “When We Adopted Max,” or even a short, meaningful quote.
- Thoughtfully arrange the inscribed stones around the base of the succulent in the pot, creating a visually appealing “memory map.” Each stone tells a part of your unique love story.
- 🖍️NON-TOXIC: Conforms to ASTM D-4236, you can use those coloring markers with confidence. with…
- 🖍️LONG LASTING: We use premium ink, dries quickly, resists fading and water, can produce smooth…
Buy on Amazon
4. Voicewave Sound Art: A Symphony of Love
Time: 30 minutes | Cost: $10
Transform your heartfelt words into a stunning visual display with Voicewave Sound Art. This unique gift allows you to record a special message, song snippet, or inside joke, then translate its waveform into a beautiful piece of painted canvas art. The magic lies in the subtle QR code on the back, enabling your partner to hear the original audio, adding an interactive and deeply personal layer to this artistic expression.
Materials:
- A small art canvas (e.g., 8×10 or 11×14 inches)
- Acrylic paints in colors that are meaningful or match your decor
- A small QR code sticker or a blank sticker where you can print one
- Your smartphone for recording and generating the QR code
- Paintbrushes
Steps:
- Record a short, sweet voice note using your smartphone (e.g., “I love you,” a snippet of your favorite song, or a funny inside joke).
- Take a screenshot of the voice note’s waveform (most recording apps display this). This visual representation is what you’ll paint.
- Using a pencil, lightly sketch the waveform pattern onto your canvas.
- Carefully paint over your pencil sketch with acrylic paints, recreating the wave pattern. Experiment with different colors or gradients for added visual interest. Let it dry completely.
- Generate a QR code online (many free generators exist) that links directly to the audio file of your recorded message (you may need to upload it to a cloud service first). Print this QR code onto a sticker.
- Affix the QR code sticker discreetly to the back of the canvas, ensuring it’s easy to find and scan.
5. GPS “Our Place” Keychain: Carry Our Story Everywhere
Time: 10 minutes | Cost: $5
Immortalize the place where your journey together began with a custom GPS coordinate keychain. This simple yet deeply meaningful gift allows your partner to carry a tangible reminder of that special spot everywhere they go. It’s a subtle nod to your unique story, a secret message of shared history stamped into a practical item.
Materials:
- A blank keychain made of leather, metal, or wood (choose one that suits their style)
- A metal stamping kit for a professional, engraved look, OR a fine-tip permanent marker for an artistic touch
- A sturdy keyring if the blank doesn’t already have one
- A pencil for light sketching (optional, if using a marker)
Steps:
- Using a reliable online map service or GPS app, find the precise latitude and longitude coordinates of your first date location, your first home, or any other significant “our place.”
- If using a metal stamping kit, carefully stamp the coordinates onto the keychain blank. Practice on scrap material first if you’re new to stamping. If using a permanent marker, lightly sketch the coordinates with a pencil first, then trace over them carefully.
- Once the coordinates are clearly marked and dry, attach a durable keyring if it’s not already integrated into the blank.
6. “Open When” QR Box: Messages for Every Mood
Time: 20 minutes | Cost: $8
This innovative gift combines the classic “Open When” letter concept with modern technology, creating a treasure trove of video messages for every possible mood or moment. Your partner receives a beautifully curated box of mini envelopes, each containing a QR code linking to a personalized video message. It’s an incredibly thoughtful way to provide comfort, encouragement, or a burst of joy, even when you can’t be physically present.
Materials:
- 6-10 mini envelopes (various colors or patterns can add charm)
- Paper for creating labels for each envelope
- Your smartphone for recording the video messages
- A small decorative box to hold the envelopes (a shoebox can be decorated)
- A pen or marker for labeling
Steps:
- Record several short, heartfelt videos tailored for different scenarios. Think “Open When you’re sad,” “Open When you miss me,” “Open When you need motivation,” “Open When you’re celebrating,” or “Open When you just need a laugh.”
- Upload each video to a cloud service (like Google Drive or Dropbox) or a private YouTube link, and then generate a unique QR code for each video using a free online QR code generator.
- Print out the QR codes and stick one inside each mini envelope.
- Label the front of each envelope clearly with the “Open When…” prompt.
- Arrange all the labeled envelopes neatly within the decorative box. You might include a small note explaining how to use the box and the thoughtfulness behind it.
7. Hidden Heart Embroidery: A Secret Token of Love
Time: 30 minutes | Cost: $12
This subtle yet incredibly intimate gift involves secretly stitching a tiny heart or your initials onto the inner cuff or hem of your partner’s favorite sweatshirt or hoodie. It’s a private declaration of love, a hidden message known only to them, providing a constant, comforting reminder of your affection every time they wear it. This project is perfect for those who appreciate understated elegance and deeply personal gestures.
Materials:
- Your partner’s favorite sweatshirt, hoodie, or even a casual shirt
- Embroidery floss in a color that either blends or subtly contrasts with the fabric
- An embroidery needle (a sharp, fine needle is best for detailed work)
- A fabric marker or a regular pencil for sketching your design
- Small embroidery hoop (optional, but helpful for beginners)
Steps:
- Choose a discreet spot for your embroidery, such as the inside of a sleeve cuff, the bottom hem, or even near the inner collar. This is meant to be a hidden detail.
- Lightly sketch a tiny heart, your initials, or a small meaningful symbol onto the chosen spot using a fabric marker or pencil. Keep it small and simple.
- Using your embroidery floss and needle, carefully stitch over your sketched line. A simple backstitch or running stitch works well for outlines. (If you’re new to embroidery, check out our guide below!)
- Once your design is complete, knot the floss securely on the inside of the fabric, ensuring the knot is neat and won’t be visible from the outside. Trim any excess floss.
RELATED: How to Embroider | DIY Embroidery Stitches Guide
8. “Night We Met” Star Map: Celestial Connection
Time: 15 minutes | Cost: $5
Capture the exact celestial alignment from the night you first met, had your first kiss, or any other significant date, and preserve it forever in a unique piece of art. This star map is a romantic and thoughtful way to commemorate a pivotal moment in your relationship, a visual representation of destiny or simply a beautiful memory.
Materials:
- A sheet of sturdy black cardstock (for the night sky effect)
- A silver or gold metallic marker or a fine-tip white paint pen
- A ruler for straight lines and accurate placement (optional)
- A star map app or website (e.g., Stellarium, Star Walk) to find accurate star positions
Steps:
- Utilize a star map application or website to look up the precise star positions for your chosen anniversary date and location. Input the specific date, time, and geographical coordinates to ensure accuracy.
- Carefully dot the individual stars onto the black cardstock using your silver or gold metallic marker. Pay attention to the relative brightness and spacing of the stars as depicted in your reference. You can freehand or lightly sketch first.
- At the bottom of your star map, elegantly label it with the significant date, location, and a short message like “The night our stars aligned” or “The night we met.”
9. Wood-Burned Initial Slice: Rustic Romance
Time: 20 minutes | Cost: $10
Bring a rustic, timeless charm to your Valentine’s gift with a wood-burned initial slice. This project emulates the classic “carving your initials into a tree” but creates a lasting, indoor-friendly memory plaque. It’s a raw, authentic declaration of love that feels grounded and enduring, perfect for a cozy home or office space.
Materials:
- A smooth, sanded wood slice (3-5 inches in diameter, readily available at craft stores)
- A wood-burning tool with various tips for detailed work, OR a dark, fine-tip permanent marker as a safer, simpler alternative
- A pencil for sketching your design
- Sandpaper (optional, for extra smooth finish)
Steps:
- Lightly draw a heart enclosing your and your partner’s initials onto the center of the wood slice using a pencil. You can also add a significant date or a small symbol.
- If using a wood-burning tool, carefully trace over your pencil sketch, allowing the tool to burn into the wood for a permanent, carved-in look. Always follow the tool’s safety instructions and work in a well-ventilated area. If using a permanent marker, trace over your pencil marks with steady strokes to achieve a clean, dark outline.
- Once finished, if using a wood-burning tool, allow the wood slice to cool completely before handling. If using a marker, ensure the ink is fully dry. You can optionally seal it with a clear coat for protection.
10. Pressed Flower Coasters: Preserved Beauty
Time: 20 minutes | Cost: $15
Transform fleeting beauty into lasting functional art with these elegant pressed flower coasters. This project allows you to preserve petals from a significant bouquet (perhaps your wedding, anniversary, or a first date) by sealing them between glass tiles. Each coaster becomes a mini-window into a cherished memory, a delicate reminder of your love and shared experiences.
Materials:
- Two clear glass tiles per coaster (4×4 inches is a common and versatile size)
- An assortment of dried flower petals or small pressed flowers (collect them over time or purchase from a craft store)
- Copper foil tape (self-adhesive, typically used for stained glass)
- Small felt pads to protect surfaces (one for each corner of the finished coaster)
- Tweezers for precise placement of petals
Steps:
- Carefully arrange your dried flower petals or small pressed flowers onto one glass tile. Experiment with different compositions until you achieve a design you love. Use tweezers for delicate placement.
- Once satisfied, gently place the second glass tile directly on top, sandwiching the flowers firmly between the two pieces of glass.
- Starting at one corner, carefully wrap the copper foil tape tightly around all four edges of the joined glass tiles. Ensure the tape is smooth, covers the edges completely, and seals the flowers securely inside. Press firmly to adhere.
- Finally, attach small felt pads to each of the four bottom corners of the finished coaster to prevent scratching surfaces and provide stability.
11. “Recipe for Us” Board: A Taste of Your Love
Time: 15 minutes | Cost: $12
Craft a unique “Recipe for Us” cutting board that humorously and tenderly outlines the essential “ingredients” of your relationship. This gift transforms your shared traits, inside jokes, and cherished qualities into a whimsical recipe format, making your love story palatable and endlessly charming. It’s a functional piece of kitchen art that will bring a smile to their face every time they prepare a meal.
Materials:
- A smooth bamboo or wooden cutting board (choose a size that’s practical for display or use)
- A food-safe permanent marker (such as a specific food-safe Sharpie or paint pen)
- A ruler (optional, for maintaining straight lines and neat formatting)
- Pencil for light sketching
Steps:
- Brainstorm a list of your relationship’s unique “ingredients” or qualities. Think “1 tbsp Patience,” “3 cups Laughter,” “2 dashes Sarcasm,” “Infinite Love,” “A pinch of Adventure,” “A spoonful of Understanding.”
- Lightly sketch your “recipe” onto the cutting board with a pencil. Format it like an actual recipe card, including “Ingredients,” “Instructions,” and “Yields: A Lifetime of Happiness.”
- Carefully trace over your pencil sketch with the food-safe permanent marker. Take your time to ensure clean, legible handwriting.
- Allow the ink to dry completely for at least 24 hours before use or washing. This ensures the design is permanently set and food-safe.
12. Scanned Letter Canvas: Your Words, His Art
Time: 15 minutes | Cost: $10
Transform a cherished handwritten note from your partner into a beautiful, textured piece of wall art. This gift immortalizes their unique handwriting and heartfelt words on canvas, creating a tangible connection to their sentiment. It’s a deeply personal and artistic way to display a love letter, turning it into a permanent fixture in your home.
Materials:
- A small art canvas (e.g., 8×10 or 11×14 inches, suitable for hanging)
- Iron-on transfer paper designed for fabric or canvas
- An old handwritten note, card, or letter from your partner (the more personal, the better)
- A household iron and an ironing surface
Steps:
- Carefully scan the handwritten note, card, or letter into a digital format on your computer.
- Using image editing software (even basic programs work), crop and adjust the scanned image to fit your canvas size. Importantly, you must reverse or mirror the image before printing, as iron-on transfers work by flipping the design.
- Print the mirrored image onto the iron-on transfer paper, following the paper manufacturer’s specific instructions.
- Place the printed transfer paper face-down onto your canvas. Using a heated iron, carefully press the design onto the canvas, again following the transfer paper’s instructions for temperature and duration. This process bonds the ink to the canvas, creating a textured, permanent look.
13. Relationship Timeline Jar: Our Story, Unrolled
Time: 15 minutes | Cost: $5
Embark on a nostalgic journey with the Relationship Timeline Jar, a beautiful collection of your shared memories. This simple yet incredibly touching gift involves filling a jar with chronologically ordered paper strips, each detailing a significant moment in your relationship. It’s a wonderful way to relive your story together, offering endless opportunities for conversation, laughter, and reflection on your journey as a couple.
Materials:
- A clear Mason jar or any decorative glass jar with a lid
- Colored paper strips (various colors can help organize different types of memories or simply add visual appeal)
- A pen or marker for writing
- A ribbon or twine for decoration
- A small tag for labeling the jar
Steps:
- Begin by writing down one distinct memory, milestone, or funny moment onto each individual paper strip. Organize them in chronological order as best as you can. Examples: “Our first date at the coffee shop,” “That hilarious road trip to the coast,” “When we adopted our first pet,” “The day you helped me through [challenging event].”
- Once written, roll each paper strip up individually into a small scroll.
- Gently fill the Mason jar with all the rolled-up memory scrolls.
- Finally, tie a decorative ribbon or twine around the neck of the jar. Attach a small tag with a title like “Our Story So Far,” “Memories of Us,” or “Open When You Want to Smile.”
14. First Date Map Ornament: Where It All Began
Time: 10 minutes | Cost: $3
Commemorate the exact spot where your love story unfurled with a charming First Date Map Ornament. This simple, elegant keepsake captures a visual representation of your first date location, enclosed within a clear ornament. It’s a beautiful way to mark the beginning of your journey, perfect for hanging on a tree, displaying on a shelf, or even attaching to a gift as a special tag.
Materials:
- A clear, fillable ornament (glass or plastic, with a removable top)
- A printed map of your first date location (use an online map service to zoom in on the specific spot)
- Twine or a decorative ribbon for hanging
- Scissors (small, sharp craft scissors are ideal for intricate cuts)
Steps:
- Using an online map service, find and print a small, detailed map of your first date location. Focus on the specific building, park, or street where it happened.
- Carefully cut the printed map into a circle (or a shape that best fits) that can be easily rolled and inserted into the top opening of the clear ornament.
- Gently roll the map and insert it through the top opening of the ornament. Once inside, you can use a fine tool (like tweezers or a skewer) to unroll and position the map so it’s clearly visible.
- Replace the ornament’s top. Tie a piece of twine or a festive ribbon through the hanging loop, and if desired, add a small handwritten date tag to complete your keepsake.
Selecting the Perfect DIY Valentine’s Gift for Your Relationship Stage
Choosing the right gift often depends on where you are in your journey together. Here’s a guide to help you match your handmade gift to your relationship stage, ensuring your gesture is both appropriate and deeply appreciated:
New Relationships (Under 6 Months): Keep it Light, Fun, and Thoughtful
In the early stages of dating, it’s best to convey thoughtfulness without being overly intense. Gifts that celebrate shared initial moments or playful aspects of your connection are ideal.
- DIY Photo Booth Strip: Captures fun, candid moments without heavy sentiment.
- First Date Map Ornament: A sweet nod to your beginning, subtle and memorable.
- GPS “Our Place” Keychain: A cool, understated way to remember a special location.
These options are charming, personal, and show you care without putting too much pressure on a blossoming relationship.
Established Relationships (6 Months to 2 Years): Celebrate Growing History and Connection
Once you’ve built some history, you have a wealth of shared experiences to draw upon. Gifts in this stage can be more reflective of your journey and deeper understanding of each other.
- Voicewave Sound Art: A creative way to express “I love you” or a cherished phrase.
- “Night We Met” Star Map: Commemorates a significant moment, showing you remember the details.
- The “Living Memory” Garden: Symbolically represents your growing love and shared milestones.
- Relationship Timeline Jar: A wonderful way to reflect on all the beautiful moments you’ve created together.
These gifts demonstrate your appreciation for your shared past and your excitement for the future.
Long-Term Relationships (2+ Years): Deep Cuts and Inside Jokes
For couples who have shared years of experiences, inside jokes, and a unique shared language, gifts that tap into that intimate understanding are profoundly meaningful. These gifts often carry layers of private significance.
- Pressed Flower Coasters: Perfect for preserving flowers from significant events, creating functional art with deep sentimental value.
- Scanned Letter Canvas: Turns a cherished handwritten note from your partner into an artistic keepsake, honoring their unique voice.
- “Recipe for Us” Board: A humorous and heartfelt representation of your unique relationship dynamic.
- Hidden Heart Embroidery: A secret, intimate gesture on a favorite clothing item, a private symbol of your enduring love.
These items speak to the unique fabric of your long-standing relationship, celebrating the depth of your bond.
Long-Distance Relationships: Bridging the Miles with Thought
When distance separates you, gifts that offer a sense of presence and ongoing connection are invaluable.
- “Open When” QR Box: This gift is literally *made* for long-distance relationships. Record various video messages they can open when they need to feel close to you, offering comfort, laughter, or encouragement across the miles. It’s like sending little digital hugs.
This option ensures that even when you’re apart, your love and support are just a scan away.
How Do You Wrap a DIY Valentine’s Gift for Maximum Impact?
The presentation of your handmade gift is almost as important as the gift itself. Skip the flashy, generic wrapping paper that often obscures the personal touch. Instead, embrace an aesthetic that complements the handmade nature of your present:
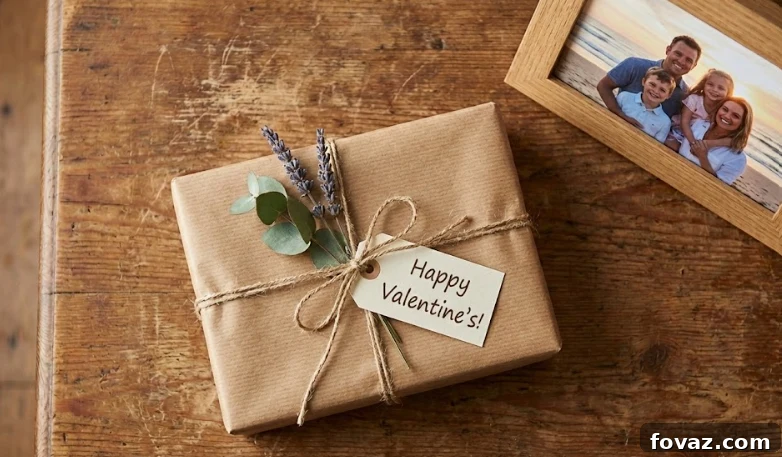
- Embrace Natural Materials: Kraft paper and twine are your best friends. Their simple, rustic charm perfectly matches the authentic, heartfelt aesthetic of a DIY gift. They provide a clean canvas that lets your thoughtful creation shine.
- The Power of the Handwritten Note: This is non-negotiable. A heartfelt, handwritten note is crucial for explaining the story behind your gift. Detail why you chose those specific GPS coordinates, what the voice recording says, which particular memories you included in the jar, or the significance of the pressed flowers. The narrative and emotional connection behind your gift matter immensely, making it truly priceless.
- Add Simple Instructions for Interactive Gifts: If you’ve created something interactive, like the “Open When” QR box or the Relationship Timeline Jar, make sure to include clear, concise instructions. A small tag or card explaining how to scan the codes or suggesting reading the memories together will ensure your partner fully enjoys and understands the interactive elements of your gift.
Remember, the goal is to enhance the personal touch, not overshadow it. Simple, thoughtful wrapping, coupled with a genuine explanation, transforms your DIY gift into an unforgettable experience.
FAQs About DIY Valentine’s Gifts
Still have questions about crafting the perfect handmade Valentine’s gift? We’ve got you covered with answers to common queries.
What is the easiest DIY Valentine’s gift to make, especially for beginners?
The Photo Booth Strip is hands down the easiest and quickest DIY Valentine’s gift. It takes a mere 10 minutes to create and costs under $2. All you need to do is select four favorite candid photos, crop them into equal squares, glue them vertically onto a strip of cardstock, and then trim with a slight border. Zero crafting skills are required, yet it delivers maximum nostalgia and sentimental value. It’s a charming way to highlight fun memories without any fuss.
How can I make a romantic gift without spending a lot of money?
The secret to a romantic, budget-friendly gift lies in hyper-personalization, not a hefty price tag. Instead of focusing on monetary value, channel your efforts into specificity and meaning. For example, a $5 keychain stamped with the GPS coordinates of your first date will resonate far more deeply than a $50 generic necklace. Utilize materials you might already have around the house, such as old photos, a mason jar, fabric scraps, or colored paper. By adding layers of personal meaning and focusing on shared memories, you create an invaluable gift that money simply can’t buy.
What are good handmade gifts for someone you just started dating that won’t come on too strong?
When you’re in a new relationship, it’s wise to choose lighter, fun, and thoughtful options that express interest without overwhelming your new partner. Excellent choices include the First Date Map Ornament, the DIY Photo Booth Strip, or the GPS “Our Place” Keychain. These gifts are sweet, creative, and show that you put thought into the gesture, but they steer clear of grand, intense declarations, making them perfectly appropriate for a budding romance.
How do I make a DIY Valentine’s gift look professional and polished?
Achieving a professional look for your DIY gift hinges more on neatness and attention to detail than on perfect execution. Focus on clean edges by using a ruler for straight cuts, allowing all paint and glue to dry completely and thoroughly before assembling or adding layers, and finishing with simple, elegant wrapping like kraft paper and twine. The charm of a handmade gift often comes from the visible effort and sincerity, so embrace the slight imperfections as part of its unique character, rather than striving for factory-made flawlessness.
Can I really make a meaningful DIY Valentine’s gift in under an hour?
Absolutely! Time constraints should never deter you from creating a heartfelt gift. A remarkable thirteen out of these fourteen projects can be completed in 30 minutes or less. Even the Hidden Heart Embroidery, while requiring a bit more dexterity if you’re new to stitching, can typically be finished within 30 minutes. Most other projects, from the Fingerprint Photo Frame to the Voicewave Sound Art, are designed to be completed during a lunch break, while dinner is in the oven, or even in a quick evening session. The impact of a thoughtful, handmade gift is profound, regardless of the time it takes to create.