
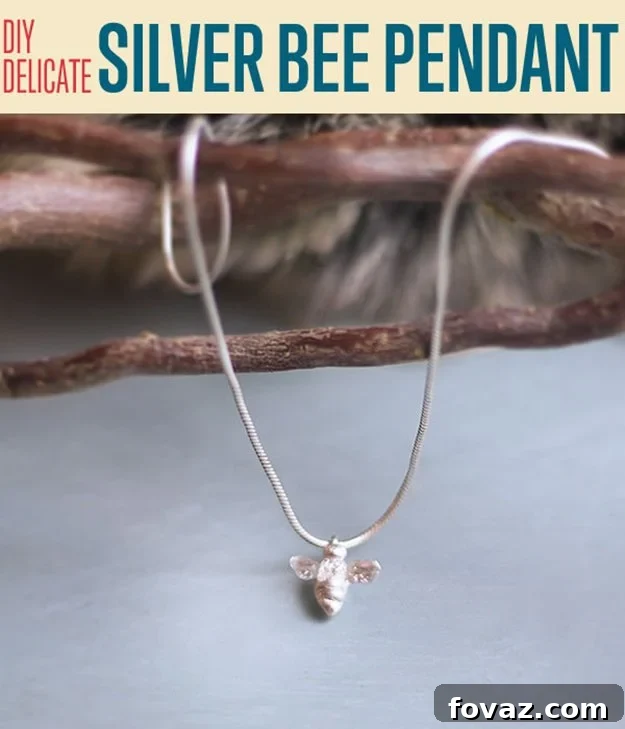
Embark on a delightful crafting journey and create your very own charming silver bee pendant with this easy-to-follow Precious Metal Clay (PMC) tutorial. This project is specifically designed for crafters of all skill levels, even those with minimal sculpting experience, allowing you to produce a stunning, personalized piece of jewelry in just about an hour of hands-on work. This delicate bee pendant isn’t just a beautiful accessory; it’s a testament to the magic of handmade artistry, perfect for adding a touch of whimsical elegance to any outfit, any time of the year.
Working with Precious Metal Clay is a uniquely rewarding experience. It offers the moldability of clay combined with the luxurious finish of fine silver, transforming from a pliable material into solid metal with a simple firing process. Our goal with this guide is to demystify PMC and empower you to craft a durable, exquisite silver pendant that looks store-bought but carries the heartwarming touch of a DIY creation. Get ready to sculpt, fire, and polish your way to a truly buzz-worthy piece of jewelry!
Why Choose Precious Metal Clay (PMC) for Your Jewelry Projects?
Precious Metal Clay, often simply called PMC, is a revolutionary material that combines microscopic particles of pure silver (or gold, copper, bronze) with an organic binder and water. This innovative blend makes it possible to sculpt, mold, and shape metal just like regular clay. Once dried and fired at high temperatures, the binder burns away, and the metal particles sinter (fuse) together, resulting in a solid, durable piece of fine silver. For jewelry makers, especially beginners, PMC offers several distinct advantages:
- Ease of Use: No complex metalworking tools or techniques are required. If you can work with modeling clay, you can work with PMC.
- Precision and Detail: PMC captures intricate details beautifully, allowing for finely sculpted designs.
- Accessibility: Torch firing small PMC pieces, like our bee pendant, can be done at home with a simple butane torch, eliminating the need for expensive kilns for smaller projects.
- Versatility: From pendants to earrings, rings, and charms, PMC can be used to create a vast array of unique jewelry pieces.
- Pure Metal Finish: The finished product is 99.9% pure silver, often referred to as “fine silver,” which is highly prized for its brilliant luster and tarnish resistance compared to sterling silver.
Essential Supplies for Your Silver Bee Pendant
Before diving into the creative process, gathering your materials is key. For the metal components of this project, you’ll need a basic Precious Metal Clay setup. Many specialized items can be found at jewelry supply stores or online. For all PMC-related supplies, we highly recommend trusted retailers like riogrande.com, metalclaysupply.com, and Amazon.com. They offer a wide range of products for metal clay enthusiasts.
- PMC Clay: For this delicate project, we highly recommend using PMC3 (Precious Metal Clay 3). PMC3 is known for its fine particle size, which allows for lower firing temperatures and shorter firing times, making it ideal for torch firing. Its exceptional malleability also makes it perfect for intricate details and delicate structures like our bee’s wings.
- Necklace Chain: (Not pictured in original list, but essential for the finished piece) Choose a chain that complements the delicate size of your bee pendant. Sterling silver or fine silver chains are excellent choices to match the pendant’s material.
- Jewelry Eye Pin: These small pins with a loop at one end are crucial for attaching your pendant to the necklace chain. You can find them at most craft stores like Michael’s or specialized bead and jewelry supply shops. Select a small gauge eye pin to maintain the delicate aesthetic of the bee.
- Metal Glue: (Not pictured) A strong adhesive is needed to securely attach the eye pin to the finished silver bee. Look for industrial-strength metal glue or super-strength general-purpose adhesive at craft stores or hardware stores. Ensure it dries clear and provides a lasting bond.
Recommended PMC Tools
While some crafting tools can be improvised, having dedicated PMC tools can significantly enhance your experience and the quality of your finished piece. These tools are designed to handle the unique properties of metal clay, ensuring better results and a smoother creative process.
- Butane Torch: A handheld butane torch is indispensable for firing small PMC pieces. Ensure you have a reliable torch that provides a consistent flame.
- Butane Refill: Keep a can of butane refill handy to ensure your torch is always ready for use. Running out mid-firing can be problematic.
- Black Max (Optional): This oxidizing solution is used to give silver a beautiful, aged, or antiqued look. If you desire a rich, dark patina to highlight the bee’s textures, Black Max is an excellent addition to your toolkit.
- Polishing Cloth: Essential for bringing out the brilliant shine of your fine silver after firing and finishing. Opt for a cloth specifically designed for jewelry.
- Brass Burnishing Brush: This tool is incredibly satisfying to use. After firing, your silver piece will be white and dull; a brass brush brings out the stunning metallic luster.
- Firing Brick: A non-flammable surface is crucial for safe torch firing. A ceramic or charcoal firing brick provides an insulated, heat-resistant base for your PMC pieces.
- Sculpting Tools (Optional but Recommended): While a toothpick or a kitchen knife can work in a pinch, a small set of dedicated sculpting tools offers greater precision and control. Many crafters find wax carving tool sets (often stainless steel) to be perfect for PMC. You can find a comprehensive set for around $8-10 on Amazon.com by searching “wax carvers.” These tools are a worthwhile investment, providing fine tips and edges for detailed work.
- Thin Metal Files: You’ll only need one for this project, but they typically come in handy sets. These files are useful for refining edges or smoothing any minor imperfections on your silver piece after firing.
Other Household & Craft Room Items:
Beyond specialized tools, a few common items from around your home or craft room will complete your setup:
- Scissors: For cutting paper towels or packaging.
- Paper Towels: Useful for dabbing water or cleaning.
- Scrap Paper: Protects your work surface and keeps things tidy.
- Tweezers: Handy for manipulating small clay pieces or placing your hot finished pendant.
Step-by-Step Guide: Crafting Your Delicate Silver Bee Pendant
Step 1: Sculpting the Bee’s Body Segments
Begin your bee with three small, distinct balls of PMC3 clay. To give your bee a natural, tapered body, ensure these balls are graduated in size: one small, one medium, and one large. Now, take the largest of these balls and gently roll it into a teardrop shape. This will form the “bum” or abdomen of your bee, which will be the widest part. Focus on creating a smooth, organic shape that will serve as a sturdy base for the rest of your bee’s body.
Step 2: Adding Texture to the Abdomen
With your teardrop-shaped bee abdomen ready, it’s time to add some character. Using one of your fine-tipped sculpting tools—or a simple toothpick or the blunt edge of a butter knife if you don’t have dedicated tools—carefully press lines horizontally around the width of the teardrop. These lines will create a segmented, textured look, mimicking the natural patterns on a bee’s body. Be gentle but firm enough to leave clear indentations, but avoid cutting through the clay. This texture will become beautifully pronounced once the silver is polished.
Step 3: Forming the Torso and Adding Detail
Now, take your “medium” sized ball of PMC3 clay. This piece will become the bee’s torso. To securely attach it to the teardrop-shaped abdomen, you’ll need to prepare the joining surfaces. PMC clay dries quickly, so a little moisture is your best friend for strong bonds. Dab a tiny drop of tap water onto both the area on the abdomen where the torso will sit and the base of the torso piece itself. The water makes the clay sticky, allowing the pieces to adhere together. For an even stronger bond, you can lightly rough up the joining surfaces with a needle tool before wetting. Once attached, use a needle or a fine-tipped sculpting tool to make a series of gentle pokes or indentations across the surface of the torso. These small divots will give your bee a wonderful “fuzzy” texture after firing, creating the charming appearance of a bumblebee.
Step 4: Attaching the Head
This step mirrors the previous one, focusing on completing the bee’s basic body structure. Take your smallest clay ball, destined to be the bee’s head, and prepare it for attachment. Apply a small drop of water to the joining surfaces of both the head and the torso, just as you did in Step 3, to ensure they bond properly. Carefully press the head onto the front of the torso, gently shaping it to blend seamlessly with the body. Ensure all connections are secure but don’t exert too much pressure, as the clay is still soft and malleable.
Step 5: Crafting and Attaching the Delicate Wings
The wings, though delicate, are surprisingly easy to create. Start by rolling two minuscule balls of PMC3 clay – aim for them to be equal in size. Gently squish each ball flat, then carefully shape them into tiny teardrops. These teardrops will form the elegant wings of your bee. To attach them, dab a tiny bit of water onto the base of each wing and the corresponding side of the bee’s torso where you want the wings to sit. Gently press each wing into place, ensuring a secure attachment without distorting their delicate shape. Take your time with this step, as well-placed wings truly bring the bee to life.
Step 6: Drying Your Micro Sculpture
Once your tiny bee sculpture is complete, it’s crucial to allow it to dry thoroughly before firing. Any residual moisture can cause problems during the firing process. If you opt for air-drying, patience is key; allow at least 24 hours for complete dryness. For those who are a bit more impatient (and who isn’t when crafting something exciting!), a candle warmer can significantly speed up the drying process. Place your bee on a candle warmer, and for such a small piece, two hours is often sufficient to achieve bone-dryness, making it ready for the next exciting stage: firing.
Step 7: The Art of Torch Firing Your PMC Bee
Filing your bone-dry metal clay piece is where the real magic happens, transforming soft clay into solid silver. If you’re new to torch firing, YouTube offers many excellent visual demonstrations. Here’s a detailed breakdown of the basic steps to ensure a safe and successful firing:
- Preparation: Place your completely bone-dry PMC bee onto your firing brick. Ensure the firing brick is on a stable, non-flammable surface, away from any combustible materials. Good ventilation is also advisable.
- Initiating the Flame: Turn on your butane torch and adjust the flame to a steady, blue cone. Begin sweeping the end of the flame (the hottest part) around your PMC piece in a continuous, gentle motion. The goal is even heating. Avoid holding the flame static on any single spot for too long, as this can cause localized overheating. Keep the flame at an angle, never aiming straight down, which could create a concentrated hot spot.
- The Binder Burn-Off: Shortly after heating begins, your piece will briefly ignite, bursting into small flames. Don’t be alarmed; this is perfectly normal and a crucial part of the process. These flames indicate that the organic binder holding the silver particles together is burning away. The flames will extinguish on their own within a few seconds. This is where the sintering (fusion) of the metal truly begins. You might also notice a slight shrinkage in your piece during this stage, which is completely expected and a sign that the metal is compacting.
- Achieving the “Peach Glow”: Continue sweeping the flame around your piece. After the binder burn-off, the silver will begin to glow a beautiful, soft peach or orange color. This glow is your primary indicator of proper firing temperature. Performing this step in a dimly lit room can make it much easier to observe this color change clearly. Once the peach glow is consistent across the entire piece, continue firing for an additional 2-3 minutes. This sustained heat ensures that the silver particles fully fuse, resulting in a strong and durable final product.
- Post-Firing Appearance: After the recommended firing time, turn off your torch and let the piece cool naturally on the firing brick. You’ll notice that your fired bee will appear white and chalky. This isn’t because something went wrong; it’s simply a layer of fine dust and oxidation on the surface. Rest assured, underneath this white layer is beautiful fine silver!
- Cooling Safely: This step cannot be overstressed: allow your piece to cool completely before touching it. Fine silver retains heat incredibly well, and what might look cool could still be hot enough to cause a severe burn. Give it ample time to air cool, or you can gently quench it in cool water once the glow has completely faded, but only if you are certain it’s cooled enough not to crack from thermal shock. Better safe than sorry!
Step 8: Revealing the Silver Shine
This is arguably the most satisfying part of the entire process! Once your silver bee has cooled completely, it will appear white and somewhat dull. To reveal its true beauty, take your brass burnishing brush. Firmly brush across the surface of your bee in a single, consistent direction. As you brush, you will witness the dusty white layer magically disappear, giving way to the brilliant, rich luster of fine silver underneath. Continue brushing until your bee achieves a uniform, radiant shine. This process not only polishes the silver but also hardens the surface slightly.
Step 9: Final Polish and Assembly
After burnishing, give your newly revealed silver bee a very gentle rub with a soft polishing cloth. This will clean away any remaining residue and enhance its shine, bringing out the full brilliance of the fine silver. Now that your beautiful pendant is complete, it’s time to prepare it for wearing by attaching it to a necklace chain.
Take one of your small silver eye pins. Use a wire cutter to snip the tail of the eye pin down to a length that is approximately three-quarters the length of your little bee. This ensures the pin is well-hidden and proportionate. With jewelry pliers, gently open the small loop at the head of the eye pin. Carefully slide your chosen necklace chain into this opening, then use the pliers to pinch the loop securely closed, ensuring the chain cannot slip out. The eye pin’s opening is tiny by design, so it’s essential to open and close it properly around the chain. Finally, apply a small dot of strong metal glue (or super-strength general-purpose adhesive) to the cut end of the eye pin and carefully glue it onto the back of your bee pendant. Position it centrally to ensure the bee hangs straight. Allow the glue to dry completely for the time specified on the adhesive bottle, which can range from a few hours to overnight. Once dried, your stunning, classy, and petite silver bumblebee is ready to be worn and admired!
Congratulations, you’re done! Enjoy your new handmade masterpiece, a testament to your creativity and skill.
A Note About Achieving an Aged Silver Look:
While this delicate bee looks absolutely stunning with a bright, white-silver finish, many crafters adore the aesthetic of aged, weathered silver. If you prefer a richer, tarnished, or antique look for your jewelry, consider using Black Max, an oxidizing solution (often pictured with PMC supplies). Black Max quickly darkens silver, highlighting textures and recessed areas, giving the piece a fantastic vintage appeal. There are numerous helpful tutorials on YouTube demonstrating how to effectively apply Black Max to achieve different levels of patination. It’s a simple process that can dramatically alter the character of your silver creations.
Care for Your Fine Silver Pendant
To keep your delicate silver bee pendant looking its best, follow these simple care tips: store it in a cool, dry place, ideally in an airtight bag or jewelry box, to minimize tarnishing. Avoid exposing it to harsh chemicals, perfumes, and lotions. Clean it regularly with a soft polishing cloth specifically designed for silver. For deeper cleaning, a mild soap and water solution can be used, ensuring it’s thoroughly dried afterward.
And that’s how you do it, crafters!
We hope you thoroughly enjoyed this detailed and easy-to-follow tutorial on how to create your own exquisite silver bee pendant. There’s a profound sense of accomplishment that comes with making something beautiful with your own hands. We’d love to hear your thoughts on this DIY jewelry project in the comments section below! Did you find the instructions clear? Do you have any alternative tips or tricks for working with Precious Metal Clay?
At our core, we believe in the power of DIY – transforming ideas into tangible creations, making craft projects, enhancing home decor, discovering upcycling ideas, trying new recipes, and mastering tutorials. We created this platform to inspire everyone to tap into their creative side and realize the endless possibilities of doing things themselves. Join our thriving community of DIY enthusiasts where every project is just a click away. Connect with us and share your creative journey on Facebook, Twitter, Pinterest, and Instagram! We can’t wait to see your buzzing creations!
Explore More Easy DIY Necklace Tutorials:
If you loved making this silver bee pendant, you’ll be thrilled to discover our other engaging DIY necklace tutorials: