
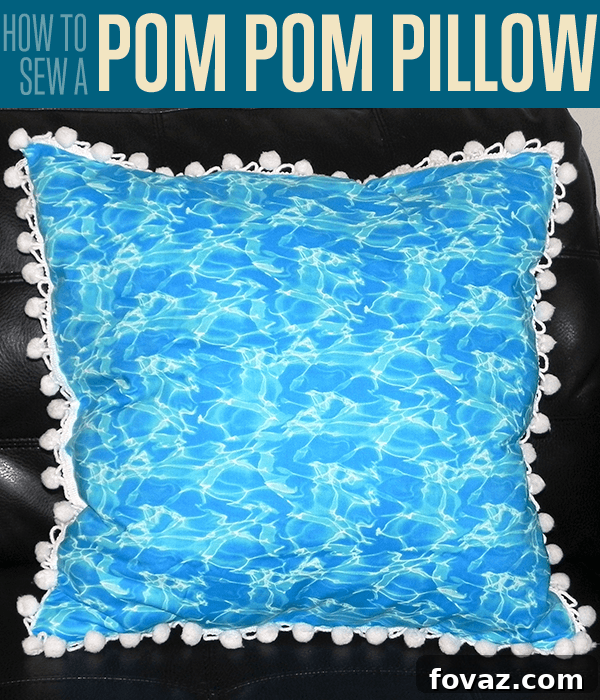
Unleash Your Creativity: The Ultimate Guide to Crafting Your Own Charming Pom-Pom Pillows
Transforming your living space doesn’t have to break the bank or involve a complete overhaul. Sometimes, the smallest details make the biggest impact. If you’ve ever admired those whimsical throw pillows adorned with playful pom-poms and wished you could add that touch of unique character to your home, you’re in for a treat! This comprehensive sewing tutorial will guide you through the remarkably simple process of creating your very own DIY pom-pom pillows, making expensive or hard-to-find decor a thing of the past.
Gone are the days of sad, uninspired throw pillows that merely fill a space. With a little fabric, some delightful pom-pom trim, and a dash of creativity, you can infuse your rooms with vibrant pops of color, interesting textures, and a personality that’s uniquely yours. Crafting your own pillows offers not just significant cost savings but also the immense satisfaction of personalizing your home decor down to the last stitch. Ready to give your sofa or bed a stylish refresh? Let’s dive into this fun and rewarding project!
Why DIY Your Throw Pillows? The Benefits of Creative Home Decor
Before we embark on our sewing adventure, let’s explore why making your own decorative pillows, especially those as charming as pom-pom pillows, is such a fantastic idea:
- Cost-Effectiveness: Store-bought designer pillows, particularly those with unique embellishments, can be surprisingly expensive. By sourcing your own fabric and trim, you can often create multiple pillows for the price of one retail version.
- Unmatched Personalization: The freedom to choose your exact fabric, color palette, and trim allows you to perfectly match your existing decor or create a bold new statement. You’re not limited by what’s available in stores.
- Therapeutic & Rewarding: Engaging in a craft project like sewing can be incredibly relaxing and satisfying. There’s a genuine sense of accomplishment in seeing your vision come to life from raw materials.
- Unique & Custom Style: Your DIY pillows will be one-of-a-kind. They reflect your taste and creativity, ensuring your home decor stands out from the mass-produced items found everywhere else.
- Seasonal & Trend Adaptability: Easily update your decor with the seasons or current trends without a major investment. Swap out fabric colors for spring pastels, summer brights, autumnal jewel tones, or festive holiday themes.
DIY Pom Pom Pillow: A Step-by-Step Sewing Tutorial
This project is perfect for both beginner sewers and experienced crafters looking for a quick and satisfying project. The playful pom-pom trim instantly adds whimsy and a delightful tactile element, making these pillows a joy to create and display. Follow these simple steps to bring your vision to life.
Gather Your Essential Materials and Tools
Preparation is key to any successful DIY project. Here’s what you’ll need to get started. We’ll be creating a generously sized pillow, but you can adjust dimensions to suit your preference.
- Fabric of Your Choice: For a large pillow, we recommend two 21.5” squares. Consider sturdy yet soft fabrics like cotton twill, linen, canvas, or even a decorative upholstery fabric. The print and texture will define the pillow’s character. (We’ll cut two squares, each 21.5″ x 21.5″, allowing for a 1/2-inch seam allowance around a 20.5″ finished pillow).
- Pom-Pom Trim: You’ll need enough to go around three sides of your pillow. For a 21.5” square, four pieces, each 21.5” long, will provide ample trim, allowing you to choose how many sides to embellish. Experiment with different pom-pom sizes and colors to match your fabric.
- Straight Pins: Essential for holding your fabric and trim securely in place before sewing. Opt for sharp, fine pins that won’t snag your fabric.
- Sewing Machine: Any basic sewing machine capable of a straight stitch will work perfectly. Ensure it’s in good working order and threaded correctly.
- Coordinating Thread: Choose a thread color that either matches your fabric perfectly for a seamless look or contrasts subtly for a decorative touch. High-quality polyester thread is generally recommended for durability.
- Pillow Stuffing: High-quality polyester fiberfill is a popular choice for its loft and resilience. Alternatively, consider feather/down inserts for a more luxurious feel, or even repurpose old pillow stuffing.
- Pinking Shears (Recommended): While not strictly necessary, pinking shears create a zigzag edge that helps prevent fabric fraying, especially important for pillow inserts that might be washed. Regular sharp fabric scissors are also fine.
- Measuring Tape or Ruler: For accurate fabric and trim measurements.
- Fabric Marker or Chalk (Optional): For marking cutting lines or seam allowances.
Let’s Get Started: Your Step-by-Step Guide to Pillow Perfection
Step 1: Precision Cutting and Trim Placement
The foundation of a great pillow lies in accurate cutting. Begin by carefully cutting your chosen fabric squares. Using pinking shears at this stage can significantly reduce fraying, leading to a neater finish and a more durable pillow. If you don’t have pinking shears, a simple zigzag stitch along the raw edges after cutting can serve a similar purpose, or you can just proceed carefully.
Once your fabric squares are ready, lay one square of fabric down on a flat surface, ensuring the right side (the side you want visible on your finished pillow) is facing up. Now, take one of your pieces of pom-pom trim. Carefully place the trim along one edge of the fabric square, making sure the actual pom-poms are facing inward towards the center of the fabric square, with the trim’s ribbon edge aligned with the raw edge of your fabric. This is crucial because when you turn the pillow right side out, the pom-poms will beautifully emerge from the seam. Use a few straight pins to temporarily hold the trim in place.
Step 2: Layering Your Fabric for Sewing
With your first fabric square and pom-pom trim in position, it’s time to add the second fabric square. Carefully place the second square of fabric directly on top of the first, ensuring its right side is facing down. This means the two right sides of your fabric should be facing each other, “kissing” in the middle. Take your time to ensure all the raw edges of both fabric squares and the pom-pom trim are perfectly aligned. This careful alignment is critical for a neat and professional-looking finished pillow.
Step 3: Secure Pinning and Strategic Sewing
Now that your fabric layers and trim are aligned, it’s time to secure everything. Begin pinning along the edge where you placed your first piece of pom-pom trim. Insert straight pins perpendicular to the raw edge, spacing them every inch or two. This will hold all layers firmly during sewing. Repeat this process for two of the other sides of your fabric square, ensuring you place pom-pom trim along these edges with the pom-poms facing inward, just as you did for the first side. This means three sides of your pillow will feature the delightful pom-pom trim.
For the fourth and final side, you will *not* place any trim. Instead, this side will serve as the opening for turning and stuffing your pillow. On this side, leave an unsewn opening of about 6 to 8 inches in the center. Mark the start and end points of this opening with extra pins. You will sew from one corner to the start of the opening, backstitch to secure, lift your needle, move to the end of the opening, backstitch, and then continue sewing to the next corner. This creates a sturdy, designated gap. Remember to backstitch at the beginning and end of each seam to lock the stitches in place. Use a consistent seam allowance (typically 1/2 inch) around all three and a half sides.
Step 4: The Big Reveal – Turning Inside Out
Once all your sewing is complete, it’s time for a satisfying moment! Carefully clip the corners of your pillow close to the seam, being careful not to cut through your stitches. This step helps create sharper, crisper corners when the pillow is turned right side out. Now, reach through the unsewn opening you left on the fourth side and gently pull the entire pillow fabric through until the right sides of the fabric are facing out. Take your time with this step, especially around the corners. You can use a blunt object, like a chopstick or a turning tool, to carefully push out the corners from the inside, ensuring they are as sharp as possible without tearing the fabric.
Step 5: Stuffing and Sealing the Deal
Your pillow is almost complete! Now for the fun part: stuffing. Begin to gently insert your chosen pillow stuffing through the open seam. Distribute the stuffing evenly throughout the pillow, pushing it into the corners first to ensure a full, well-shaped cushion. Continue to add stuffing until the pillow reaches your desired level of firmness and plumpness. Avoid overstuffing, which can put strain on your seams, or understuffing, which results in a floppy pillow.
Once you’re happy with the stuffing, it’s time to close the opening. Fold the raw edges of the opening inward, aligning them with the sewn seam line, and press them flat. Use straight pins to hold this fold securely. The neatest way to close this opening is by hand, using an invisible stitch, also known as a ladder stitch. This stitch creates a nearly undetectable seam. Alternatively, for a quicker but less invisible finish, you can carefully topstitch the opening closed on your sewing machine, keeping your stitches as close to the edge as possible.
Styling Your New Creation and Beyond
Congratulations! In about an hour, you’ve created a beautiful, custom pom-pom pillow that adds just the right touch of personality and charm to your living room, bedroom, or even an outdoor patio space. There’s an incredible satisfaction in stepping back and admiring something you’ve made with your own hands. The perfect pop of color and texture can truly make a space feel more inviting and uniquely yours.
Don’t stop at just one! Consider making new pillows every season by choosing fabrics in colors and patterns that evoke that time of year for you. Imagine rich, jewel tones in a heavier fabric like velvet or faux fur for autumn and winter, or crisp linen pastels and vibrant florals for spring and summer. This simple project allows for endless creativity and ensures your home decor always feels fresh and current.
Pro Tips for the Savvy DIYer:
- Fabric Preparation: Always pre-wash and dry your fabric before cutting and sewing. This prevents any potential shrinking or distortion after your pillow is finished and washed.
- Coupon Savings: To save extra money on fabric and trim, always check for sales and coupons! Many craft and fabric stores offer apps with digital coupons or have weekly flyers. A little planning can go a long way in cutting costs.
- Alternate Trims: If pom-poms aren’t quite your style, consider other fun trims like tassels, fringe, piping, or even a simple contrasting fabric flange.
- Stuffing Density: For a more structured, decorative pillow, stuff it firmly. For a softer, more squishy pillow perfect for lounging, use less stuffing.
- Practice Makes Perfect: If you’re new to sewing, practice a few straight stitches on scrap fabric before working on your actual project. This builds confidence and ensures neat seams.
Thanks and Happy DIY’ing! Share Your Creations!
We absolutely can’t wait to see the incredible pom-pom pillows you create! Share your projects with us and inspire others to embrace the joy of DIY home decor. There’s a wonderful community of crafters out there eager to celebrate your successes and share tips.
Like this post? Explore More Sewing Tutorials for Your Next Project!
If you enjoyed this beginner-friendly sewing project, you’ll love diving into our other popular tutorials. Whether you’re looking to master more sewing hacks, discover clever tips for efficient crafting, or explore other home decor projects, we have a wealth of resources waiting for you. Expand your sewing skills and embark on your next creative adventure today!