
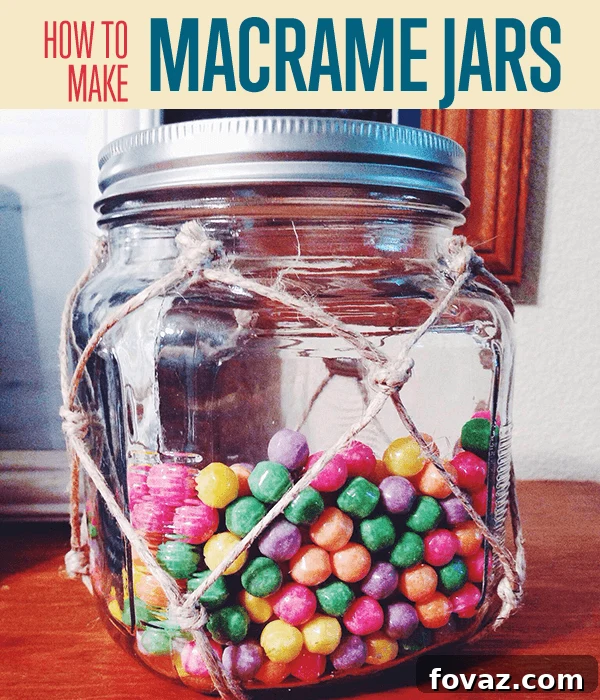
DIY Macrame Glass Jars: Craft Your Own Bohemian-Chic Storage & Decor
There’s an undeniable allure to macrame, a timeless art form that dates back centuries but continues to captivate with its intricate knot work and bohemian charm. For me, the distinctive, nautical-looking net patterns instantly transport me back to my cherished days spent along the sun-drenched coast of South Carolina. Beyond the nostalgic, beach-inspired aesthetic, crafting macrame glass jars offers a truly rewarding experience. This project isn’t just about creating beautiful decor; it’s about embracing simplicity, sustainability, and personal expression. It’s incredibly easy to master, requiring minimal supplies that are both affordable and readily available, making it the perfect DIY endeavor for anyone looking to add a touch of handmade elegance to their home without breaking the bank.
Whether you’re a seasoned crafter or just dipping your toes into the world of DIY, these macrame glass jars are an accessible and enjoyable project. Imagine transforming an ordinary glass jar into a stunning decorative piece that can hold anything from seashells and trinkets to fresh flowers or even your favorite craft supplies. Not only will you end up with a unique, eye-catching item, but you’ll also gain the satisfaction of creating something beautiful with your own hands. Get ready to unleash your creativity as we dive into crafting these gorgeous, versatile macrame containers!
Why Craft Your Own Macrame Glass Jars?
Beyond the simple joy of creating, there are numerous compelling reasons to embark on this macrame jar project. It’s more than just a craft; it’s an opportunity to infuse your living space with personality and purpose.
- Personalized Home Decor: Mass-produced decor can feel impersonal. Handmade macrame jars allow you to choose your twine color, jar style, and knot density, ensuring your finished piece perfectly complements your existing home aesthetic, whether it’s bohemian, farmhouse, coastal, or eclectic.
- Eco-Friendly Upcycling: Give old glass jars a new lease on life! Instead of discarding used pickle jars, canning jars, or sauce containers, transform them into functional and beautiful objects. This sustainable approach reduces waste and champions creative reuse.
- Budget-Friendly Crafting: You don’t need expensive tools or materials for this project. Twine is incredibly affordable, and glass jars can often be found for free or pennies at thrift stores, making this a highly economical way to update your decor.
- Versatile Functionality: These macrame jars are incredibly adaptable. Use them as charming vases for fresh or dried flowers, stylish holders for pens and craft brushes, organizers for bathroom essentials, unique candle lanterns (with battery-operated candles for safety), or even thoughtful, handmade gifts.
- Mindful & Relaxing Activity: The repetitive motion of tying knots in macrame can be wonderfully meditative and stress-reducing. It’s a fantastic way to unwind, focus your mind, and engage in a calming activity that yields a tangible, beautiful result.
- Develop New Skills: For beginners, this project introduces fundamental macrame knots and techniques in a manageable way. It’s a great stepping stone to more complex macrame projects in the future.
Essential Supplies for Your Macrame Jar Project
Gathering your supplies is the first exciting step in any DIY adventure. For these macrame glass jars, you’ll find that everything you need is affordable and easily accessible, often found in your local craft store or even around your home. Quality supplies make for a smoother crafting experience and a more polished final product.
- Glass Container with a Lid: The foundation of your project! I used a jar roughly the size of a standard pickle jar, which I found for a few dollars. However, feel free to get creative. Canning jars, mason jars, old food jars, or even unique glass bottles can work beautifully. Thrift stores are an excellent resource for inexpensive and interesting containers. Choose a jar with a lid if you plan to use it for storage, as the lid will help frame the top macrame section elegantly. Ensure your chosen container is clean and dry before you begin.
- Twine or Macrame Cord: This is where the magic happens. I recommend using natural fibers like cotton, jute, or hemp twine for an authentic, bohemian, or nautical look. Cotton cord often provides a softer feel and cleaner knots, while jute offers a more rustic texture. The thickness of your twine will influence the look of your netting – a thicker cord will create a bolder pattern, while a thinner one will be more delicate. You’ll need approximately 30 feet of twine for a pickle-jar-sized container. Buying a roll will give you plenty for this and future projects.
- Ruler or Measuring Tape: Precision is key for uniform knots and a symmetrical netting pattern. A standard ruler will suffice for measuring your twine lengths and the consistent spacing between your knots. This ensures a professional and aesthetically pleasing finish to your macrame.
- Sharp Scissors: You’ll need a good pair of sharp scissors to cut your twine cleanly and efficiently. Dull scissors can fray the ends of your cord, making it harder to tie knots and giving your project a messy appearance.
- Hot Glue Gun and Glue Sticks: Hot glue will be your best friend for securely attaching the macrame netting to your glass container. A hot glue gun provides a quick, strong bond that dries clear, making it ideal for this purpose. Always exercise caution when using a hot glue gun to prevent burns.
Step-by-Step Guide: Crafting Your Macrame Glass Jar
Now that you have all your supplies ready, let’s dive into the creative process. Follow these detailed steps to transform your ordinary glass jar into a stunning macrame masterpiece.
Preparation and Initial Setup
Step 1: Measure and Cut Your Twine
Begin by taking your chosen twine and ruler. Carefully measure out five individual pieces, each exactly 6 feet (approximately 180 cm) in length. Use your sharp scissors to cut each piece cleanly. Having these precise lengths is crucial for creating a symmetrical and well-proportioned macrame netting that will adequately cover your jar. A total of 30 feet of twine provides ample length for a standard pickle-jar size, allowing for the knots and some room for trimming.
Step 2: Create the Foundation Knot
Gather all five of your 6-foot twine pieces together, ensuring their ends are aligned. Fold the entire bundle in half, finding the exact midpoint. At this midpoint, create a secure slip knot. This initial knot will serve as the very bottom (or top, depending on how you view the initial setup) of your macrame netting, and it will effectively transform your five 6-foot pieces into ten 3-foot sections of working cord. This central knot is the anchor from which your entire design will grow.
Building the Macrame Netting
Step 3: Tie the First Row of Knots
Now you have ten individual strings extending from your central slip knot. Take any two adjacent strings from this group. Using your ruler, measure approximately 2 inches (about 5 cm) down from the original central knot. At this 2-inch mark, tie a simple, secure knot connecting these two strings. This knot will be the first in your macrame pattern, establishing the spacing for your entire design. Consistency in this measurement is vital for a uniform look.
Step 4: Complete the First Row
Continue the process described in Step 3 for the remaining strings. You will work in pairs, moving around the circumference of your central knot. Take the next two adjacent strings, measure 2 inches down from the central knot, and tie another knot. Repeat this until you have tied five individual knots, each connecting two strings, all spaced consistently at 2 inches from your central foundation knot. This completes your first full row of macrame knots, forming the very beginning of your netting structure.
Step 5: Tie the Second Row of Alternating Knots
To create the characteristic net pattern of macrame, you need to stagger your next row of knots. Take one string from one of the previously tied pairs (from Step 4). Then, take one string from the *adjacent* pair. You should now have two strings that were previously part of different knots. Measure approximately 2 inches (about 5 cm) down from the knots you just made in Step 4. At this point, tie a new knot connecting these two staggered strings. This alternating technique is what creates the “holes” in your netting.
Step 6: Continue the Second Row Pattern
Repeat Step 5, working your way around the netting. Always take one string from an existing knot and pair it with an adjacent string from the neighboring knot. Ensure that the spacing for these new knots remains consistent at 2 inches from the previous row of knots. This meticulous approach ensures your macrame netting develops a beautiful, even, and consistent pattern, truly embodying the essence of macrame art. Take your time to make each knot neat and firm.
Step 7: Extend the Netting to Fit Your Jar
Continue repeating the alternating knotting pattern from Steps 5 and 6. After every few rows, gently place the developing macrame netting over your glass container to check its fit and length. This frequent checking is crucial; you want the netting to be snug but not stretched, and long enough to cover the main body of your jar from top to bottom. Keep knotting rows until the macrame net will adequately cover the height of your container, allowing for a small overlap at the top and bottom where it will be secured.
Securing and Finishing Your Macrame Jar
Step 8: Position the Netting on the Container
Once your macrame netting has reached the desired length and fit, carefully place it over your glass container. Ensure it’s centered and evenly distributed. Then, turn the container upside down. This inverted position will make it much easier to access and secure the bottom strings of your netting to the base of the jar using hot glue.
Step 9: Secure the Base of the Netting (Initial Gluing)
With the jar upside down, take your hot glue gun. Apply a small dot of hot glue to the very bottom center of the container, close to where your original slip knot (from Step 2) is located. Carefully press the strands of twine from the netting into the hot glue, securing them firmly to the glass. Start with the strings closest to the original knot, spreading them out slightly.
Step 10: Complete the Base Gluing
Continue applying small amounts of hot glue around the bottom circumference of the container, spreading the individual twine strands from your netting outwards in a neat, star-like pattern if possible. Press each strand firmly into the glue until all the bottom strings of the macrame netting are completely and securely glued to the base of the container. Ensure there are no loose ends and that the netting feels stable on the jar.
Step 11: Remove the Central Knot
Once the hot glue at the base is completely dry and secure, use your sharp scissors to carefully cut the original slip knot that you made in Step 2. This knot served its purpose as an anchor during the knotting process. Cutting it will release any remaining tension and allow the macrame-covered container to sit perfectly upright and flush on any surface. Make sure not to cut any of the newly glued strings.
Step 12: Trim Excess Twine at the Top
Now, flip your container right-side up. Using your scissors, carefully cut the twine strands directly above the final row of macrame knots near the top rim of the container. You’re aiming for a clean, even edge around the top, preparing the area for its final securing step. Be precise to maintain the integrity of your knot pattern.
Step 13: Finish Trimming the Top Strands
Continue the trimming process from Step 12 until all of the loose, excess twine strands above the top row of knots have been cut away from the container. You should now have a tidy, even line of knots around the top rim of your jar, with no long, dangling pieces. Double-check for any stray strands that might have been missed.
Step 14: Secure the Top Knots
With your hot glue gun, apply small dots of glue to each of the knots along the top rim of the container. Gently press these knots down against the glass to secure them firmly. This step ensures the netting stays in place and doesn’t shift or unravel with use. As you glue, be mindful of the jar’s lid. Make absolutely certain that the placement of the glued knots does not obstruct or prevent the lid from being shut completely and securely. This is crucial for maintaining the functionality of your macrame jar.
Step 15: Celebrate Your Nautical Masterpiece!
Congratulations! You have successfully crafted a gorgeous, nautical-inspired macrame container. Take a moment to admire your handiwork. This versatile jar is now ready to hold anything your heart desires—from cherished seashells collected on beach trips to pencils on your desk, your favorite craft supplies, or even a secret stash of candy. The satisfaction of creating something so beautiful and functional with your own hands is truly unparalleled.
Tips for a Flawless Macrame Jar Project
To ensure your macrame glass jar project turns out beautifully and without frustration, consider these helpful tips:
- Maintain Consistent Tension: The key to professional-looking macrame is consistent knot tension. Try to tie each knot with roughly the same amount of tightness. Uneven tension can lead to a distorted pattern and a less symmetrical finish.
- Measure Meticulously: Don’t rush your measuring. Precise string lengths and consistent spacing between knots (the 2-inch measurements) are vital for an even and aesthetically pleasing net pattern. Use your ruler frequently.
- Practice Makes Perfect: If you’re new to macrame or knot-tying in general, consider practicing a few knots on a spare piece of twine before starting on your main project. This builds confidence and muscle memory.
- Adjust for Jar Size: The measurements provided are a guideline for a pickle-jar-sized container. If you use a significantly larger or smaller jar, you’ll need to adjust the initial string lengths and potentially the spacing between knots. More strings for a wider jar, shorter strings for a smaller jar.
- Work in Good Lighting: Good lighting helps you see your knots clearly, prevent mistakes, and ensure even spacing.
- Safety First with Hot Glue: Always be cautious when using a hot glue gun. The glue and the tip can get very hot. Keep a bowl of cool water nearby for quick relief in case of accidental contact.
- Don’t Be Afraid to Undo: If a knot doesn’t look right or the spacing is off, gently undo it and retie it. It’s better to fix it early than to have a finished project you’re not entirely happy with.
Creative Variations & Styling Ideas
Your finished macrame glass jar is a blank canvas for further creativity and personalization. Here are some ideas to inspire you:
- Color Play: Experiment with different colored twines. Natural jute offers a rustic look, while white or cream cotton provides a classic bohemian feel. Dyed twines can add a vibrant pop of color to match any decor. You can even mix two different colored cords for a striped or variegated effect.
- Embellishments: Before securing the top knots, consider threading wooden beads, small shells, or decorative charms onto some of the twine strands. These additions can enhance the bohemian or coastal vibe.
- Functional Storage: Use your macrame jars for practical storage in various rooms. In the kitchen, they can hold cooking utensils or dried herbs. In the bathroom, they’re perfect for cotton balls, Q-tips, or bath salts. In an office, they elegantly organize pens, markers, or paperclips.
- Unique Lighting: Transform your macrame jar into a captivating lantern. Place battery-operated fairy lights or LED tealight candles inside for a warm, ambient glow. *Always use battery-operated lights, never an open flame, due to the flammable nature of twine.*
- Gift Giving: A handmade macrame jar makes a thoughtful and personal gift for birthdays, housewarmings, or holidays. Fill it with homemade treats, a small plant, or a selection of bath bombs for a truly special present.
- Mini Plant Hanger: Adapt the netting technique slightly to create a macrame hanger for a small potted plant. Instead of securing to the bottom of the jar, create a loop to hang it.
- Painted Jars: For a different look, consider painting the inside of your glass jar with acrylic paint before adding the macrame. This can create a contrasting color background for your knot work.
Caring for Your Handmade Macrame Decor
To ensure your beautiful macrame glass jar remains a cherished piece for years to come, a little care goes a long way. Since twine can be delicate, especially if made from natural fibers, gentle cleaning is recommended. For dust, simply use a soft brush or a lint roller to gently remove any accumulation. For minor spills or marks, spot clean the affected area with a damp cloth and a very mild soap, being careful not to saturate the twine. Allow it to air dry completely. Avoid submerging the jar in water, as this can damage the twine and potentially loosen the glue. With proper care, your handmade macrame jar will continue to bring charm and character to your space.
There’s immense satisfaction in crafting something beautiful with your own hands, and this macrame glass jar project truly embodies that spirit. Not only have you created a stunning and versatile piece of home decor, but you’ve also engaged in a relaxing and rewarding activity. We absolutely love seeing your creativity flourish!
Don’t hesitate to share your magnificent macrame jar creations with friends and family – spread the joy of DIY! We encourage you to tag us on social media or send us photos of your finished projects. Your feedback, questions, and even suggestions for future craft projects are invaluable to us. Please leave your comments in the section below, and we’ll do our best to respond as quickly as possible. The more you engage and share your ideas, the more likely we are to explore similar crafting adventures in the future! Thank you for joining us, and happy DIY’ing!
Don’t forget to sign up for our newsletter to get all the latest updates on exciting craft projects in the making!
Explore More DIY Craft Projects!
Like our page on Facebook to get fun craft projects in your feed! Pin your favorite projects to Pinterest to share with friends and inspire others.
Check out some related craft posts here:
Alice in Wonderland Style Stacked Teacup Lamp
DIY Puffy Paint Hexagon Vase
How To Make A DIY Horizon Mirror