
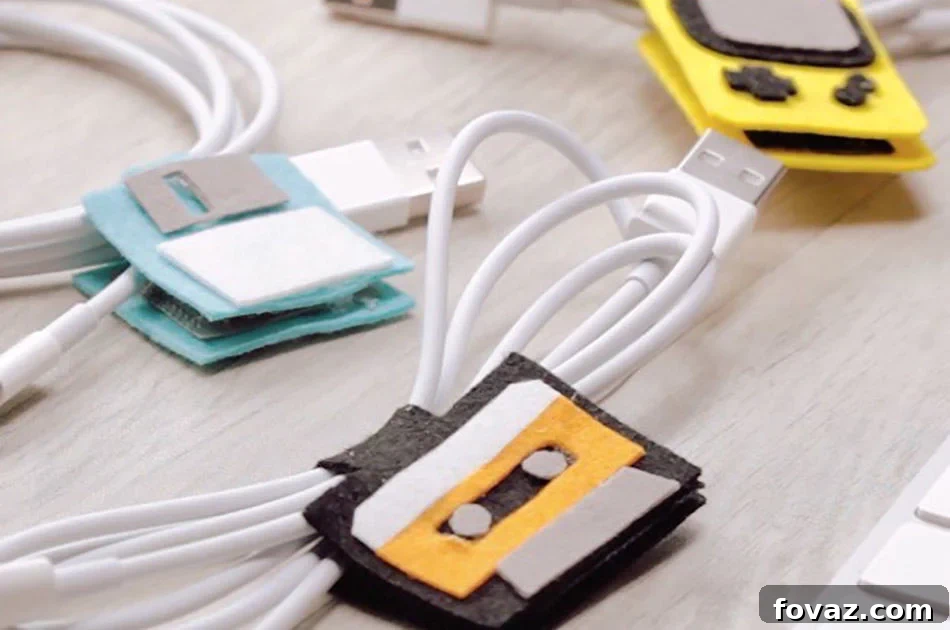
Do you remember the satisfying click of a floppy disk inserting into a drive, or the iconic sound of dial-up internet? The 1990s were a memorable era, and now you can infuse a touch of that beloved nostalgia into your modern workspace with a practical and incredibly charming DIY project. Say goodbye to the frustrating mess of tangled cables and hello to organized bliss, all while celebrating a piece of computing history. This guide will walk you through creating an adorable floppy disk-inspired cord organizer using simple felt squares – a delightful nod to a bygone era that keeps your cables neat and tidy.
Make Your Own ’90s Floppy Disk Cord Organizer: A Blast from the Past for Cable Management
In today’s tech-filled world, managing cables can feel like an endless battle. Charging cords, headphone wires, USB cables – they all seem to conspire to create an unsightly, tangled mess on your desk, in your bag, or behind your entertainment center. But what if you could tackle this common problem with a project that’s not only functional but also sparks joy and a little trip down memory lane? This ’90s-inspired floppy disk cord organizer is precisely that solution. It’s a fantastic blend of practicality and playful retro charm, offering an easy, step-by-step approach to keep your wires under control. Get ready to transform a few pieces of felt into a stylish, vintage tech accessory that will make organizing fun again!
Why Cable Organization Matters: Beyond Just Aesthetics
While a tidy desk certainly looks better, the benefits of effective cable management extend far beyond mere aesthetics. Tangled cords can lead to a host of frustrations and potential issues that impact efficiency, safety, and even the lifespan of your electronic devices. Understanding these benefits can further motivate you to embark on this satisfying DIY project.
- Prevents Damage to Cables: When cables are constantly twisted, bent, or pulled due to tangles, their internal wires can fray, break, or short-circuit. Proper organization reduces stress on the cable jacket and connectors, significantly extending the lifespan of your valuable charging cables, data transfer cords, and headphones.
- Enhances Safety: A spaghetti junction of wires on the floor or behind furniture isn’t just an eyesore; it’s a genuine tripping hazard. Furthermore, tightly bundled cables can lead to poor ventilation and excessive heat buildup, especially with power cords, which can potentially pose a fire risk. Organized cables minimize these dangers.
- Boosts Productivity and Efficiency: Imagine trying to find the right charger for your device amidst a pile of identical-looking black wires. It’s a waste of time and a source of frustration. A well-organized system allows you to quickly identify and access the specific cable you need, streamlining your workflow and saving precious minutes.
- Improves Aesthetics and Mental Clarity: A clean and clutter-free environment naturally looks more pleasant and professional. Beyond the visual appeal, a tidy space can contribute to a clearer mind, reducing stress and allowing you to focus better on your tasks. Your DIY floppy disk organizer adds a unique, decorative touch to this organized space.
- Simplifies Troubleshooting: If a device isn’t working or you need to replace a cable, clear cable routing makes it much easier to identify, unplug, and replace the correct wire without disrupting other connections. This is especially true for complex setups like home entertainment systems or multi-monitor workstations.
Embracing a DIY approach for your cable management, particularly with this charming floppy disk design, adds a personal touch that store-bought solutions often lack. It’s a rewarding project that combines utility with creative expression, making your space not just tidy, but also uniquely yours.
Embracing ’90s Nostalgia: The Enduring Appeal of Retro Tech
For those who grew up in the 1990s, the floppy disk wasn’t just a data storage device; it was a ubiquitous symbol of the burgeoning digital age, a gateway to a new world of computing. Before USB drives and cloud storage became ubiquitous, these square, magnetic disks were how we saved our homework, shared software, and even stored early digital photos. The distinct click as it slid into the “A:” drive, the “A:” drive icon itself – these are deeply ingrained memories for an entire generation. It represented a tangible piece of technology that allowed us to interact with computers in a way that felt both cutting-edge and delightfully tactile.
The enduring appeal of ’90s nostalgia lies in its unique blend of vibrant pop culture, rapid technological advancements, and a sense of simpler times before the hyper-connectivity of the modern internet. Bringing elements like the floppy disk into our modern lives isn’t just about sentimentality; it’s about appreciating where we’ve come from, celebrating iconic designs, and adding a unique, story-filled touch to our contemporary spaces. This DIY cord organizer doesn’t just manage your cables; it serves as a mini monument to a pivotal era in tech history, sparking conversations and smiles every time you use it. It’s a perfect example of how form can meet function in a way that is both practical and deeply personal, resonating with anyone who remembers the satisfying crunch of a floppy disk label.
Gather Your Crafting Supplies for This Retro DIY Project
One of the best aspects of this DIY cord organizer is its simplicity in terms of materials. You won’t need an extensive craft kit or expensive, specialized components. Most of what you need can be found at your local craft store or even around your home, making this an accessible project for beginners and seasoned crafters alike. Here’s a detailed look at the essentials:
- Three Small Felt Squares: The felt squares will form the core of your floppy disk design. You’ll want one in grey (to mimic the main floppy disk casing), one in white (for the iconic label area), and one in light blue (to simulate the inner disk’s metallic shutter, though black felt is also a classic and accurate choice for this part). Felt is an ideal material for this project because it’s soft, incredibly easy to cut without fraying (which saves you from needing to hem edges), and readily available in a wide array of vibrant or subtle colors. Its pliable nature makes it perfect for wrapping around cables.
- Sharp Scissors: A good pair of sharp fabric scissors will ensure clean, precise cuts. Precision is essential for achieving that crisp, authentic floppy disk look, especially when creating the small details. Avoid using dull scissors, as they can pull, stretch, or distort the felt, leading to uneven and messy edges. If you don’t have fabric-specific scissors, any sharp, clean pair will do, just ensure they are designated for crafts to avoid dulling them on other materials.
- Hot Glue Gun and Glue Sticks: A hot glue gun is your fastest and most reliable friend for securely bonding felt in this project. Hot glue sets quickly, providing a strong hold that is perfect for crafting. Make sure you have enough glue sticks to complete the project. Always exercise caution when using a hot glue gun to prevent burns; the nozzle and glue itself can get very hot. A low-temperature glue gun might be a safer option for younger crafters or those who are new to using this tool.
- Velcro Square (Hook and Loop Fastener): A small self-adhesive Velcro square will provide the robust and reusable closure mechanism for your organizer. Ensure it’s a “hook and loop” type, as this is what allows the two pieces to securely fasten together and stay put around your cables. The adhesive backing makes application incredibly easy, eliminating the need for additional stitching or messy liquid glue for the Velcro itself. You can find these in various sizes; a small, approximately 1-inch square is usually sufficient.
With these simple materials in hand, you’re ready to embark on a fun and rewarding crafting journey!
Step-by-Step Guide: Crafting Your Iconic Floppy Disk Cord Organizer
Follow these detailed, easy-to-understand instructions to bring your ’90s tech dream to life and achieve perfectly organized cables!
Step 1: Preparing Your Felt Squares
Begin by laying out your three small felt squares: grey, white, and light blue. Take a moment to visualize how these colors will come together to form your floppy disk. The grey felt will represent the main casing of the floppy disk, providing the primary color. The white felt will be used for the iconic paper label area, where you’d typically write down the disk’s contents. Finally, the light blue felt (or black, if you prefer a more traditional look for the “shutter”) will mimic the appearance of the inner disk’s metallic sliding dust cover, adding a crucial layer of authenticity to your design.
Step 2: Forming the Main Body of the Floppy Disk
Now, take your light blue (or black) felt square. Carefully fold it in half, ensuring that all the edges align perfectly and the fold is crisp. With the felt still folded, use your sharp scissors to cut it precisely down the middle along the fold line. This action will yield two identical rectangular pieces of felt. For the subsequent steps of this project, you will only need one of these halves, as it will serve as the flexible base that wraps around your cables and forms the main body of your cord organizer.
Step 3: Creating the Iconic Corner Cutout (Part 1)
Grab one of the rectangular folded halves you created in Step 2. Keep this piece folded for accuracy in this step. From one of the open corners of this folded piece, make a small, precise square cut. This cutout will begin to form one of the distinctive notches often seen on real floppy disks, which sometimes served purposes like write-protection indicators or alignment guides. Aim for a clean, straight cut to ensure a polished and authentic look for your organizer.
Step 4: Completing the Corner Cutout (Part 2)
Next, move to the *other* open corner of the same folded felt piece. Similar to Step 3, make another square cut. However, this time, it’s crucial that you leave a small portion of the felt attached in the middle section between the two cuts. This creates a specific opening that will visually represent the area where the grey “dust cover” will eventually sit, mimicking the moving access shutter that protected the magnetic media inside a real floppy disk. The goal is to create an opening that clearly resembles the read/write head access area of a classic floppy disk.
Step 5: Unfolding and Inspecting Your Base
Carefully unfold the light blue (or black) felt piece you’ve been working on. At this point, with the two distinct cutouts now visible, it should clearly resemble the main body of a floppy disk. Take a moment to thoroughly inspect your cuts. Ensure they are symmetrical, clean, and accurately reflect the iconic design. If you notice any uneven edges or slight imperfections, gently trim them with your scissors to refine the shape. This felt piece is now your core component, ready for the decorative elements.
Step 6: Preparing the “Dust Cover” Component
Now, pick up your grey felt square. From one of its corners, cut a neat and proportionate rectangle. This grey rectangle is critically important as it will serve as the iconic sliding dust cover found on every 3.5-inch floppy disk. This cover’s real-world purpose was to protect the delicate magnetic media from dust and damage. The size of this felt rectangle should be carefully considered; it needs to be large enough to effectively cover the opening you created in the blue felt base but not so large that it extends disproportionately beyond the edges, maintaining the authentic look.
Step 7: Adding Detail to the Grey Slider
Take the grey rectangular piece you just cut in Step 6. To add a subtle yet impactful detail, carefully fold it lengthwise about a third of the way over. While it’s folded, use your scissors to cut a very small rectangle or notch from the folded edge. This small indentation will represent the tiny window or groove often found on the slider mechanism of a real floppy disk, adding an extra layer of authenticity and visual interest to your craft. Unfold it afterward.
Step 8: Applying the First Dot of Hot Glue
Turn your attention back to the unfolded blue felt piece, which now resembles the main floppy disk body. Locate the specific area directly above the larger of the two cutouts you made in Step 4. Place a small, precise dot of hot glue onto the blue felt in this position. Remember, when working with hot glue on felt, less is often more; using too much glue can potentially seep through the fabric, making a messy or stiff spot. A small, concentrated dot is sufficient for a strong bond.
Step 9: Attaching the Grey “Dust Cover”
Working quickly, before the hot glue has a chance to cool and set, press the small grey rectangle (which you detailed in Step 7) onto the dot of hot glue. Carefully position it so that it sits neatly above and partially within the larger cutout on the blue felt, aligning with the “slider” mechanism you created. Hold it firmly in place for a few seconds, applying gentle pressure, to allow the glue to cool and bond securely. This is a crucial aesthetic step for achieving the instantly recognizable floppy disk look.
Step 10: Preparing the “Label” Component
Now, pick up your white felt square. Just as you did with the grey felt, cut a clean and appropriately sized rectangle from one of its corners. This white rectangle is designed to represent the classic paper label area found on a floppy disk, the place where users would typically write down the contents of the disk with a marker. Ensure its size is proportionate to the rest of your design; it should fit neatly below the grey “dust cover” you’ve just attached, leaving a small, even border around it for a tidy finish.
Step 11: Applying the Second Dot of Hot Glue
Return to your blue felt base, now featuring the attached grey “dust cover.” Locate the area directly below the grey rectangle. Here, place another small, precise dot of hot glue. This specific spot is where your white “label” felt component will be secured. As before, be mindful of the amount of glue you apply to ensure a clean finish and prevent any excess from seeping through the felt, maintaining the professional appearance of your project.
Step 12: Attaching the White “Label”
Immediately after applying the glue in Step 11, press the white rectangular felt piece onto this new dot of hot glue. Position it neatly and centrally below the grey piece, effectively completing the iconic face of your floppy disk. Hold it down firmly for a few seconds to ensure a strong and lasting bond. At this stage, your floppy disk design should be clearly taking shape, looking very much like the retro tech item it’s inspired by!
Step 13: Preparing for the Velcro Closure (First Side)
Carefully turn your blue felt floppy disk over so you are looking at the back side. We are now going to add the crucial Velcro closure that will allow your organizer to wrap around and securely hold your cables. Dab a line of hot glue, approximately an inch long, onto one of the ends of the felt. It’s important to ensure this glue line is positioned on the side that will face outward when the felt is eventually wrapped around a cable. This ensures the Velcro will be accessible for fastening.
Step 14: Attaching the First Velcro Piece
Press one side of your Velcro square (either the hook or loop side – it doesn’t matter which you choose first, as long as you use the corresponding side in the next step) onto the hot glue from Step 13. Hold it firmly in place for a few seconds, applying gentle pressure, to allow for a secure attachment. The self-adhesive backing of the Velcro will provide extra grip and stability once the glue has fully cooled and set, ensuring a durable closure for your organizer.
Step 15: Attaching the Second Velcro Piece
Repeat steps 13 and 14 on the *opposite* end of the blue felt piece. This time, make sure to use the *other* half of your Velcro square (if you attached the hook side in Step 14, now attach the loop side, and vice-versa) so that the two pieces can fasten together securely. Crucially, position this second Velcro piece so that it aligns perfectly with the first when the felt is wrapped around a cable. This careful alignment is key to ensuring a snug, functional, and aesthetically pleasing closure for your cable organizer.
Step 16: Your New Cable Organizer is Ready!
Congratulations! Your ’90s-inspired floppy disk cord organizer is now complete and ready for action. Before putting it to use, allow any hot glue to fully cool and set for maximum durability. Once ready, simply wrap your stylish new organizer around any unruly cable – be it a phone charger, earbud cord, small USB cable, or even thin power cords – and fasten the Velcro pieces together. Enjoy the immense satisfaction of neatly managed cables and the charming retro vibe it brings to your desk, bag, or wherever you need a touch of organized nostalgia!
Pro Tips for a Perfect Finish and Enhanced Durability
To ensure your floppy disk cord organizer looks its best and lasts a long time, consider these additional tips:
- Practice Cuts: If you’re new to crafting with felt or want to ensure precision, consider practicing your square and rectangular cuts on a scrap piece of felt before cutting into your main squares. Precision makes a significant difference in the final, authentic look.
- Glue Sparingly: While hot glue is excellent for its speed and strength, using too much can make your felt stiff, create unsightly bumps, or even seep through to the other side. Apply small, controlled dots or thin lines for the best results.
- Velcro Alignment: Take extra care when attaching the Velcro pieces. Before permanently gluing the second piece, briefly wrap the felt around a cable to test the alignment. This ensures that the two Velcro parts meet perfectly for a secure and functional fit.
- Personalize It: Make your floppy disk even more unique and truly your own! Use fabric markers (permanent markers can work too, but test on a scrap first) to “write” a fun label or title on the white felt area, just like you would on a real floppy disk. You could also add small embroidered details or use different colored felt for a unique twist.
- Safety First with Hot Glue: Always supervise children when they are using a hot glue gun. Ensure there’s good ventilation in your workspace, and always keep fingers clear of the hot nozzle and freshly dispensed glue to prevent burns.
- Consider Alternatives: While felt is a fantastic choice, you could experiment with other non-fraying fabrics like faux leather or vinyl for a different texture, feel, and potentially enhanced durability for your organizer.
Beyond Floppy Disks: More ’90s-Inspired DIY Ideas for Your Home
If you’ve enjoyed creating this blast-from-the-past cord organizer, you might be inspired to infuse more ’90s charm into your home decor and everyday items. The possibilities are endless when it comes to leveraging that distinct retro aesthetic. These projects not only celebrate a beloved decade but also offer practical uses or simply bring a smile to your face:
- Cassette Tape Holders: Give old, forgotten cassette cases a new lease on life! Transform them into unique business card holders, quirky phone stands, or compact pen organizers for your desk. You can even craft new ones from wood or plastic, painted to resemble classic cassette tapes.
- Pixel Art Coasters: Embrace the nostalgia of 8-bit video games by recreating iconic characters or logos using perler beads. These colorful, interlocking beads can be arranged to form fantastic retro designs, which are then fused together with an iron to create fun and functional coasters for your beverages.
- Tie-Dye Everything: Dive headfirst into the vibrant, free-spirited look that defined much of 90s fashion and culture. Learn basic tie-dye techniques to transform plain t-shirts, tote bags, pillowcases, or even curtains into a kaleidoscopic explosion of color for a truly authentic splash of ’90s style.
- CD Mosaic Art: Don’t throw away those scratched or unwanted CDs! They can be cut into small, reflective pieces and glued onto frames, tabletops, planters, or even plain canvases to create shimmering, iridescent mosaic designs. This is a fantastic way to upcycle old media into dazzling new art pieces.
- Scrunchie Making: Revisit the glory days of 90s hair accessories by sewing your own scrunchies. This simple sewing project allows you to experiment with various fabrics, patterns, and elastic strengths to create a collection of stylish hair ties that are both practical and perfectly retro.
These projects, much like your floppy disk organizer, offer a wonderful way to combine practical needs with a delightful journey back in time, adding personality and a touch of unique style to your surroundings. They prove that good design and fun concepts are truly timeless.
And there you have it – a simple yet ingenious way to conquer cable clutter with a healthy dose of ’90s nostalgia! This DIY floppy disk cord organizer is more than just a functional accessory; it’s a conversation starter, a nod to a beloved era, and a testament to the power of creative crafting. We hope you enjoyed this journey back to the ’90s and found this tutorial both easy to follow and inspiring. It’s truly amazing what you can create with a few basic materials and a little imagination. Now that your cables are neat and your desk has a touch of retro charm, share your creations with us! We love seeing how our community brings these projects to life.
Check out the video tutorial below to see how it’s done for an even clearer visual guide and to ensure you master every step!
For more fantastic DIY ideas, craft news, home organization hacks, and a dose of daily inspiration, be sure to follow us on social media! Connect with our vibrant community, share your own projects and tips, and stay up-to-date with our latest tutorials:
Facebook |
Twitter |
Pinterest |
Instagram
Sign up for our newsletter for exclusive content and never miss a new project!
Explore More Creative DIY Projects
Loved this project and eager to tackle more creative endeavors? We’re sure you’ll find inspiration and practical solutions in these other popular DIY guides designed to help you organize and beautify your home: