
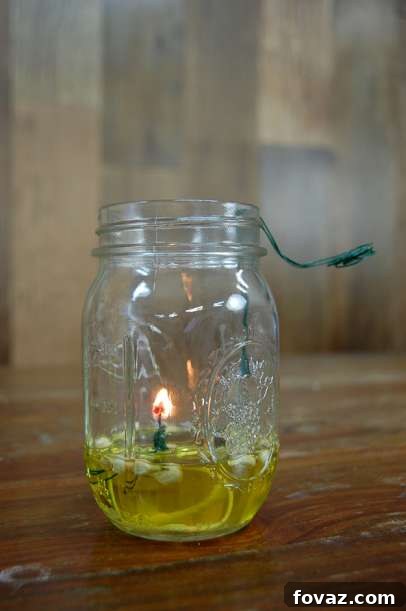
Illuminate Your Home: The Ultimate Guide to Crafting a Beautiful Mason Jar Oil Lamp
There’s an undeniable magic that a flickering flame brings to any space. Whether you’re planning a romantic dinner, enjoying a quiet evening with loved ones, or simply indulging in some well-deserved self-care, the warm glow of a lamp can instantly transform the atmosphere. Far beyond ordinary candles, a homemade Mason jar oil lamp offers a unique blend of rustic charm, personalized fragrance, and cost-effective brilliance. Imagine creating an inviting ambiance that not only looks stunning but also reflects your personal touch – all from materials you likely already have in your kitchen!
This simple DIY project guides you through crafting a beautiful and functional oil lamp using common kitchen ingredients like olive oil. Not only is this homemade solution significantly cheaper than constantly buying candles, but it also provides an opportunity to infuse your space with custom scents using essential oils and natural elements. From the invigorating aroma of peppermint and cinnamon to the soothing notes of rose and lavender, the possibilities for customization are endless. A meticulously crafted Mason jar oil lamp makes an exquisite addition to your home decor or a thoughtful, personalized gift for someone special – even if that special someone is you!
Why Choose a DIY Mason Jar Oil Lamp?
In a world full of mass-produced decor, creating something with your own hands offers a distinct sense of satisfaction and authenticity. A Mason jar oil lamp stands out for several compelling reasons:
- Unmatched Ambiance: The gentle, steady flame of an oil lamp casts a softer, more evocative light than many conventional candles. It creates a serene and romantic atmosphere, perfect for intimate gatherings, quiet evenings, or simply unwinding after a long day.
- Cost-Effective Lighting: Once you have your basic materials, the cost of operating an olive oil lamp is incredibly low. Olive oil is a readily available and affordable fuel source, making it a much more economical choice than frequently purchasing expensive candles.
- Endless Customization: This project is a canvas for your creativity. Experiment with different essential oils (lavender for relaxation, citrus for energy, cinnamon for warmth) or incorporate dried botanicals like rose petals, lavender buds, cinnamon sticks, or even coffee beans for a truly unique aesthetic and aromatic experience. The choice of jar, the arrangement of elements, and the fragrance are all yours to design.
- Sustainable and Reusable: Mason jars are designed for longevity and can be reused indefinitely. By opting for natural olive oil and reusable wicks, you’re choosing a more environmentally friendly lighting solution compared to disposable candles.
- A Thoughtful Gift: Handmade gifts carry a special meaning. A personalized Mason jar oil lamp, filled with a favorite scent or dried flowers, makes a heartfelt present for birthdays, holidays, housewarmings, or just because.
- Simple and Rewarding: You don’t need advanced crafting skills to create a stunning oil lamp. The steps are straightforward, and the satisfaction of seeing your handmade lamp glow is truly rewarding.
Before You Begin: Essential Considerations
To ensure a safe and enjoyable crafting experience, keep these important points in mind:
Safety First
While olive oil is a relatively safe fuel, any open flame requires caution. Always place your lit lamp on a stable, heat-resistant surface away from flammable materials like curtains, paper, or clothing. Never leave a burning lamp unattended, and keep it out of reach of children and pets. Ensure adequate ventilation in the room where the lamp is burning. When extinguishing the flame, gently snuff it out rather than blowing, to prevent oil splattering.
Choosing Your Mason Jar
A wide-mouthed glass jar, particularly a quart-sized canning jar, works best. The wide opening makes it easier to arrange the wire wick holder and add decorative elements. Ensure the glass is thick and durable enough to withstand moderate heat over time.
Selecting the Right Wick
For an olive oil lamp, a cotton or fiberglass wick designed for oil lamps is ideal. These wicks absorb the oil effectively and provide a consistent flame. You can find them at craft stores or online. Avoid using candle wicks, as they are often treated for wax and may not burn as efficiently with oil.
Olive Oil Quality
Any standard culinary-grade olive oil will work perfectly. You don’t need expensive extra virgin olive oil for this project; a more economical option will suffice. The oil acts as the fuel, slowly drawn up the wick to feed the flame.
Fragrance and Decor Elements
When selecting essential or fragrance oils, ensure they are safe for diffusion or burning. For dried flowers, herbs, and spices, choose elements that won’t easily catch fire when near the wick. Arrange them carefully within the oil, keeping a safe distance from the flame itself.
Materials You’ll Need
Gathering your materials is the first exciting step in bringing your Mason jar oil lamp to life:
- A Wide-Mouthed Glass Jar: A quart-size wide-mouthed canning jar is highly recommended for its stability and ease of access. However, any sturdy glass jar with a wide opening can work.
- Flexible Steel Wire: Approximately 1.5 to 2 times the height of your jar. This wire needs to be flexible enough to bend and coil but strong enough to hold its shape. Craft wire or bailing wire can be suitable.
- Lamp Wick: A cotton or fiberglass wick specifically designed for oil lamps. Ensure you have enough length to reach the bottom of your jar and extend slightly above the oil level.
- Olive Oil: Any culinary-grade olive oil will serve as your fuel.
- Essential Oil or Fragrance Oil (Optional): For adding a delightful aroma. Popular choices include lavender, peppermint, rose, cinnamon, sandalwood, or citrus blends.
- Dried Flowers, Herbs, and/or Spices (Optional): To enhance both the visual appeal and the scent. Consider dried rose petals, lavender buds, cinnamon sticks, star anise, dried orange slices, or small sprigs of rosemary.
- Tools: Pliers (for bending and twisting wire) and a pencil or small stick (for coiling the wire).
Step-by-Step Guide: Crafting Your Mason Jar Oil Lamp
Step 1: Preparing Your Wire for the Wick Holder
Your wire will form the essential structure that supports the wick and allows you to easily manage it. Begin by taking your flexible steel wire. Measure a length that is about 1.5 to 2 times the height of your jar. This extra length will be used for the coils at both ends. Using pliers, start by creating a robust ‘handle’ coil at one end of the wire. To do this, wrap the wire back and forth, twisting it several times to create a sturdy, multi-stranded section roughly the same height as your jar. This part will rest over the rim of the jar and can also serve as a handle for lifting the wick apparatus. The idea is to make this section strong and stable so it can support the wick upright.
Step 2: Forming the Wick Coil and Measuring
Now, let’s create the base for your wick. Measure the wire again at this point to ensure it’s a few inches taller than the overall height of your jar. This extra length allows the wick holder to stand comfortably inside the jar and provides enough clearance for the handle. At the opposite end of the wire from the handle coil, create another, looser coil. This coil will serve as the base where the wick sits, keeping it elevated from the very bottom of the jar. Wrap the wire loosely around a pencil or stick to create a spiral that is about one to two inches tall. This loose coil will allow the oil to be easily absorbed by the wick from below. You should now have two distinct coils: one sturdy, tighter coil at the top acting as a handle, and a looser, more open coil at the bottom designed to hold the wick.
Step 3: Attaching the Wick Securely
Take your lamp wick and carefully thread it through the loose coil you just created at the bottom of your wire structure. The length of the wick is crucial here: it needs to be long enough to reach the bottom of the jar (to ensure it can absorb plenty of oil) and extend up through the coil, with about a quarter to half an inch protruding above the wire coil. This exposed tip is what you will light. Once threaded, use pliers to gently pinch or twist the wire around the wick within the coil to secure it firmly in place. You want it to be snug but not so tight that it prevents oil from being drawn up. The majority of the wick should be submerged in the olive oil when the lamp is assembled.
Step 4: Filling Your Jar with Olive Oil
Carefully lower your completed wick assembly into the Mason jar, ensuring the handle coil rests neatly on the rim of the jar. Now, it’s time to add the fuel! Slowly pour olive oil into the jar. Fill the jar to a level where the olive oil covers the entire submerged portion of the wick, coming up just below the point where the wick is pinched by the wire coil. It’s important to leave a small amount of the wick above the oil line completely dry initially, as this part will catch the flame. However, you want enough oil so that the wick can effectively draw it up. A good rule of thumb is to fill the jar about two-thirds to three-quarters full. For reference, a few ounces of olive oil can keep your lamp burning for several hours, providing a long-lasting, gentle light.
Step 5: Personalizing Your Lamp with Scents and Decor (Optional)
This is where your Mason jar oil lamp truly becomes your own! To create a romantic, calming, invigorating, or festive atmosphere, add essential oils or fragrance oils directly to the olive oil. Start with 10-20 drops for a subtle scent and adjust according to your preference. Popular choices include:
- For relaxation: Lavender, chamomile, frankincense.
- For romance: Rose, ylang-ylang, sandalwood.
- For energy/freshness: Lemon, orange, peppermint, eucalyptus.
- For warmth/comfort: Cinnamon, clove, vanilla.
Beyond scent, you can enhance the visual intrigue by adding dried flowers, herbs, or spices. Gently place them into the oil, ensuring they are fully submerged or kept well away from the wick’s flame to prevent charring. Consider:
- Dried rosebuds or petals
- Lavender buds
- Cinnamon sticks
- Star anise pods
- Small sprigs of rosemary
- Dried orange or lemon slices
- Coffee beans
Carefully arrange these elements for a visually appealing display. Once you’ve added your chosen additions, gently stir the mixture with a thin stick or skewer to ensure the essential oils disperse evenly.
Step 6: Light & Enjoy!
With all your elements in place, your Mason jar oil lamp is ready to illuminate your space. Before lighting, allow a few minutes for the olive oil to fully saturate the wick. This “priming” ensures a steady, clean burn. Once the wick appears saturated, carefully light the exposed tip. If the flame is too large, you can gently pull the wick down a tiny bit; if it’s too small or struggles to stay lit, try pulling it up slightly to expose more wick. Adjust the wick height until you achieve a stable, medium-sized flame. Once lit, place your lamp in a safe, prominent spot and revel in the warm glow and delightful aroma it provides. Remember to always supervise your lamp while it’s burning.
Maintenance and Care Tips for Your Oil Lamp
To keep your Mason jar oil lamp burning beautifully and safely, a little maintenance goes a long way:
- Wick Trimming: Over time, the wick may develop a carbon buildup, causing a dimmer flame or smoke. Use a pair of scissors to trim the very tip of the wick, removing any charred bits. A clean wick ensures a brighter, cleaner burn.
- Refilling Oil: When the oil level gets low, simply refill the jar with more olive oil. Always ensure the wick is sufficiently submerged.
- Cleaning the Jar: If you notice any residue or if you want to change your decorative elements or scent, you can empty the jar, clean it with warm soapy water, and then dry it thoroughly before refilling.
- Storage: When not in use, you can cover the lamp with a lid or cap to prevent dust from settling in the oil and to preserve the fragrance of any added essential oils.
Creative Variations and Display Ideas
Don’t stop at just one! Here are some ideas to further inspire your Mason jar oil lamp creations:
- Varying Jar Sizes: Create a collection of lamps using different sized Mason jars for a dynamic display. Taller jars for a grand statement, smaller jars for delicate accents.
- Colored Oil: While olive oil has a natural tint, you can experiment with food-safe liquid dyes to lightly color the oil for a unique visual effect, matching your decor or a special occasion.
- Outdoor Ambiance: These lamps are perfect for adding a cozy glow to outdoor patios, decks, or garden parties. Just ensure they are placed in a protected area, away from wind and flammable objects, and never left unattended.
- Gift Sets: Package a homemade Mason jar oil lamp with a small bottle of essential oil and a note explaining its use for a truly personalized and thoughtful gift.
- Seasonal Themes: Customize your lamps for holidays or seasons. Use pinecones and cedar oil for winter, citrus slices and lemon oil for summer, or fall leaves and cinnamon oil for autumn.
Crafting a Mason jar olive oil lamp is more than just a DIY project; it’s an opportunity to infuse your living space with warmth, personality, and a touch of timeless charm. With minimal effort and common household items, you can create beautiful, fragrant, and economical lighting that enhances any moment. So gather your materials, let your creativity flow, and prepare to enjoy the enchanting glow of your very own handmade oil lamp!
Are you a visual learner? Watch our video tutorial on how to make a mason jar olive oil lamp:
https://www.youtube.com/watch?v=wOsPDKKcKZ4