
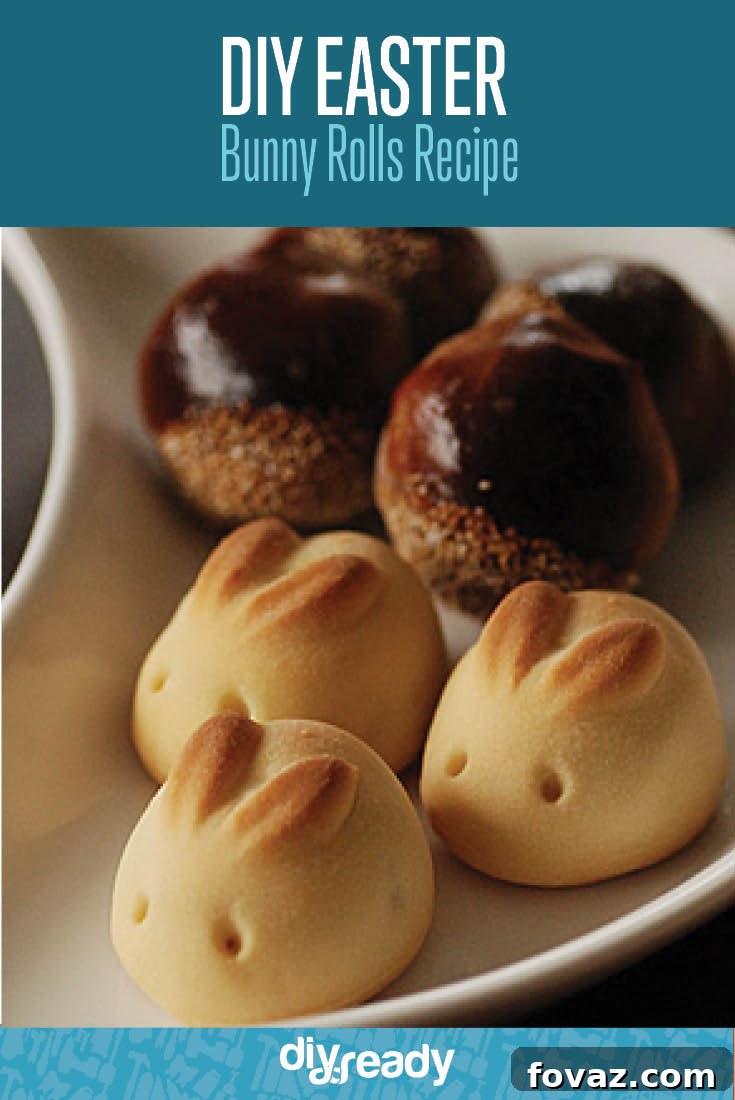
Delightful DIY Easter Bunny Rolls: A Festive Treat for Your Spring Table
As the days grow longer and the world awakens with vibrant hues, spring ushers in a season of renewal, hope, and joyful celebrations. At the heart of these festivities lies Easter, a time for family gatherings, cherished traditions, and, of course, delicious food. While the hunt for colorful eggs and the allure of marshmallow treats are staples, there’s an undeniable magic in bringing something truly unique and homemade to your Easter spread.
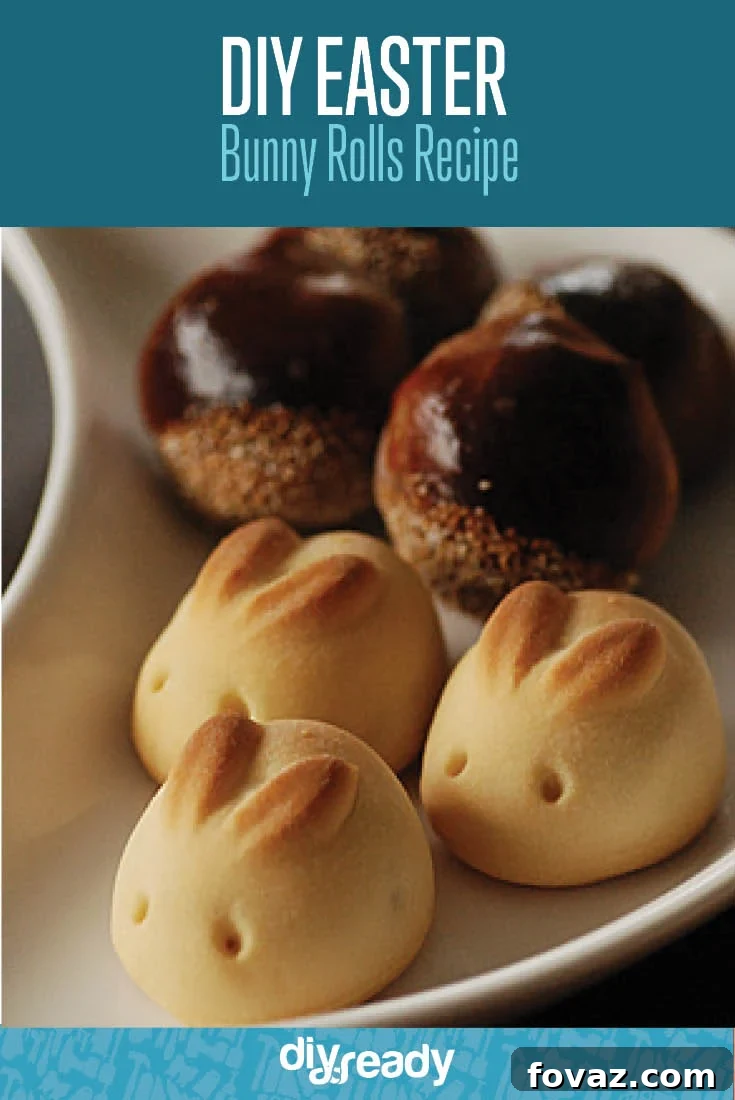
Imagine the smiles and appreciative murmurs when your guests discover these adorable **DIY Easter Bunny Rolls** gracing your table. Far more than just a simple bread, these charming, bunny-shaped delights are a heartwarming addition that embodies the spirit of Easter. They’re not just food; they’re conversation starters, delightful decorations, and proof of the love you’ve kneaded into your holiday preparations. Whether served as a delightful appetizer, a fun side dish, or simply a whimsical centerpiece, these homemade bunny rolls are guaranteed to be a memorable highlight of your Easter celebration, sparking joy and maybe even a little friendly chatter among your loved ones, just like your Aunt Debbie would appreciate!
Creating these charming rolls is a rewarding experience, perfect for bakers of all skill levels. With a few simple ingredients and a touch of creativity, you can transform ordinary dough into extraordinary edible bunnies that will enchant children and adults alike. Let’s embark on this delightful baking adventure and make your Easter table truly special.
Bake Adorable Easter Bunny Rolls: A Step-by-Step Guide
Essential Ingredients for Your Bunny Rolls:
Crafting the perfect Easter Bunny Rolls begins with a selection of fresh, high-quality ingredients. Each component plays a crucial role in creating a dough that is both pliable for shaping and results in a soft, flavorful roll.
- 2 1/2 to 3 cups All-Purpose Flour: The foundation of our rolls, providing structure. Start with 2 1/2 cups and add more gradually if the dough is too sticky during kneading, aiming for a soft, manageable consistency.
- 2 tablespoons Granulated Sugar: Not just for sweetness, sugar feeds the yeast, helping it activate and ensuring a good rise, contributing to the rolls’ tender texture and slight golden hue.
- 1 package (1/4 ounce or 7g) Active Dry Yeast: The magic ingredient that makes our rolls light and airy. Ensure your yeast is fresh and active for best results.
- 1 teaspoon Salt: Balances the flavors, enhances the taste of the other ingredients, and helps control yeast activity. Don’t skip it!
- 1 cup (8 ounces) Sour Cream: This is a secret weapon for incredibly tender and rich rolls. Sour cream adds moisture and a slight tang, contributing to a wonderfully soft crumb. Make sure it’s at room temperature for better incorporation.
- 1/4 cup Water: Used to activate the yeast and help bring the dough together. Along with the sour cream, it provides the necessary liquid for a hydrated dough. Ensure it’s lukewarm, not hot, to avoid killing the yeast.
- 2 tablespoons Unsalted Butter: Adds richness, flavor, and further contributes to the rolls’ tenderness. Melted and cooled, it’s incorporated early in the process.
- 1 Large Egg: Contributes to the dough’s structure, richness, and helps create a lovely golden crust during baking.
Having these ingredients at room temperature (especially sour cream and egg) will aid in smoother mixing and more consistent dough development, leading to superior bunny rolls.
Detailed Directions for Crafting Your Adorable Easter Bunny Rolls:
Follow these steps carefully to ensure your bunny rolls are perfect – soft, fluffy, and undeniably charming!
- Prepare the Liquid Base: In a small saucepan, gently combine the butter, sour cream, and water. Heat this mixture over low heat, stirring constantly, until the butter is just melted and the mixture is warm to the touch (around 105-115°F or 40-46°C). It should feel pleasantly warm, not hot. Crucially, do not let it get too hot or boil, as excessive heat will kill the yeast. Once warmed, remove from heat and let it cool down to lukewarm. This precise temperature is essential for activating the active dry yeast without damaging it.
- Combine Dry and Wet Ingredients: In a large mixing bowl (or the bowl of your stand mixer fitted with a dough hook attachment), combine 2 1/2 cups of the all-purpose flour, granulated sugar, active dry yeast, and salt. Whisk these dry ingredients together thoroughly. Once your liquid mixture has cooled to lukewarm, pour it into the dry ingredients along with the egg.
- Mix and Knead the Dough: If using a stand mixer, begin mixing on low speed until a shaggy dough forms. Increase the speed to medium-low and knead for 5-7 minutes. If kneading by hand, mix with a spoon until the ingredients are mostly combined, then turn the dough out onto a lightly floured surface and knead for 8-10 minutes. The dough should become smooth, elastic, and spring back when gently poked. If the dough is too sticky to handle, add the remaining 1/2 cup of flour, one tablespoon at a time, until it reaches the right consistency – soft but not overly sticky. Avoid adding too much flour, as this can result in dry rolls.
- First Rise (Bulk Fermentation): Lightly grease a clean bowl with a little oil. Place the kneaded dough in the bowl, turning it once to coat the top. Cover the bowl tightly with plastic wrap or a clean kitchen towel. Let the dough rise in a warm, draft-free place for about 1 to 1.5 hours, or until it has visibly doubled in size. The exact time may vary depending on the warmth of your environment. This rising period develops flavor and texture.
- Shape the Bunny Rolls: Once doubled, gently punch down the dough to release the air. Turn it out onto a lightly floured surface and divide it into 16 equal pieces. For best results and uniform rolls, you can use a kitchen scale to ensure each piece weighs approximately the same. Roll each piece into a smooth ball for the bunny’s body.
- Form the Ears: Line a large baking tray with baking paper or a silicone baking mat. Take each dough ball and place it on the prepared tray. Using clean kitchen shears, make two small, slightly angled cuts at the top of each ball to create the bunny’s ears. It’s crucial to round the tips of the ears slightly with your fingers after cutting, preventing them from becoming too pointy and sharp when baked. Gently separate the ears to give them definition.
- Add the Eyes: This is where your bunnies truly come to life! For the eyes, you can use whole black peppercorns (remove before eating, especially for children), small chocolate chips, currants, or even sesame seeds. Gently press two ‘eyes’ into each bunny’s face. If you prefer, you can also use a food-safe marker or a tiny dab of melted chocolate to draw the eyes after baking and cooling.
- Second Rise (Proofing): Once all the bunnies are shaped and have their eyes, loosely cover the baking tray with plastic wrap or a clean kitchen towel. Allow the rolls to rise again in a warm place for another 30-45 minutes, or until they look noticeably puffy and almost doubled in size. This second rise, known as proofing, is vital for light, airy rolls.
- Bake to Golden Perfection: Preheat your oven to 375°F (190°C). Once preheated and the rolls have finished their second rise, place the baking tray in the center of the oven. Bake for approximately 10-15 minutes, or until the rolls are beautifully golden brown on top and bottom. The exact baking time may vary based on your oven, so keep a close eye on them. For an extra golden shine, you can brush the tops with a little melted butter or an egg wash (one egg whisked with a tablespoon of water) before baking.
- Cool and Serve: Once baked, remove the Easter Bunny Rolls from the oven and transfer them to a wire rack to cool slightly. Serve them warm, perhaps with a pat of butter, jam, or alongside your main Easter meal. These rolls are best enjoyed fresh, but leftovers can be stored in an airtight container at room temperature for a day or two.
These detailed steps will guide you through the process, ensuring a successful and enjoyable baking experience. The effort is well worth it for the delightful outcome!
Tips for Perfect Easter Bunny Rolls:
- Don’t Rush the Rise: Yeast dough requires patience. Allow ample time for both rises. A warm, draft-free spot (like a slightly warmed oven that’s turned off, or near a sunny window) is ideal.
- Mind the Temperature: Ensure your liquid mixture is lukewarm (105-115°F / 40-46°C) for yeast activation. Too cold, and the yeast won’t activate; too hot, and it will die.
- Flour Wisely: Start with the minimum amount of flour specified and only add more if the dough is excessively sticky. Over-flouring can lead to dense, dry rolls.
- Creative Eyes: If you’re concerned about peppercorns, small pieces of dried cranberry, tiny chocolate chips, or even drawing eyes with food-safe markers after baking are great alternatives.
- Golden Crust: For an even more beautiful golden finish, whisk an egg with a tablespoon of water or milk to create an egg wash, and gently brush it over the shaped rolls before their second rise or just before baking.
Serving Suggestions and Variations:
These delightful bunny rolls are incredibly versatile and can be enjoyed in various ways:
- As a Side Dish: They make a charming and delicious accompaniment to any Easter brunch, lunch, or dinner, from roasted ham to spring salads.
- Appetizer Fun: Serve them as a playful starter, perhaps with a small bowl of herbed butter or flavored olive oil for dipping.
- Sweet Treat Option: For a sweeter version, increase the sugar to 3-4 tablespoons and consider glazing them lightly with a simple powdered sugar glaze (powdered sugar mixed with a tiny bit of milk or lemon juice) after they cool. You could also sprinkle them with cinnamon sugar before baking.
- Kids’ Favorite: Children absolutely adore these. They’re perfect for school lunchboxes or as a fun snack during holiday playtime.
- Gift Idea: Package a few freshly baked bunny rolls in a cute bag with a ribbon for a thoughtful homemade Easter gift for neighbors or friends.
No matter how you choose to present them, these rolls are sure to bring a smile to every face at your Easter gathering.
Recipe Via.
We hope this detailed guide empowers you to create your own batch of charming Easter Bunny Rolls. The joy of baking and sharing homemade treats during the holidays is truly unparalleled. Imagine the delightful aroma filling your kitchen and the smiles these little bunnies will bring to your family and guests. Don’t be afraid to experiment with your favorite roll recipe or personalize these even further!
Stay Connected with Us! For more creative DIY ideas, delicious recipes, and holiday inspiration, be sure to connect with our vibrant community across social media. We love seeing your creations and hearing about your baking adventures!
Don’t forget to stay connected with us on Facebook, Twitter, Pinterestand Instagram!