
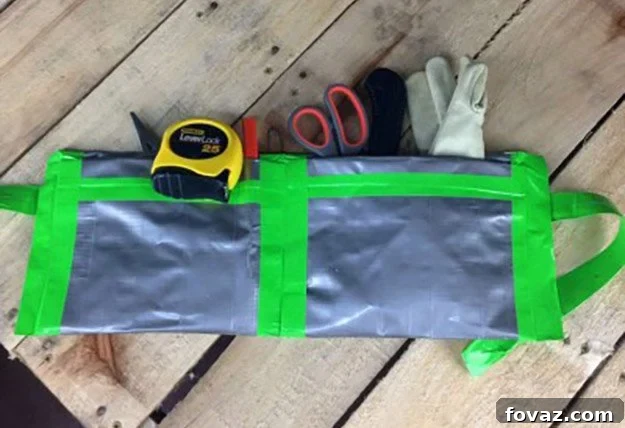
DIY Duct Tape Tool Belt: Craft Your Own Waterproof & Durable Organizer
Are you a hands-on individual always on the lookout for a practical, yet fun DIY project? Or perhaps you’re searching for the perfect personalized gift for a craft-loving friend or family member? Look no further! This comprehensive guide will walk you through creating your very own duct tape tool belt. This isn’t just any tool belt; it’s a remarkably robust, waterproof, and spill-proof accessory, designed for durability and ultimate convenience. What’s even better? You can customize it with your favorite colors and add unique trims to reflect your personal style. The entire project takes less than an hour to complete, yielding a super cool, highly practical, and incredibly personal item.
A handmade tool belt offers unparalleled advantages. Beyond its charming DIY appeal, it provides a cost-effective solution for organizing your tools, art supplies, or crafting essentials. Its inherent waterproof quality makes it ideal for garden work, outdoor repairs, or messy art projects, protecting your clothes and keeping your instruments dry. Whether you’re a professional tradesperson needing a quick extra organizer, a gardening enthusiast, an artist, or just someone who loves unique handmade items, this duct tape tool belt is an absolute game-changer. Let’s dive into how you can craft this fantastic accessory today!
Why Choose a Duct Tape Tool Belt?
The magic of duct tape goes far beyond quick fixes. When cleverly fashioned, it transforms into incredibly durable and functional items. A tool belt made from duct tape boasts several compelling benefits:
- Unmatched Durability: Duct tape is renowned for its strength and resilience. When multiple layers are fused, they create a fabric-like material that can withstand significant wear and tear, ensuring your tool belt lasts through countless projects.
- Waterproof & Spill-Proof: One of the standout features is its resistance to water and spills. This makes it perfect for outdoor tasks, protecting your tools from rain or splashes, and preventing paints or liquids from seeping through to your clothing.
- Fully Customizable: Duct tape comes in an astonishing array of colors, patterns, and even textures. This allows for complete creative freedom, enabling you to design a tool belt that perfectly matches your preferences, a team’s colors, or a specific aesthetic.
- Cost-Effective: Compared to store-bought tool belts, crafting one with duct tape is incredibly budget-friendly, making it an accessible project for everyone.
- Quick & Easy: As promised, this project is swift. With a few basic supplies and some focused effort, you can have a fully functional tool belt ready in under 60 minutes.
- Versatile Use: Not just for tools! Use it for gardening essentials, art supplies, crafting notions, pet grooming accessories, or even as a unique apron for kids’ activities.
Tools and Supplies You’ll Need to Craft Your Duct Tape Tool Belt
Before embarking on this exciting DIY journey, gather your materials. Having everything ready will make the process smooth and enjoyable.
- Exacto Knife or Utility Knife: Essential for precise, clean cuts through the duct tape. A sharp blade is key for professional-looking edges.
- Cutting Mat or Clean Non-Stick Surface: Protects your workspace and prevents tape from sticking where it shouldn’t. A self-healing cutting mat with a grid is highly recommended for accurate measurements.
- Ruler: Crucial for accurate measuring and straight cuts. A metal ruler is ideal for use with a utility knife.
- One or More Rolls of Duct Tape: This is your primary material! Choose colors and patterns that inspire you. Consider having a main color and an accent color for a more dynamic look.
Step 1: Creating Your Duct Tape Fabric Sheets
The foundation of your tool belt lies in creating sturdy, custom duct tape fabric sheets. This technique transforms individual strips of tape into a robust, canvas-like material. Precision here will lead to a more professional finish.
Begin by creating two primary duct tape fabric sheets, each meticulously measured to 9 x 18 inches. These will form the main body and pockets of your tool belt. Additionally, you’ll need to prepare a belt strip. This strip should be approximately 15 inches longer than your waist measurement, allowing ample room for adjustment and securing. If you’re incorporating multiple colors into your design, now is the time to select an accent color specifically for the belt and its accompanying buckle elements. You will also need two separate 3-inch strips of duct tape, cut from the same accent color chosen for your main belt strip. These shorter strips are crucial for constructing the buckle loops.
For optimal precision, I highly recommend using a large cutting mat equipped with a clear grid. This grid acts as an invaluable guide, making the process of laying out and measuring your duct tape strips significantly easier and more accurate. Before forming the complete fabric sheet, lay out the individual cut strips of duct tape to visualize and ensure proper alignment. This preparatory step helps in creating a smooth, even, and professional-looking duct tape fabric.
If you’re new to making duct tape fabric, this video provides a clear visual demonstration to guide you through the process:
Step 2: Folding and Securing the First Pocket
With your first duct tape fabric sheet ready, it’s time to transform it into a functional pocket. This step requires careful folding and precise taping to create a robust and spacious compartment for your tools.
Take one of your meticulously crafted 9×18 inch duct tape sheets. Lay it flat on your cutting mat. From one end, measure 8 inches and carefully fold the sheet back towards its center. This initial fold will establish the depth of your pocket. Next, from the top edge of the section you just folded over, measure down an additional inch and fold that portion back over again. This second fold creates a reinforced lip for the pocket, enhancing its durability and preventing items from easily falling out. To secure this pocket structure, take a piece of duct tape (approximately 9 inches long) and cut it in half lengthwise. You will now have two thinner strips. Use one of these halved strips to seal the sides of the newly formed pocket. In this example, I’ve chosen a vibrant green tape as an accent color to highlight the pocket’s closure, but you are absolutely free to select any color that complements your design or simply your personal preference.
Step 3: Crafting the Second Pocket
Consistency is key to a symmetrical and well-balanced tool belt. Now that you’ve successfully created one pocket, the process for the second is identical. Simply replicate the steps outlined above using your other 9×18 inch duct tape fabric sheet.
Ensure that your measurements and folds are consistent with the first pocket to maintain uniformity across your tool belt. This dedication to detail will result in a more professional and aesthetically pleasing final product. Take your time, double-check your folds, and firmly press down the tape to ensure a strong, lasting bond for your second functional compartment.
Step 4: Assembling and Taping the Pockets Together
With both pockets constructed, the next crucial step is to securely join them to form the central body of your tool belt. This requires strong adhesion and careful alignment to ensure stability and durability.
Carefully lay your two completed duct tape pockets side-by-side on your cutting mat, ensuring their top edges are perfectly aligned. The goal is to create a seamless connection between them. Once positioned, take a long piece of duct tape – again, I opted for my vibrant green accent color to tie the design together, but your color choice is entirely up to you – and run it smoothly along the seam where the two pockets meet on the front side. Apply firm pressure to ensure excellent adhesion. Flip the entire assembly over and repeat this process on the back side, reinforcing the join from both angles. To add an extra layer of strength and create a cohesive look across the entire front face of the tool belt, secure the fold across the top with one continuous, long piece of tape. This not only enhances durability but also provides a neat, finished appearance.
Step 5: Reinforcing the Sides and Crafting the Belt Flap
This step focuses on solidifying the structure of your tool belt and creating the essential flap through which your main belt will eventually thread. Proper reinforcement here is vital for the longevity and functionality of your finished product.
Once your pockets are joined, you’ll have a top edge that might still be open or less reinforced. To create the belt flap, take the remaining top portion of your combined pocket assembly (the part above where your pockets start) and fold it back downwards. You want to fold it approximately 3 inches down. Then, take this 3-inch folded section and fold it in half again, effectively tucking it over the back of the tool belt. This will create a sturdy flap that measures about 1.5 inches in height, providing a robust channel for your main belt. Ensure the folds are crisp and straight. Secure this folded flap firmly to the back of the tool belt using long, strong strips of duct tape. Extend the tape across the entire width of the tool belt, both along the bottom edge of the newly formed flap and along the side edges, to enclose any open sides of the pockets and provide comprehensive reinforcement. This action not only secures the flap but also further strengthens the entire structure of the tool belt, ensuring it can hold its shape and contents reliably.
Step 6: Constructing the Belt and Buckle Loops
Now it’s time to integrate the belt mechanism into your tool belt, allowing you to wear and use your custom creation. This involves creating strong loops for the belt to pass through.
Recall the two 3-inch strips of duct tape you set aside earlier, cut from your accent color. These will form the critical belt loops. Take these two strips and carefully wrap them around one end of your main belt strip. Position the first loop about 0.5 inches from the end of the belt strip. The key is to create just enough space within the loop to comfortably allow the main belt to slide through without being too loose or too tight. Once the first loop is formed and secured, place the second 3-inch strip approximately 0.5 inches away from the first one. This precise spacing creates a functional “buckle” system. Secure each of these small loops firmly to the main belt strip with additional, smaller pieces of duct tape, wrapping around the base of the loops to ensure they won’t detach under stress. Finally, take your completed main belt strip (with the newly attached loops) and tuck one end securely under the folded flap you created in Step 5 on your tool belt body. Using one long, robust piece of duct tape, firmly secure this portion of the belt in place, ensuring it’s centered and strongly adhered to the tool belt itself. This attachment point needs to be exceptionally strong, as it will bear the weight of your tools and the tension of being worn.
Step 7: Final Assembly and Wearing Your New Tool Belt
Congratulations! You’re just moments away from donning your very own handcrafted duct tape tool belt. This final step brings all your hard work together, preparing your belt for action.
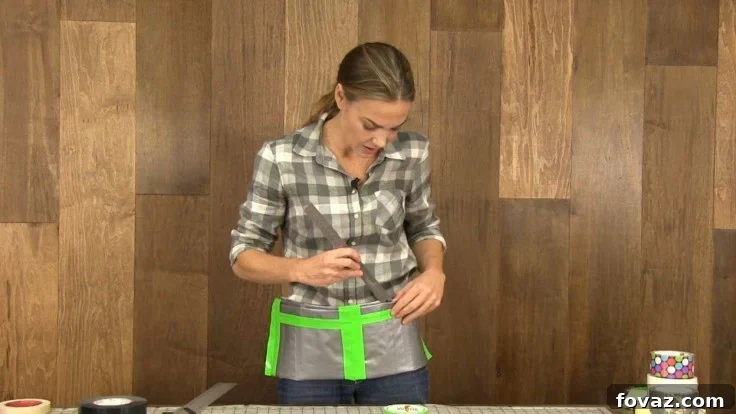
With the belt strap securely attached to the main tool belt body and the two smaller buckle loops in place, your belt is now ready to wear. Simply take the free end of your main belt strip and thread it through the first of the two small buckle loops you created in the previous step. Pull it through completely. Then, loop the belt back through the second small buckle loop. This creates a friction-based closure, securing the belt firmly around your waist. Adjust the length as needed for a comfortable and snug fit. Once adjusted, you’re all set! Load up your new, waterproof, and personalized tool belt with your essential tools, crafting supplies, or gardening gadgets. You’ll be amazed at how practical and reliable your duct tape creation is.
Customization Ideas for Your Duct Tape Tool Belt
The beauty of a DIY duct tape project is the boundless potential for personalization. Don’t stop at just choosing a color! Here are some ideas to make your tool belt truly unique:
- Multi-Pocket Design: Instead of just two large pockets, consider creating smaller compartments for pens, pencils, screwdrivers, or even a cell phone. Simply adjust the folding and taping process to section off areas within your main pockets.
- Tool Loops: Add small, individual loops of duct tape, either sewn or taped securely onto the front of your pockets, to hold specific tools like pliers, wrenches, or a hammer.
- Key Holder: Attach a small duct tape loop with a D-ring or carabiner for easy access to keys or other clip-on items.
- Personalized Trim: Use decorative duct tape patterns or contrasting solid colors for the edges, pocket flaps, or the belt itself to create eye-catching designs.
- Embellishments: While duct tape is already decorative, you could experiment with adding waterproof stickers, patches, or even permanent marker designs to further personalize your belt.
- Varying Sizes: Create different sized tool belts for various purposes – a smaller one for children’s art supplies, a larger one for heavy-duty workshop tools.
Safety Tips for Working with Duct Tape and Knives
While this is a fun and easy project, safety should always be a priority, especially when using sharp tools.
- Always Use a Cutting Mat: This protects your work surface from knife damage and provides a stable base for cutting.
- Cut Away From Your Body: When using an Exacto or utility knife, always direct the blade away from yourself and your fingers.
- Use a Ruler as a Guide: For straight cuts, always press a metal ruler down firmly on the tape and use it as a guide for your knife. Never freehand cut with a utility knife.
- Store Knives Safely: Always retract utility knife blades or cap Exacto knives immediately after use. Store them out of reach of children.
- Mind the Stickiness: Duct tape is incredibly adhesive. Be mindful of where you place cut pieces to avoid them sticking to unwanted surfaces or tangling.
- Work in a Well-Lit Area: Good lighting helps prevent accidents and ensures precise work.
Maintaining Your Duct Tape Tool Belt
One of the great features of a duct tape tool belt is its low maintenance. However, a little care can go a long way in prolonging its life and keeping it looking fresh:
- Cleaning: For most dirt and grime, simply wipe down your tool belt with a damp cloth. For tougher stains, a mild soap solution can be used, followed by a clean wipe. Avoid harsh chemical cleaners as they might degrade the tape’s adhesive or finish.
- Drying: Since it’s waterproof, you can easily rinse it off. Ensure it’s thoroughly air-dried before storing to prevent any moisture buildup in crevices.
- Repairing Tears: If a seam or pocket develops a tear over time, it’s incredibly easy to repair! Simply apply a new piece of duct tape over the damaged area, pressing firmly to secure. This ability to self-repair adds to its longevity.
- Storage: Store your tool belt in a dry place. While durable, extreme prolonged heat might affect the adhesive over many years, so keep it out of direct, intense sunlight if not in use.
Conclusion: Your Ultimate DIY Companion Awaits!
There you have it – a complete guide to crafting your very own incredibly practical, waterproof, and stylish duct tape tool belt! This project is a testament to the versatility of humble duct tape and the satisfaction of a successful DIY endeavor. Whether you’re a seasoned crafter or just starting your journey into homemade projects, this tool belt offers a quick, rewarding, and highly functional outcome.
Imagine the convenience of having all your essential tools right at your fingertips, protected from the elements, and organized in a personalized fashion. It’s perfect for woodworking, gardening, painting, or any hobby that requires easy access to small implements. This duct tape tool belt isn’t just an accessory; it’s a statement of resourcefulness and creativity.
So, gather your supplies, pick your favorite colors, and get ready to impress yourself and others with your ingenious creation. Don’t forget to share your finished duct tape tool belt with us – we’d love to see your unique designs and how you’ve customized them! Happy crafting!