
Fun & Easy DIY Soap Making for Kids: A Creative Hygiene Adventure
In today’s world, teaching children the importance of good hygiene, especially regular handwashing with soap and water, is more critical than ever. But what if you could turn this essential habit into an exciting, hands-on activity? This comprehensive guide on DIY soap making for kids offers a fantastic opportunity to combine education with entertainment, empowering your little ones to create their own vibrant, scented soaps. Not only will they have a blast in the process, but they’ll also be more enthusiastic about using their personalized creations, fostering excellent hygiene habits from a young age.
This tutorial utilizes the safe and simple melt-and-pour method, making it perfectly suitable for children with adult supervision. Forget about complex chemicals like lye; we’re focusing on fun, color, and creativity! Get ready to transform basic ingredients into beautiful, bubbly bars of soap that kids will love to use and even proudly gift.
RELATED: How To Make Your Own Exfoliating Loofah Soap
Your Essential Guide to Kid-Friendly Soap Making
Why Choose Melt-and-Pour Soap Making for Kids?
When it comes to crafting with children, safety is always the top priority. Traditional soap making, often referred to as “cold process,” involves working with lye (sodium hydroxide), a highly caustic chemical that can be dangerous if not handled properly. This method requires precise measurements, controlled temperatures, and extensive safety precautions, making it unsuitable for children.
The melt-and-pour method, however, eliminates all these risks. You start with a pre-made soap base, typically glycerin-based, which has already undergone the saponification process (where oils and lye react to form soap). All you need to do is melt the base, add your desired colors and scents, and pour it into molds. It’s a bit like baking with a pre-made cake mix – all the hard work is done, leaving you free to focus on the fun and creative aspects. This simplicity makes it an ideal activity for engaging young minds in the wonders of DIY without any hazardous elements, ensuring a joyful and secure crafting experience for everyone involved.
What You Need: Your Creative Toolkit
Gathering your supplies is the first exciting step in your soap-making journey. Most of these items can be easily found at craft stores, online retailers, or even in your kitchen. Opting for quality ingredients will ensure your homemade soaps are not only beautiful but also gentle and effective.
- 2 lbs. Glycerin Soap Base: This clear or white soap base is the foundation of your project. Glycerin is a humectant, meaning it draws moisture to the skin, making these soaps wonderfully moisturizing and gentle. It’s readily available and specifically designed for melt-and-pour projects.
- Cupcake Tray or Soap Molds: Silicone molds are fantastic for this project as they make removing the finished soaps incredibly easy. You can use standard cupcake trays for round soaps, or explore fun shapes like animals, stars, or geometric patterns designed specifically for soap making.
- Soap Dye or Food Coloring: Special soap dyes are formulated to create vibrant, lasting colors without staining the skin. Food coloring can also be used, especially gel food coloring, but be aware that some colors might fade over time or bleed slightly. Always use sparingly; a little goes a long way!
- Soap Scents or Essential Oils: Choose kid-friendly scents like lavender (calming), orange (uplifting), or a fruity fragrance oil. Ensure any essential oils are diluted properly and safe for topical use, especially for children. Always check product labels for suitability.
- Microwave-Safe Measuring Cup (with a pour spout): A large glass measuring cup is perfect for melting the soap base. The pour spout will come in handy when transferring the melted soap into your molds.
- Small Toys or Trinkets (optional): For an extra element of surprise and fun, small, waterproof toys like mini rubber ducks, plastic animals, or even small shells can be embedded within the soap. Ensure they are safe, non-toxic, and have no sharp edges.
- Knife (for adult use only): A sharp knife is needed to cut the soap base into smaller, meltable cubes.
- Spoon or Popsicle Sticks: For stirring in colors and scents. Popsicle sticks are great for kids as they are disposable and easy to handle.
Tip for Organization: To keep your workspace tidy and efficiently manage your ingredients, try storing your soap dyes, essential oils, and any small trinkets directly inside or next to their corresponding molds. This makes the pouring and customization steps seamless and fun.
Step-by-Step: Crafting Your Colorful Soaps
Step 1: Preparing Your Glycerin Soap Base
The first step involves preparing your glycerin soap base for melting. With adult supervision, carefully use a knife to cut the large block of glycerin soap into smaller, uniform cubes, approximately 1-inch in size. This seemingly simple action serves a crucial purpose: smaller pieces will melt much more quickly and evenly in the microwave, preventing hot spots and ensuring a smooth, lump-free liquid base. This also makes it easier to measure out specific amounts for different colors or scents if you plan on making a variety.
Remember, we opt for a pre-made glycerin soap base in this kid-friendly recipe because it eliminates the need for handling hazardous chemicals like lye, which is traditionally used to create soap from scratch. This ensures a safe and enjoyable crafting experience for everyone, making it perfect for little hands to participate without risk.
Step 2: Gently Melting the Soap Base
Now comes the magical part! Invite your child to carefully place a handful of the pre-cut glycerin soap cubes into your microwave-safe measuring cup. The key here is to melt the soap slowly and gently. Heat the soap on high in the microwave for short bursts, typically 30-second increments. After each increment, remove the cup and give the soap a quick stir. Continue this process until the soap is completely liquid and smooth, with no solid lumps remaining. Stirring between intervals helps distribute the heat evenly and speeds up the melting process.
Important Safety Tips for Melting:
- Portion Control: If you’re planning to make soaps in various vibrant colors and distinct scents, it’s best to melt smaller quantities (2-3 cubes) at a time. Once melted, immediately transfer these portions into separate, smaller heat-safe containers or bowls. This allows for individual customization without having to reheat large batches.
- Constant Vigilance: Never leave the microwave unattended while melting soap. Overheating can cause the soap to boil over, create a film on top, or even burn, which can produce an unpleasant odor and potentially affect the quality of your finished soap. Keep an eye on it to ensure it melts smoothly.
Step 3: Infusing with Scents and Colors
This is where your little artisan’s creativity truly shines! Once the soap base is fully melted, let your child add a few drops of their chosen soap scent and soap dye. Encourage them to start with a small amount – a couple of drops usually suffice – as both dyes and fragrance oils are highly concentrated. They can always add more if a stronger hue or aroma is desired. Once the drops are added, hand them a spoon or a popsicle stick and let them gently stir the mixture until the color is uniform and the scent is evenly distributed throughout the liquid soap.
Creative Tips for Customization:
- Less is More: With both soap dye and essential oils/fragrance oils, remember that a small quantity often goes a long way. Starting conservatively prevents over-coloring or overpowering scents.
- Color Play: Don’t be afraid to experiment with different dye combinations! Try mixing a drop of blue with a drop of yellow to create green, or red and yellow for orange. This adds an extra layer of learning and fun to the crafting process. Consider using iridescent mica powders for a shimmering effect, ensuring they are cosmetic-grade and safe for soap.
- Layered Scents: For older kids, you might even try subtle layering of scents if making multi-colored soaps, though for beginners, one clear scent per batch is often best.
RELATED: 11 Creative DIY Bathroom Ideas On A Budget
Step 4: Pouring into the Molds and Adding Surprises
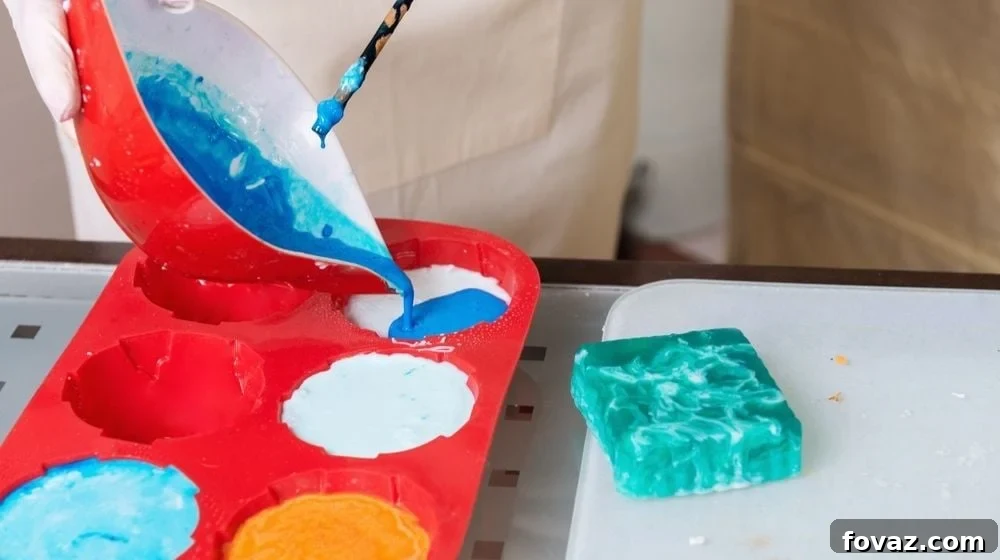
With your beautifully colored and scented soap mixture ready, it’s time to pour! Carefully transfer the liquid soap from your measuring cup into your chosen cupcake trays or silicone molds. This step requires a steady hand, so adult assistance is crucial. You have several creative options here: you can pour a single color into each mold for classic, vibrant soaps, or get adventurous by pouring multiple colors in layers for a stunning, marbled, or rainbow effect. To achieve distinct layers, allow each color to cool slightly and form a thin skin before adding the next layer.
For an extra touch of delight and to encourage handwashing, you can have your child carefully drop a small, waterproof trinket or toy into the center of the mold once a small amount of soap has been poured. As the soap cools, the toy will be encapsulated, creating a fun surprise that gradually reveals itself with each wash. Imagine the excitement of finding a tiny rubber ducky or a colorful plastic animal inside their very own soap!
Crucial Caution: Always exercise extreme care when handling and pouring the melted soap. It will be very hot and can cause burns if it comes into direct contact with skin. Ensure children maintain a safe distance and only assist under direct adult supervision during this stage.
Step 5: The Cooling Process
Patience is a virtue, especially when crafting! Once the molds are filled, it’s time to let your soaps solidify. The fastest and most effective way to do this is by placing them in the refrigerator. Allow them to chill for approximately 2-3 hours. This cooling period is essential for the soap to fully harden and set, making it easy to remove from the molds without damage. You’ll know they’re ready when they feel firm and cool to the touch.
Once sufficiently cooled, carefully remove the soaps from their molds. If you used flexible silicone molds, gently push from the bottom to pop them out. If you opted for a standard cupcake tray, an adult can carefully run a dull knife around the edges of each soap to help release it, or simply flip the tray over if the soap is completely solid.
Step 6: Time to Test Your Creations!
The most rewarding part of any DIY project is finally getting to enjoy your hard work! Now that your beautiful, custom-made soaps are ready, it’s time for the ultimate test: a good handwash. Encourage your child to lather up their hands with their very own creation. Watch their faces light up as they create rich, foamy bubbles! Glycerin soap is known for its excellent lathering properties, ensuring a satisfying and effective wash every time. This hands-on demonstration reinforces the link between their craft and a crucial life skill – personal hygiene. It’s a joyful moment that completes the entire soap-making adventure.
Discover More Soap Making Fun!
If you and your kids enjoyed this activity, there’s a whole world of soap making to explore. Here’s another fantastic kid-friendly soap making tutorial from ClutterBug that offers different insights and techniques:
Beyond the Craft: The Benefits of DIY Soap Making for Kids
Engaging in activities like melt-and-pour soap making offers a wealth of benefits that extend far beyond simply creating a bar of soap. It’s a fantastic educational tool and a wonderful way to spend quality time together as a family.
- Promotes Hygiene: Kids are naturally more inclined to use something they’ve made themselves. This personal connection to their soap can significantly boost their enthusiasm for handwashing, turning a chore into a self-directed activity.
- Boosts Creativity: From choosing colors and scents to embedding toys, children have endless opportunities to express their creativity. This freedom encourages imaginative thinking and problem-solving.
- Develops Fine Motor Skills: Cutting the soap base (for older children under supervision), stirring, and pouring all help refine fine motor skills and hand-eye coordination.
- Introduces Basic Science Concepts: While simplified, the process still involves basic principles like melting, cooling, and the mixture of different substances. You can discuss the states of matter and how heat changes them.
- Enhances Parent-Child Bonding: Working together on a creative project fosters communication, teamwork, and creates lasting memories. It’s a shared experience that strengthens family connections.
- Teaches Resourcefulness: Kids learn that useful items can be made at home, encouraging a sense of self-sufficiency and an appreciation for handmade goods.
- Great for Gifting: Handmade soaps make thoughtful and personalized gifts for friends, family, and teachers, teaching children the joy of giving.
Wrapping Up Your Creative Soap Adventure
Soap making with kids using the melt-and-pour method is more than just a craft; it’s an enriching experience that combines learning, creativity, and essential life skills. From selecting vibrant colors and delightful scents to embedding hidden treasures, every step is an opportunity for fun and discovery. We sincerely hope you and your family thoroughly enjoyed this simple yet rewarding tutorial and that your homemade soaps bring a touch of joy and freshness to your daily routine. Stay tuned to DIYProjects.com for even more engaging and creative ideas!
What creative colors or scents did your kids choose for their soaps? Share your favorite types of homemade soap creations in the comments section below – we’d love to hear from you!
UP NEXT: More Inspiring DIY Projects
- DIY Projects: How To Make Soap Without Lye (Alternative Methods)
- 21 Incredible Bathroom Makeover Ideas You Can DIY On A Budget
- 8 Fun And Easy Origami Animals For Kids (A different kind of craft!)
Calling all crafting DIYhards, DIY Projects needs YOU! Click here if you want to write for us.
Don’t forget to stay connected with us on Facebook, Twitter, and Instagram for daily inspiration and more exciting DIY ideas!