
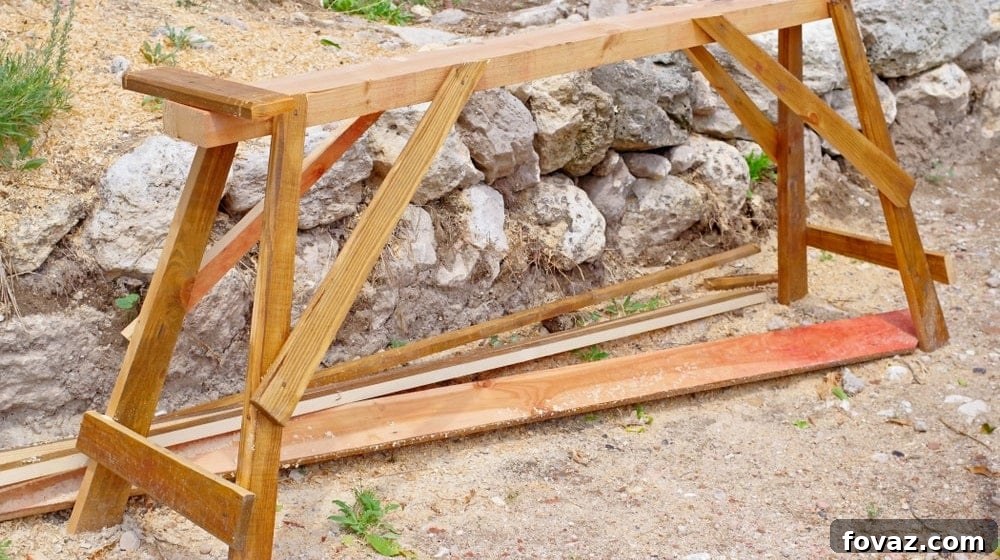
DIY Sawhorse Plans: Build Your Own Sturdy Woodworking Workhorses
A sawhorse is an indispensable piece of equipment for any workshop, garage, or even a backyard DIY space. Whether you’re a seasoned carpenter or just starting your woodworking journey, knowing how to build a sawhorse is a fundamental skill and a highly rewarding project. These versatile stands provide a stable surface for cutting, painting, assembling, and countless other tasks, making your work safer and more efficient. The beauty of crafting your own lies in the ability to customize every aspect – from height and length to material strength – ensuring it perfectly suits your specific needs and projects. Imagine building tall sawhorses to support large tables, compact ones for precise cutting, or even robust pairs for heavy-duty construction. This project is particularly beginner-friendly, featuring mostly basic cuts and assembly techniques, making it an excellent opportunity to familiarize yourself with power tools like a miter saw or refine your hand-sawing skills. Dive in and discover how simple and satisfying it is to create your own essential workshop companion!
Why Building Your Own Sawhorse is a Smart Move for Any DIY Enthusiast
While commercially available sawhorses can certainly get the job done, building your own offers unparalleled advantages that extend beyond mere cost savings. Foremost among these is the complete freedom of customization. You’re not limited by standard sizes or designs; instead, you can tailor your sawhorse to specific dimensions that complement your stature and the typical size of your projects. Need a sawhorse that’s taller to save your back during prolonged work sessions? Or perhaps a wider stance for enhanced stability when working with bulky or irregularly shaped materials? Maybe a longer top surface to effortlessly support full sheets of plywood or long boards? All these personal preferences and practical requirements can be seamlessly integrated into your design. This level of customization ensures your sawhorse becomes a truly personal and highly efficient tool, perfectly adapted to your unique working style and project demands.
Moreover, constructing a sawhorse from scratch often results in a more robust and durable product compared to many off-the-shelf options. By carefully selecting higher-quality lumber, such as dense hardwoods or structurally sound softwoods, and reinforcing joints with precision and strong fasteners, you can build a sawhorse designed to withstand years of rigorous use and heavy loads. This DIY approach also serves as a fantastic learning experience, boosting your confidence with fundamental woodworking techniques like accurate measuring, making precise angled cuts, and securely fastening wood components. It’s an investment not just in a piece of equipment, but in your workshop, your skills, and your overall project efficiency and safety. Embrace the satisfaction of creating a truly useful, custom-built tool that will serve as a reliable foundation for countless future projects.
Essential Supplies and Tools for Your DIY Sawhorse Project
Before you embark on constructing your custom sawhorse, gathering all the necessary tools and materials is a crucial first step. This not only streamlines the building process but also ensures you have everything on hand to complete the project safely and efficiently. Remember, the dimensions provided below are a tried-and-tested starting point, designed for a versatile sawhorse, but they can be easily modified to create a sawhorse that perfectly matches your unique requirements. Feel free to adjust the lumber sizes and lengths to suit heavier loads, different working heights, or specific workspace constraints. Always prioritize safety, so ensure you have appropriate personal protective equipment (PPE) like safety glasses and hearing protection ready before you begin any cutting or drilling.
- Lumber for Legs (6 pieces): We recommend six pieces of 1×3 lumber, each 3 feet in length. These dimensions offer a good balance of strength and manageability for a standard, versatile sawhorse. For increased load-bearing capacity or a more substantial build, you could easily opt for wider (e.g., 2×4) or thicker (e.g., 1×4) lumber. Adjusting the length will directly impact the final working height of your sawhorse, so choose based on your comfort and typical project needs.
- Sawhorse Top/Work Surface (1 piece): A single piece of 3/4 inch x 5-1/2 inch plank or board, 3 feet in length, will form the primary working surface. A 3-foot length provides ample space for most DIY tasks, but for handling longer materials like full sheets of plywood or extra-long boards, consider extending this to 4 or 5 feet. The 3/4 inch thickness is important for ensuring a stable and rigid platform.
- Shorter Support Braces (2 pieces): Two pieces of 1×3 lumber, each 1 foot in length. These crucial shorter pieces will serve as cross-braces, significantly enhancing the rigidity and preventing lateral movement of your sawhorse’s leg assemblies.
- Power Drill: An indispensable tool for creating accurate pilot holes and driving screws with consistent torque. A cordless drill offers maximum flexibility and convenience around your workspace.
- 1/8 inch Drill Bit: Specifically chosen for pre-drilling pilot holes. This size is ideal for preventing wood splitting, especially when working close to edges, and ensures that your 2-1/2 inch wood screws will drive in smoothly and securely without excessive force.
- Phillips Head Bit: Ensure this bit is compatible with the head type of your chosen wood screws to prevent stripping the screw heads during installation.
- Miter Saw: This power tool is highly recommended for making accurate, repeatable angled cuts, which are essential for the sawhorse legs and braces. If a miter saw is unavailable, a circular saw used with a speed square or a high-quality hand saw with a miter box can be used, though extra care and precision will be required to achieve clean, consistent angles.
- Wood Clamps (at least 2): Essential for securing lumber during both cutting and assembly phases. Clamps ensure both safety by holding pieces steady and accuracy by preventing movement. Longer clamps are particularly useful for holding multiple leg pieces together for simultaneous cutting.
- Wood Screws (approx. 24): We recommend 2-1/2 inch wood screws. These provide strong, lasting connections for the various components. For heavier-duty sawhorses or increased peace of mind, consider using screws with a larger gauge (e.g., #8 or #10) or incorporating wood glue into the joints for additional reinforcement.
- Pencil: For clearly marking all cut lines, drilling locations, and alignment points.
- Measuring Tape: Accuracy is paramount in woodworking. A reliable, clearly marked measuring tape is non-negotiable for precise cuts and ensuring all components fit together perfectly.
- Safety Glasses: Always wear certified safety glasses when operating power tools or handling wood to protect your eyes from flying debris, dust, and splinters.
- Hearing Protection: Essential when using power saws to prevent long-term hearing damage. Earplugs or earmuffs should be worn consistently.
Step-by-Step Guide to Building Your Durable DIY Sawhorse
Follow these detailed instructions carefully to construct a robust and reliable sawhorse that will serve as a cornerstone of your woodworking endeavors. Precision in measuring and cutting will ensure a stable, functional, and long-lasting final product.
Step 1: Preparing Your Leg Stock – Cutting to Initial Length
Begin by taking your 1×3 lumber and cutting four pieces, each to a precise length of three feet. These four pieces will form the primary structural components of your sawhorse’s legs. While our plan specifies 1x3s for a good balance of strength and weight, remember that you have the flexibility to choose different dimensions (e.g., 2x4s for a heavier-duty sawhorse or 1x4s for a slightly taller build). The critical aspect here is consistency: if you opt for a different size, ensure you use that same size for all components where 1x3s are specified throughout this guide to maintain structural integrity and a balanced design. Accurate initial cuts in this step will significantly contribute to the overall stability and professional appearance of your finished sawhorse.
Step 2: Setting Up Your Miter Saw for Accurate Angled Cuts
Achieving the correct angles for your sawhorse legs is crucial for ensuring its stability and proper stance. While miter saws may vary slightly in their specific locking mechanisms, the core principles for setting angles remain consistent across most models. Locate the rubber handle or locking knob, typically found at the front of your miter saw, usually situated beneath the rotating base. Twist this handle counterclockwise to loosen the cutting table or fence. Next, find the lever, button, or detent override that allows you to adjust the miter angle. Press down on this mechanism, which is usually positioned above the handle, and carefully rotate the saw’s cutting board to precisely 22.5 degrees. This specific angle is chosen because it allows the legs to splay outwards, creating a wide, inherently stable base, while simultaneously ensuring they will sit flush against the top board of your sawhorse. This deliberate angling is fundamental to preventing any wobbling and effectively distributing the weight and forces placed upon the sawhorse.
Step 3: Preparing the Legs for Uniform Simultaneous Angled Cuts
To ensure absolute uniformity and save a significant amount of time, we will cut all four leg pieces simultaneously. After you have made your initial four 3-foot leg pieces from Step 1, carefully align them and clamp them together securely. Stack them neatly one on top of the other, ensuring all ends are perfectly flush and the edges are aligned. Use at least two robust wood clamps to hold the bundle firmly in place. Position the clamps strategically so they do not interfere with the upcoming blade path. This technique not only guarantees that all four legs will have identical angles, which is critical for a truly stable sawhorse, but also dramatically speeds up the cutting process. Before making any cuts, double-check that the clamps are tight and the wood pieces cannot shift or vibrate during the cut, which could lead to inaccurate or unsafe results.
Step 4: Executing the First Angled Cut on the Clamped Leg Bundle
With your four leg pieces securely clamped together and your miter saw precisely set to 22.5 degrees, you are now ready to make the first angled cut. Carefully place the clamped bundle of wood onto your miter saw’s cutting surface. Ensure that the slim side of the 1x3s is facing upwards and positioned correctly against the saw’s fence, aligning with the typical sawhorse leg design. Make your first 22.5-degree cut cleanly across one end of the clamped leg system. The exact side you choose to start with doesn’t fundamentally matter, but strive to cut as close to the end of the boards as possible while still achieving a complete, clean, and full-width angled cut through all four pieces simultaneously. Exercise extreme caution when operating the miter saw: always keep your hands well clear of the blade path, maintain a firm grip on the wood, and ensure you are wearing all appropriate safety gear, including safety glasses and hearing protection.
Step 5: Completing the Angled Leg Cuts for a Perfectly Stable Base
Now, carefully flip the clamped leg pieces over, maintaining their clamped configuration. You will make the second angled cut on the opposite end of the legs. This is a crucial step for achieving stability: you must angle these second cuts so that the two angled sides of each leg run precisely parallel to each other. Visually, this means the bottom of each leg will be wider than the top, creating a stable, splayed footprint when the sawhorse is assembled. As with the first set of cuts, aim to cut as close to the ends as possible to maximize the length of your legs while maintaining the desired angle. The final shape of each individual leg should resemble a trapezoid, with the two longer, angled edges converging slightly towards the top. This meticulously engineered design ensures that when the sawhorse is assembled and placed on a flat floor, the legs will splay out evenly, providing exceptional stability and preventing any undesirable wobbling.
Step 6: Preparing the Sawhorse Top Piece – The Foundation of Your Work Surface
Next, select the board that will serve as the primary top surface of your sawhorse. In our example, we’ve chosen a 3-foot long plank with dimensions of 3/4 inch x 5-1/2 inch. This length directly determines the overall working length and capacity of your sawhorse. A 3-foot top typically provides a comfortable and adequate amount of space for most common DIY tasks, allowing you to cut, measure, or assemble materials without constantly repositioning them. However, if your projects frequently involve longer or larger items, such as full sheets of plywood or long lumber, feel free to choose a longer board (e.g., 4 or 5 feet) to maximize your available workspace. Before proceeding, ensure this chosen top board is free from any significant warps, twists, or major defects, as it needs to provide a reliably flat, level, and stable working surface for all your future projects.
Step 7: Attaching the Legs to the Top Board – Precision and Structural Strength
This is a critical assembly step that demands careful attention to detail. Begin by positioning one of your previously cut, angled legs flush against the bottom edge of your top board. The narrower, top end of the trapezoidal leg should fit perfectly beneath the top board, while the wider, angled bottom should naturally splay outwards, ready to sit flat and firmly on the floor. Before driving any screws, it’s absolutely essential to pre-drill pilot holes. Use a drill bit (our 1/8 inch bit is ideal for 2-1/2 inch screws) that is slightly smaller than the diameter of your chosen wood screws. Pilot holes serve two crucial functions: they prevent the wood from splitting, especially near the edges where stress is highest, and they ensure the screws drive in smoothly, securely, and straight. Drill two pilot holes through the top board and into the leg. Then, fasten the leg to the board using two 2-1/2 inch wood screws. Ensure the screw penetrates the top board and extends at least one inch into the leg for a strong, lasting connection. Repeat this precise process for each of the four legs, attaching them to form two distinct “A” shapes on either end of your top board.
Step 8: Completing the Initial Leg Assemblies for Both Ends
Continue the leg attachment process precisely as outlined in Step 7 for all four legs. Attach the first pair of legs to one end of the top board, ensuring they form a stable and symmetrical “A” frame. Once the first pair is securely fastened, repeat this exact procedure on the opposite end of the top board with the remaining two legs, creating a second “A” frame. It is critically important that each leg is securely fastened with two screws and that they are positioned consistently relative to each other and the top board to ensure an even stance and balanced load distribution. Take a moment to carefully stand the partially assembled sawhorse up (with caution!) and visually check that all four legs sit firmly on the ground without any discernible wobble. This foundational stability is paramount for the safe and effective use of your sawhorse, so address any inconsistencies now.
Step 9: Crafting the Short Support Braces for Transverse Stability
To significantly enhance the lateral stability and rigidity of your sawhorse, you will now create the short support braces. Take two of your 1×3 lumber pieces (approximately 1 foot in length, as specified in your supplies list) and clamp them securely together, one on top of the other, ensuring their ends are flush. Set your miter saw to precisely 22.5 degrees again, just as you did for the main legs. Make an angled cut at each end of the clamped pieces. Once these initial cuts are made, carefully flip these two pieces over and make another set of angled cuts on their other ends. Crucially, these second cuts should angle *towards* each other, creating a piece with two parallel angled ends, similar in concept to the legs but shorter and designed to fit between the leg pairs. The finished brace should measure approximately 1-foot long and feature these opposing 22.5-degree angles on each end. These braces are vital for connecting the individual legs within each “A” frame, transforming them into a much more rigid and unified structure.
Step 10: Attaching the Short Support Braces for Enhanced Rigidity
Now, carefully integrate these newly cut short support braces into your sawhorse structure. Align one brace with the inside faces of a pair of legs, ensuring it is perfectly flush with the outside edges of the legs. The goal is for the angled ends of the brace to sit perfectly and snugly against the angled inner surfaces of the legs. If your cuts were accurate in the previous step, the brace should sit at precisely the same height from the floor on both sides, creating a perfectly horizontal and level support. As always, pre-drill pilot holes before driving any screws to prevent splitting and ensure a strong connection. Use two screws on each side to securely fasten the brace to each leg, totaling four screws per brace. Repeat this entire process for the other “A” frame at the opposite end of your sawhorse. These robust braces are absolutely vital for preventing the legs from splaying further outwards under heavy loads and significantly improve the overall rigidity and stability of the sawhorse, making it much safer to use.
Step 11: Cutting Long Support Braces for Longitudinal Strength
To further reinforce the sawhorse and prevent any lengthwise racking or twisting, you will now cut two longer support braces. These braces will run along the entire length of your sawhorse, connecting the two “A” frames at each end. Measure the exact distance between the outer faces of the legs on each end of your sawhorse. In our 3-foot example, these braces will also be approximately 3 feet long. A quick and accurate way to get this measurement without a tape measure is to simply place a 1×3 piece alongside the assembled legs and mark the required length with a pencil directly on the wood. Once accurately marked, cut two identical 1×3 boards to this precise length. These long braces are crucial for the overall structural integrity of the sawhorse, ensuring it can withstand forces applied along its length without twisting, wobbling, or collapsing. Even if you find yourself short on identical lumber, as noted in the original, using a slightly different sized piece for one brace can work in a pinch for temporary or lighter use, but consistent dimensions are always preferred for optimal strength and longevity.
Step 12: Final Assembly – Attaching the Long Braces and Finishing Up
With all components meticulously prepared, it’s time for the final assembly steps that will bring your sawhorse to completion. Attach the two long support braces to the outer faces of the sawhorse legs, ensuring they run perfectly parallel to the top board. Position these braces at a height that feels appropriate for your typical use – generally about halfway down the legs provides a good balance of strength and clearance. Before fastening, ensure that the braces are perfectly horizontal and align squarely with the legs. Pre-drill pilot holes as usual. Then, use at least two screws per leg connection for each brace, ensuring a robust and secure attachment. If you opted for thinner brace boards (e.g., 1x1s), one screw per connection might suffice for lighter loads, but two is always recommended for maximum durability and peace of mind. Complete this on both sides of your sawhorse. Once all the long braces are securely fastened, take a moment to give your new sawhorse a thorough inspection. Check all connections for tightness, ensure it stands absolutely steady without any wobble, and finally, marvel at your completed, versatile woodworking companion. Congratulations, you’ve just built a sturdy and reliable sawhorse, perfectly tailored and ready to assist you with countless projects!
Building your own sawhorse is more than just a simple woodworking task; it’s an empowering experience that equips your workshop with a custom-built, essential tool. This project, while straightforward, teaches fundamental skills that are applicable to a vast array of future DIY ventures. From understanding its basic A-frame structure to executing the precise angled cuts that provide its signature stability, every step contributes to a deeper understanding of woodworking principles. You now possess a sturdy, reliable work support, perfectly tailored to your needs, whether you’re cutting lumber, assembling furniture, or creating your next masterpiece. Embrace the satisfaction of working with your hands and the knowledge that you’ve crafted a truly useful item that will serve you well for years to come. Happy building!
Expand Your Woodworking Skills with More DIY Projects:
If you enjoyed building your sawhorse and are eager to tackle more exciting woodworking challenges, we have plenty of inspiration for you. Take your newfound skills to the next level with projects that transform ordinary materials into functional and beautiful pieces for your home or workshop.
Repurposed Pallet Furniture | Make A Wood Pallet Coffee Table