
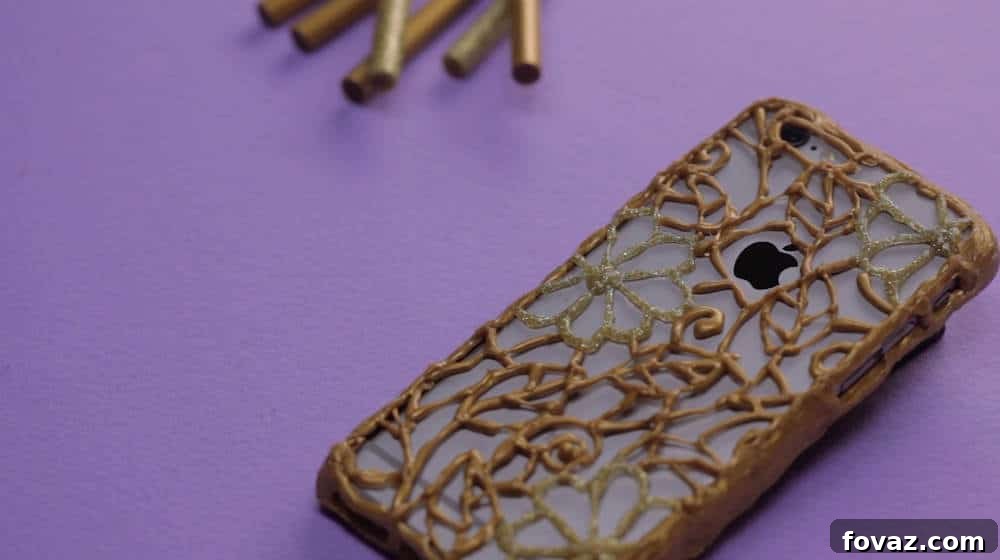
Tired of generic phone cases? Ready to infuse your personality into your daily tech accessory? Imagine safeguarding your smartphone with a truly one-of-a-kind, eye-catching case that reflects your unique style – all crafted by your own hands! And the best part? It’s incredibly simple and budget-friendly. All you need is a reliable hot glue gun to transform your phone into a statement piece. Dive into the world of DIY phone case creation and discover how easy it is to protect your device with flair!
Unleash Your Creativity: The Ultimate Guide to Crafting Unique DIY Custom Phone Cases with a Hot Glue Gun
Creating a custom phone case doesn’t have to be an expensive endeavor. In fact, this ingenious DIY project is remarkably affordable, making personalized phone protection accessible to everyone. The core essentials for this craft are humble yet powerful: a sheet of wax paper (or parchment paper) and a trusty hot glue gun. For seasoned crafters, these items are likely already staples in your creative toolkit. If you’re new to the crafting scene, fret not! Both items are readily available at most craft or department stores for just a few dollars. This small investment pays dividends, as your hot glue gun will quickly become an indispensable tool for countless future DIY adventures, from quick fixes to elaborate artistic projects.
This engaging and inventive custom phone case project offers a fantastic blend of practicality and personal expression. It’s an innovative way to provide your phone with a layer of protection against daily wear and tear, all while showcasing your individual aesthetic without breaking the bank. Forget the limitations of mass-produced designs; with a hot glue gun, your phone case becomes a blank canvas for your imagination.
Witness the magic unfold! Watch this comprehensive video tutorial and follow our detailed step-by-step guide below to see just how effortlessly you can craft your very own bespoke mobile case:
Prepare to be amazed by your own crafting prowess. This project is not only satisfying but also yields a functional and stylish accessory you’ll be proud to show off.
DIY Custom Hot Glue Phone Case Supplies:
- Wax or Parchment Paper: This non-stick surface is crucial for preventing the hot glue from adhering permanently to your phone and work surface. It allows the cured glue case to peel off cleanly.
- Hot Glue Gun: The star of our show! A standard mini or full-size hot glue gun will work perfectly. Ensure it’s in good working condition.
- Glue Gun Sticks: The creative possibilities here are endless! While clear glue sticks are a classic choice, don’t hesitate to experiment with colorful glue sticks to add vibrant hues and patterns. For an extra touch of sparkle, consider using glitter glue sticks to create dazzling effects.
- Scissors: Essential for cutting paper stencils and making any necessary adjustments.
- Tape: Low-tack tape (like painter’s tape or masking tape) is perfect for securing your stencil and parchment paper without leaving residue on your phone.
Click Here to Download Your Free Stencil!
DIY Custom Hot Glue Phone Case Steps: A Detailed Guide
Step 1 – Prepare Your Design: Trace Your Phone and Plan Your Pattern
The first crucial step is to determine the exact dimensions and shape of your phone case. Begin by placing your phone on a piece of paper and carefully tracing its outline. This provides the fundamental blueprint for your case. Once you have the precise shape, you can start drawing your desired pattern directly onto this outline. This is where your creativity takes center stage! Not sure what design to create? Don’t worry, inspiration is just a click away! Feel free to choose from our selection of FREE downloadable patterns to kickstart your project. Whether you prefer geometric shapes, abstract swirls, floral motifs, or a minimalist grid, sketching it out first ensures your vision comes to life accurately.
Step 2 – Create and Secure Your Stencil
With your design finalized on paper, carefully cut out the drawing using your scissors. Precision is key here, especially for intricate patterns. Once cut, gently tape this paper stencil to the back of your phone. Use small pieces of low-tack tape to secure it firmly in place, ensuring it won’t shift during the next steps. This stencil will serve as a visual guide for applying your hot glue, making the process straightforward and minimizing errors.
Step 3 – Establish the Protective Barrier: Cover with Parchment Paper
Now, it’s time to create the non-stick barrier that allows your hot glue case to detach flawlessly. Completely cover your phone (with the stencil taped on) with a sheet of parchment paper. Ensure the paper extends beyond the edges of your phone on all sides. Secure the parchment paper firmly to the back of your phone and around its sides using more tape. This will prevent the paper from wrinkling or moving while you’re working with the hot glue. Remember: wax paper, parchment paper, and baking paper are functionally similar for this project. Their siliconized or waxed surface acts as a perfect release agent, forming a protective layer between the hot glue and your phone. This crucial step guarantees that your finished hot glue case will peel off smoothly once dried, typically within 60 seconds.
Step 4 – Define the Structure: Outline Your Phone with Hot Glue
With your phone securely wrapped and stenciled, it’s time to bring out the hot glue gun. Allow it to heat up fully before you begin. The glue gun dispenses a molten polymer that quickly solidifies into a flexible, rubbery, and protective substance. Carefully begin by outlining the perimeter of your phone directly onto the parchment paper. Aim for a consistent, steady stream of glue to create a clean, even border. This initial outline will form the structural foundation of your custom phone case. While this DIY case offers a good degree of protection against scratches and minor bumps during everyday use, it’s important to manage expectations—this is not an OtterBox. Avoid extreme impacts or water submersion. Its primary purpose is personalization and light protection, keeping your phone looking new longer.
Step 5 – Personalize the Back: Trace Your Design and Fill It In
Once you’ve established the outer frame of your phone case, it’s time to unleash your artistic side! Refer to your underlying stencil or let your imagination run wild as you trace your desired pattern onto the back of the case using the hot glue gun. This is where you can truly make the case your own. Experiment with different colors of glue sticks to create vibrant contrasts or harmonious blends. You can choose to completely fill in areas of your design for a solid look, or leave spaces open to create intricate, net-like patterns. Consider adding textures by varying the thickness of your glue lines or building up layers. Have fun with it, be creative, and let your unique style shine through! Remember, there are no strict rules – this is your custom phone case, so express yourself freely.
Step 6 – Build the Sidewalls and Front Lip: Ensuring Secure Fit and Protection
To ensure your phone case offers comprehensive protection and stays securely on your device, you must meticulously build up the side walls and create a protective lip around the front screen. Take extra care to outline the side edges of your phone with a consistent, thick bead of hot glue. As you work along the sides, remember to leave precise openings for all essential phone features: volume controls, power/lock button, camera lenses, speakers, and charging port. It’s crucial that these cutouts are clean and accessible. Once the back and all side walls are adequately filled and formed with hot glue, extend your design slightly over the front edges of the phone. Create a subtle raised lip around the screen, especially at the corners. This lip will help hold the case firmly in place and offer an extra layer of protection for your phone’s screen when laid face down. Aim for uniform thickness around these edges for a professional finish.
Step 7 – Refine and Flatten: Achieving a Smooth Finish
To give your custom hot glue phone case a polished and comfortable feel, some final refinements are necessary. While the hot glue is still warm and pliable (but not scorching hot), use the side or tip of your hot glue gun’s nozzle to gently flatten out any uneven edges or raised bumps. Carefully smooth out the surfaces, especially the areas that will come into contact with your hands, to eliminate sharp points or rough textures. This step allows you to make any last-minute adjustments, ensuring your case fits snugly and feels good to hold. Work quickly but carefully, as the glue sets quite rapidly. A smooth, even surface not only looks better but also enhances the durability and comfort of your DIY creation.
Step 8 – The Grand Reveal: Peel It Off and Start Using It!
The moment of truth! Once your hot glue has completely dried and cooled (which typically takes under 60 seconds, depending on the thickness of your glue application), you can gently peel your newly crafted phone case off the parchment paper. You’ll be amazed at how easily it separates, revealing a flexible, sturdy, and uniquely designed protective cover. Carefully remove any remaining tape or parchment paper fragments. Now, slide your phone into its brand-new, handmade case! Your personalized DIY hot glue phone case is now ready for immediate use. Admire your handiwork and enjoy the satisfaction of protecting your device with a truly custom accessory that embodies your personal touch.
Of course, the versatility of hot glue means there are countless other creative avenues for DIY phone cases! If you’re looking for more inspiration or alternative techniques, I’m particularly captivated by this innovative version demonstrated by PipeCleanerCrafts B:
Beyond the Basics: Customization Ideas and Tips for Your Hot Glue Phone Case
While our guide provides a solid foundation, the beauty of DIY lies in endless customization. Here are some ideas to take your hot glue phone case to the next level:
- Layering Colors: Apply a base layer of one color, let it dry slightly, then add another color on top for interesting depth and gradients.
- Embellishments: Before the glue fully dries, carefully press small, flat embellishments like rhinestones, glitter, small beads, or even dried flowers into the hot glue for added texture and sparkle.
- Textural Patterns: Experiment with different nozzle techniques – dots, zigzags, spirals – to create unique tactile patterns on your case.
- Two-Tone Designs: Create a distinct border in one color and fill the interior with another, or divide your case into geometric sections with different hues.
- Glow-in-the-Dark: Some brands offer glow-in-the-dark glue sticks, perfect for a fun, luminous effect.
- Matte vs. Glossy: The natural finish of hot glue is somewhat matte. For a glossy finish, you might carefully apply a thin layer of clear craft sealant (ensure it’s compatible with hot glue) once the case is fully cured.
Caring for Your Hot Glue Phone Case: Longevity and Maintenance
To ensure your custom hot glue phone case lasts and continues to look great, a little care goes a long way:
- Cleaning: For light cleaning, simply wipe your case with a soft, damp cloth. For more stubborn marks, a small amount of mild soap diluted in water can be used. Avoid harsh chemicals or abrasive cleaners, which can degrade the glue.
- Heat Exposure: Hot glue can soften under extreme heat. Avoid leaving your phone case in direct sunlight for extended periods, or in very hot environments like inside a parked car on a summer day.
- Flexibility: While flexible, excessive stretching or bending can stress the material. Handle your case gently when removing or attaching it to your phone.
- Repairs: If a small section of your case tears or peels, you can often make minor repairs by carefully applying a small dab of hot glue to the damaged area and smoothing it out with the glue gun tip.
Embrace the satisfaction of crafting a functional accessory that’s truly yours. This DIY approach not only saves money but also provides an outlet for personal expression and a conversation starter!
Looking for more fun, affordable, and easy craft projects? Be sure to explore 25 Cool Projects For Teens for even more creative inspiration.
Don’t miss out on more exciting DIY ideas and tutorials! Stay connected with us on Facebook, Twitter, Pinterest and Instagram!