
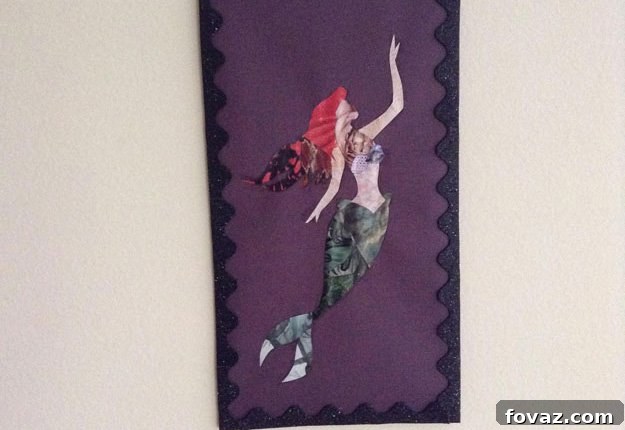
Are you looking to infuse a touch of magic and personalized charm into your living space without breaking the bank? This delightful DIY wall art project is a fantastic way for Disney fans of all ages to create unique room decor. Not only is it incredibly fun and rewarding, but it also offers a brilliant opportunity to give old magazines and shoeboxes a beautiful new life. Get ready to unleash your inner artist and craft a stunning Disney Princess magazine collage that’s truly one-of-a-kind. Follow our detailed tutorial below, or let it inspire you to create any shape or character you desire!
DIY Disney Princess Magazine Collage: Crafting Enchanting Upcycled Wall Art
Bringing personality and whimsical style into your home doesn’t have to be expensive or complicated. This simple, budget-friendly project perfectly combines creativity with sustainability, transforming everyday items into a captivating piece of art. Imagine turning vibrant pages from forgotten magazines into a whimsical tribute to your favorite Disney Princess. This comprehensive guide will walk you through crafting a magnificent Princess Ariel silhouette collage, but the techniques are easily adaptable for any character, theme, or design you envision. It’s an excellent way to add a pop of color, a touch of fantasy, and a whole lot of heart to your walls, making your room truly reflect your unique passions.
What You’ll Need to Create Your Magazine Collage Masterpiece:
Gathering your materials is the first exciting step in any DIY adventure. For this enchanting Disney Princess magazine collage, you’ll likely find most of what you need already lying around your home, making it an incredibly accessible and eco-friendly craft. This project champions the art of upcycling, transforming what might otherwise be discarded into a treasured piece of personalized decor. Here’s a detailed list of essentials and a few optional items to elevate your creation:
- Old Magazines: The more varied in color, texture, and imagery, the better! These will be your primary source of artistic material. Look for glossy pages with vibrant hues, interesting patterns, and diverse photographic elements. Fashion, travel, home decor, or nature magazines are excellent choices.
- Craft Glue: A standard white craft glue (like PVA glue or school glue) works perfectly. Ensure it dries clear to avoid any visible marks on your finished piece. A glue stick can also be useful for initial placements of smaller pieces, providing a less messy application.
- Sharp Scissors: A good pair of sharp craft scissors will make cutting intricate shapes much easier and more precise, contributing to a cleaner final look.
- Adhesive Tape: Masking tape or painter’s tape is ideal for securing the base layers. It’s strong enough to hold paper securely yet is designed to be easily removable without damaging surfaces, making it perfect for temporary or internal fixes.
- Pen and Pencil: A pencil for initial sketching and a black pen (or a silver/white gel pen) for tracing on dark paper will be essential for transferring your silhouette design with clarity.
- Shoebox (or Sturdy Cardboard): This will serve as the strong, lightweight base for your wall art. Any medium-sized shoebox, a piece of corrugated cardboard from a delivery box, or even the back of an old notepad can be repurposed. Ensure it’s flat and rigid.
- Black Construction Paper: Choose a thick, opaque black paper. This will provide a striking, uniform background for your colorful collage pieces, making them visually pop and defining the silhouette beautifully.
- White Blank Paper: Standard printer paper, drawing paper, or even cardstock is suitable for sketching and cutting out your initial silhouette template.
- Ribbon (Optional, for extra flair): A piece of ribbon, especially one with glitter, a metallic sheen, or a complementary color, can add a beautiful decorative border or hanging loop to your finished artwork, giving it a polished, gallery-like quality.
- Craft Knife/X-Acto (Optional, for precision): For very fine cuts, particularly on the silhouette’s intricate details, a craft knife with a self-healing cutting mat can offer superior precision and cleaner edges compared to scissors.
- Mod Podge (Optional, for sealing and finish): If you want to give your collage a durable, protective layer and a glossy or matte finish, a topcoat of Mod Podge can seal everything in, enhance colors, and protect against dust and moisture.
Having all your supplies ready and organized before you begin will ensure a smooth, enjoyable, and uninterrupted crafting experience. Now, let’s dive into the creative process and bring your Disney Princess to life!
Step 1: Constructing the Perfect Base for Your Collage Art
The foundation of any great artwork is crucial, and this Disney Princess collage is no exception. A sturdy, neatly finished base provides the perfect canvas for your creative endeavors. We’ll begin by preparing the base from your shoebox or chosen cardboard, ensuring it’s robust and perfectly sized for your intricate design.
First, carefully use your sharp scissors or a craft knife to cut out a flat panel from the shoebox. Aim for a rectangular or square piece, depending on the desired final shape and orientation of your wall art. The key here is to ensure this cardboard panel is slightly smaller than your black construction paper. This critical margin will allow you to neatly wrap the black paper around the edges of the cardboard, creating a seamless and professional-looking finish. Take your time to make clean, straight cuts, as the precision of this initial step will significantly impact the overall neatness and aesthetic appeal of your finished wall art.
Once your cardboard panel is cut and smoothed, center it precisely on top of your black construction paper. Try to position it as close to the exact center as possible, leaving an even border of black paper around all four sides. This border is what you’ll fold over to completely cover the cardboard’s raw edges. Start by folding one of the longer edges (e.g., the bottom edge) of the black paper tightly over the cardboard’s surface, ensuring it’s taut on the front. Use your reliable adhesive tape to secure it firmly to the back of the cardboard. Repeat this precise process with the opposite (top) edge, pulling the paper snugly to ensure the front surface remains smooth and free of wrinkles.
For the shorter sides, a clever trick will prevent bulky or uneven corners, ensuring a clean, tailored finish. Before folding the side flaps over, gently crease and fold each corner of the black paper diagonally inwards, creating small, neat triangular tabs. These tabs effectively remove excess paper from the corners. This little detail makes the subsequent side folds much cleaner and gives your entire base a more polished, professional appearance, resembling a perfectly wrapped gift. After folding these tabs, bring the side flaps over the cardboard and secure them firmly with tape, just as you did with the top and bottom edges. Double-check that the front surface of your black-covered cardboard is completely smooth, taut, and wrinkle-free. This meticulously prepared base is now ready to proudly showcase your beautiful Princess Ariel magazine collage.
Step 2: Crafting Your Princess Ariel Silhouette Template
This is where your chosen Disney Princess truly begins to take shape and her iconic form becomes the central focus of your artwork! For our project, we’re focusing on the instantly recognizable silhouette of Princess Ariel. The clearer and simpler your silhouette, with minimal intricate details, the more impactful and visually stunning your final collage will be, allowing the magazine patterns to truly shine through.
You have a few excellent options for creating your silhouette template. The easiest and most recommended method for most crafters is to find a high-resolution, clear image of Princess Ariel’s silhouette online and print it directly onto your white blank paper. Look specifically for images that are bold, clearly defined, and appropriately sized for your cardboard base. Alternatively, if you possess a knack for drawing, you can freehand sketch Ariel’s silhouette onto the white paper yourself, allowing for even greater personalization. For those less confident in their drawing skills but without a printer, you could also project an image onto the paper (using a phone or projector) and carefully trace it, or even use a light box. The primary goal is to obtain a clean, well-proportioned, and easily traceable outline of Ariel.
Once you have your Ariel silhouette clearly defined on the white paper, carefully cut it out using your sharp scissors. Try to be as precise as possible, as this white paper cutout will serve as your master template. Now, place this white paper silhouette on top of your black construction paper, which will eventually form part of your collage outline. Using a black pen (which surprisingly shows up quite well on black paper, creating a subtle yet visible guide) or even a silver/white gel pen for better contrast, carefully trace around the entire outer outline of your white paper Ariel onto the black paper. This traced black paper outline will serve as your ultimate guide for precisely placing your colorful magazine pieces later.
Here comes the part that might sound a little unusual: “cutting her up into smaller chunks.” While it might sound gruesome, it’s a crucial and intelligent step for the magazine collage technique! Instead of keeping the black paper silhouette as one continuous piece, meticulously cut it into several smaller, more manageable sections. For Princess Ariel, logical sections might include her flowing hair, her face/torso, and her distinctive mermaid tail, perhaps even separating individual fins. The purpose of this strategic segmentation is two-fold: it makes it significantly easier to work with different magazine patterns for specific areas of the silhouette, and it inherently creates the distinct “puzzle-like” effect when you reassemble these pieces with your colorful magazine clippings. Don’t worry about cutting perfectly artistic shapes for these chunks; rough, functional sections are perfectly fine. This ingenious method allows you to apply different magazine textures, colors, and patterns to distinct areas of the princess, making the final piece incredibly vibrant, detailed, and visually engaging. Each “chunk” will become a canvas for a unique splash of magazine art.
Step 3: Unveiling the Magic – Selecting Your Magazine Patterns
This is undeniably the most creative, exploratory, and enjoyable part of the entire project! Now it’s time to delve into your accumulated collection of old magazines and unearth the hidden gems—the vibrant colors, intriguing textures, and captivating patterns—that will truly bring your Princess Ariel to life. Think of yourself as an artistic treasure hunter, meticulously searching for elements that will weave together a rich, visual tapestry. This step is where your collage truly begins to tell its unique and colorful story, reflecting your personal aesthetic.
When selecting your patterns, think beyond just simple, monochromatic blocks of color. While matching colors to Princess Ariel’s iconic palette is an absolutely fantastic starting point—such as vibrant greens for her flowing tail, rich reds for her distinctive hair, and perhaps iridescent blues or soft purples for her seashell top or other details—consider the nuanced aspects. For Ariel’s tail, you might look for greens that mimic the shimmering quality of water, patterns that suggest scales, or even subtle wavy lines. For her hair, search for fiery reds with subtle streaks of orange, dynamic swirls, or even abstract patterns that evoke movement. Don’t limit yourself to literal interpretations; abstract designs, close-ups of natural elements like leaves or flowers, architectural details, or even parts of landscape photos that simply evoke the right mood or color can work wonders and add incredible depth.
Flip through the pages methodically, tearing out anything that catches your eye or sparks an idea. Don’t be afraid to collect far more than you think you’ll need; having a diverse and abundant selection will give you maximum creative freedom during the assembly phase. Look for glossy finishes, bold typography, interesting photographic elements, or even pages with subtle gradient shifts that can add dimension. Consider how different textures and sheen levels from various magazine pages will play off each other when assembled. A section of a serene ocean landscape photo might work beautifully for her tail, while a close-up of luxurious fabric or an abstract floral pattern could add sophisticated detail to her top or accessories. The inherent beauty of a magazine collage lies in these unexpected combinations and the unique visual narrative created by blending disparate, upcycled elements.
Once you’ve amassed a good collection, organize your selected magazine clippings by color or by the specific section of Ariel they might adorn (e.g., a pile for hair, a pile for tail, etc.). This makes the next step much more streamlined and efficient. The more time and thought you invest in thoughtfully selecting and curating your patterns and colors, the richer, more visually engaging, and truly spectacular your final Disney Princess wall art will be. Let your imagination be your guide, enjoy the tactile process of sifting through pages, and revel in the transformative journey of turning discarded paper into potential art!
Step 4: Assembling Your Princess Ariel Magazine Collage Puzzle
With your sturdy base meticulously prepared and your treasure trove of magazine patterns carefully chosen, it’s time for the exciting assembly phase where all the colorful elements come together to form your magical Princess Ariel collage. This stage is akin to solving a beautiful, intricate puzzle, piece by vibrant piece, watching your vision materialize before your eyes.
Take one of the smaller “chunks” of your black paper Ariel silhouette that you meticulously cut in Step 2 (for instance, her flowing hair section). Place this black paper chunk directly onto a chosen magazine pattern—perhaps a page with fiery red swirls or an abstract texture. Using your pencil, carefully trace around the exact edge of this black paper chunk onto the selected magazine page. The goal is to accurately cut out a magazine piece that perfectly matches the shape of that specific silhouette chunk. Repeat this precise process for all the black paper chunks you created, matching each one to a magazine pattern that best represents that particular part of Ariel’s design. For example, trace her tail chunk onto a green magazine page that evokes ocean currents, her hair chunk onto a dynamic red page, and her top onto a page with shimmering blue or purple hues. Be mindful of the direction of patterns on the magazine page; you can rotate your chunks to capture the most visually appealing segment of the underlying image.
Once you have meticulously cut out all the individual magazine shapes, you’ll have a compelling collection of vibrant, pre-cut pieces, each corresponding perfectly to a specific section of Ariel’s silhouette. Now, refer back to your original full-size Ariel outline (the one you traced onto the black construction paper on your base in Step 2) as your comprehensive guide. Begin to glue the corresponding magazine shapes into their respective places, fitting them together seamlessly like the pieces of a finely crafted puzzle within the black outline. Apply a thin, even layer of craft glue to the entire back surface of each magazine piece. It’s important to remember that too much glue can cause the delicate paper to warp, bubble, or even bleed through, so a little goes a long way. Press each piece firmly and gently into place, ensuring there are no trapped air bubbles beneath the surface. Work methodically, section by section, until your entire Princess Ariel silhouette is completely filled with your carefully chosen and arranged magazine patterns, creating a stunning mosaic effect.
To add an exquisite finishing touch and a little extra pizzazz, consider lining the entire outer edge of your newly completed collage with a decorative ribbon. A black, glittery ribbon, for instance, can provide a stunning contrast against the vibrant collage and highlight the artwork beautifully, giving it a sophisticated frame. Simply apply a thin, consistent line of craft glue along the perimeter of your cardboard base (or just inside the edge of your black paper frame) and carefully press the ribbon into place, ensuring it’s straight and evenly applied. This not only frames your artwork elegantly but also gives it a more finished, polished, and professional look. You could also experiment with metallic markers to add subtle shimmering outlines to parts of Ariel, or even adhere small adhesive gems or sequins for an extra touch of sparkle and enchantment.
And there you have it! Your beautiful, handmade Disney Princess magazine collage is complete, a true testament to your creativity and ingenuity. Allow the glue to dry completely, preferably overnight, in a flat, undisturbed area before handling or attempting to hang it. Once thoroughly dry, your enchanting piece of DIY wall art is ready to be admired, displayed, and celebrated in your favorite space!
Tips for Success and Personalization: Elevate Your DIY Wall Art
To ensure your magazine collage turns out perfectly and truly reflects your unique style, here are some extra tips, tricks, and ideas for further personalization:
- Vary Your Magazine Sources: Don’t limit yourself to just one type of magazine. Fashion magazines offer bold colors and textures; nature magazines provide organic patterns and vibrant landscapes; travel guides have unique imagery; and even old calendars can offer a vast array of beautiful colors and textures.
- Experiment with Shapes: While we focused on Princess Ariel, this versatile technique can be applied to countless designs. Try other Disney characters, abstract geometric shapes, animals, inspirational quotes, or even letters of the alphabet to spell out a name or a meaningful word.
- Precision Cutting for Clean Lines: For ultra-clean and crisp lines, especially on the intricate parts of the silhouette, consider using a craft knife (with a self-healing cutting mat underneath for safety and surface protection) instead of scissors for key cuts.
- Smooth Gluing Technique: To prevent lumps, wrinkles, and paper warping, use a brush, a designated glue spreader, or even your finger to apply a thin, even layer of glue to the back of each magazine piece. After placing, press firmly from the center outwards to eliminate any trapped air bubbles.
- Layering and Overlapping (Advanced Technique): For a more complex and textured look, you can experiment with slightly layering or overlapping some magazine pieces instead of fitting them perfectly like puzzle pieces. This can add dynamic depth and dimension to your collage.
- Sealing Your Artwork for Durability: For added durability, protection, and a professional finish, once all the glue is completely dry (wait at least 24 hours), apply a thin, even coat of Mod Podge (available in matte, satin, or gloss finishes) over the entire collage. This acts as a sealant, protects the paper from dust and humidity, and gives it a uniform, polished look.
- Creative Hanging Options: To display your artwork, you can attach a sawtooth picture hanger to the back of your cardboard base, or simply use strong double-sided mounting tape for a flush wall display. You could also punch two holes at the top and thread a decorative ribbon for hanging.
- Add Extra Embellishments: Beyond ribbon, think about using glitter glue, metallic paint pens for outlines, small adhesive pearls or rhinestones, or even a light dusting of craft glitter on specific areas for extra sparkle and magic.
Why Choose DIY Wall Art? The Invaluable Benefits of Crafting Your Own Decor
Embarking on a DIY project like this magazine collage offers far more than just a beautiful, custom piece of decor for your wall. It’s an experience that comes with a multitude of tangible and intangible benefits, enriching both your home and your personal well-being:
- Unmatched Personalization: You get to create something that perfectly matches your unique style, color scheme, and personal passions, truly making your living space an authentic reflection of who you are.
- Eco-Friendly & Sustainable Living: By creatively upcycling old magazines and cardboard, you’re giving materials a vibrant second life and actively contributing to waste reduction. It’s a wonderful, tangible way to embrace a greener, more sustainable lifestyle.
- Incredibly Budget-Friendly: Crafting your own decor is significantly cheaper than purchasing mass-produced art or custom pieces, allowing you to adorn your home stylishly and creatively without straining your finances.
- Boosts Creative Expression: DIY projects provide an excellent outlet for self-expression and creativity, allowing you to explore different colors, textures, and designs. The hands-on process itself is often therapeutic, stress-reducing, and immensely rewarding.
- Creates Unique Home Decor: Your handmade art will be completely unique – a one-of-a-kind conversation starter that proudly reflects your ingenuity, effort, and artistic touch. No one else will have exactly the same piece!
- Instills a Sense of Accomplishment: There’s an immense and deep satisfaction that comes from seeing a project through from conception to completion and proudly displaying something you’ve created with your own hands.
- Skill Development: Each DIY project helps you develop new skills, whether it’s precision cutting, careful gluing, or understanding color theory, enhancing your overall crafting abilities.
We sincerely hope you thoroughly enjoyed this detailed tutorial on how to create a magical Disney Princess magazine collage! This project is a wonderful testament to how simple, readily available materials, combined with a little imagination and effort, can yield truly spectacular and personalized results. We’d absolutely love to hear from you! Please feel free to share your thoughts, any helpful tips you discovered, and especially photos of your own wall art creations in the comments section below. Do you have any other exciting DIY projects you’d like us to explore and feature? Share your brilliant ideas with us, and we might just give them a try!
At DIYProjects.com, we are passionately dedicated to inspiring creativity and empowering people to realize the incredible things they can achieve with their own hands. From engaging craft projects and innovative home decor ideas to resourceful upcycling challenges, delicious recipes, and helpful step-by-step tutorials, we wholeheartedly believe in the joy and power of making. We envision a vibrant, supportive community of DIY enthusiasts where inspiration, guidance, and a sense of belonging are always just a click away. Stay connected with us and be an active part of our creative journey on Facebook, Twitter, Pinterest, and Instagram!
Discover More Inspiring DIY Projects for Your Home:
If you’re brimming with creativity and looking for your next exciting adventure in home decor or crafting, explore some of our other popular DIY wall art ideas and inspiring projects. There’s always something new to create!
Hanging Clipboard DIY Wall Art Ideas: Simple & Stylish Decor
DIY Wall Art You Can Make in Under an Hour: Quick & Creative Projects
20 Cool Home Decor Wall Art Ideas for You to Craft: Get Inspired!